android学习:《超级课程表》的课表界面设计
2016-08-01 23:47
501 查看
《超级课程表》的课表界面设计
话不多说,直接看效果图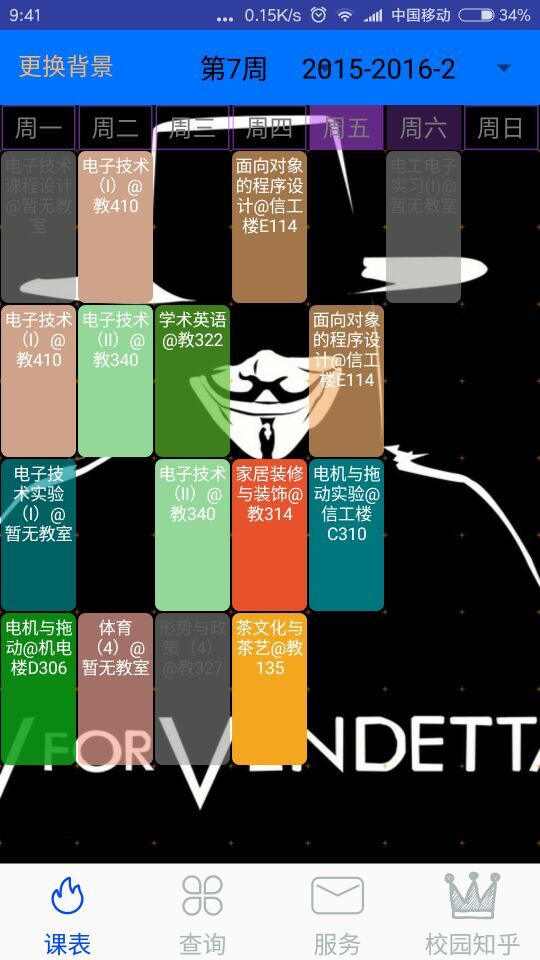
下面我们来看《超级课程表的界面》
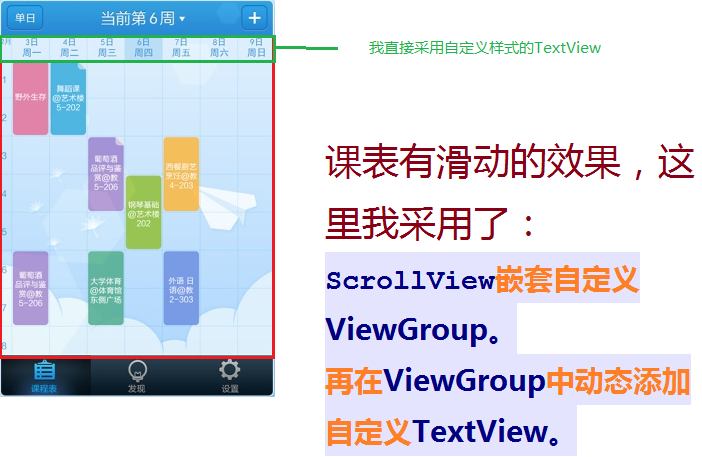
这样的话,我们需要自定义三种视图:
1.自定义 View方格背景2.自定义 ViewGroup来装课表信息
3.自定义 TextView显示课表信息
三者的关系是:自定义View提供背景,自定义ViewGroup提供装载 课表视图 的容器,自定义TextView显示课表信息。
首先我们先画背景!丛里往外进行设计
1.自定义View,画出方格背景
1.画网格线需要先测量出两横线之间的距离和两竖线之间的距离,这里我直接令两竖线的距离和两横线的距离相等。2.两竖线之间的距离直接将手机屏幕的宽度 width 除于 7;
//实现View中的OnMeasure方法进行测量
@Override
protected void onMeasure(int widthMeasureSpec, int heightMeasureSpec) {
width = MeasureSpec.getSize(widthMeasureSpec);
// widthLine = 7:一周
sectionWidth = width / widthLine;
sectionHeight = sectionWidth;
//heightLine = 12:一天一般有12节课
height = (int) (sectionHeight * heightLine);
setMeasuredDimension(width,height);
}
3.测量出View的高度和宽度以及两线之间的距离sectionHeight==heightLine后,我们开始画线:
//实现onDraw方法,其中mPaint需要在构造函数进行一些初始化和设定工作
@Override
protected void onDraw(Canvas canvas) {
//画横线
for(int i = 0;i<=heightLine;i++){
canvas.drawLine(0,(float)( i*sectionHeight),
(float)width,(float)(i*sectionHeight),mPaint);
}
//画竖线
for(int i =0;i<=widthLine;i++){
canvas.drawLine((float)( i*sectionWidth),0,
(float)(i*sectionWidth),(float)height,mPaint);
}
}
综上,我们已经完成自定义 背景方格,下面我们开始自定义ViewGroup容器
2.自定义ViewGroup容器
**1.自定义ViewGroup,我们需要用ViewGroup来给自定义课表信息进行摆放到特定的位置**2.把课表摆放到特定位置,那么我们首先需要的就是计算出这个特定位置,因为需要按照方格背景来进行摆放,因此我们需要的宽和高基本和之前自定义View的宽和高相同。同样我们需要实现onMeasure方法
@Override
protected void onMeasure(int widthMeasureSpec, int heightMeasureSpec) {
width = MeasureSpec.getSize(widthMeasureSpec);
// widthLine = 7:一周
sectionWidth = width / widthLine;
sectionHeight = sectionWidth;
//heightLine = 12:一天一般有12节课
height = (int) (sectionHeight * heightLine);
setMeasuredDimension(width,height);
}
@Override
protected void onLayout(boolean changed, int l, int t, int r, int b) {
int count = getChildCount();//获得子控件个数
for (int i = 0; i < count; i++) {
MyButtonView child = (MyButtonView) getChildAt(i);
int courseInWeek = child.getCourseInWeek();//获得周几
int startClass = child.getStartClass();
int stopClass = child.getStopClass();
//dividerWidth 为 子控件之间的间隔
//计算左边的坐标
int left = (int) (sectionWidth * courseInWeek+dividerWidth);
//计算右边坐标
int right = (int) (left + sectionWidth - 2*dividerWidth);
//计算顶部坐标
int top = (int) (2*sectionHeight * startClass+dividerWidth);
//计算底部坐标
int bottom = (int) (stopClass*sectionHeight- dividerWidth);
child.layout(left, top, right, bottom);
}
}3.自定义TextView,展示课表信息
**1.添加一些属性<declare-styleable name="MyButtonView"> <attr name="courseInWeek" format="integer"/> <attr name="startClass" format="integer"/> <attr name="stopClass" format="integer"/> <attr name="courseInfo" format="string"/> </declare-styleable>
**2.实现构造方法
public MyButtonView(Context context) {
this(context, 0);
}

public MyButtonView(Context context, AttributeSet attrs) {
this(context, attrs,0);
}

public public MyTextView(Context context, AttributeSet attrs, int defStyleAttr) {
super(context, attrs, defStyleAttr);
TypedArray array=context.obtainStyledAttributes(attrs, R.styleable.MyTextView);
courseInWeek = array.getInt(R.styleable.MyButtonView_courseInWeek,0);
courseId = array.getInt(R.styleable.MyButtonView_courseId,0);
courseInfo = array.getString(R.styleable.MyButtonView_courseInfo);
}
3.在自定义TextVeiw中实现get和set方法!!!!!!自动实现
4.主页面布局
需要在布局中添加命名空间,我用android studio编写的代码xmlns:myview="http://schemas.android.com/apk/res-auto"
eclipse中应该是
xmlns:myview="http://schemas.android.com/apk/包名"
主页面布局
<LinearLayout xmlns:android="http://schemas.android.com/apk/res/android"
xmlns:tools="http://schemas.android.com/tools"
xmlns:myview="http://schemas.android.com/apk/res-auto"
android:layout_width="match_parent"
android:layout_height="match_parent"
android:orientation="vertical"
tools:context="com.study.pengshao.ncutimetable.MainActivity">

<include layout="@layout/week_title"/>

<ScrollView
android:overScrollMode="never"
android:layout_width="wrap_content"
android:layout_height="wrap_content"
android:scrollbars="none">

<RelativeLayout
android:layout_width="match_parent"
android:layout_height="wrap_content">

<com.study.pengshao.ncutimetable.com.classUtils.MyViewGroupClass
android:id="@+id/class_item_vg"
android:layout_width="match_parent"
android:layout_height="match_parent"
>
</com.study.pengshao.ncutimetable.com.classUtils.MyViewGroupClass>
<com.study.pengshao.ncutimetable.com.classUtils.BackgroundView
android:id="@+id/background_view"
android:layout_width="match_parent"
android:layout_height="match_parent"
/>
</RelativeLayout>

</ScrollView>

</LinearLayout>
5.动态向ViewGroup中添加自定义课表视图
MyViewGroupClass myViewGroup = (MyViewGroupClass)findViewById(R.id.class_item_vg)
MyTextView myTextView = new MyTextView (MainActivity.this);
//datas是一个数据的List<data>
for(int i = 0,n = datas.size();i<n;i++){
myTextView.setCourseInWeek(datas.get(i).getCourseWeek());
myTextView.setStartClass(datas.get(i).getStartClass());
myTextView.setStartClass(datas.get(i).getStopClass());
myTextView.setText(datas.get(i).getClassInfo());
myViewGroup.addView(myTextView);
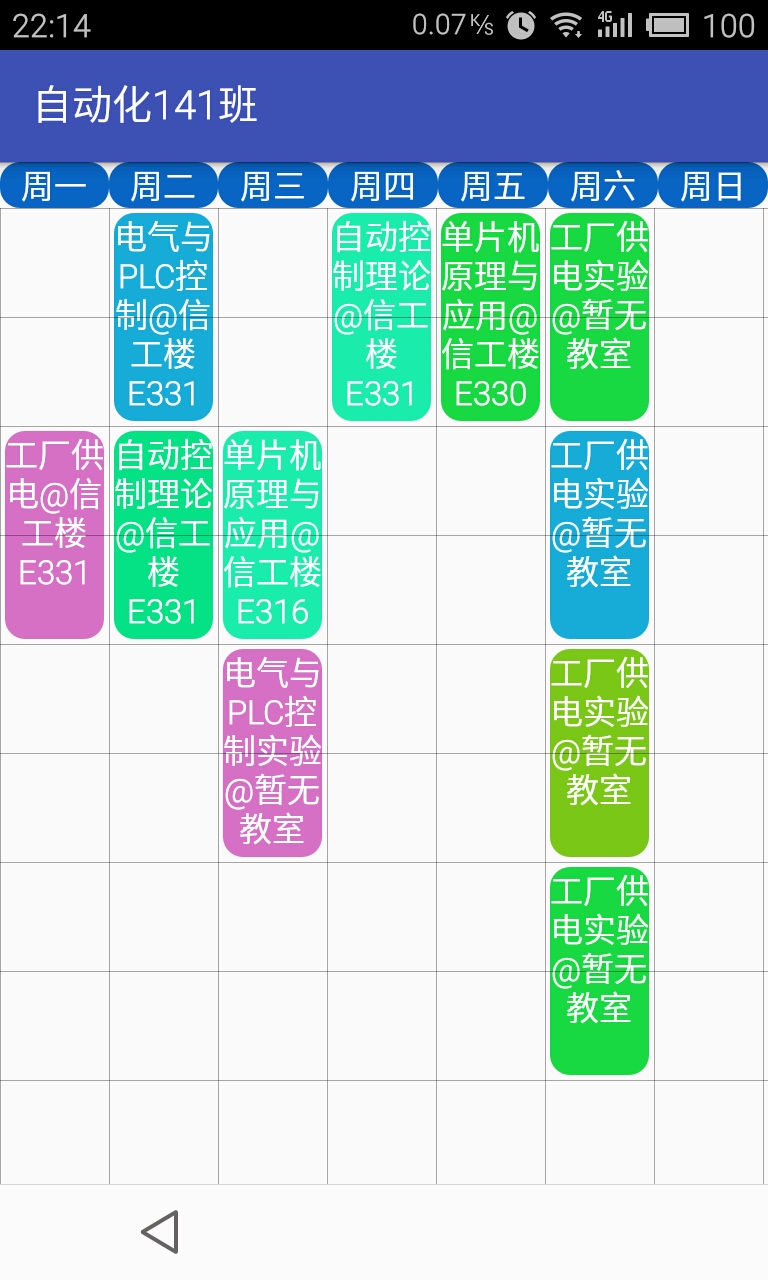
}再附上一张效果图
**

相关文章推荐
- [Android UI界面] 转:学习Android界面设计的超级利器HierarchyView.bat
- 学习Android界面设计的超级利器HierarchyView.bat
- 学习Android界面设计的超级利器HierarchyView.bat
- 学习Android界面设计的超级利器HierarchyView.bat
- Android仿超级课程表的课程界面设计
- Android 开发学习记录(1)---- 界面设计
- [转载]Android界面设计学习日志(二)
- 学习Android界面设计的超级利器HierarchyView
- Android(OPhone) 学习笔记 - 界面设计工具
- Android仿超级课程表的课程界面设计
- Android学习记录:界面设计
- Android学习基础篇——高级界面设计(二)
- 学习Android界面设计的超级利器HierarchyView.bat
- 学习Android界面设计的超级利器HierarchyView.bat
- [转载]Android界面设计学习日志(一)
- Android 界面设计工具 droiddraw
- 传智播客学习之Android-界面布局
- Android组件界面设计工具 DroidDraw
- Android UI开发专题(一) 之界面设计
- 吸墨网Android手机客户端界面设计