仿SegmentFault系列(一) PopupMenu
2016-07-26 20:19
627 查看
仿SegmentFault系列(一) PopupMenu
前言
一直觉得SegmentFault安卓客户端做的很不错,特别棒的MetrialDesign风格实践,当然包括知乎我也很喜欢,不过有一天我不小心反编出了SegmentFault的api接口,所以我决定亲自实现一遍SegmentFault安卓客户端。希望能通过这一系列的博客将其中的技术要点记录下来,跟大家一起分享。网络上很容易找到的资料这里就不再赘述,重点是分大家分享一下瞎研究的奇技淫巧和黑科技。这次选择了PopupMenu作为第一篇,多少还是因为太复杂的东西怕自己hold不住,水平有限,希望能给大家带来一个清晰的开篇。
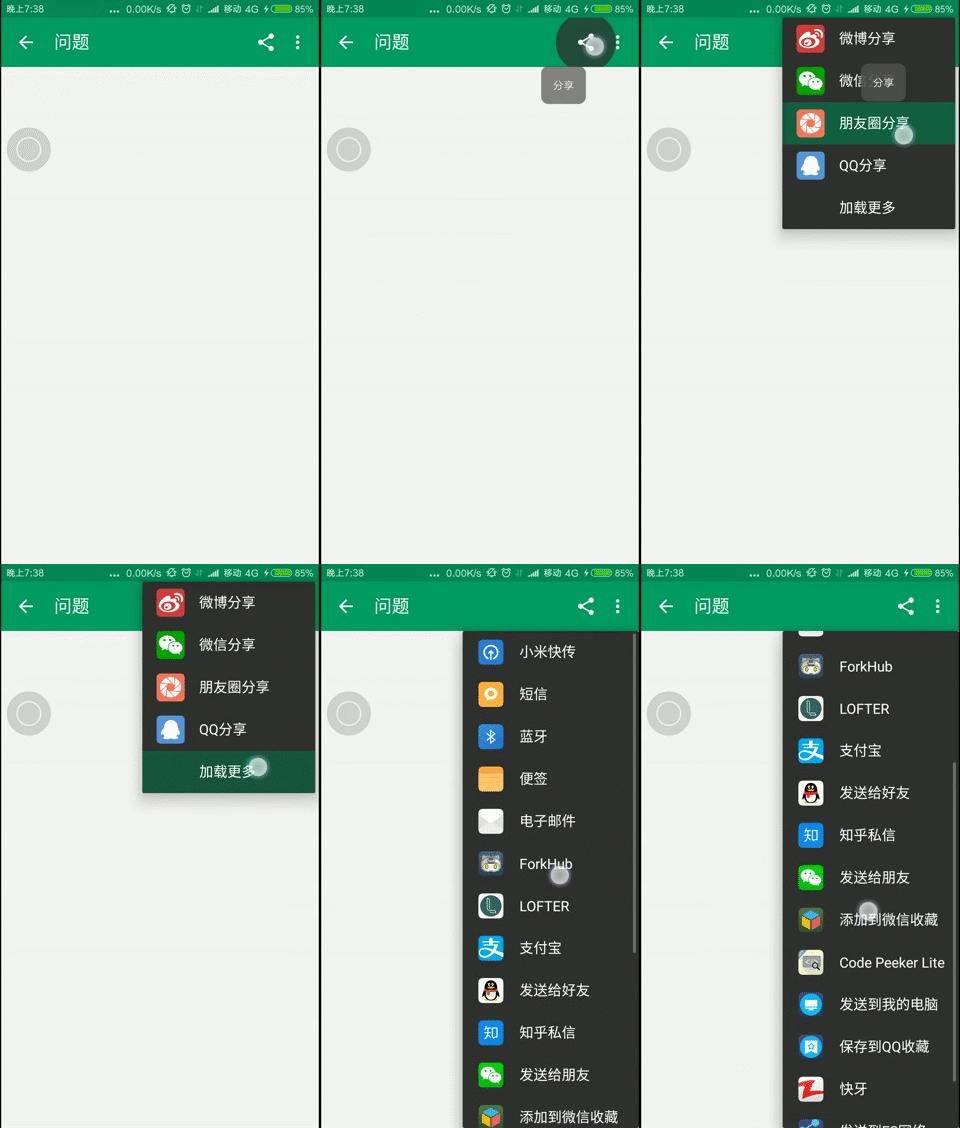
先走一波效果图

基本上是还原了SegmentFault中分享菜单的设计,只是SegmentFault种菜单的selector并没有使用ripple效果,不过抛开这个,其他地方可以说是一模一样了。
技术选型
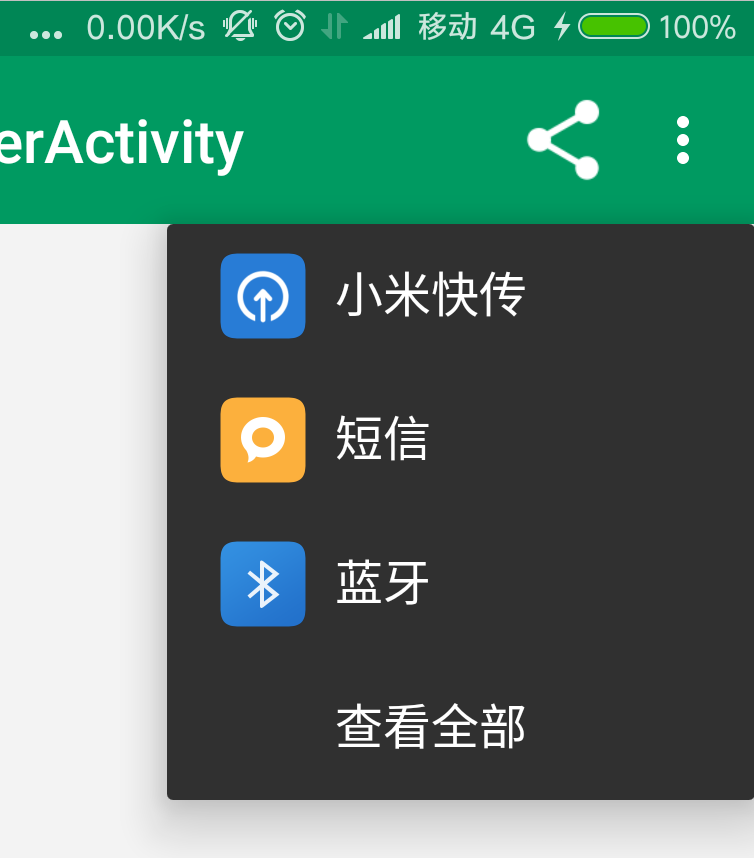
如果说到分享的话,最直觉的做法就是使用ShareActionProvider了,于是网上找了一波资料后发现做出来是这样的??
这个问题不小啊… 首先菜单位置并不是顶到最上面的啊??而且我这个分享图标怎么蜜汁变大了呢??而且我怎么控制菜单里显示的东西呢??人家上来显示微博分享、微信分享、各种分享的,我这怎么成了小米快传了??
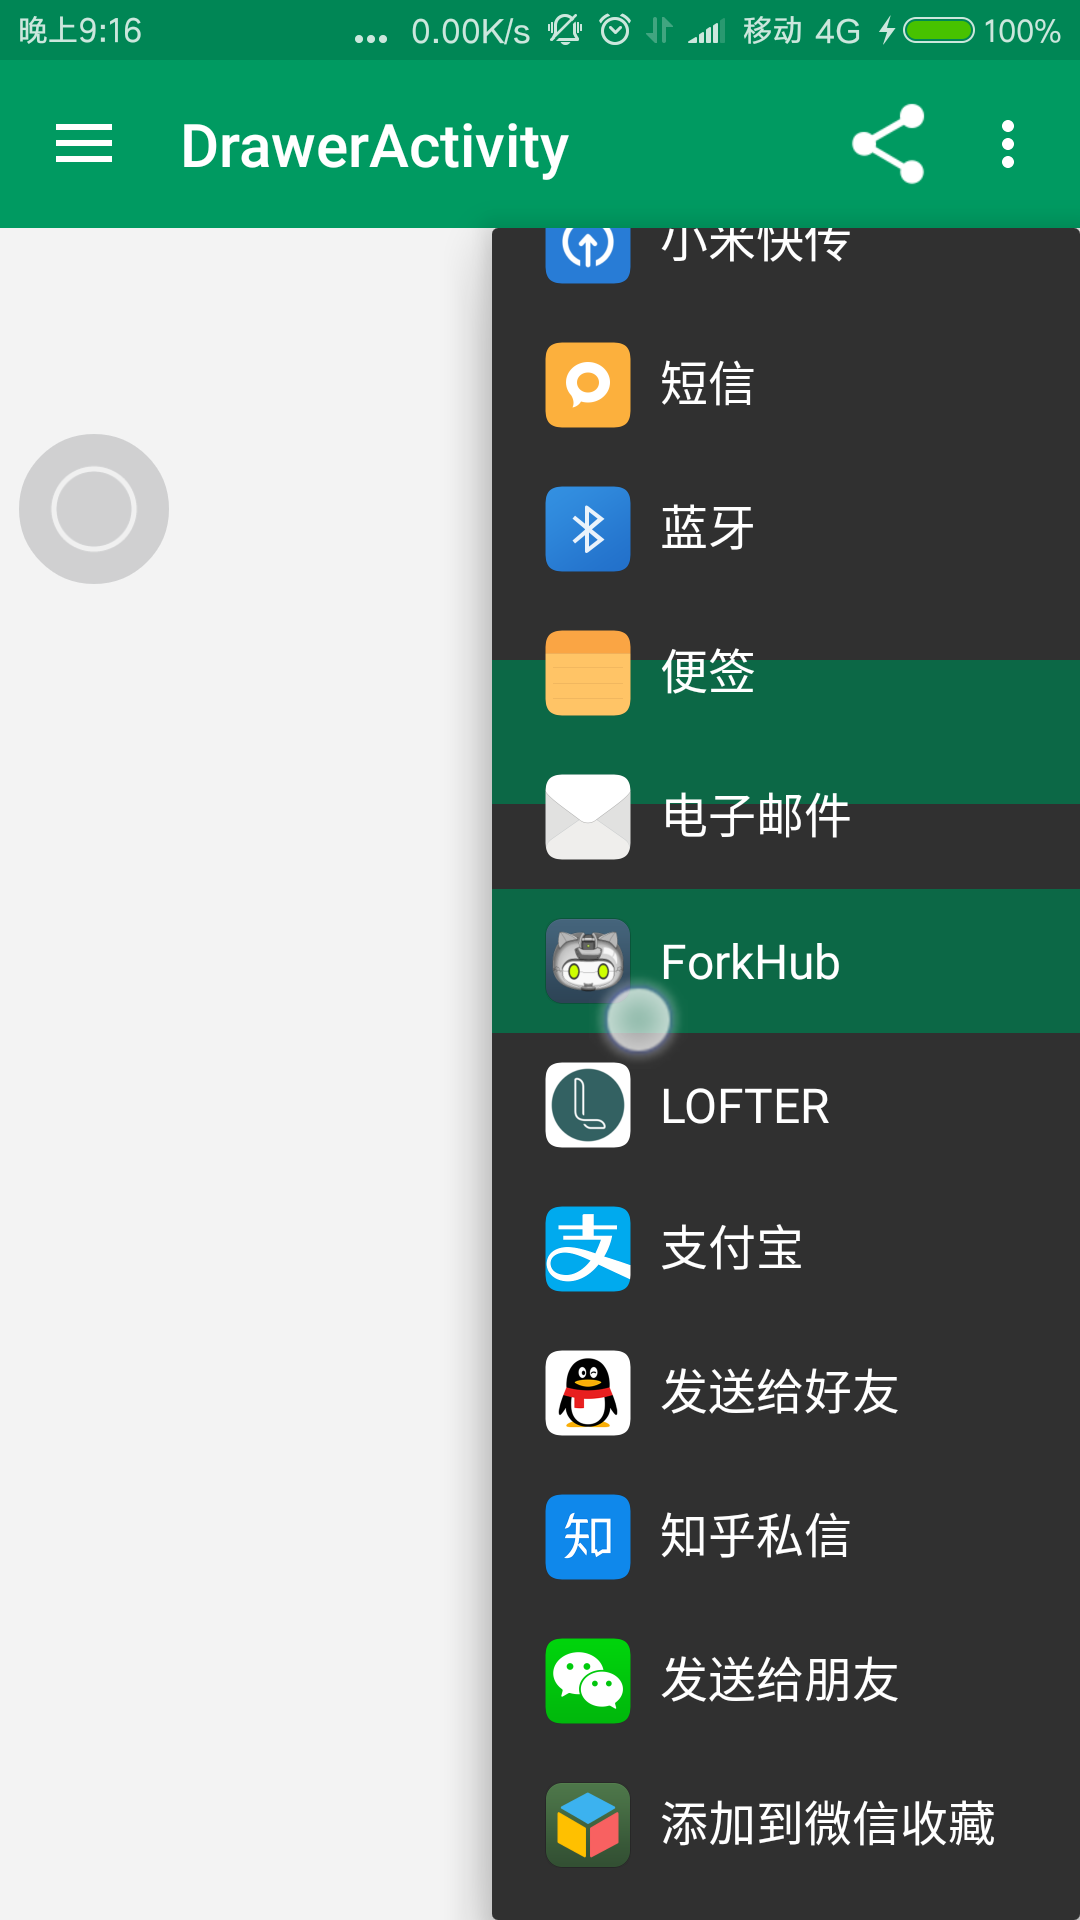
然后我又点开了查看全部

这又是什么情况?? 是我身体不行了看东西有重影了??看起来像是新的菜单没有完全遮挡住旧的菜单,然后出现重叠了
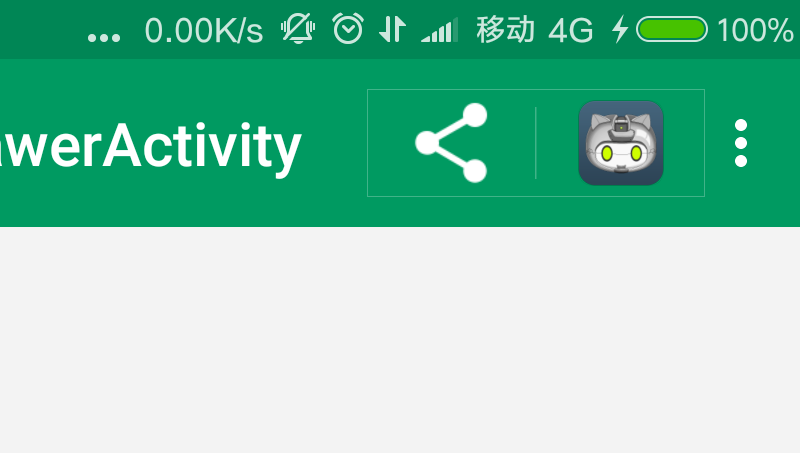
接着我不小心手抖点了下ForkHub,等我退回来的时候就酱了。。

对没错我的toolbar上乱入了一直喵咪,应该是谷歌贴心的认为这是你最常用的分享应用,所以就给你显示在这里了,可是我一句话都没说好吗?!
心灰意冷,所以最终决定使用popupMenu来实现动图中所出现的效果。所以只要我们能够拿到系统中支持分享的应用列表,让popupMenu显示出来就可以了。
好了我要开始分析源码了!
为了实现最终效果,还真得好好看一遍PopupMenu的实现方式,我就假设大家都对PopupMenu的使用有一点了解,所以会更多地偏向原理而不讨论使用方法。在讲PopupMenu之前,还是得从ListPopupWindow说起ListPopupWindow
ListPopupWindow是supportv7包提供的控件,以popup的方式展示一个list,所以说,ListPopupWindow本质上维护了一个PopupWindow并将其内容设置为一个ListView,我们可以看一下他的show()方法的代码/**
* Show the popup list. If the list is already showing, this method
* will recalculate the popup's size and position.
*/
public void show() {
//在这里动态创建了popupwindow要展示的ListView
int height = buildDropDown();
...
//如果正在显示
if (mPopup.isShowing()) {
...
...
//重新算了一波宽高位置并更新了下
mPopup.update(getAnchorView(), mDropDownHorizontalOffset,
mDropDownVerticalOffset, (widthSpec < 0)? -1 : widthSpec,
(heightSpec < 0)? -1 : heightSpec);
}else {
//开始算宽度
final int widthSpec;
//如果是设置的宽度是MATCH_PARENT就按MATCH_PARENT来
if (mDropDownWidth == ViewGroup.LayoutParams.MATCH_PARENT) {
widthSpec = ViewGroup.LayoutParams.MATCH_PARENT;
} else {
//如果设置的是WRAP_CONTENT就按AnchorView的宽度来
if (mDropDownWidth == ViewGroup.LayoutParams.WRAP_CONTENT) {
widthSpec = getAnchorView().getWidth();
} else {
//或者是传进去一个确定的宽度就听你的
widthSpec = mDropDownWidth;
}
}
//算了下高度
final int heightSpec;
...
mPopup.setWidth(widthSpec);
mPopup.setHeight(heightSpec);
...
//调用了显示PopupWindow的代码
PopupWindowCompat.showAsDropDown(mPopup, getAnchorView(), mDropDownHorizontalOffset,
mDropDownVerticalOffset, mDropDownGravity);
...
}删掉了很多细节的代码,保留了函数大概的结构,在函数的开始就创建了一个listview并作为PopupWindow的content,如果你对这个buildDropDown()不是很放心,那我们就进来看一下
private int buildDropDown() {
ViewGroup dropDownView;
int otherHeights = 0;

if (mDropDownList == null) {
Context context = mContext;
...
...
//这个DropDownListView是一个ListView的子类
//从这里开始创建并初始化它
mDropDownList = new DropDownListView(context, !mModal);
if (mDropDownListHighlight != null) {
mDropDownList.setSelector(mDropDownListHighlight);
}
//这里的这个adpter是由使用者实例化并传入的
mDropDownList.setAdapter(mAdapter);
mDropDownList.setOnItemClickListener(mItemClickListener);
mDropDownList.setFocusable(true);
mDropDownList.setFocusableInTouchMode(true);
mDropDownList.setOnItemSelectedListener(new AdapterView.OnItemSelectedListener() {
public void onItemSelected(AdapterView<?> parent, View view,
int position, long id) {

if (position != -1) {
DropDownListView dropDownList = mDropDownList;

if (dropDownList != null) {
dropDownList.mListSelectionHidden = false;
}
}
}

public void onNothingSelected(AdapterView<?> parent) {
}
});
mDropDownList.setOnScrollListener(mScrollListener);

if (mItemSelectedListener != null) {
mDropDownList.setOnItemSelectedListener(mItemSelectedListener);
}

dropDownView = mDropDownList;

//他也支持在菜单的顶部或底部加一个用于提示的hintview
//做法就是把hintView跟ListView放到一个LinearLayout里作为dropDownView
View hintView = mPromptView;
...
...
//把这个listview(准确说是dropDownView)放到popupWindow里了
mPopup.setContentView(dropDownView);
} else {
dropDownView = (ViewGroup) mPopup.getContentView();
...
}
...
// Max height available on the screen for a popup.
...
return listContent + otherHeights;
}
确实是创建出了一个ListView并把它设置给了PopupWindow,这样一来,这个控件也就一点都不神秘了。所以,想要控制ListPopupWindow的显示效果,只要自定义一个合适的adapter就好了,但还有个问题就是,通过前面的代码可以发现,它的宽度计算方式并不是我们想要的,我可能想要在toolbar右下面显示一个宽度自适应(包含内容)的菜单,但你会发现,你的选择要么就是指定一个具体宽度,要么就是跟toolbar一样宽,想要宽度自适应,基本上要亲自测量了。于是MenuPopupHelper就出现了。
MenuPopupHelper
其实MenuPopupHelper这个类的设计思路就是奔着这个方向走的,解决PopupWindow使用上的几个问题:我要控制listview中每个item的视图
我要拥有供宽度自适应的能力
上面所说的都可以在tryShow()方法中找到依据
public boolean tryShow() {
mPopup = new ListPopupWindow(mContext, null, mPopupStyleAttr, mPopupStyleRes);
mPopup.setOnDismissListener(this);
mPopup.setOnItemClickListener(this);
//设置适配器 这个适配器的实例是由MenuPopupHelper生成的
mPopup.setAdapter(mAdapter);
mPopup.setModal(true);
...
...
if (!mHasContentWidth) {
//测量listview的宽度
mContentWidth = measureContentWidth();
mHasContentWidth = true;
}
//设置PopupWindow的宽度
mPopup.setContentWidth(mContentWidth);
mPopup.setInputMethodMode(PopupWindow.INPUT_METHOD_NOT_NEEDED);
//在这里调用PopupWindow的show方法
mPopup.show();
mPopup.getListView().setOnKeyListener(this);
return true;
}
关于这里使用的adapter,他定义了一个内部类,我们直接来看他Adapter中的getItem和getView这两个方法
public MenuItemImpl getItem(int position) {
//数据集items通过mAdapterMenu获取
//而mAdapterMenu是通过MenuPopupHelper的构造函数传进来的MenuBuilder对象
ArrayList<MenuItemImpl> items = mOverflowOnly ?
mAdapterMenu.getNonActionItems() : mAdapterMenu.getVisibleItems();
if (mExpandedIndex >= 0 && position >= mExpandedIndex) {
position++;
}
//返回的是一个MenuItem 可以从里边拿到title、icon等 这就是我们每一项的数据
return items.get(position);
}
public View getView(int position, View convertView, ViewGroup parent) {
if (convertView == null) {
//LAYOUT为静态常量 他的值为R.layout.abc_popup_menu_item_layout 可以在sdk目录下的\extras\android\support\v7\appcompat\res\layout文件夹中找到
convertView = mInflater.inflate(ITEM_LAYOUT, parent, false);
}
MenuView.ItemView itemView = (MenuView.ItemView) convertView;
//这句还挺重要的 他决定了要不要在菜单中显示图标
if (mForceShowIcon) {
//布局文件里的跟标签就是ListMenuItemView
((ListMenuItemView) convertView).setForceShowIcon(true);
}
//根据每项数据给itemView设置值
itemView.initialize(getItem(position), 0);
return convertView;
}你可能会有个疑问,我并没有看到viewholder之类的东西啊,难道MenuPopupHelper并没有为listview做优化吗?其实不是,其中的猫腻就在ListMenuItemView。 先看一波xml的布局文件
<android.support.v7.view.menu.ListMenuItemView
xmlns:android="http://schemas.android.com/apk/res/android"
android:layout_width="match_parent"
android:layout_height="?attr/dropdownListPreferredItemHeight"
android:minWidth="196dip"
style="@style/RtlOverlay.Widget.AppCompat.PopupMenuItem">

<!-- Icon will be inserted here. -->

<!-- The title and summary have some gap between them, and this 'group' should be centered vertically. -->
<RelativeLayout
android:layout_width="0dip"
android:layout_weight="1"
android:layout_height="wrap_content"
android:layout_gravity="center_vertical"
android:duplicateParentState="true"
style="@style/RtlOverlay.Widget.AppCompat.PopupMenuItem.InternalGroup">

<TextView
android:id="@+id/title"
android:layout_width="match_parent"
android:layout_height="wrap_content"
android:layout_alignParentTop="true"
android:textAppearance="?attr/textAppearanceLargePopupMenu"
android:singleLine="true"
android:duplicateParentState="true"
android:ellipsize="marquee"
android:fadingEdge="horizontal"
style="@style/RtlOverlay.Widget.AppCompat.PopupMenuItem.Text" />

<TextView
android:id="@+id/shortcut"
android:layout_width="wrap_content"
android:layout_height="wrap_content"
android:layout_below="@id/title"
android:textAppearance="?attr/textAppearanceSmallPopupMenu"
android:singleLine="true"
android:duplicateParentState="true"
style="@style/RtlOverlay.Widget.AppCompat.PopupMenuItem.Text" />

</RelativeLayout>

<!-- Checkbox, and/or radio button will be inserted here. -->

</android.support.v7.view.menu.ListMenuItemView>
仔细一看会发现有两句注释
...
<!-- Icon will be inserted here. -->
...
<!-- Checkbox, and/or radio button will be inserted here. -->
...
这注释是怎么个情况呢?这个还得看ListMenuItemView这个类
public class ListMenuItemView extends LinearLayout implements MenuView.ItemView {这实际上是一个linearLayout 实现了ItemView接口
然后再看几个类的的私有字段
private ImageView mIconView;
private RadioButton mRadioButton;
private TextView mTitleView;
private CheckBox mCheckBox;
private TextView mShortcutView;
这对应着这个ListMenuItemView内的几个子view,你会发现有几个view像ImageView 、RadioButton 之类的注释中好像提及了,先别急,这不重要,先看类内覆写的onFinishInflate方法
@Override
protected void onFinishInflate() {
super.onFinishInflate();

setBackgroundDrawable(mBackground);
//mTitleView在这里通过findviewbyid的方式赋值了
mTitleView = (TextView) findViewById(R.id.title);
if (mTextAppearance != -1) {
mTitleView.setTextAppearance(mTextAppearanceContext,
mTextAppearance);
}
//这个也是一样
mShortcutView = (TextView) findViewById(R.id.shortcut);
}
这个方法会在inflate操作结束后回调,于是他就在这进行了findviewbyid操作,然后把找到的view通过类内的几个引用保存起来,以后再进行各种set方法的时候就不用findviewbyid了,所以,最开始的疑问就得到答案了,这个关于findviewbyid的优化还是做了的,因为ListMenuItemView本身就带有ViewHolder的功能。
然后再看看关于ImageView 或 RadioButton 的问题,我们直接看ListMenuItemView 的setIcon()方法
public void setIcon(Drawable icon) {
//这里正好就跟之前adapter中的那句
//((ListMenuItemView) convertView).setForceShowIcon(true);
//对应上了,要不要显示icon 跟两个条件有关
//要么就是mForceShowIcon为true 这个可以通过setForceShowIcon方法设置
//要么就是mItemData.shouldShowIcon(),但这个返回值默认为false,也没有提供设置的方法,网上有通过反射修改其返回值的,大家可以随意百度一下
final boolean showIcon = mItemData.shouldShowIcon() || mForceShowIcon;
//mPreserveIconSpacing的值可以通过主题来配置 一般都是true
if (!showIcon && !mPreserveIconSpacing) {
return;
}

if (mIconView == null && icon == null && !mPreserveIconSpacing) {
return;
}
//如果我们能够经历千辛万苦来到这里,就可以走到动态插入ImageView的代码里了!
//insertIconView()就是加载一个ImageVIew然后插入到之前注释标记过的地方
if (mIconView == null) {
insertIconView();
}

if (icon != null || mPreserveIconSpacing) {
//看到这放心了吧 出图标了吧
mIconView.setImageDrawable(showIcon ? icon : null);

if (mIconView.getVisibility() != VISIBLE) {
mIconView.setVisibility(VISIBLE);
}
} else {
mIconView.setVisibility(GONE);
}
}
注释中已经写得很明白了,就是动态的创建view并将其加入到ListMenuItemView中同样的道理其他的view也是通过这种方式来创建的,于是到此为止,MenuPopupHelper已经为我们解决了菜单中每个item的布局问题
然后再来看宽度自适应的问题
private int measureContentWidth() {
int maxWidth = 0;
View itemView = null;
int itemType = 0;

final ListAdapter adapter = mAdapter;
final int widthMeasureSpec = MeasureSpec.makeMeasureSpec(0, MeasureSpec.UNSPECIFIED);
final int heightMeasureSpec = MeasureSpec.makeMeasureSpec(0, MeasureSpec.UNSPECIFIED);
final int count = adapter.getCount();
for (int i = 0; i < count; i++) {
final int positionType = adapter.getItemViewType(i);
if (positionType != itemType) {
itemType = positionType;
itemView = null;
}

if (mMeasureParent == null) {
mMeasureParent = new FrameLayout(mContext);
}

itemView = adapter.getView(i, itemView, mMeasureParent);
itemView.measure(widthMeasureSpec, heightMeasureSpec);

final int itemWidth = itemView.getMeasuredWidth();
if (itemWidth >= mPopupMaxWidth) {
return mPopupMaxWidth;
} else if (itemWidth > maxWidth) {
maxWidth = itemWidth;
}
}

return maxWidth;
}
大概思路就是选一个最大的子view的宽度 作为listview的宽度,但是不能超过mPopupMaxWidth
mPopupMaxWidth = Math.max(res.getDisplayMetrics().widthPixels / 2,
res.getDimensionPixelSize(R.dimen.abc_config_prefDialogWidth));
查了下这个
R.dimen.abc_config_prefDialogWidth的值是320dp??
没事这不重要 反正宽度他也帮我们测量好了
到此为止MenuPopupHelper比较重要的东西已经讲完了,但有个问题需要注意,虽然MenuPopupHelper也提供了show方法,但里面的操作是临时new出一个ListPopupWindow,然后调用其show方法(就是最开始讲的tryshow()),也就是说,在MenuPopupHelper调用show方法之前,你是找不到任何ListPopupWindow的实例的。
PopupMenu
所有的问题都解决完了,就差提供数据的人了,PopupMenu类内就维护了一个MenuPopupHelper,并为MenuPopupHelper提供数据,当然PopupMenu的数据集也是由用户传入,传入的方式是直接提供一个按钮的xml资源文件
public void inflate(@MenuRes int menuRes) {
getMenuInflater().inflate(menuRes, mMenu);
}
或得到其类内的MenuBuilder自己添加数据
public Menu getMenu() {
return mMenu;
}
而且PopupMenu还提供了一个实现好的TouchListenr以便你可以实现长按按钮手不离开屏幕直接下拉就可以把菜单唤出的操作,不得不说,这个还是比较贴心的,注释也写的很详细
/**
* Returns an {@link android.view.View.OnTouchListener} that can be added to the anchor view
* to implement drag-to-open behavior.
* <p>
* When the listener is set on a view, touching that view and dragging
* outside of its bounds will open the popup window. Lifting will select the
* currently touched list item.
* <p>
* Example usage:
* <pre>
* PopupMenu myPopup = new PopupMenu(context, myAnchor);
* myAnchor.setOnTouchListener(myPopup.getDragToOpenListener());
* </pre>
*
* @return a touch listener that controls drag-to-open behavior
*/
public View.OnTouchListener getDragToOpenListener() {
if (mDragListener == null) {
...
...
}
return mDragListener;
}
其他的就是一些回调监听了,到此为止 源码部分就结束了,这样我们就可以重新整理下思路了。
实现思路
这样一来思路就比较明确了,我们可以使用两个PopupMenu来实现这个效果,第一个用来实现固定列表项的菜单,就是微信分享、微博分享、各种分享的那个。另一个用来显示系统中可分享的应用列表,关于如何拿到分享列表及如何跳转到分享应用,网上有很多可行的例子,这里就不再具体分析了,我们直接看代码吧/**
* 设置弹出菜单的背景 模态 数据适配器 宽高 位置 anchorView
*
* @param menuRes
* @return
*/
private PopupMenu initFixedPopup(@MenuRes int menuRes) {
//通过主题配置使弹出菜单可以顶到toolbar的上面
//这里的context参数是toolbar的context,本身就带着toolbar的theme
PopupMenu popupMenu = new PopupMenu(new ContextThemeWrapper(context,
R.style.MyactionOverflowMenuStyle), toolbar, Gravity.RIGHT);
//通过反射拿到PopupMenu内的MenuPopupHelper,这样就可以调用他的setForceShowIcon方法显示icon了
fixedHelper = (MenuPopupHelper) ReflectUtil.getField("mPopup", popupMenu);
fixedHelper.setForceShowIcon(true);
popupMenu.getMenuInflater().inflate(menuRes, popupMenu.getMenu());
//菜单文件中将加载更多定义在了最后一个
MenuItem loadMoreMenu = popupMenu.getMenu().getItem(popupMenu.getMenu().size() - 1);
//监听菜单选择,当点击加载更多的时候dismiss当前菜单,弹出第二个菜单
popupMenu.setOnMenuItemClickListener(item -> {
popupMenu.dismiss();
if (item.getItemId() == loadMoreMenu.getItemId()) {
showSharePopup();
return true;
}
//这两行可以忽略,这是用来向外发送点击事件的
if (onFixedMenuSelected != null)
onFixedMenuSelected.call(item);
return true;
});
return popupMenu;
}我将具体要展示的内容定义在了一个菜单的布局文件中,这个函数接受一个布局文件的id,然后会根据布局的内容返回一个PopupMenu
菜单定义
<?xml version="1.0" encoding="utf-8"?>
<menu xmlns:android="http://schemas.android.com/apk/res/android">

<item
android:id="@+id/menu_share_weibo"
android:title="微博分享"
android:icon="@drawable/logo_sinaweibo" />

<item android:id="@+id/menu_share_weixin"
android:title="微信分享"
android:icon="@drawable/logo_wechat"/>

<item android:id="@+id/menu_share_pengyouquan"
android:title="朋友圈分享"
android:icon="@drawable/logo_wechatmoments"/>

<item android:id="@+id/menu_share_qq"
android:title="QQ分享"
android:icon="@drawable/logo_qq"/>

<item android:id="@+id/menu_share_more"
android:title="加载更多"/>

</menu>
然后是控制菜单显示位置的style定义
<style name="MyactionOverflowMenuStyle" parent="@style/Widget.AppCompat.PopupMenu.Overflow">
<item name="overlapAnchor">true</item>
<item name="android:dropDownHorizontalOffset">0dp</item>
</style>
这个直接放在
styles.xml文件中就好了
然后是创建第二个菜单的函数
/**
* 初始化分享菜单 列出系统中支持分享功能的应用
* @return
*/
private PopupMenu initShareMenu() {
PopupMenu popup = new PopupMenu(context, toolbar, Gravity.RIGHT);
MenuPopupHelper mPopup = (MenuPopupHelper) ReflectUtil.getField("mPopup", popup);
mPopup.setForceShowIcon(true);

//准备 添加 数据集
Intent intent = new Intent(Intent.ACTION_SEND, null);
intent.addCategory(Intent.CATEGORY_DEFAULT);
intent.setType("text/plain");
PackageManager pm = context.getPackageManager();
resolveInfos = pm.queryIntentActivities(intent,
PackageManager.COMPONENT_ENABLED_STATE_DEFAULT);
Menu shareMenuItems = popup.getMenu();
for (int i = 0; i < resolveInfos.size(); i++) {
ResolveInfo resolveInfo = resolveInfos.get(i);
shareMenuItems.add(-1, i, Menu.NONE,
resolveInfo.loadLabel(pm)).setIcon(resolveInfo.loadIcon(pm));
}

//设置点击监听,可以无视他
popup.setOnMenuItemClickListener(item -> {
if (onShareMenuSelected != null) {
onShareMenuSelected.call(item, this);
}
return true;
});
return popup;
}
这个菜单就出现在默认位置就好了,所以直接使用了toolbar的context,其他的跟上一个大同小异。
最后就是处理一下分享按钮的触摸监听
toolbar.post(() -> initShareButton(getActionMenuView().getChildAt(0)));
getActionMenuView()是父类ToolbarHelper提供的方法,等下一次讲toolbar的时候会详细讲解,这里之所以用post的方式来初始化分享按钮。是因为要先等分享按钮被创建出来,应该发生在Activity的onCreateOptionsMenu(Menu)方法被调用之后了。
然后是initShareButton
/**
* 给分享按钮添加点击和触摸监听从而实现popupMenu弹出
* @param shareButton
*/
private void initShareButton(View shareButton) {
shareButton.setOnClickListener(v-> fixedPopup.show());
shareButton.setOnTouchListener(new ListPopupWindow.ForwardingListener(shareButton) {
@Override
public ListPopupWindow getPopup() {
return fixedHelper.getPopup();
}

@Override
public boolean onForwardingStarted() {
fixedHelper.show();
return true;
}

@Override
public boolean onForwardingStopped() {
fixedHelper.dismiss();
return true;
}
});
}
你们可能会问了,这个地方跟我之前说的不太一样啊,说好的用
shareButton.setOnTouchListener(fixedPopup.getDragToOpenListener());呢,这一坨代码又是什么鬼??其实我开始也是想这么干的,但在长按下拉之后唤出的菜单拿不到手指焦点,仔细其Toolbar类中看了他的溢出菜单的唤出方式,发现了这么段代码
setOnTouchListener(new ListPopupWindow.ForwardingListener(this) {
@Override
public ListPopupWindow getPopup() {
if (mOverflowPopup == null) {
return null;
}

return mOverflowPopup.getPopup();
}

@Override
public boolean onForwardingStarted() {
showOverflowMenu();
return true;
}

@Override
public boolean onForwardingStopped() {
// Displaying the popup occurs asynchronously, so wait for
// the runnable to finish before deciding whether to stop
// forwarding.
if (mPostedOpenRunnable != null) {
return false;
}

hideOverflowMenu();
return true;
}
之后我就比着葫芦画瓢把这段代码抄进去了,然后焦点问题就解决了。。这地方我也不是很明白,但确实奏效了,希望有时间可以好好分析下吧。
打完收工
到这里PopupMenu篇就结束了,中间遇到了不少坑,所以特意记录下来希望能对你们有所帮助,源码我会在下一篇将Toolbar的时候一并贴出来,第一次写技术博客,大家一起加油吧!相关文章推荐
- 使用C++实现JNI接口需要注意的事项
- Android IPC进程间通讯机制
- Android Manifest 用法
- [转载]Activity中ConfigChanges属性的用法
- Android之获取手机上的图片和视频缩略图thumbnails
- Android之使用Http协议实现文件上传功能
- Android学习笔记(二九):嵌入浏览器
- android string.xml文件中的整型和string型代替
- i-jetty环境搭配与编译
- android之定时器AlarmManager
- android wifi 无线调试
- Android Native 绘图方法
- Android java 与 javascript互访(相互调用)的方法例子
- android 代码实现控件之间的间距
- android FragmentPagerAdapter的“标准”配置
- Android"解决"onTouch和onClick的冲突问题
- android:installLocation简析
- android searchView的关闭事件
- SourceProvider.getJniDirectories
