centos 6 编译安装LAMP
2016-07-26 18:22
411 查看
搭建环境:Centos 6.8,httpd2.4.18,mysql 5.6.23,php 5.6.17
一、前期准备
请参考LNMP前期准备和mysql安装请参考:/article/11924004.html
二、httpd安装
安装apr
前期准备(补充安装,--with-xsl使用)
libevent编译安装(libevent是一个基于事件触发的网络库,memcached底层也是使用libevent库。)
http://www.freetds.org/userguide/choosingtdsprotocol.htm#TAB.PROTOCOL.BY.PRODUCT
安装php支持memcache扩展模块

五、后记
本篇博文拖了好久才写出来,其实LAMP编译安装还是挺简单的,只是httpd和php的模块化整合搞了好久(./configure具体配置不知何用),计划用于公司的IPOS系统测试使用,后面几篇博文计划httpd.conf,php.ini,nginx.conf配置说明。web服务器的搭建还是得熟练点,毕竟Linux使用最多的东西。
本文出自 “Frank” 博客,请务必保留此出处http://zhoufan.blog.51cto.com/4278592/1830297
一、前期准备
请参考LNMP前期准备和mysql安装请参考:/article/11924004.html
二、httpd安装
安装apr
tar xf apr-1.5.2.tar.gz
cd apr-1.5.2
./configure --prefix=/usr/local/apr
make && make install
安装apr-util
tar xf apr-util-1.5.4.tar.gz
cd apr-util-1.5.4
./configure --prefix=/usr/local/apr-util --with-apr=/usr/local/apr
make && make install
安装httpd
cd httpd-2.4.18
./configure --prefix=/usr/local/apache --sysconfdir=/etc/httpd --enable-so --enable-ssl --enable-cgi --enable-rewrite --with-zlib --with-pcre --with-apr=/usr/local/apr --with-apr-util=/usr/local/apr-util --enable-modules=most --enable-mpms-shared=all --with-mpm=event
make && make install
编译安装部分参数说明
--enable-so #支持DSO动态装载模块
--enable-ssl #要编译启用ssl模块(前提是需要安装openssl-devel)
--enable-cgi #启用CGI模块(默认就启用)
--enable-rewrite #URL重写(支持URL重写)
--with-zlib #这是一个压缩库(专用于网络传输)
--with-pcre #使用增强的perl正则表达式分析工具(使用这项需要安装pcre-devel,pcre:正则表达式分析器)
--with-apr=/usr/local/apr #指明apr的目录(若apr在特殊路径下)
--with-apr-util=/usr/local/apr-util/ #指明apr-util路径(若apr-util在特殊路径下
)
--enable-mpms-shared=all #把所有的mpm模块都编译进来而且是共享模块
--with-mpm=work #默认使用的mpm模块
--enable-modules=most(all) #还有很多其他模块,其他的动态可装载模块需要
测试httpd配置是否正常
/usr/local/apache/bin/apachectl -t设置httpd服务和开机启动项
cp /usr/local/apache/bin/apachectl /etc/rc.d/init.d/httpd
vim /etc/rc.d/init.d/httpd
#chkconfig: 35 61 61
#description:Apache
chkconfig --add httpd
chkconfig httpd on
三、php编译安装
前期准备(补充安装,--with-xsl使用)
yum install libxslt-devel安装php
tar xf php-5.6.17.tar.gz
cd php-5.6.17
./configure --prefix=/usr/local/php --with-mysql=/usr/local/mysql --with-apxs2=/usr/local/apache/bin/apxs --with-mysqli=/usr/local/mysql/bin/mysql_config --with-iconv-dir=/usr/local -openssl --enable-mbstring --with-freetype-dir --with-jpeg-dir --with-png-dir --with-zlib --wbxml-dir=/usr --enable-xml --disable-rpath --enable-bcmath --enable-shmop --enable-sysvsem -e-inline-optimization --enable-mbregex --enable-mbstring --with-gd --enable-gd-native-ttf --hash --enable-pcntl --enable-sockets --with-mcrypt --with-ldap --with-ldap-sasl --with-xmlrpable-zip --enable-soap --with-bz2 --with-config-file-path=/etc --with-config-file-scan-dir=/etc/php.d --enable-maintainer-zts --with-xmlrpc=shared --with-xsl
make ZEND_EXTRA_LIBS='-liconv'
make install
编译安装部分参数说明(很多加载项用途不明,从别处抄袭,前几位参数还是特别重要的,比如--with-apsx2,httpd和php整合用使用)
--with-mysql=/usr/local/mysql     #MySQL安装目录,对mysql的支持
--with-mysqli=/usr/local/mysql/bin/mysql_config  #mysqli扩展技术不仅可以调用MySQL的存储过程、处理MySQL事务,而且还可以使访问数据库工作变得更加稳定。
--with-apxs2=/usr/local/apache/bin/apxs    #整合apache,apxs功能是使用mod_so中的LoadModule指令,加载指定模块到 apache,要求 apache 要打开SO模块
--with-iconv-dir=/usr/local   # 选项指令,用于PHP编译时指定iconv在系统里的路径,否则会扫描默认路径(与ZEND_EXTRA_LIBS='-liconv')。
--enable-maintainer-zts #编译成zts模块,event,worker模式使用
--with-freetype-dir   #打开对freetype字体库的支持
--with-jpeg-dir   #打开对jpeg图片的支持
--with-png-dir   #打开对png图片的支持
--with-zlib-dir   #打开zlib库的支持,用于http压缩传输
--with-libxml-dir   #打开libxml2库的支持
--disable-rpath    #关闭额外的运行库文件
--enable-bcmath    #打开图片大小调整,用到zabbix监控的时候用到了这个模块
--enable-sysvsem  #这样就使得你的PHP系统可以处理相关的IPC函数了。
--enable-inline-optimization  #优化线程
--with-curl    #打开curl浏览工具的支持
--with-curlwrappers    #运用curl工具打开url流
--enable-mbregex
--enable-fpm           #支持PHP-fpm,早期版本需要补丁后才有这个参数,CGI方式安装的启动程序
--enable-mbstring   #多字节,字符串的支持
--with-mcrypt     #mcrypt算法扩展
--with-mhash      #mhash算法扩展
--with-gd          #打开gd库的支持
--enable-gd-native-ttf   #支持TrueType字符串函数库
--with-openssl      #openssl的支持,加密传输https时用到的
--enable-pcntl   #freeTDS需要用到的,可能是链接mssql才用到
--enable-sockets     #打开sockets支持
--with-xmlrpc    #打开xml-rpc的c语言
--enable-zip   #打开对zip的支持
--enable-ftp   #打开ftp的支持
--with-bz2    #打开对bz2文件的支持
--without-iconv  #关闭iconv函数,字符集间的转换
--with-ttf     #打开freetype1.*的支持,可以不加了
--with-xsl     #打开XSLT文件支持,扩展了libXML2库,需要libxslt软件
--with-gettext    #打开gnu的gettext支持,编码库用到
--with-pear    #打开pear命令的支持,PHP扩展用的
--enable-calendar  #打开日历扩展功能
--enable-exif    #图片的元数据支持
--enable-magic-quotes   #魔术引用的支持
--disable-debug    #关闭调试模式
--with-mime-magic=/usr/share/file/magic.mime      #魔术头文件位置
#CGI方式安装才用的参数
--enable-fastCGI            #支持fastcgi方式启动PHP
--enable-force-CGI-redirect        #重定向方式启动PHP
--with-ncurses         #支持ncurses屏幕绘制以及基于文本终端的图形互动功能的动态库
--with-gmp  #应该是支持一种规范
--enable-dbase          #建立DBA作为共享模块
--with-pcre-dir=/usr/local/bin/pcre-config    #perl的正则库案安装位置
--disable-dmalloc
--with-gdbm      #dba的gdbm支持
--enable-sigchild
--enable-sysvshm
--enable-zend-multibyte         #支持zend的多字节
--enable-wddx
--enable-soap
提供php配置文件
cp php.ini-production /etc/php.ini修改httpd.conf,使其支持php,并且可以识别index.php结尾作为首页
AddType application/x-httpd-php  .php
AddType application/x-httpd-php-source  .phps
DirectoryIndex  index.php  index.html
四、PHP扩展
libevent编译安装(libevent是一个基于事件触发的网络库,memcached底层也是使用libevent库。)
tar xf libevent-2.0.22-stable.tar.gz
cd libevent-2.0.22-stable
./configure --prefix=/usr/local/libevent
make && make install
echo "/usr/local/libevent/lib" > /etc/ld.so.conf.d/libevent.conf
ldconfig
memcached编译安装
tar xf memcached-1.4.25.tar.gz
cd memcached-1.4.25
/configure --prefix=/usr/local/memcached --with-libevent=/usr/local/libevent/
make && make install
编译memcached开机启动项(部分设置均在服务脚本中)
vim /etc/rc.d/init.d/memcached
#!/bin/bash
#
# Init file for memcached
#
# chkconfig: - 86 14
# description: Distributed memory caching daemon
#
# processname: memcached
# config: /etc/sysconfig/memcached

. /etc/rc.d/init.d/functions

## Default variables
PORT="11211"
USER="root"
MAXCONN="1024"
CACHESIZE="64"
OPTIONS=""

RETVAL=0
prog="/usr/local/memcached/bin/memcached"
desc="Distributed memory caching"
lockfile="/var/lock/subsys/memcached"

start() {
echo -n $"Starting $desc (memcached): "
daemon $prog -d -p $PORT -u $USER -c $MAXCONN -m $CACHESIZE
RETVAL=$?
echo
[ $RETVAL -eq 0 ] && touch $lockfile
return $RETVAL
}

stop() {
echo -n $"Shutting down $desc (memcached): "
killproc $prog
RETVAL=$?
echo
[ $RETVAL -eq 0 ] && rm -f $lockfile
return $RETVAL
}

restart() {
stop
start
}

reload() {
echo -n $"Reloading $desc ($prog): "
killproc $prog -HUP
RETVAL=$?
echo
return $RETVAL
}

case "$1" in
start)
start
;;
stop)
stop
;;
restart)
restart
;;
condrestart)
[ -e $lockfile ] && restart
RETVAL=$?
;;
reload)
reload
;;
status)
status $prog
RETVAL=$?
;;
*)
echo $"Usage: $0 {start|stop|restart|condrestart|status}"
RETVAL=1
esac

exit $RETVAL
chmod +x /etc/rc.d/init.d/memcached chkconfig --add memcached service memcached startmemcached部分参数说明
-l <ip_addr>:指定进程监听的地址;
-d: 以服务模式运行;
-u <username>:以指定的用户身份运行memcached进程;
-m <num>:用于缓存数据的最大内存空间,单位为MB,默认为64MB;
-c <num>:最大支持的并发连接数,默认为1024;
-p <num>: 指定监听的TCP端口,默认为11211;
-U <num>:指定监听的UDP端口,默认为11211,0表示关闭UDP端口;
-t <threads>:用于处理入站请求的最大线程数,仅在memcached编译时开启了支持线程才有效;
-f <num>:设定Slab Allocator定义预先分配内存空间大小固定的块时使用的增长因子;
-M:当内存空间不够使用时返回错误信息,而不是按LRU算法利用空间;
-n: 指定最小的slab chunk大小;单位是字节;
-S: 启用sasl进行用户认证;
freetds编译安装(用于php连接mssql)
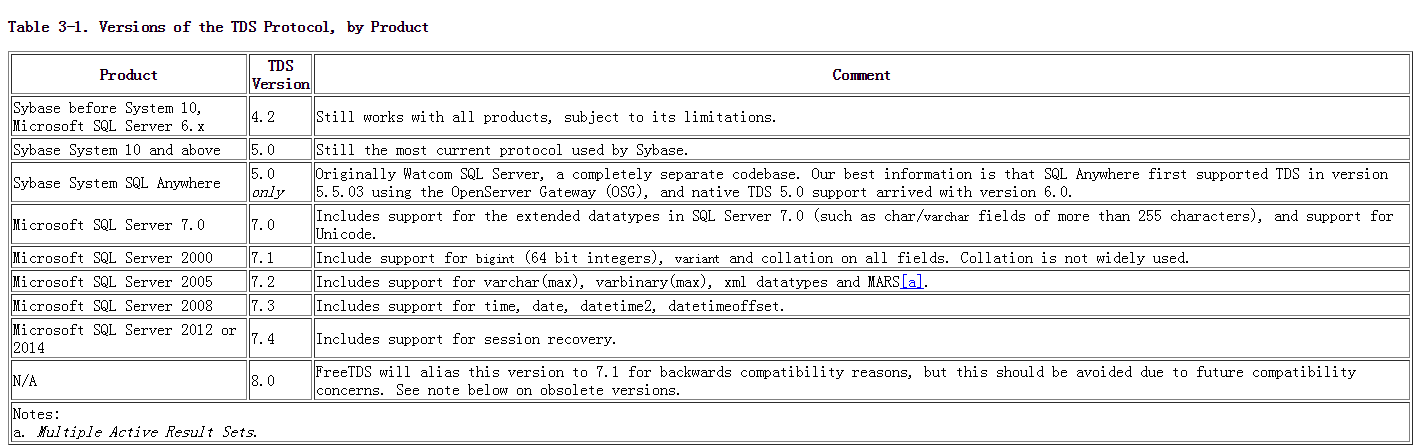
tar xf freetds-1.00.11.tar.gz
cd freetds-1.00.11
./configure --prefix=/usr/local/freetds --with-tdsver=7.3 --enable-msdblib --with-gnu-ld --enable-shared --enable-static
make && make install
cd /usr/local/src/php-5.6.17/ext/mssql/
/usr/local/php/bin/phpize
./configure --with-php-config=/usr/local/php/bin/php-config --with-mssql=/usr/local/freetds/
make && make install
--with-tdsver=7.3说明,具体说明参照:
http://www.freetds.org/userguide/choosingtdsprotocol.htm#TAB.PROTOCOL.BY.PRODUCT
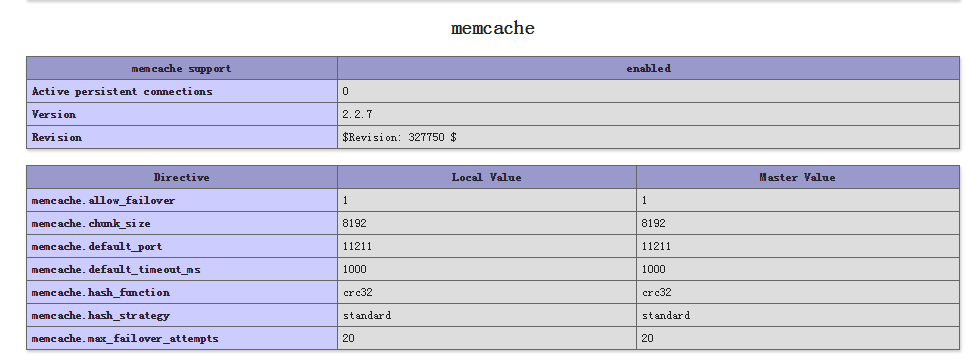
安装php支持memcache扩展模块
tar zxvf memcache-2.2.7.tgz
cd memcache-2.2.7
/usr/local/php/bin/phpize
./configure --enable-memcache --with-php-config=/usr/local/php/bin/php-config --with-zib-dir
make && make install
修改php.ini,增加freetds和memcache功能
extension_dir = "/usr/local/php/lib/php/extensions/no-debug-zts-20131226/"
extension=mssql.so
extension="GBK"
extension=memcache.so
重启httpd使生效
service httpd restart编写php测试页面
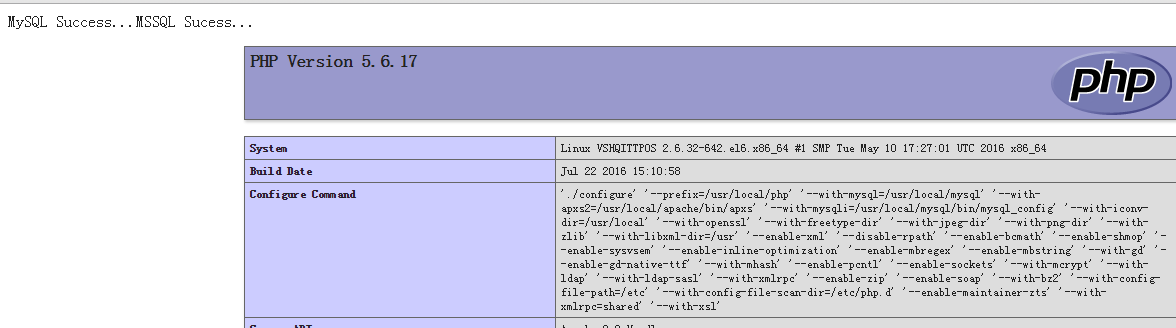
<?php
$link = mysql_connect('ip address','user','passwd');
if ($link)
echo "MySQL Success...";
else
echo "MySQL Failure...";
mysql_close();
$conn=mssql_connect('ip address','user','passwd');
if($conn)
echo"MSSQL Sucess...";
else
echo"MSSQL Failure...";
mssql_close();
phpinfo();
?>测试可正常使用五、后记
本篇博文拖了好久才写出来,其实LAMP编译安装还是挺简单的,只是httpd和php的模块化整合搞了好久(./configure具体配置不知何用),计划用于公司的IPOS系统测试使用,后面几篇博文计划httpd.conf,php.ini,nginx.conf配置说明。web服务器的搭建还是得熟练点,毕竟Linux使用最多的东西。
本文出自 “Frank” 博客,请务必保留此出处http://zhoufan.blog.51cto.com/4278592/1830297

相关文章推荐
- Install Centos7.2【U盘】
- CentOS中实现与Ubuntu下apt-get install build-essential功能类似的命令
- 服务器硬件及其操作系统基础
- linux中如何查看日志中某个异常出现的次数
- linux基础命令
- linux兴趣小组暑假第二次讲座总结
- Linux学习笔记4linux的文件系统
- Linux 编程中的API函数和系统调用的关系【转】
- Linux 中open系统调用实现原理【转】
- linux中动态库和静态库
- linux 基础学习入门 3
- Linux学习笔记3命令别名(alias)
- linux基础知识简单命令
- Linux学习笔记2
- Linux学习笔记 1
- Unix/Linux下5种I/O模型
- linux入门第二讲、一些命令、命令历史和一些简单的操作
- Linux如何创建用户并配置FTP权限
- Linux内核编译过程详解
- centos discuz论坛环境搭建