android studio for android learning (二十二 )如何在camera2中加载其它控件和当前摄像头视图显示在一起以及UI优化
2016-07-25 22:12
771 查看
1.在camera视图中显示其它控件,在增强现实中有很重要的应用,下面介绍一种在camera视图中加载其它控件的方法。
2.下面先来展示下要达到的效果,如下图中所示
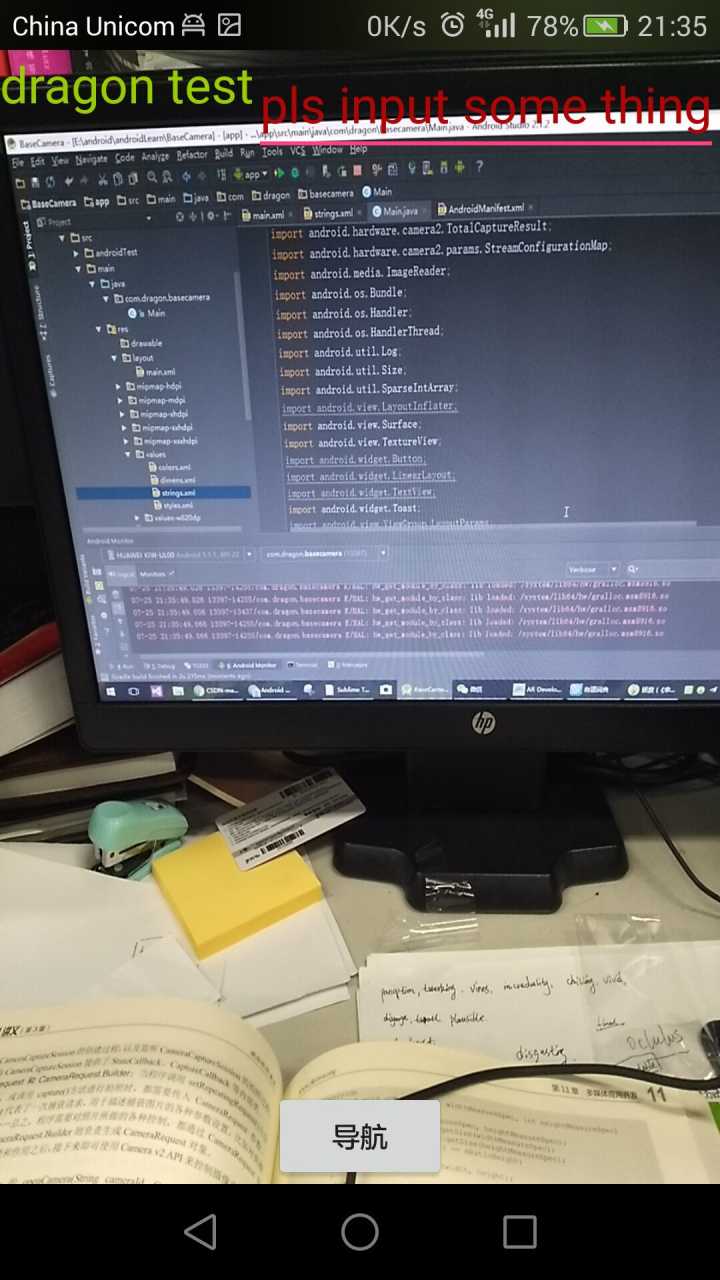
3.首先要是在一般的容器来,像linearlayout,relativeLayout,tableLayout,FrameLayout等可以在代码中动态布局,但在摄像头视图下,本人用的是textureView怎么都不可以添加相关的控件,比如加个editText或是button等,特别是上图想要的效果,基本达不到。
4.首先出现上图所示的关键不是代码而是布局文件,产生上面视图和布局文件如下所示
<?xml version="1.0" encoding="utf-8"?>
<merge xmlns:android="http://schemas.android.com/apk/res/android"
android:id="@+id/mainView"
android:layout_width="match_parent"
android:layout_height="match_parent">
<!--TextureView的最小AIP 14 ,现在改到最小已经是21-->

<TextureView
android:id="@+id/texture"
android:layout_width="match_parent"
android:layout_height="match_parent"
android:layout_alignParentTop="true"
android:layout_centerHorizontal="true"
/>

<TextView
android:id="@+id/textView"
android:layout_width="match_parent"
android:layout_height="wrap_content"
android:text="dragon test"
android:textColor="@android:color/holo_green_light"
android:textSize="25sp"
android:visibility="visible" />
<EditText
android:id="@+id/editText"
android:layout_width="wrap_content"
android:layout_height="wrap_content"
android:layout_below="@id/textView"
android:text="pls input some thing"
android:layout_centerHorizontal="true"
android:textSize="25sp"
android:visibility="visible"
android:textColor="#b00505"
android:layout_gravity="right"/>
<Button
android:id="@+id/btn1"
android:text="导航"
android:layout_gravity="bottom|center"
android:layout_width="wrap_content"
android:layout_height="wrap_content"/>

</merge>
5.大家可能发现这个布局文件和其它的布局文件不一样,是的你发现了新大陆,< merge/>标签,这个标签不像android其它六大类标签,它主要是在UI的结构优化中起非常重要的作用,它可以删除多余的层级,优化UI,使用如上面所示,注意这个视图是一层层渲染的,所以要注意先后顺序。
6.使用上面的文件注意两点。
1.< merge />只可以作为xml layout的根节点。
2.当需要扩充的xml layout本身是由merge作为根节点的话,需要将被导入的xml layout置于 viewGroup中,同时需要设置attachToRoot为True。
7.除了< merge/>外,下面再补充两种其它两种关于UI优化的知识点,android抽象布局中的include,ViewStub,他们和merge一样,是官方提供的三种布局。
8.布局重用< include />,它主要是能重用布局文件,下面举个简单的例子
<LinearLayout xmlns:android="http://schemas.android.com/apk/res/android"
android:orientation="vertical"
android:layout_width=”match_parent”
android:layout_height=”match_parent”
android:background="@color/app_bg"
android:gravity="center_horizontal">

<include layout="@layout/titlebar"/>

<TextView android:layout_width=”match_parent”
android:layout_height="wrap_content"
android:text="@string/hello"
android:padding="10dp" />

</LinearLayout>
< include />标签可以使用单独的layout属性。
< include />标签若指定了ID属性,而你的layout也定义了ID,则你的layout的ID会被覆盖,解决办法如下。
View bookmarks_container_2 = findViewById(R.id.bookmarks_favourite);

bookmarks_container_2.findViewById(R.id.bookmarks_list);
3 . 在include标签中所有的android:layout_*都是有效的,前提是必须要写layout_width和layout_height两个属性。
merge和include的复用:
merge标签用来消除我们在include一个布局到另一个布局时所产生的冗余view group。比如现在很多布局中会有两个连续的Button,于是我们将这两个连续的Button做成可复用布局(re-usable layout)。在使用include标签时我们必须先将这两个Button用一个view group比如LinearLayout组织在一起然后供其它布局使用,如果是include的地方也是LiearLayout就会造成有两层连续的LiearLayout,除了降低UI性能没有任何好处。这个时候我们就可以使用< merge/>标签作为可复用布局的root view来避免这个问题,具体如下,当我们用< include/>标签复用上述代码时,系统会忽略merge元素,直接将两个连续的Button放在< include/>标签所在处。。
<merge xmlns:android="http://schemas.android.com/apk/res/android">

<Button
android:layout_width="fill_parent"
android:layout_height="wrap_content"
android:text="@string/add"/>

<Button
android:layout_width="fill_parent"
android:layout_height="wrap_content"
android:text="@string/delete"/>

</merge>
9.< ViewStub />:标签最大的优点是当你需要时才会加载,使用他并不会影响UI初始化时的性能。各种不常用的布局像进度条、显示错误消息等可以使用< ViewStub />标签,以减少内存使用量,加快渲染速度。< ViewStub />是一个不可见的,大小为0的View。< ViewStub />标签使用如下:
<ViewStub
android:id="@+id/stub_import"
android:inflatedId="@+id/panel_import"
android:layout="@layout/progress_overlay"
android:layout_width="fill_parent"
android:layout_height="wrap_content"
android:layout_gravity="bottom" />
加载方法如下所示
((ViewStub) findViewById(R.id.stub_import)).setVisibility(View.VISIBLE);
// or
View importPanel = ((ViewStub) findViewById(R.id.stub_import)).inflate();
ViewStub目前还不支持 < merge /> 标签
github源码下载地址
10.对AR/VR研究有兴趣的可以加入下面Q群或是关注下面所示的公众号。


reference:
1.http://developer.android.com/training/improving-layouts/reusing-layouts.html2.http://android-developers.blogspot.com/2009/03/android-layout-tricks-3-optimize-by.html
3.http://developer.android.com/training/improving-layouts/optimizing-layout.html#Lint
4.http://android-developers.blogspot.com/2009/02/android-layout-tricks-1.html
5.http://developer.android.com/training/improving-layouts/loading-ondemand.html
6.http://blog.csdn.net/xyz_lmn/article/details/14524567
7.https://developer.android.com/guide/topics/resources/layout-resource.html
8.https://developer.android.com/training/improving-layouts/reusing-layouts.html
9.http://blog.csdn.net/achellies/article/details/7105840
10.http://my.oschina.net/u/1175007/blog/486572

相关文章推荐
- 使用C++实现JNI接口需要注意的事项
- Android IPC进程间通讯机制
- Android Manifest 用法
- [转载]Activity中ConfigChanges属性的用法
- Android之获取手机上的图片和视频缩略图thumbnails
- Android之使用Http协议实现文件上传功能
- Android学习笔记(二九):嵌入浏览器
- android string.xml文件中的整型和string型代替
- i-jetty环境搭配与编译
- android之定时器AlarmManager
- android wifi 无线调试
- Android Native 绘图方法
- Android java 与 javascript互访(相互调用)的方法例子
- android 代码实现控件之间的间距
- android FragmentPagerAdapter的“标准”配置
- Android"解决"onTouch和onClick的冲突问题
- android:installLocation简析
- android searchView的关闭事件
- SourceProvider.getJniDirectories