谈谈关于MVP模式中V-P交互问题
2016-07-23 08:22
597 查看
在差不多两年的时间内,我们项目组几十来号人都扑在一个项目上面。这是一个基于微软SCSF(Smart Client Software Factory)的项目,客户端是墨尔本一家事业单位。前两周,我奉命负责对某个模块进行Code Review工作,在此期间,发现了一些问题,也有了一些想法。不过,有些想法可能还不是很成熟,不能完全保证其正确性,有机会写出来讨论一下。今天来说说关于MVP的一些想法。
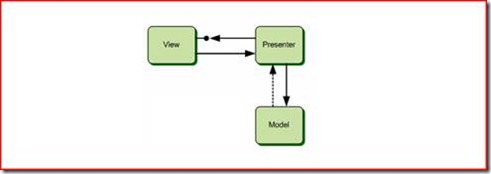
MVP具有很多的变体,其中最为常用的一种变体成为Passive View(被动视图)。对于Passive View,Model、View和Presenter之间的关系如下图所示。View和Modell之间不能直接交互,View通过Presenter与Model打交道。Presenter接受View的UI请求,完成简单的UI处理逻辑,并调用Model进行业务处理,并调用View将相应的结果反映出来。View直接依赖Presenter,但是Presenter间接依赖View,它直接依赖的是View实现的接口。关于MVP和Passive
View基本的常识性东西,不是本篇文章论述的重点,对此不清楚的读者相信可以Google出很多相关的资料来,所以在这里就再多做介绍了。
Presenter是整个MVP体系的控制中心,而不是单纯的处理View请求的人;
View仅仅是用户交互请求的汇报者,对于响应用户交互相关的逻辑和流程,View不参与决策,真正的决策者是Presenter;
View向Presenter发送用户交互请求应该采用这样的口吻:“我现在将用户交互请求发送给你,你看着办,需要我的时候我会协助你”,不应该是这样:“我现在处理用户交互请求了,我知道该怎么办,但是我需要你的支持,因为实现业务逻辑的Model只信任你”;
对于绑定到View上的数据,不应该是View从Presenter上“拉”回来的,应该是Presenter主动“推”给View的;
View尽可能不维护数据状态,因为其本身仅仅实现单纯的、独立的UI操作;Presenter才是整个体系的协调者,它根据处理用于交互的逻辑给View和Model安排工作。
三、理想与现实的距离
上面对Passive View MVP特征的罗列,我觉得是一种理想状态。是在大型项目中,尤其是项目的开发者自身并不完全理解MVP原理的情况下,要整体实现这样的一种理想状态是一件很难的事情。有人可能会说,在开发人员不了解MVP的情况下要求他们用好MVP,你这不是扯淡吗?实际上,在这里并不是说开发人员完全没有MVP关于关注点分离的概念,只是对MVP中的三元角色并没有非常清晰的界定(实际上也没有一个明确的规范对Model、View和Presenter具体的职责范围进行明确的划分),在开发的时候,会不自觉地受传统编程习惯的影响,将Presenter单纯地当成是View调用Model的中介。我经常这么说:如果以View为中心,将Presenter当成是View和Model的中间人,这也叫MVP模式,不过这里的P不是Presenter,而是Proxy,是Model在View的代理而已。
从Passive View中Model、View和Presenter三者之间的依赖关系来看,这个模型充分地给了开发者犯这样错误的机会。注意上面的图中View到Presenter的箭头表明View是可以任意的调用Presenter的。开发人员完全有可能将大部分UI处理逻辑写在View中,而Presenter仅仅对Model响应操作的简单调用。因为在我Review的各种所谓的MVP编程方式中,有不少是这么写的。在很多情况下,甚至不用认真去分析具体的代码,从View和Presenter中代码的行数就可以看出来,因为View的代码和Presenter的代码都不在一个数量级。
我现在的一个目的是提出一种编程模式,杜绝开发人员将程序写成基于Proxy的MVP,在我看来,唯一的办法就是尽量弱化(不可能剔除)View对Presenter的依赖。实际上,对于MVP来说,View仅仅向Presenter递交用户交互请求,仅此而已。如果我们将View对Presenter的这点依赖关系实现在框架层次中,最终开发人员的编程来说就不需要这种依赖了。那么我就可以通过一定的编程技巧使View根本无法访问Presenter,从而避免Presenter成为Proxy的可能的。
那么,如果在不能获得Presenter的情况下,使View能够正常将请求递交给Presenter呢?很简单,通过事件订阅机制就可以了,虽然View不可以获取到Presenter,但是Presenter却可以获取到View,让Presenter订阅View的相关事件就可以的。
然后,我们也为所有的Presenter创建基类Presenter<IView>,泛型类型IView表示具体View实现的接口。表示View的同名只读属性在构造函数中赋值,赋值完成之后调用调用虚方法OnViewSet。具体的Presenter可以重写该方法进行对View进行事件注册工作。但是需要注意的是,Presenter的创建是在ViewBase的构造函数中通过调用CreatePresenter方法实现,所以执行OnViewSet的时候,View本身还没有完全初始化,所以在此不能对View的控件进行操作。
由于,Presenter是通过接口的方式与View进行交互的。在这里,由于View通过Form的形式体现,有时候我们要通过这个接口访问Form的一些属性、方法和事件,需要将相应的成员定义在接口上面,比较麻烦。此时,我们可以选择将这些成员定义在一个接口中,具体View的接口继承该接口就可以了。在这里,我们相当是为所有的View接口创建了“基接口”。作为演示,我现在了Form的三个事件成员定义在街口IViewBase中。
首先,我们创建实体类Customer,简单起见,仅仅包含四个属性:Id、FirstName、LastName和Address:
然后,为了真实模拟MVP三种角色,特意创建一个CustomerModel类型,实际上在真实的应用中,并没有单独一个类型来表示Model。CustomerModel维护客户列表,体统相关的查询和更新操作。CustomerModel定义如下:
接着,我们定义View的接口ICustomerView。ICustomerView定义了两个事件,CustomerSelected在用户从Gird中选择了某个条客户记录是触发,而CustomerSaving则在用户完成编辑点击OK按钮视图提交修改时触发。ICustomerView还定义了View必须完成的三个基本操作:绑定客户列表(ListAllCustomers);显示单个客户信息到TextBox(DisplayCustomerInfo);保存后清空可编辑控件(Clear)。
事件参数的类型CustomerEventArgs定义如下,两个属性CustomerId和Customer分别代表客户ID和具体的客户,它们分别用于上面提到的CustomerSelected和CustomerSaving事件。
而具体的Presenter定义在如下的CustomerPresenter类型中。在重写的OnViewSet方法中注册View的三个事件:Load事件中调用Model获取所有客户列表,并显示在View的Grid上;CustomerSelected事件中通过事件参数传递的客户ID调用Model获取相应的客户信息,显示在View的可编辑控件上;CustomerSaving则通过事件参数传递的被更新过的客户信息,调用Model提交更新。
对于具体的View来说,仅仅需要实现ICustomerView,并处理响应控件事件即可(主要是用户从Grid中选择某个记录触发的RowHeaderMouseClick事件,以及点击OK的事件)。实际上不需要View亲自处理这些事件,而仅仅需要触发相应的事件,让事件订阅者(Presenter)来处理就可以了。此外还需要重写CreatePresenter方法完成对CustomerPresenter的创建。CustomerView定义如下:
作者:蒋金楠
微信公众账号:大内老A
微博:www.weibo.com/artech
如果你想及时得到个人撰写文章以及著作的消息推送,或者想看看个人推荐的技术资料,可以扫描左边二维码(或者长按识别二维码)关注个人公众号(原来公众帐号蒋金楠的自媒体将会停用)。
本文版权归作者和博客园共有,欢迎转载,但未经作者同意必须保留此段声明,且在文章页面明显位置给出原文连接,否则保留追究法律责任的权利。
一、简单讲讲MVP是什么玩意儿
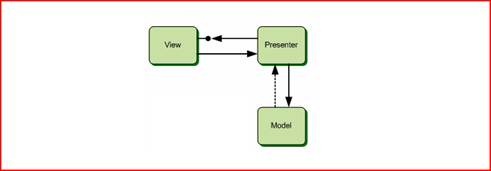
如果从层次关系来讲,MVP属于Presentation层的设计模式。对于一个UI模块来说,它的所有功能被分割为三个部分,分别通过Model、View和Presenter来承载。Model、View和Presenter相互协作,完成对最初数据的呈现和对用户操作的响应,它们具有各自的职责划分。Model可以看成是模块的业务逻辑和数据的提供者;View专门负责数据可视化的呈现,和用户交互事件的相对应。一般地,View会实现一个相应的接口;Presenter是一般充当Model和View的纽带。MVP具有很多的变体,其中最为常用的一种变体成为Passive View(被动视图)。对于Passive View,Model、View和Presenter之间的关系如下图所示。View和Modell之间不能直接交互,View通过Presenter与Model打交道。Presenter接受View的UI请求,完成简单的UI处理逻辑,并调用Model进行业务处理,并调用View将相应的结果反映出来。View直接依赖Presenter,但是Presenter间接依赖View,它直接依赖的是View实现的接口。关于MVP和Passive
View基本的常识性东西,不是本篇文章论述的重点,对此不清楚的读者相信可以Google出很多相关的资料来,所以在这里就再多做介绍了。
二、Passive View模式的基本特征总结
Passive View,顾名思义,View是被动的。那么主动是谁呢?答案是Presenter。对于Presenter的主动性,我个人是这么理解的:Presenter是整个MVP体系的控制中心,而不是单纯的处理View请求的人;
View仅仅是用户交互请求的汇报者,对于响应用户交互相关的逻辑和流程,View不参与决策,真正的决策者是Presenter;
View向Presenter发送用户交互请求应该采用这样的口吻:“我现在将用户交互请求发送给你,你看着办,需要我的时候我会协助你”,不应该是这样:“我现在处理用户交互请求了,我知道该怎么办,但是我需要你的支持,因为实现业务逻辑的Model只信任你”;
对于绑定到View上的数据,不应该是View从Presenter上“拉”回来的,应该是Presenter主动“推”给View的;
View尽可能不维护数据状态,因为其本身仅仅实现单纯的、独立的UI操作;Presenter才是整个体系的协调者,它根据处理用于交互的逻辑给View和Model安排工作。
三、理想与现实的距离
上面对Passive View MVP特征的罗列,我觉得是一种理想状态。是在大型项目中,尤其是项目的开发者自身并不完全理解MVP原理的情况下,要整体实现这样的一种理想状态是一件很难的事情。有人可能会说,在开发人员不了解MVP的情况下要求他们用好MVP,你这不是扯淡吗?实际上,在这里并不是说开发人员完全没有MVP关于关注点分离的概念,只是对MVP中的三元角色并没有非常清晰的界定(实际上也没有一个明确的规范对Model、View和Presenter具体的职责范围进行明确的划分),在开发的时候,会不自觉地受传统编程习惯的影响,将Presenter单纯地当成是View调用Model的中介。我经常这么说:如果以View为中心,将Presenter当成是View和Model的中间人,这也叫MVP模式,不过这里的P不是Presenter,而是Proxy,是Model在View的代理而已。
从Passive View中Model、View和Presenter三者之间的依赖关系来看,这个模型充分地给了开发者犯这样错误的机会。注意上面的图中View到Presenter的箭头表明View是可以任意的调用Presenter的。开发人员完全有可能将大部分UI处理逻辑写在View中,而Presenter仅仅对Model响应操作的简单调用。因为在我Review的各种所谓的MVP编程方式中,有不少是这么写的。在很多情况下,甚至不用认真去分析具体的代码,从View和Presenter中代码的行数就可以看出来,因为View的代码和Presenter的代码都不在一个数量级。
我现在的一个目的是提出一种编程模式,杜绝开发人员将程序写成基于Proxy的MVP,在我看来,唯一的办法就是尽量弱化(不可能剔除)View对Presenter的依赖。实际上,对于MVP来说,View仅仅向Presenter递交用户交互请求,仅此而已。如果我们将View对Presenter的这点依赖关系实现在框架层次中,最终开发人员的编程来说就不需要这种依赖了。那么我就可以通过一定的编程技巧使View根本无法访问Presenter,从而避免Presenter成为Proxy的可能的。
那么,如果在不能获得Presenter的情况下,使View能够正常将请求递交给Presenter呢?很简单,通过事件订阅机制就可以了,虽然View不可以获取到Presenter,但是Presenter却可以获取到View,让Presenter订阅View的相关事件就可以的。
四、让View不再依赖Presenter的编程模型
现在,我们就来如果通过一种简单的编程模式就能够让View对Presenter的依赖完全地从中最终开发者的源代码中移除。为此,我们需要定义一系列的基类,首先我为所有的View创建基类ViewBase,在这里我们直接用Form作为View,而在SCSF中View一般是通过UserControl来表示的。ViewBase定义如下,为了使View中不能调用Presenter,我将其定义成私有字段。那么,如何让View和Presenter之间建立起关联呢?在这里通过虚方法CreatePresenter,具体的View必须重写该方法,不然会抛出一个NotImplementedException异常。在构造函数中,调用该方法比用返回值为Presenter赋值。1: using System;
2: using System.ComponentModell;
3: using System.Windows.Forms;
4: namespace MVPDemo
5: {6: public class ViewBase: Form
7: {8: private object _presenter;
9:
10: public ViewBase()
11: {12: _presenter = this.CreatePresenter();
13: }
14:
15: protected virtual object CreatePresenter()
16: {17: if (LicenseManager.CurrentContext.UsageModel == LicenseUsageModel.Designtime)
18: {19: return null;
20: }
21: else
22: {23: throw new NotImplementedException(string.Format("{0} must override the CreatePresenter method.", this.GetType().FullName));24: }
25: }
26: }
27: }
然后,我们也为所有的Presenter创建基类Presenter<IView>,泛型类型IView表示具体View实现的接口。表示View的同名只读属性在构造函数中赋值,赋值完成之后调用调用虚方法OnViewSet。具体的Presenter可以重写该方法进行对View进行事件注册工作。但是需要注意的是,Presenter的创建是在ViewBase的构造函数中通过调用CreatePresenter方法实现,所以执行OnViewSet的时候,View本身还没有完全初始化,所以在此不能对View的控件进行操作。
1: namespace MVPDemo
2: {3: public class Presenter<IView>
4: {5: public IView View { get; private set; }6:
7: public Presenter(IView view)
8: {9: this.View = view;
10: this.OnViewSet();
11: }
12: protected virtual void OnViewSet()
13: { }14: }
15: }
由于,Presenter是通过接口的方式与View进行交互的。在这里,由于View通过Form的形式体现,有时候我们要通过这个接口访问Form的一些属性、方法和事件,需要将相应的成员定义在接口上面,比较麻烦。此时,我们可以选择将这些成员定义在一个接口中,具体View的接口继承该接口就可以了。在这里,我们相当是为所有的View接口创建了“基接口”。作为演示,我现在了Form的三个事件成员定义在街口IViewBase中。
1: using System;
2: using System.ComponentModell;
3: namespace MVPDemo
4: {5: public interface IViewBase
6: {7: event EventHandler Load;
8: event EventHandler Closed;
9: event CancelEventHandler Closing;
10: }
11: }
五、实例演示
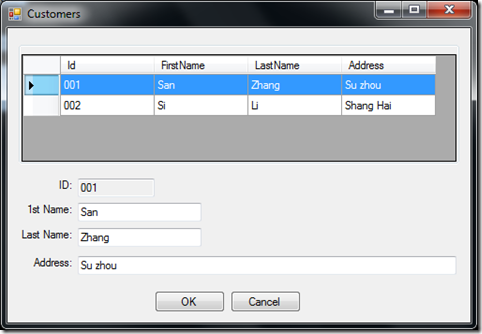
上面我通过定义基类和接口为整个编程模型搭建了一个框架,现在我们通过一个具体的例子来介绍该编程模型的应用。我们采用的是一个简单的Windows Forms应用,模拟管理客户信息的场景,逻辑很简单:程序启动的时候显示出所有的客户端列表;用户选择某一客户端,将响应的信息显示在TextBox中以供编辑;对客户端信息进行相应修改之后,点击OK按钮进行保存。整个操作界面如下图所示:
首先,我们创建实体类Customer,简单起见,仅仅包含四个属性:Id、FirstName、LastName和Address:
1: using System;
2: namespace MVPDemo
3: {4: public class Customer: ICloneable
5: {6: public string Id
7: { get; set; }8:
9: public string FirstName
10: { get; set; }11:
12: public string LastName
13: { get; set; }14:
15: public string Address
16: { get; set; } 17:
18: object ICloneable.Clone()
19: {20: return this.Clone();
21: }
22:
23: public Customer Clone()
24: {25: return new Customer {26: Id = this.Id,
27: FirstName = this.FirstName,
28: LastName = this.LastName,
29: Address = this.Address
30: };
31: }
32: }
33: }
然后,为了真实模拟MVP三种角色,特意创建一个CustomerModel类型,实际上在真实的应用中,并没有单独一个类型来表示Model。CustomerModel维护客户列表,体统相关的查询和更新操作。CustomerModel定义如下:
1: using System.Collections.Generic;
2: using System.Linq;
3: namespace MVPDemo
4: {5: public class CustomerModel
6: {7: private IList<Customer> _customers = new List<Customer>{8: new Customer{ Id = "001", FirstName = "San", LastName = "Zhang", Address="Su zhou"},9: new Customer{ Id = "002", FirstName = "Si", LastName = "Li", Address="Shang Hai"}10: };
11:
12: public void UpdateCustomer(Customer customer)
13: {14: for (int i = 0; i < _customers.Count; i++)
15: {16: if (_customers[i].Id == customer.Id)
17: {18: _customers[i] = customer;
19: break;
20: }
21: }
22: }
23:
24: public Customer GetCustomerById(string id)
25: {26: var customers = from customer in _customers
27: where customer.Id == id
28: select customer.Clone();
29: return customers.ToArray<Customer>()[0];
30: }
31:
32: public Customer[] GetAllCustomers()
33: {34: var customers = from customer in _customers
35: select customer.Clone();
36: return customers.ToArray<Customer>();
37: }
38: }
39: }
接着,我们定义View的接口ICustomerView。ICustomerView定义了两个事件,CustomerSelected在用户从Gird中选择了某个条客户记录是触发,而CustomerSaving则在用户完成编辑点击OK按钮视图提交修改时触发。ICustomerView还定义了View必须完成的三个基本操作:绑定客户列表(ListAllCustomers);显示单个客户信息到TextBox(DisplayCustomerInfo);保存后清空可编辑控件(Clear)。
1: using System;
2: namespace MVPDemo
3: {4: public interface ICustomerView : IViewBase
5: {6: event EventHandler<CustomerEventArgs> CustomerSelected;
7:
8: event EventHandler<CustomerEventArgs> CustomerSaving;
9:
10: void ListAllCustomers(Customer[] customers);
11:
12: void DisplayCustomerInfo(Customer customer);
13:
14: void Clear();
15: }
16: }
事件参数的类型CustomerEventArgs定义如下,两个属性CustomerId和Customer分别代表客户ID和具体的客户,它们分别用于上面提到的CustomerSelected和CustomerSaving事件。
1: using System;
2: namespace MVPDemo
3: {4: public class CustomerEventArgs : EventArgs
5: {6: public string CustomerId
7: { get; set; }8:
9: public Customer Customer
10: { get; set; }11: }
12: }
而具体的Presenter定义在如下的CustomerPresenter类型中。在重写的OnViewSet方法中注册View的三个事件:Load事件中调用Model获取所有客户列表,并显示在View的Grid上;CustomerSelected事件中通过事件参数传递的客户ID调用Model获取相应的客户信息,显示在View的可编辑控件上;CustomerSaving则通过事件参数传递的被更新过的客户信息,调用Model提交更新。
1: using System.Windows.Forms;
2:
3: namespace MVPDemo
4: { 5: public class CustomerPresenter: Presenter<ICustomerView>
6: {7: public CustomerModel Model
8: { get; private set; }9:
10: public CustomerPresenter(ICustomerView view)
11: : base(view)
12: {13: this.Model = new CustomerModel();
14: }
15:
16: protected override void OnViewSet()
17: {18: this.View.Load += (sender, args) =>
19: {20: Customer[] customers = this.Model.GetAllCustomers();
21: this.View.ListAllCustomers(customers);
22: this.View.Clear();
23: };
24: this.View.CustomerSelected += (sender, args) =>
25: {26: Customer customer = this.Model.GetCustomerById(args.CustomerId);
27: this.View.DisplayCustomerInfo(customer);
28: };
29: this.View.CustomerSaving += (sender, args) =>
30: {31: this.Model.UpdateCustomer(args.Customer);
32: Customer[] customers = this.Model.GetAllCustomers();
33: this.View.ListAllCustomers(customers);
34: this.View.Clear();
35: MessageBox.Show("The customer has been successfully updated!", "Successfully Update", MessageBoxButtons.OK, MessageBoxIcon.Information);36: };
37: }
38: }
39: }
对于具体的View来说,仅仅需要实现ICustomerView,并处理响应控件事件即可(主要是用户从Grid中选择某个记录触发的RowHeaderMouseClick事件,以及点击OK的事件)。实际上不需要View亲自处理这些事件,而仅仅需要触发相应的事件,让事件订阅者(Presenter)来处理就可以了。此外还需要重写CreatePresenter方法完成对CustomerPresenter的创建。CustomerView定义如下:
1: using System;
2: using System.Windows.Forms;
3:
4: namespace MVPDemo
5: {6: public partial class CustomerView : ViewBase, ICustomerView
7: {8: public CustomerView()
9: {10: InitializeComponent();
11: }
12:
13: protected override object CreatePresenter()
14: {15: return new CustomerPresenter(this);
16: }
17:
18: #region ICustomerView Members
19:
20: public event EventHandler<CustomerEventArgs> CustomerSelected;
21:
22: public event EventHandler<CustomerEventArgs> CustomerSaving;
23:
24: public void ListAllCustomers(Customer[] customers)
25: {26: this.dataGridViewCustomers.DataSource = customers;
27: }
28:
29: public void DisplayCustomerInfo(Customer customer)
30: {31: this.buttonOK.Enabled = true;
32: this.textBoxId.Text = customer.Id;
33: this.textBox1stName.Text = customer.FirstName;
34: this.textBoxLastName.Text = customer.LastName;
35: this.textBoxAddress.Text = customer.Address;
36: }
37:
38: public void Clear()
39: {40: this.buttonOK.Enabled = false;
41: this.textBox1stName.Text = string.Empty;
42: this.textBoxLastName.Text = string.Empty;
43: this.textBoxAddress.Text = string.Empty;
44: this.textBoxId.Text = string.Empty;
45: }
46:
47: #endregion
48:
49: protected virtual void OnCustomerSelected(string customerId)
50: {51: var previousId = this.textBoxId.Text.Trim();
52: if (customerId == previousId)
53: {54: return;
55: }
56: if(null != this.CustomerSelected)
57: {58: this.CustomerSelected(this, new CustomerEventArgs{ CustomerId = customerId});59: }
60: }
61:
62: protected virtual void OnCustomerSaving(Customer customer)
63: {64: if(null != this.CustomerSaving)
65: {66: this.CustomerSaving(this, new CustomerEventArgs{ Customer = customer});67: }
68: }
69:
70: private void dataGridViewCustomers_RowHeaderMouseClick(object sender, DataGridViewCellMouseEventArgs e)
71: {72: var currentRow = this.dataGridViewCustomers.Rows[e.RowIndex];
73: var customerId = currentRow.Cells[0].Value.ToString();
74: this.OnCustomerSelected(customerId);
75: }
76:
77: private void buttonOK_Click(object sender, EventArgs e)
78: {79: var customer = new Customer();
80: customer.Id = this.textBoxId.Text.Trim();
81: customer.FirstName = this.textBox1stName.Text.Trim();
82: customer.LastName = this.textBoxLastName.Text.Trim();
83: customer.Address = this.textBoxAddress.Text.Trim();
84: this.OnCustomerSaving(customer);
85: }
86: }
87: }
作者:蒋金楠
微信公众账号:大内老A
微博:www.weibo.com/artech
如果你想及时得到个人撰写文章以及著作的消息推送,或者想看看个人推荐的技术资料,可以扫描左边二维码(或者长按识别二维码)关注个人公众号(原来公众帐号蒋金楠的自媒体将会停用)。
本文版权归作者和博客园共有,欢迎转载,但未经作者同意必须保留此段声明,且在文章页面明显位置给出原文连接,否则保留追究法律责任的权利。

相关文章推荐
- PropertyChangeListener简单理解
- 什么是设计模式
- 设计模式之创建型模式 - 特别的变量问题
- 七、设计模式——装饰模式
- 设计模式总结
- 设计模式之创建型模式
- 浅谈设计模式的学习
- Ruby设计模式编程之适配器模式实战攻略
- 实例讲解Ruby使用设计模式中的装饰器模式的方法
- 设计模式中的模板方法模式在Ruby中的应用实例两则
- Ruby设计模式编程中对外观模式的应用实例分析
- 实例解析Ruby设计模式编程中Strategy策略模式的使用
- Ruby中使用设计模式中的简单工厂模式和工厂方法模式
- Ruby使用设计模式中的代理模式与装饰模式的代码实例
- 详解组合模式的结构及其在Ruby设计模式编程中的运用
- C# 设计模式系列教程-建造者模式
- C#编程中使用设计模式中的原型模式的实例讲解
- 使用设计模式中的工厂方法模式进行C#编程的示例讲解
- 实例解析C#设计模式编程中简单工厂模式的使用
- 详解C#设计模式编程中生成器模式的使用