Spring 4 + Reactor Integration Example--转
2016-07-21 09:25
561 查看
原文地址:http://www.concretepage.com/spring-4/spring-4-reactor-integration-example
Reactor is a framework to make event driven programming much easier. This is based on Reactor Design Pattern. Reactor is good for asynchronous applications on the JVM. Here we will create asynchronous and event driven application using Spring 4 and Reactor. Reactor uses Selectors, Consumers and Events as core module. Consumer is event consumer which needs to be notified for the event. Reactor is event gateway where event consumers are registered with a notification key. Selector is an abstraction to find consumer by invoking event. Find the example for detailed understanding.
1. JDK 6
2. Gradle
3. Eclipse
To get this output we are using local URL as http://localhost:8080/empdata.jsp To consume the JSON, we have two classes as below.
Employee.java
Find the EmployeeResource.java.
EmployeeResource.java
MessageConsumer.java
MessageProducer.java
ReactorConfig.java
Main.java
Find the output.
build.gradle
Now we are done. Enjoy Learning.
Reactor is a framework to make event driven programming much easier. This is based on Reactor Design Pattern. Reactor is good for asynchronous applications on the JVM. Here we will create asynchronous and event driven application using Spring 4 and Reactor. Reactor uses Selectors, Consumers and Events as core module. Consumer is event consumer which needs to be notified for the event. Reactor is event gateway where event consumers are registered with a notification key. Selector is an abstraction to find consumer by invoking event. Find the example for detailed understanding.
Software Required to Run Example
To run the example we need the following software.1. JDK 6
2. Gradle
3. Eclipse
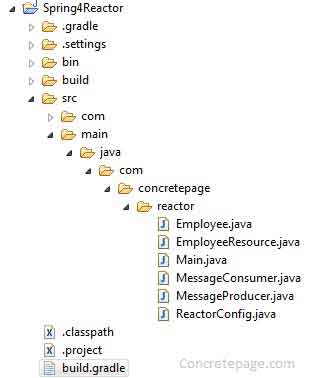
Project Structure in Eclipse
Find our demo project structure in eclipse.Java Class for JSON
For the event driven example, we have created sample page that will return the JSON as below.{"result":"success","employee":{"id":1,"name":"Ram"}}To get this output we are using local URL as http://localhost:8080/empdata.jsp To consume the JSON, we have two classes as below.
Employee.java
package com.concretepage.reactor;
import com.fasterxml.jackson.annotation.JsonIgnoreProperties;
@JsonIgnoreProperties(ignoreUnknown=true)
public class Employee {
private Integer id;
private String name;
public Integer getId() {
return id;
}
public void setId(Integer id) {
this.id = id;
}
public String getName() {
return name;
}
public void setName(String name) {
this.name = name;
}
}
Find the EmployeeResource.java.
EmployeeResource.java
package com.concretepage.reactor;
public class EmployeeResource {
private String result;
private Employee employee;
public String getResult() {
return result;
}
public void setResult(String result) {
this.result = result;
}
public Employee getEmployee() {
return employee;
}
public void setEmployee(Employee employee) {
this.employee = employee;
}
}
Create Consumer using reactor.function.Consumer
To create the consumer, our class must implement reactor.function.Consumer. We need to override accept method which has the argument as reactor.event.Event. To get the event data we can use the method as Event.getData. Here in this method, we are accessing a REST URL that will return the JSON data.MessageConsumer.java
package com.concretepage.reactor;
import java.util.concurrent.CountDownLatch;
import org.springframework.beans.factory.annotation.Autowired;
import org.springframework.web.client.RestTemplate;
import reactor.event.Event;
import reactor.function.Consumer;
public class MessageConsumer implements Consumer<Event<Integer>> {
@Autowired
CountDownLatch latch;
RestTemplate restTemplate = new RestTemplate();
@Override
public void accept(Event<Integer> event) {
EmployeeResource  empResource = restTemplate.getForObject("http://localhost:8080/empdata.jsp", EmployeeResource.class);
System.out.println("Employee " + event.getData() + ":" + empResource.getEmployee().getName());
latch.countDown();
}
}
Create Producer
In the producer class, we are notifying consumer with a key and an event that is ready to be processed.MessageProducer.java
package com.concretepage.reactor;
import java.util.concurrent.CountDownLatch;
import java.util.concurrent.atomic.AtomicInteger;
import org.springframework.beans.factory.annotation.Autowired;
import reactor.core.Reactor;
import reactor.event.Event;
public class MessageProducer {
@Autowired
Reactor reactor;
@Autowired
CountDownLatch latch;
public void publishEmployee(int numberOfEmp) throws InterruptedException {
AtomicInteger counter = new AtomicInteger(1);
for (int i=0; i < numberOfEmp; i++) {
reactor.notify("employees", Event.wrap(counter.getAndIncrement()));
}
latch.await();
System.out.println("-------Done-------");
}
}
Configuration Class for Reactor
We need to create a reactor.core.Reactor bean that needs reactor.core.Environment as an argument.ReactorConfig.java
package com.concretepage.reactor;
import java.util.concurrent.CountDownLatch;
import org.springframework.boot.autoconfigure.EnableAutoConfiguration;
import org.springframework.context.annotation.Bean;
import org.springframework.context.annotation.Configuration;
import reactor.core.Environment;
import reactor.core.Reactor;
import reactor.core.spec.Reactors;
@Configuration
@EnableAutoConfiguration
public class ReactorConfig {
private static final int NUMBER_OF_EMP = 5;
@Bean
Environment env() {
return new Environment();
}
@Bean
Reactor reactor(Environment env) {
return Reactors.reactor()
.env(env)
.dispatcher(Environment.THREAD_POOL)
.get();
}
@Bean
MessageConsumer consumer(){
return new MessageConsumer();
}
@Bean
MessageProducer producer(){
return new MessageProducer();
}
@Bean
public CountDownLatch latch() {
return new CountDownLatch(NUMBER_OF_EMP);
}
}
Main Class to Run Example
Find the main class to run the example. Reactor provides Selectors to run our asynchronous and event-driven application. Here we using $ selector. Reactor.on method registers a consumer that is triggered when notification matches the given selector.Main.java
package com.concretepage.reactor;
import static reactor.event.selector.Selectors.$;
import org.springframework.context.annotation.AnnotationConfigApplicationContext;
import reactor.core.Reactor;
public class Main {
public static void main(String[] args) throws InterruptedException {
final int NUMBER_OF_EMP = 5;
AnnotationConfigApplicationContext ctx = new AnnotationConfigApplicationContext();
ctx.register(ReactorConfig.class);
ctx.refresh();
Reactor reactor = (Reactor)ctx.getBean("reactor");
MessageConsumer consumer = (MessageConsumer)ctx.getBean("consumer");
MessageProducer publisher = (MessageProducer)ctx.getBean("producer");
reactor.on($("employees"), consumer);
publisher.publishEmployee(NUMBER_OF_EMP);
}
}
Find the output.
Employee 2:Ram
Employee 4:Ram
Employee 3:Ram
Employee 5:Ram
Employee 1:Ram
-------Done-------
Gradle for Spring and Reactor JAR Depedency
Find the gradle file to resolve the JAR dependency.build.gradle
apply plugin: 'java'
apply plugin: 'eclipse'
archivesBaseName = 'Concretepage'
version = '1.0-SNAPSHOT'
repositories {
maven { url "https://repo.spring.io/libs-release" }
mavenLocal()
mavenCentral()
}
dependencies {
compile 'org.springframework.boot:spring-boot-starter:1.2.0.RELEASE'
compile 'org.projectreactor.spring:reactor-spring-context:1.1.3.RELEASE'
compile 'org.springframework:spring-web:4.1.3.RELEASE'
compile 'com.fasterxml.jackson.core:jackson-databind:2.5.0-rc1'
compile 'org.springframework.data:spring-data-commons:1.9.1.RELEASE'
compile 'org.springframework.boot:spring-boot-starter-security:1.2.0.RELEASE'
}
Now we are done. Enjoy Learning.

相关文章推荐
- [React Native] Up and Running
- react-native init 项目后出现 unexpected token <
- react 学习网站,够全
- React中使用Ant Table组件
- 《React-Native系列》5、RN实现弹出选择界面与动画效果
- React Native Tutorial摘要(一)
- [ZeroMQ] libzmq 源码阅读 之 Reactor机制(mailbox, event)
- React Native 真机运行配置1
- React Native真机调试
- ReactNative学习小结
- ReactiveNetwork
- React Native之调用安卓原生控件
- React Native
- React Native 高质量学习资料汇总
- React Native 开发之 (07) 常用组件-View
- React Native开发android应用
- 从零开始的 React 组件开发之路 (一):表格篇
- React Native(Mac篇)
- React-native报错ERROR Watcher took too long to load解决方法
- ReactNative 仿网易新闻UI Demo