Android实际开发问题12_渲染初认识
2016-07-06 16:16
543 查看
本篇博客只是将自己对于UI渲染的认识简单说明一下.
首先从android系统卡顿说起,android界面为什么会发生卡顿呢?主要是因为android手机(大部分)渲染频率为60Hz,即1s可以渲染1000/60=16.6666ms,意思就是说,界面的处理必须在这16.666ms中处理完,如果由于绘制时间过长,超出了16.666那么下一帧就会缺少时间绘制,因为在绘制过程中已经到了临界时间,这样就出现了丢帧,就导致了卡顿情况的发生..
为了避免这种情况的发生,就要想办法将所有操作在16.666ms之中完成,也就是减少渲染时间.下面通过一个例子介绍一下:
假如让一个工人去刷一面5m*5m的墙,平均分成五份,每份涂一种颜色,总共五种颜色,下面给出两种解决方案:
A.现将墙整体刷为一种颜色,然后再将墙的4/5刷成第二种颜色,以此类推,将墙刷为五种颜色....
B.找到五种颜色的临界点,然后在各自的区域里刷上不同的颜色...
我想只要没有什么奇葩想法的,应该都会觉得B算是两种解决方案中最为合理的一种....A方案耗费时间是B方案的3倍,而且还大大的消耗了资源....
通过上面这个例子,能够联想到android显示区域就是这面墙,怎么样能够合理的显示布局控件,就可以快速的提升渲染速度和所需资源
下面通过系统自带的渲染工具,我们可以了解一下渲染情况:设置->开发人员选项->调试GPU过度绘制->显示过度绘制区域
这里共有四种颜色,分别代表渲染的力度:
1x 蓝色区域
2x 绿色区域
3x浅红色区域
>=4x深红色区域
这里的x表明的就是每一个像素的点被渲染的次数,渲染次数越多,渲染时间越长
下面看看如果如下代码

完全的白色区域,没有渲染痕迹,这也就说明在布局根目录以及其父类容器并未进行渲染
然后添加一层带有背景色的容器
当前的渲染状况
然后继续向里面添加有背景色的容器
当前的渲染情况
再次添加一层带有背景色容器
当前渲染状况
再次添加一层带有背景色的容器

当前就是最高的调试显示级别,再加入带有背景色的容器显示也和上面一样
显示状况:
可以看出并无太大区别...
然后去掉每一层的背景色
当前的显示状况

当前显示的就是为渲染时一样,也就是只有当有颜色渲染时才会出现渲染需求,如果就是向里面添加无背景色的容器,添加多少层也不会出现过度渲染问题,但是会造成系统异常,详情请百度
所以通过以上介绍我们就能够看出要想不过度渲染,最好要详细设计好控件的摆放...
下面展示一下我自己的自定义view,虽然明白上述道理,可是丰富的ui还是屡屡触及底线
当前的显示

上面可以看出这里的过度渲染十分严重,设法去除掉activity跟布局背景色之后

虽然也有部分是过度渲染,但是显然看起来更加舒服了.....
这个页面的时间整体就是一个view,下面展示一下:

欢迎大家浏览此博客,欢迎大家微信关注本源坊......
首先从android系统卡顿说起,android界面为什么会发生卡顿呢?主要是因为android手机(大部分)渲染频率为60Hz,即1s可以渲染1000/60=16.6666ms,意思就是说,界面的处理必须在这16.666ms中处理完,如果由于绘制时间过长,超出了16.666那么下一帧就会缺少时间绘制,因为在绘制过程中已经到了临界时间,这样就出现了丢帧,就导致了卡顿情况的发生..
为了避免这种情况的发生,就要想办法将所有操作在16.666ms之中完成,也就是减少渲染时间.下面通过一个例子介绍一下:
假如让一个工人去刷一面5m*5m的墙,平均分成五份,每份涂一种颜色,总共五种颜色,下面给出两种解决方案:
A.现将墙整体刷为一种颜色,然后再将墙的4/5刷成第二种颜色,以此类推,将墙刷为五种颜色....
B.找到五种颜色的临界点,然后在各自的区域里刷上不同的颜色...
我想只要没有什么奇葩想法的,应该都会觉得B算是两种解决方案中最为合理的一种....A方案耗费时间是B方案的3倍,而且还大大的消耗了资源....
通过上面这个例子,能够联想到android显示区域就是这面墙,怎么样能够合理的显示布局控件,就可以快速的提升渲染速度和所需资源
下面通过系统自带的渲染工具,我们可以了解一下渲染情况:设置->开发人员选项->调试GPU过度绘制->显示过度绘制区域
这里共有四种颜色,分别代表渲染的力度:
1x 蓝色区域
2x 绿色区域
3x浅红色区域
>=4x深红色区域
这里的x表明的就是每一个像素的点被渲染的次数,渲染次数越多,渲染时间越长
下面看看如果如下代码
<LinearLayout xmlns:android="http://schemas.android.com/apk/res/android"
android:layout_width="match_parent"
android:layout_height="match_parent">
</LinearLayout>
这个是MainActivity,里面什么内容都没有,所以他的显示区域是这样的
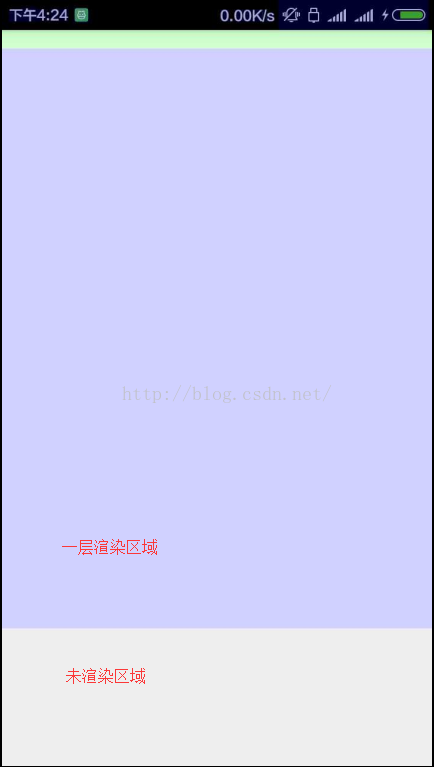
完全的白色区域,没有渲染痕迹,这也就说明在布局根目录以及其父类容器并未进行渲染
然后添加一层带有背景色的容器
<LinearLayout xmlns:android="http://schemas.android.com/apk/res/android"
android:layout_width="match_parent"
android:layout_height="match_parent">

<LinearLayout
android:layout_width="match_parent"
android:layout_height="500dp"
android:background="#fff"></LinearLayout>
</LinearLayout>
当前的渲染状况
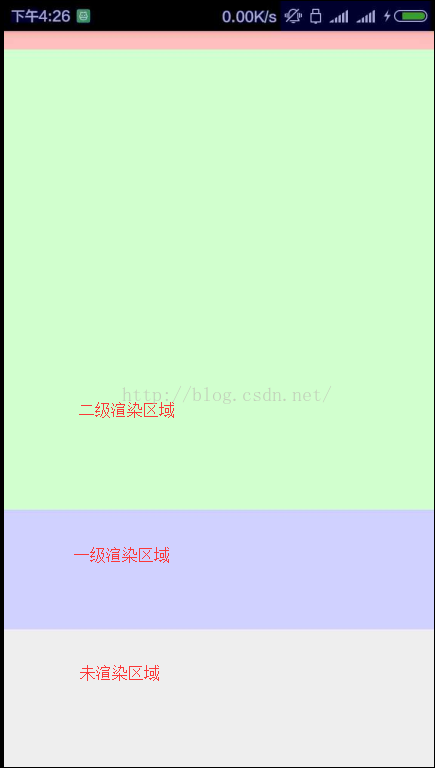
然后继续向里面添加有背景色的容器
<LinearLayout xmlns:android="http://schemas.android.com/apk/res/android"
android:layout_width="match_parent"
android:layout_height="match_parent">

<LinearLayout
android:layout_width="match_parent"
android:layout_height="500dp"
android:background="#fff">

<LinearLayout
android:layout_width="match_parent"
android:layout_height="400dp"
android:background="#fff"></LinearLayout>
</LinearLayout>
</LinearLayout>
当前的渲染情况
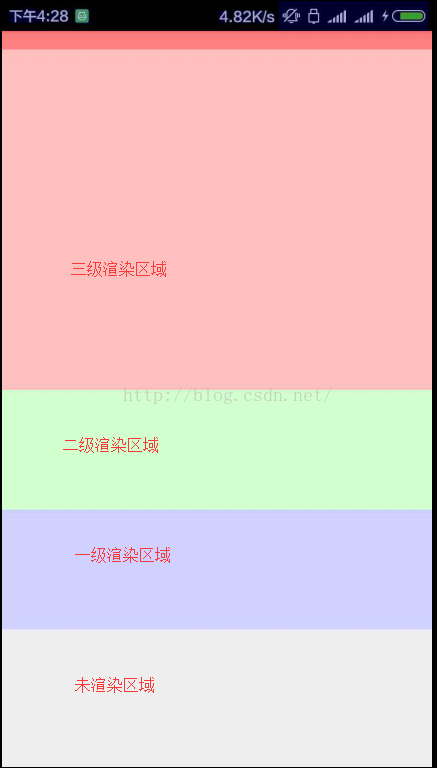
再次添加一层带有背景色容器
<LinearLayout xmlns:android="http://schemas.android.com/apk/res/android"
android:layout_width="match_parent"
android:layout_height="match_parent">

<LinearLayout
android:layout_width="match_parent"
android:layout_height="500dp"
android:background="#fff">

<LinearLayout
android:layout_width="match_parent"
android:layout_height="400dp"
android:background="#fff">

<LinearLayout
android:layout_width="match_parent"
android:layout_height="300dp"
android:background="#fff"></LinearLayout>
</LinearLayout>
</LinearLayout>
</LinearLayout>
当前渲染状况
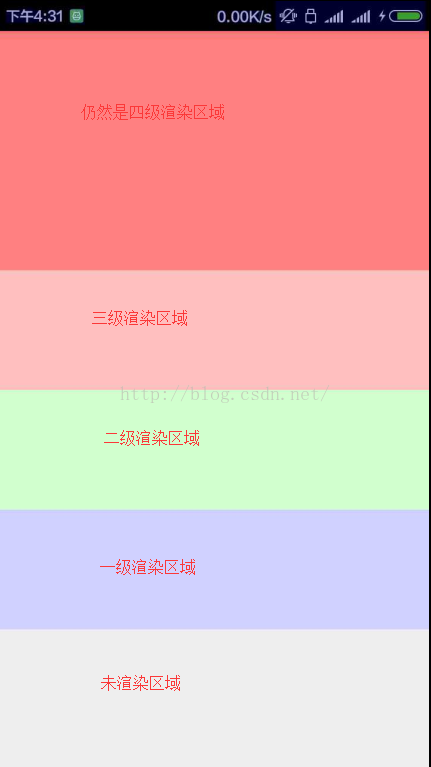
再次添加一层带有背景色的容器
<LinearLayout xmlns:android="http://schemas.android.com/apk/res/android"
android:layout_width="match_parent"
android:layout_height="match_parent">

<LinearLayout
android:layout_width="match_parent"
android:layout_height="500dp"
android:background="#fff">

<LinearLayout
android:layout_width="match_parent"
android:layout_height="400dp"
android:background="#fff">

<LinearLayout
android:layout_width="match_parent"
android:layout_height="300dp"
android:background="#fff">

<LinearLayout
android:layout_width="match_parent"
android:layout_height="200dp"
android:background="#fff"></LinearLayout>
</LinearLayout>
</LinearLayout>
</LinearLayout>
</LinearLayout>
当前的渲染情况
当前就是最高的调试显示级别,再加入带有背景色的容器显示也和上面一样
<LinearLayout xmlns:android="http://schemas.android.com/apk/res/android"
android:layout_width="match_parent"
android:layout_height="match_parent">

<LinearLayout
android:layout_width="match_parent"
android:layout_height="500dp"
android:background="#fff">

<LinearLayout
android:layout_width="match_parent"
android:layout_height="400dp"
android:background="#fff">

<LinearLayout
android:layout_width="match_parent"
android:layout_height="300dp"
android:background="#fff">

<LinearLayout
android:layout_width="match_parent"
android:layout_height="200dp"
android:background="#fff">

<LinearLayout
android:layout_width="match_parent"
android:layout_height="100dp"
android:background="#fff"></LinearLayout>
</LinearLayout>
</LinearLayout>
</LinearLayout>
</LinearLayout>
</LinearLayout>
显示状况:
可以看出并无太大区别...
然后去掉每一层的背景色
<LinearLayout xmlns:android="http://schemas.android.com/apk/res/android"
android:layout_width="match_parent"
android:layout_height="match_parent">

<LinearLayout
android:layout_width="match_parent"
android:layout_height="500dp">

<LinearLayout
android:layout_width="match_parent"
android:layout_height="400dp">

<LinearLayout
android:layout_width="match_parent"
android:layout_height="300dp">

<LinearLayout
android:layout_width="match_parent"
android:layout_height="200dp">

<LinearLayout
android:layout_width="match_parent"
android:layout_height="100dp"></LinearLayout>
</LinearLayout>
</LinearLayout>
</LinearLayout>
</LinearLayout>
</LinearLayout>
当前的显示状况
当前显示的就是为渲染时一样,也就是只有当有颜色渲染时才会出现渲染需求,如果就是向里面添加无背景色的容器,添加多少层也不会出现过度渲染问题,但是会造成系统异常,详情请百度
所以通过以上介绍我们就能够看出要想不过度渲染,最好要详细设计好控件的摆放...
下面展示一下我自己的自定义view,虽然明白上述道理,可是丰富的ui还是屡屡触及底线
当前的显示
上面可以看出这里的过度渲染十分严重,设法去除掉activity跟布局背景色之后
虽然也有部分是过度渲染,但是显然看起来更加舒服了.....
这个页面的时间整体就是一个view,下面展示一下:
欢迎大家浏览此博客,欢迎大家微信关注本源坊......

相关文章推荐
- Android系统定位服务
- android_项目的简单创建和生成
- Android——ANR异常
- Android中取消GridView & ListView默认的点击背景色
- Android view 滑动事件冲突解决方法(理论篇)
- Android之Canvas画画板
- hello world(android ListView)
- Retrofit + RxAndroid 实践总结
- 欢迎使用CSDN-markdown编辑器
- Android 动画
- 从HandlerThread 的使用来分析HandlerThread的源码
- Android技术前线 java8之lambda预热
- 公司android打包环境配置
- TextView始终获取不到焦点,导致无法实现跑马灯效果
- Android CoordinatorLayout使用 标题由图片变纯色
- Android事件分发机制完全解析,带你从源码的角度彻底理解(下)
- Android动态生成Selector选择器代码
- Android.mk
- android 中ionic JavaScript调用原生代码
- Android静态安全检测 -> 数据库文件任意读写