salt-api安装与配置
2016-07-04 11:04
507 查看
1、安装依赖
yum -y install kernel-firmware kernel-headers perf e2fsprogs libyaml PyYAML
yum install salt-api
2、配置openssl证书
cd /etc/pki/tls/certs
/usr/bin/openssl genrsa -aes128 2048 > /etc/pki/tls/private/localhost.key
Generating RSA private key, 2048 bit long modulus........................................+++...............+++e is 65537 (0x10001)Enter pass phrase:(此处输入一个test)Verifying - Enter pass phrase:(再次确认你输入的)/usr/bin/openssl req -utf8 -new -key /etc/pki/tls/private/localhost.key (也输入你上次输入那个)此时../private/的文件夹中多了个localhost.keyopenssl rsa -in localhost.key -out localhost_nopass.key回车输入上次输入的
3、创建api访问用户,但是不能登录系统useradd -M -s /sbin/nologin testpasswd test //设置密码
4、配置salt-api、并重启服务
5、测试salt-api(1)首先登录获取Token
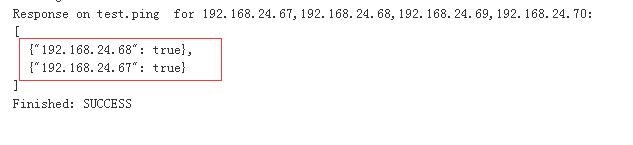
6、使用Jenkins调用salt-api测试
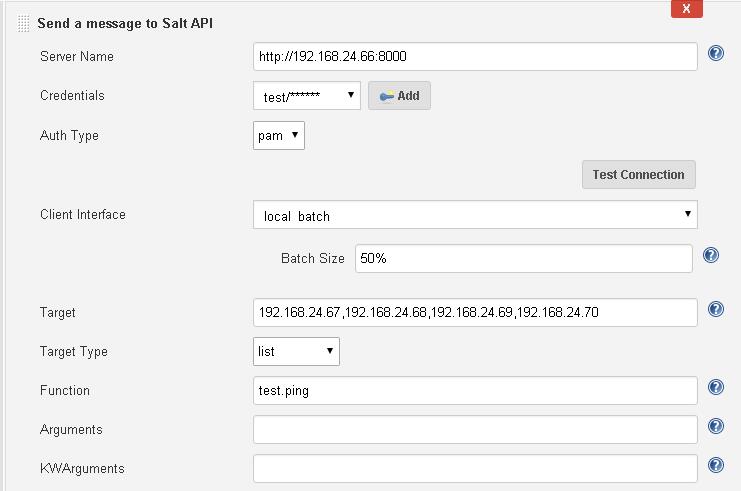
可以看到返回信息
yum -y install kernel-firmware kernel-headers perf e2fsprogs libyaml PyYAML
yum install salt-api
pip install cherrypy==
3.2
.
3 //需要安装pip
2、配置openssl证书
cd /etc/pki/tls/certs
/usr/bin/openssl genrsa -aes128 2048 > /etc/pki/tls/private/localhost.key
Generating RSA private key, 2048 bit long modulus........................................+++...............+++e is 65537 (0x10001)Enter pass phrase:(此处输入一个test)Verifying - Enter pass phrase:(再次确认你输入的)/usr/bin/openssl req -utf8 -new -key /etc/pki/tls/private/localhost.key (也输入你上次输入那个)此时../private/的文件夹中多了个localhost.keyopenssl rsa -in localhost.key -out localhost_nopass.key回车输入上次输入的
3、创建api访问用户,但是不能登录系统useradd -M -s /sbin/nologin testpasswd test //设置密码
4、配置salt-api、并重启服务
[root@localhost salt]# pwd
/etc/salt
[root@localhost salt]# egrep -v "^$|^#" master
default_include: master.d/*.conf           //开启配置路径
interface: 192.168.24.66
auto_accept: True
file_roots:
base:
- /srv/salt
pillar_roots:
base:
- /srv/salt/pillar
[root@localhost master.d]# pwd
/etc/salt/master.d
[root@localhost master.d]# cat api.conf
rest_cherrypy:
host: 192.168.24.66
port: 8000
disable_ssl: True                                        //不使用https
ssl_crt: /etc/pki/tls/certs/localhost.crt                //指定证书路径
ssl_key: /etc/pki/tls/private/localhost_nopass.key
[root@localhost master.d]# cat eauth.conf
external_auth:
pam:
test:                                                  //指定salt-api用户
- .*
- '@wheel'
- '@runner'
[root@localhost ~]# /etc/init.d/salt-api restart
Stopping salt-api daemon:                                  [  OK  ]
Starting salt-api daemon:                                  [  OK  ]
[root@localhost ~]#
[root@localhost ~]# /etc/init.d/salt-master restart
Stopping salt-master daemon:                               [  OK  ]
Starting salt-master daemon:                               [  OK  ]
5、测试salt-api(1)首先登录获取Token
[root@localhost ~]#  curl  -k http://192.168.24.66:8000/login -H  "Accept: application/json"  -d username='test' -d password='test' -d eauth='pam' -d tgt='*' -d fun='status.diskusage' |jq .
% Total    % Received % Xferd  Average Speed   Time    Time     Time  Current
Dload  Upload   Total   Spent    Left  Speed
265   196  196   196    0    69    786    276 --:--:-- --:--:-- --:--:--   522
{
"return": [
{
"eauth": "pam",
"user": "test",
"expire": 1467643424.707126,
"token": "0ea7c9ad559bc45b68507aee80aad0bf095ba56e",
"start": 1467600224.707125,
"perms": [
".*",
"@wheel",
"@runner"
]
}
]
}
(2)使用salt-api获取minion端内存信息、自此后登录就不需要密码
[root@localhost ~]#  curl -k http://192.168.24.66:8000/ -H "Accpet:application/json" -H "X-Auth-Token:0ea7c9ad559bc45b68507aee80aad0bf095ba56e" -d client='local' -d tgt='*' -d fun='cmd.run' -d arg='free -m'|jq .
% Total    % Received % Xferd  Average Speed   Time    Time     Time  Current
Dload  Upload   Total   Spent    Left  Speed
112   522  104   522    0    42   2267    182 --:--:-- --:--:-- --:--:--  2142
{
"return": [
{
"192.168.24.68": "             total       used       free     shared    buffers     cached\nMem:          3696       1451       2245          0         76       1145\n-/+ buffers/cache:        229       3467 \nSwap:         5999          0       5999",
"192.168.24.67": "             total       used       free     shared    buffers     cached\nMem:          3696       1451       2245          0         76       1144\n-/+ buffers/cache:        229       3466 \nSwap:         5999          0       5999"
}
]
}
[root@localhost ~]# curl -k http://192.168.24.66:8000/jobs -H "Accpet:application/json" -H "X-Auth-Token:0ea7c9ad559bc45b68507aee80aad0bf095ba56e" -d client='runner' -d fun='manage.status'|jq .
% Total    % Received % Xferd  Average Speed   Time    Time     Time  Current
Dload  Upload   Total   Spent    Left  Speed
0    68    0    68    0    31    131     59 --:--:-- --:--:-- --:--:--    71
{
"return": [
{
"up": [
"192.168.24.67",
"192.168.24.68"
],
"down": []
}
]
}
6、使用Jenkins调用salt-api测试
可以看到返回信息

相关文章推荐
- Effective C++: std::bind和std::function.
- 简单几步让CentOS系统时间同步
- 沈逸老师ubuntu速学笔记(2)-- ubuntu16.04下 apache2.4和php7结合编译安装,并安裝PDOmysql扩展
- Machine Learning - 第3周(Logistic Regression、Regularization)
- 红外图像特点及识别方法
- 201. Bitwise AND of Numbers Range
- java可重入锁
- Python numpy学习
- 记录proguard混淆问题
- Leetcode 66. Plus One
- AFNetworking的简单【post】【get】使用
- 二维码的生成
- Failed to connect socket to '/var/run/libvirt/libvirt-sock': No such file or director
- Android VideoView 全屏
- 权限管理——RBAC模型总结
- java的三层架构01_展示层
- 【陷阱系列】SQLServer in/not in 陷阱
- iOS-App Transport Security has blocked a cleartext HTTP (http://) resource load since it is insecure
- 2016精选Java面试题各个击破一
- UVA - 11246 - K-Multiple Free set(容斥原理)