Android之Fragment的使用(一)
2016-07-02 20:52
465 查看
声明: 本人菜鸟一枚, 本博客是本人自学的内容, 适用于初学者, 不喜勿喷, 谢谢大家
简介
设计原理
创建Fragment
在Activity的布局文件里声明Fragment
通过编码将Fragment添加到已存在的ViewGroup中
管理Fragments
两个概念:
Fragment、宿主
fragment的生命周期直接受其宿主activity的生命周期的影响。例如,一旦activity被暂停,它里面所有的fragment也被暂停, 一旦activity被销毁,它里面所有的fragment也被销毁。
有了fragment,你可以不必去管理视图体系的复杂变化。通过将activity的布局分割成若干个fragment,可以在运行时编辑 activity的呈现,并且那些变化会被保存在由activity管理的后台栈里面。
几张从Api中截取的重要的图:
除了基类fragment,这里还有几个你可能会继承的子类:
DialogFragment
ListFragment
PreferenceFragment
将Fragment添加到Activity中有两种方式
1) 在Activity的布局文件里声明Fragment
2) 通过编码将Fragment添加到已存在的ViewGroup中
创建Fragment和其布局文件供后面使用
Fragment
布局文件
activity_main.java
activity_main2.xml
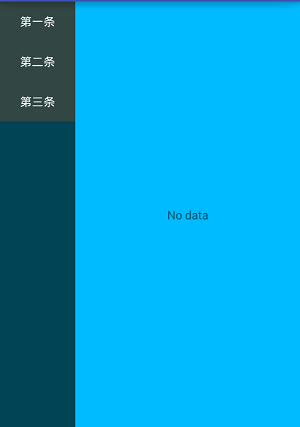
两种方法的效果是一样的, 如图:
使用FragmentManager可以做如下事情. 包括:
1) 使用findFragmentById() (用于在Activity布局中提供有界面的Fragment) 或者findFragmentByTag() 获取Activity中存在的Fragment(用于有界面或没有界面的Fragment)
2) 使用popBackStack() (模仿用户的BACK命令) 从后台栈弹出fragment.
3) 使用addOnBackStackChangedListener()注册一个监听后台栈变化的监听器.
在本节中还要提到Fragment的传参方式这是非常重要的一点
代码如下:
1, 创建相应的Fragment
PopBackFragment.java
fragment_pop_back.xml
2, 创建相应的Activity
PopBackStackActivity.java
activity_pop_back_stack.xml
效果图:
座右铭: 少说话, 多做事
简介
设计原理
创建Fragment
在Activity的布局文件里声明Fragment
通过编码将Fragment添加到已存在的ViewGroup中
管理Fragments
简介
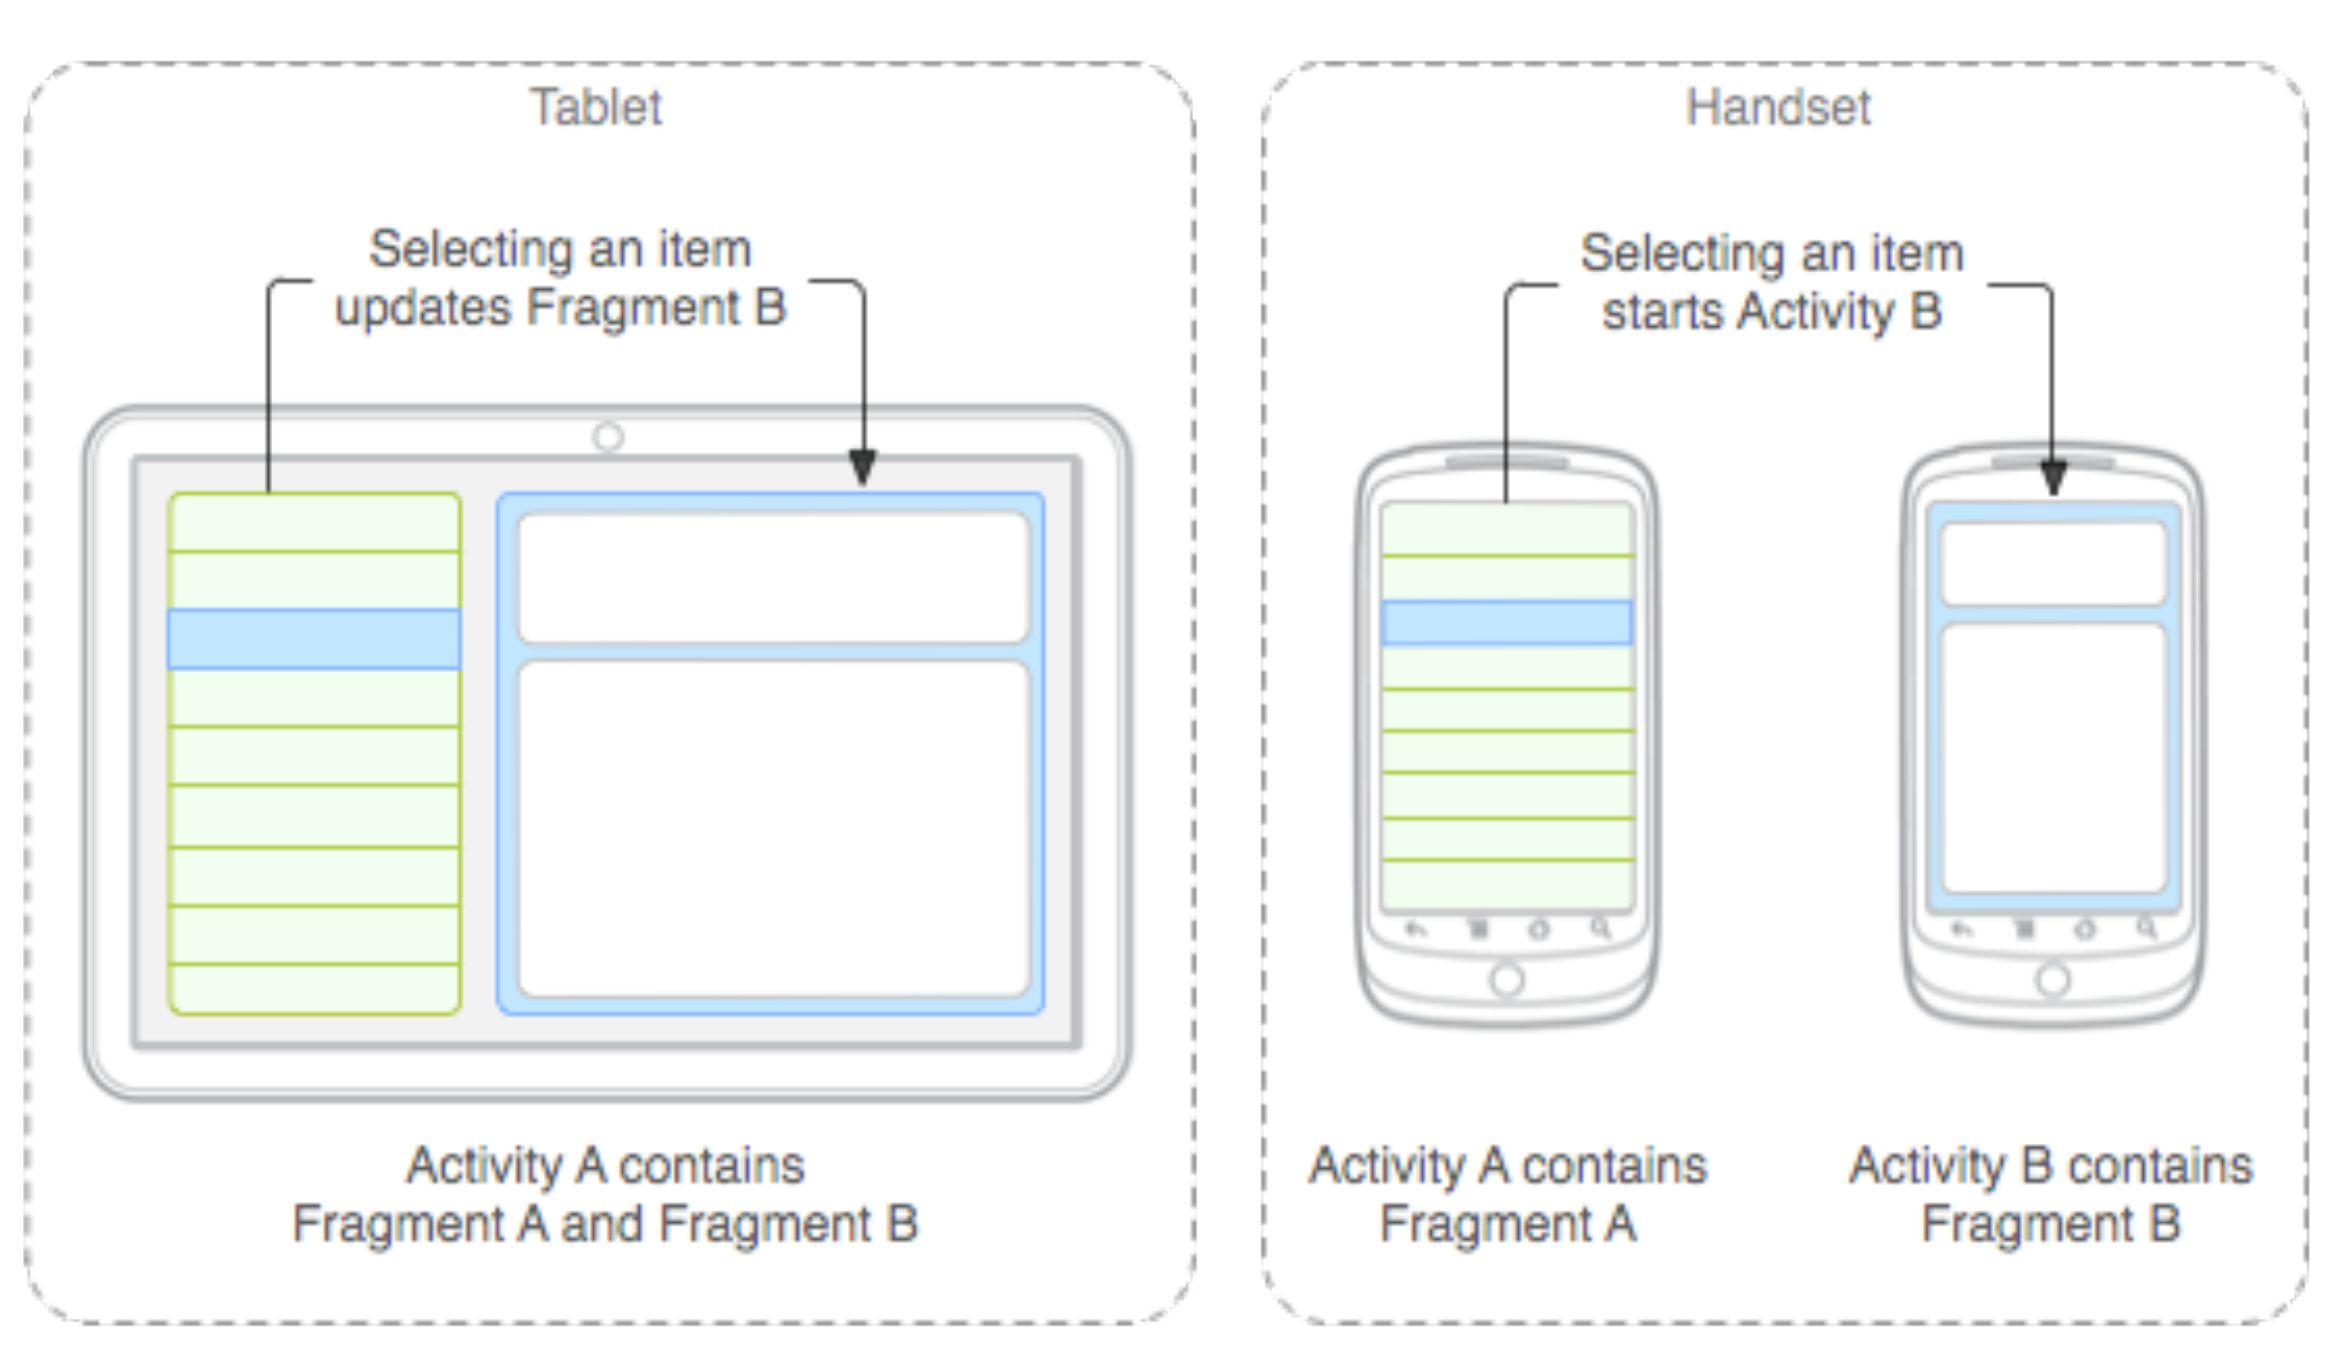
Fragment是Activity中用户界面的一个行为或者是一部分。你可以在一个单独的Activity上把多个Fragment组合成为一个多区域的UI,并且可以在多个Activity中再使用。你可以认为Fragment是Activity的一个模块零件,它有自己的生命周期,接收它 自己的输入事件,并且可以在Activity运行时添加或者刪除。两个概念:
Fragment、宿主
fragment的生命周期直接受其宿主activity的生命周期的影响。例如,一旦activity被暂停,它里面所有的fragment也被暂停, 一旦activity被销毁,它里面所有的fragment也被销毁。
设计原理
Android在3.0(11)版本中引入了fragment的概念有了fragment,你可以不必去管理视图体系的复杂变化。通过将activity的布局分割成若干个fragment,可以在运行时编辑 activity的呈现,并且那些变化会被保存在由activity管理的后台栈里面。
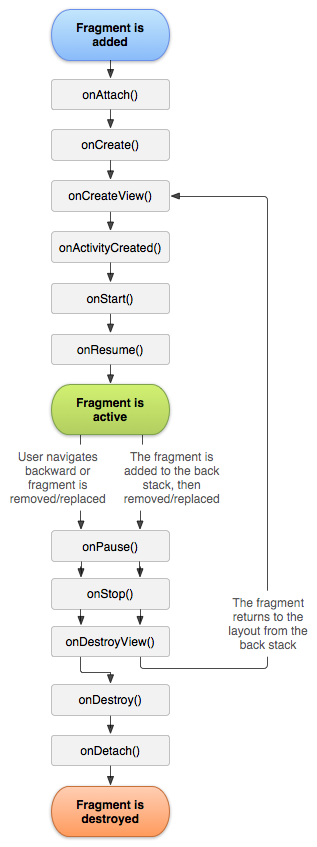
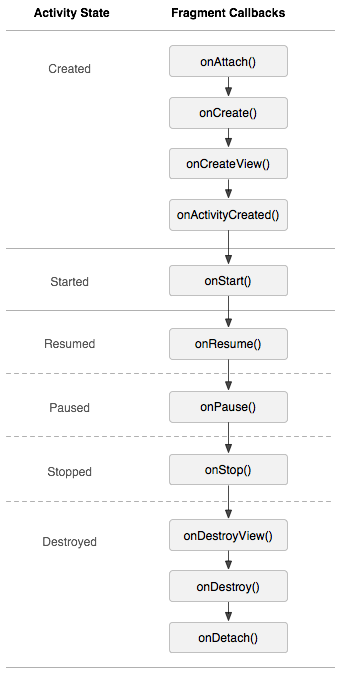
几张从Api中截取的重要的图:
创建Fragment
要创建一个fragment,必须创建一个fragment的子类(或是继承自它的子类). fragment类的代码看起来很像activity。它与 activity—样都有回调函数,例如onCreate(),onStart(),onPause(),和onStop()。事实上,如果你正在将一个现成的Android 应用转而使用Fragment来实现,可以简单的将代码从activity的回调函数移植到各自的fragment回调函数中。除了基类fragment,这里还有几个你可能会继承的子类:
DialogFragment
ListFragment
PreferenceFragment
将Fragment添加到Activity中有两种方式
1) 在Activity的布局文件里声明Fragment
2) 通过编码将Fragment添加到已存在的ViewGroup中
创建Fragment和其布局文件供后面使用
Fragment
//TitleFragment.java
/**
* Created by Lulu on 2016/7/2.
*/
public class TitleFragment extends Fragment {
@Nullable
@Override
public View onCreateView(LayoutInflater inflater, ViewGroup container, Bundle savedInstanceState) {
View view = inflater.inflate(R.layout.title_layout, container, false);

return view;

}
}
//ContentFragment.java
/**
* Created by Lulu on 2016/7/2.
*/
public class ContentFragment extends Fragment {
@Nullable
@Override
public View onCreateView(LayoutInflater inflater, ViewGroup container, Bundle savedInstanceState) {
View view = inflater.inflate(R.layout.content_layout, container, false);
return view;
}
}
布局文件
<!--title_layout.xml-->
<?xml version="1.0" encoding="utf-8"?>
<LinearLayout xmlns:android="http://schemas.android.com/apk/res/android"
android:layout_width="match_parent"
android:layout_height="match_parent"
android:background="#004455"
android:orientation="vertical">

<Button
android:id="@+id/button"
android:layout_width="match_parent"
android:layout_height="wrap_content"
android:background="#324643"
android:text="第一条"
android:textColor="#FFFFFF" />

<Button
android:id="@+id/button2"
android:layout_width="match_parent"
android:layout_height="wrap_content"
android:background="#324643"
android:text="第二条"
android:textColor="#FFFFFF" />

<Button
android:id="@+id/button3"
android:layout_width="match_parent"
android:layout_height="wrap_content"
android:background="#324643"
android:text="第三条"
android:textColor="#FFFFFF" />
</LinearLayout>

<!--content_layout.xml-->
<?xml version="1.0" encoding="utf-8"?>
<LinearLayout xmlns:android="http://schemas.android.com/apk/res/android"
android:layout_width="match_parent"
android:layout_height="match_parent"
android:gravity="center"
android:orientation="vertical"
android:background="#00bbff">

<TextView
android:id="@+id/textView"
android:layout_width="wrap_content"
android:layout_height="wrap_content"
android:text="No data" />
</LinearLayout>
在Activity的布局文件里声明Fragment
//MainActivity.java
public class MainActivity extends AppCompatActivity {

TitleFragment titleFragment;
ContentFragment contentFragment;
@Override
protected void onCreate(Bundle savedInstanceState) {
super.onCreate(savedInstanceState);
setContentView(R.layout.activity_main);
//通过下面方法获取到该Activity下的Fragment
titleFragment = (TitleFragment) getFragmentManager().findFragmentById(R.id.title_fragment);
contentFragment = (ContentFragment) getFragmentManager().findFragmentById(R.id.content_fragment);
}
}
activity_main.java
<?xml version="1.0" encoding="utf-8"?>
<LinearLayout xmlns:android="http://schemas.android.com/apk/res/android"
xmlns:tools="http://schemas.android.com/tools"
android:layout_width="match_parent"
android:layout_height="match_parent"

android:orientation="horizontal"
tools:context="com.lulu.lfragments.MainActivity">

<fragment
android:id="@+id/title_fragment"
android:layout_weight="1"
android:layout_width="0dip"
android:layout_height="match_parent"
android:name="com.lulu.lfragments.TitleFragment"
/>
<fragment
android:id="@+id/content_fragment"
android:layout_weight="3"
android:layout_width="0dip"
android:layout_height="match_parent"
android:name="com.lulu.lfragments.ContentFragment"
/>
</LinearLayout>
通过编码将Fragment添加到已存在的ViewGroup中
//Main2Activity.java
public class Main2Activity extends AppCompatActivity {

ContentFragment contentFragment;

@Override
protected void onCreate(Bundle savedInstanceState) {
super.onCreate(savedInstanceState);
setContentView(R.layout.activity_main2);

addContentLayout();
}

/**
* 通过代码添加fragment
*/
private void addContentLayout() {
FragmentManager fm = getFragmentManager();
//开启一个事务
FragmentTransaction ft = fm.beginTransaction();
contentFragment = new ContentFragment();
//添加Fragment
ft.add(R.id.content, contentFragment);
//        ft.remove();
//        ft.replace();

//提交事务
ft.commit();
}
}
activity_main2.xml
<?xml version="1.0" encoding="utf-8"?>
<LinearLayout xmlns:android="http://schemas.android.com/apk/res/android"
xmlns:tools="http://schemas.android.com/tools"
android:layout_width="match_parent"
android:layout_height="match_parent"

tools:context="com.lulu.lfragments.Main2Activity">

<fragment
android:id="@+id/title_fragment"
android:name="com.lulu.lfragments.TitleFragment"
android:layout_width="0dp"
android:layout_height="match_parent"
android:layout_weight="1" />

<FrameLayout
android:id="@+id/content"
android:layout_width="0dp"
android:layout_height="match_parent"
android:layout_weight="3" >

</FrameLayout>

</LinearLayout>
两种方法的效果是一样的, 如图:
管理Fragments
想要管理activity中的fragments, 可以使用FragmentManager. 可以通过activity中调用getFragmentManager()获得.使用FragmentManager可以做如下事情. 包括:
1) 使用findFragmentById() (用于在Activity布局中提供有界面的Fragment) 或者findFragmentByTag() 获取Activity中存在的Fragment(用于有界面或没有界面的Fragment)
2) 使用popBackStack() (模仿用户的BACK命令) 从后台栈弹出fragment.
3) 使用addOnBackStackChangedListener()注册一个监听后台栈变化的监听器.
在本节中还要提到Fragment的传参方式这是非常重要的一点
代码如下:
1, 创建相应的Fragment
PopBackFragment.java
public class PopBackFragment extends Fragment {

private String title;

public PopBackFragment() {
}

/**
* 正确的传入参数的方式, 可以解决布局文件重新加载而造成的数据丢失的问题
* 如, 屏幕的旋转
* @param title
* @return
*/
public static PopBackFragment getInstance(String title) {
PopBackFragment p = new PopBackFragment();
Bundle b = new Bundle();
b.putString("title", title);
p.setArguments(b);
return p;
}

@Nullable
@Override
public View onCreateView(LayoutInflater inflater, @Nullable ViewGroup container, @Nullable Bundle savedInstanceState) {
View view = inflater.inflate(R.layout.fragment_pop_back, container, false);
TextView textView = (TextView) view.findViewById(R.id.textView_text);
textView.setText(getArguments().getString("title"));
return view;
}

}
fragment_pop_back.xml
<FrameLayout xmlns:android="http://schemas.android.com/apk/res/android"
xmlns:tools="http://schemas.android.com/tools"
android:layout_width="match_parent"
android:layout_height="match_parent"
tools:context="com.lulu.lfragments.PopBackFragment">

<!-- TODO: Update blank fragment layout -->
<TextView
android:textSize="50sp"
android:gravity="center"
android:id="@+id/textView_text"
android:layout_width="match_parent"
android:layout_height="match_parent"
android:text="No data" />

</FrameLayout>
2, 创建相应的Activity
PopBackStackActivity.java
public class PopBackStackActivity extends AppCompatActivity {

@Override
protected void onCreate(Bundle savedInstanceState) {
super.onCreate(savedInstanceState);
setContentView(R.layout.activity_pop_back_stack);
}

public void oneClick(View view) {
PopBackFragment p1 = PopBackFragment.getInstance("one");
FragmentTransaction ft = getFragmentManager().beginTransaction();
ft.replace(R.id.content, p1);
//把当前Fragment添加到Activity栈中
//如果不添加, 返回时会返回整个Activity
ft.addToBackStack(null);
ft.commit();
}

public void twoClick(View view) {
PopBackFragment p1 = PopBackFragment.getInstance("two");
FragmentTransaction ft = getFragmentManager().beginTransaction();
ft.replace(R.id.content, p1);
//把当前Fragment添加到Activity栈中
//如果不添加, 返回时会返回整个Activity
ft.addToBackStack(null);
ft.commit();
}

}
activity_pop_back_stack.xml
<?xml version="1.0" encoding="utf-8"?>
<RelativeLayout xmlns:android="http://schemas.android.com/apk/res/android"
xmlns:tools="http://schemas.android.com/tools"
android:layout_width="match_parent"
android:layout_height="match_parent"
android:paddingBottom="@dimen/activity_vertical_margin"
android:paddingLeft="@dimen/activity_horizontal_margin"
android:paddingRight="@dimen/activity_horizontal_margin"
android:paddingTop="@dimen/activity_vertical_margin"
tools:context="com.lulu.lfragments.PopBackStackActivity"
>

<Button
android:layout_width="wrap_content"
android:layout_height="wrap_content"
android:text="one"
android:id="@+id/one"
android:onClick="oneClick"
android:layout_alignParentTop="true"
android:layout_alignParentLeft="true"
android:layout_alignParentStart="true" />

<Button
android:layout_width="wrap_content"
android:layout_height="wrap_content"
android:text="two"
android:onClick="twoClick"
android:id="@+id/button5"
android:layout_alignParentTop="true"
android:layout_alignParentRight="true"
android:layout_alignParentEnd="true" />

<FrameLayout
android:id="@+id/content"
android:layout_width="match_parent"
android:layout_height="match_parent"
android:layout_centerHorizontal="true"
android:layout_below="@+id/one"/>
</RelativeLayout>
效果图:
座右铭: 少说话, 多做事

相关文章推荐
- 使用C++实现JNI接口需要注意的事项
- Android IPC进程间通讯机制
- Android Manifest 用法
- [转载]Activity中ConfigChanges属性的用法
- Android之获取手机上的图片和视频缩略图thumbnails
- Android之使用Http协议实现文件上传功能
- Android学习笔记(二九):嵌入浏览器
- android string.xml文件中的整型和string型代替
- i-jetty环境搭配与编译
- android之定时器AlarmManager
- android wifi 无线调试
- Android Native 绘图方法
- Android java 与 javascript互访(相互调用)的方法例子
- android 代码实现控件之间的间距
- android FragmentPagerAdapter的“标准”配置
- Android"解决"onTouch和onClick的冲突问题
- android:installLocation简析
- android searchView的关闭事件
- SourceProvider.getJniDirectories