IOS气泡动画教程
2016-07-01 16:05
519 查看
IOS气泡动画教程
个人翻译:By Tang,原文地址:iOS Bubble Animation Tutorial,可能要翻墙才能访问,版权属于原作者,只做翻译的搬运工。前面两段文字,基本上就是说明这个动画产生的原因,和本文实现基本没什么关系,就不翻译了,直接贴上效果图如下:

这个获得了一个巨大的成功,收到的第一个评论是:

Jackrabbit团队或许十分后悔让我负责这个项目,过去3个月我下了要实现海底中动员中气泡效果的决定。
实际上,我之所以决心实现气泡动画,是因为我之前创建了一个名叫JRMFloatingAnimation的库,允许你完全自定义浮动(floating)图片视图的动画效果。
今天,我分享了气泡动画的制作过程,并向你展示如何实现它,制作的动画有点可爱。

1.创建小鱼
开始创建小鱼,打开Xcode创建一个新的工程,在你的初始化控制器(ViewController)里面,添加如下的代码:@property (strong, nonatomic) UIImageView *fishImageView;
- (void)viewDidLoad {
[super viewDidLoad];
self.fishImageView = [[UIImageView alloc] initWithFrame:CGRectMake(self.view.center.x - 100, self.view.center.y - 100, 200, 200)];
self.fishImageView.image = [UIImage imageNamed:@"fish"];
[self.view addSubview:self.fishImageView];
UITapGestureRecognizer *singleTap = [[UITapGestureRecognizer alloc] initWithTarget:self action:@selector(createBubble)];
singleTap.numberOfTapsRequired = 1;
[self.fishImageView setUserInteractionEnabled:YES];
[self.fishImageView addGestureRecognizer:singleTap];
}
- (void)createBubble {
UIImageView *bubbleImageView = [[UIImageView alloc] initWithImage:[UIImage imageNamed:@"bubble"]];
[bubbleImageView setFrame:CGRectMake((self.fishImageView.frame.width / 2), self.fishImageView.frame.origin.y, 5, 5)];
[self.view addSubview:bubbleImageView];
}查看源代码
实际上我的小鱼图片资源是从freepik.com上获取的,气泡是从这里。代码在控制器拥有的视图中间创建了一条鱼,并添加了点击的手势,还有一个气泡。
2.数学相关的计算
让它浮动,我们该怎么做呢?我们可以让气泡沿着Y轴移动,但是不能像气泡那样浮动。他们浮动是Z子型的曲线运动。相信我,请阅读这个文档了解更多气泡计算,因此我们该怎么实现这个?好了,首先我们需要创建一个Z字型的路径(path),对于这个,我们会用UIBezierPath,利用
moveToPoint和
addLineToPoint两个方法,可以用来创建简单的点到点的形状。你可以用控制点(control points)控制贝塞尔曲线的路径,看起来像这样:
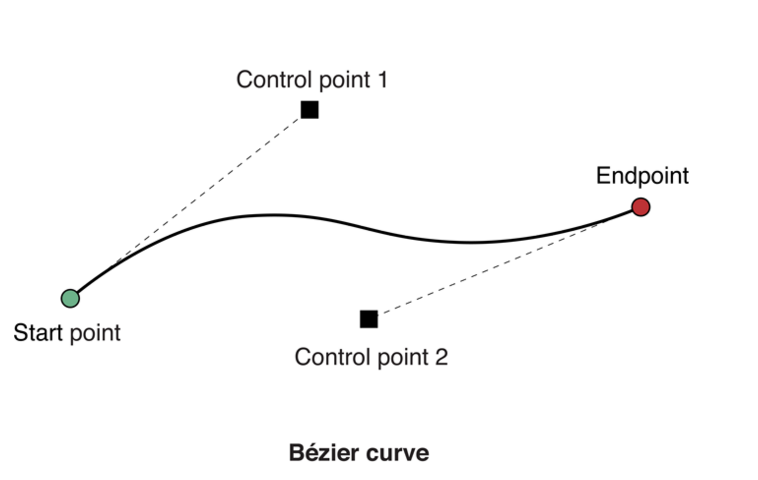
关于Bezier曲线说明
这看起来就像是我们需要的路径了,因此现在我们只需要做一些数学运算了。现在,通过一些多项方程式可以推导这些控制点,
但是面对现实微积分学得并不是那么好,并且我只是一个程序员意味着我应该要找到一种快速和简单的方式去做这个路径,当然如果你的数学十分棒,可以自己去学习,在这里,下面是我的笔记,创建
欢快按钮(Cheers button)的动画效果计算过程:

让我们来做这个:

几点说明:
ox = 鱼横向移动的X轴坐标
oy = 鱼顶部的Y轴坐标
ex = ox
ey = oy + 气泡浮动的高度
cp1x = ox - 时间t
cp1y = ox 和 ex 中间
cp2x = ox + t
cp2y = cp1y
这些希望对你有帮助,你可以自己画出来。
3.创建路径
不错,现在可以创建路径了,添加方法:createBubble如下:
UIBezierPath *zigzagPath = [[UIBezierPath alloc] init];
CGFloat oX = bubbleImageView.frame.origin.x;
CGFloat oY = bubbleImageView.frame.origin.y;
CGFloat eX = oX;
CGFloat eY = oY - 200;
CGFloat t = 40;
CGPoint cp1 = CGPointMake(oX - t, ((oY + eY) / 2));
CGPoint cp2 = CGPointMake(oX + t, cp1.y);
// the moveToPoint method sets the starting point of the line
[zigzagPath moveToPoint:CGPointMake(oX, oY)];
// add the end point and the control points
[zigzagPath addCurveToPoint:CGPointMake(eX, eY) controlPoint1:cp1 controlPoint2:cp2];
查看源代码
4.创建动画效果
我们需要沿着路径创建气泡动画效果,对于这个可以用CAKeyframeAnimation关键帧动画对象,因为它有一个
path属性可以进行动画。那好,我们开始在路径计算后添加如下代码:
CAKeyframeAnimation *pathAnimation = [CAKeyframeAnimation animationWithKeyPath:@"position"];
pathAnimation.duration = 2;
pathAnimation.path = zigzagPath.CGPath;
// remains visible in it's final state when animation is finished
// in conjunction with removedOnCompletion
pathAnimation.fillMode = kCAFillModeForwards;
pathAnimation.removedOnCompletion = NO;
[bubbleImageView.layer addAnimation:pathAnimation forKey:@"movingAnimation"];
查看源代码
好了,开始测试吧!效果图如下:
几个字来描述就是:
看起来还不错哦,如果你点击很快的点击鱼,可以清楚的看到贝塞尔运动轨迹,下一步就是在动画之后移除气泡视图。
5.弹出气泡
我们想在气泡弹出时候做一个效果,轻微的放大气泡然后才消失。需要CATransactions指定完成动画快,在路径动画之前,添加以下代码
[CATransaction begin];
[CATransaction setCompletionBlock:^{
// transform the image to be 1.3 sizes larger to
// give the impression that it is popping
[UIView transitionWithView:bubbleImageView
duration:0.1f
options:UIViewAnimationOptionTransitionCrossDissolve
animations:^{
bubbleImageView.transform = CGAffineTransformMakeScale(1.3, 1.3);
} completion:^(BOOL finished) {
[bubbleImageView removeFromSuperview];
}];
}];
查看源代码
在添加
[CATransaction commit]方法之后,并到
bubbleImageView图层,最后运行代码可以看到新的效果!
很棒!!!!
6.添加一些变量
现在让我们添加一些随机的数来让气泡显得更加自然,首先需要修正控制点,因此气泡将会随机的左右摇晃显示,现在开始来考虑这个棘手的问题,如何实现呢,虽然这不是一个十分聪明的做法,在0-1之间计算随机数。但这却是一个有效的方法:
// randomly switch up the control points so that the bubble
// swings right or left at random
NSInteger r = arc4random() % 2;
if (r == 1) {
CGPoint temp = cp1;
cp1 = cp2;
cp2 = temp;
}
查看源代码
最后决定将气泡出现的位置移动鱼的尾部,就像”放屁”一样,你也可以将鱼替换成自己的图片:
[bubbleImageView setFrame:CGRectMake(self.fishImageView.frame.origin.x + 5,
self.fishImageView.frame.origin.y + 80, 10, 10)];
查看源代码
好了,这个效果已经相当真实了!我们将要做些事件让行为随机,在
Stack Overflow上找到了个帮助函数:
- (float)randomFloatBetween:(float)smallNumber and:(float)bigNumber {
float diff = bigNumber - smallNumber;
return (((float) (arc4random() % ((unsigned)RAND_MAX + 1)) / RAND_MAX) * diff) + smallNumber;
}
查看源代码
添加:
// 1. Randomize the ending point height:
CGFloat eY = oY - [self randomFloatBetween:50 and:300];
// 2. Randomize the control point widths:
CGFloat t = [self randomFloatBetween:20 and:100];
// 3. Randomize the size of the bubbles:
CGFloat size = [self randomFloatBetween:5 and:30];
[bubbleImageView setFrame:CGRectMake(self.fishImageView.frame.origin.x + 5,
self.fishImageView.frame.origin.y + 80, size, size)];
// 4. Randomize the alpha of the bubbles:
bubbleImageView.alpha = [self randomFloatBetween:.1 and:1];
查看源代码
记住,你可以调整 “small number” and “big number” 两个数值,获取不同的效果:
7.添加鱼的动画效果
如果要将你的鱼像例子那样运动起来,需要添加以下代码:- (void)goFishGo {
[UIView animateWithDuration:5 animations:^{
self.fishImageView.frame = CGRectMake(self.view.frame.size.width + 200, self.view.center.y - 100, 200, 200);
} completion:^(BOOL finished) {
self.fishImageView.frame = CGRectMake(self.view.frame.origin.x - 200, self.view.center.y - 100, 200, 200);
[self goFishGo];
}];
}查看源代码
这将会使你的鱼从屏幕的左面移动到右面,然后重新开始运动。要更改的地方就是需要在你的
createBubbles方法中,代替
fishImageView图层,动态获取鱼尾运动中的位置坐标。
[bubbleImageView setFrame:CGRectMake([self.fishImageView.layer.presentationLayer frame].origin.x + 5,
[self.fishImageView.layer.presentationLayer frame].origin.y + 80, size, size)];
查看源代码
最后,我们需要移除手势,设置一个定时器,让鱼儿自己运动起来,像是飞或是游泳。
- (void)viewDidLoad {
[super viewDidLoad];

self.fishImageView = [[UIImageView alloc] initWithFrame:CGRectMake(self.view.center.x - 100, self.view.center.y - 100, 200, 200)];
self.fishImageView.image = [UIImage imageNamed:@"fish"];
[self.view addSubview:self.fishImageView];

[NSTimer scheduledTimerWithTimeInterval:.1
target:self
selector:@selector(createBubble)
userInfo:nil
repeats:YES];

[self goFishGo];
}
查看源代码
恭喜你,做到了,屁股在冒泡!
你可以下载项目代码在Github

相关文章推荐
- 峰回路转,Firefox 浏览器即将重返 iOS 平台
- 峰回路转,Firefox 浏览器即将重返 iOS 平台
- 不可修补的 iOS 漏洞可能导致 iPhone 4s 到 iPhone X 永久越狱
- iOS 12.4 系统遭黑客破解,漏洞危及数百万用户
- 每日安全资讯:NSO,一家专业入侵 iPhone 的神秘公司
- [转][源代码]Comex公布JailbreakMe 3.0源代码
- Gifski:一个跨平台的高质量 GIF 编码器
- 模仿动画的放大缩小容器
- jQuery 1.9.1源码分析系列(十五)动画处理之缓动动画核心Tween
- Android实现定制返回按钮动画效果的方法
- Android中ViewFlipper的使用及设置动画效果实例详解
- jQuery实现美观的多级动画效果菜单代码
- php判断GIF图片是否为动画的方法
- jQuery实现动画效果circle实例
- HTML5游戏引擎LTweenLite实现的超帅动画效果(附demo源码下载)
- 浅析JavaScript动画
- js排序动画模拟-插入排序
- javascript+HTML5的Canvas实现Lab单车动画效果
- 基于javascript实现漂亮的页面过渡动画效果附源码下载