Qt 学习之路 2(84):Repeater
2016-06-30 09:07
621 查看
前面的章节我 们介绍过模型视图。这是一种数据和显示相分离的技术,在 Qt 中有着非常重要的地位。在 QtQuick 中,数据和显示的分离同样也是利用这种“模型-视图”技术实现的。对于每一个视图,数据元素的可视化显示交给代理完成。与 Qt/C++ 类似,QtQuick 提供了一系列预定义的模型和视图。本章开始,我们着重介绍这部分内容。这部分内容主要来自http://qmlbook.org/ch06/index.html,在此表示感谢。
由于 QtQuick 中的模型视图的基本概念同前面的章节没有本质的区别,所以这里不再赘述这部分内容。
将数据从表现层分离的最基本方法是使用
import QtQuick 2.2
Column {
spacing: 2
Repeater {
model: 10
Rectangle {
width: 100
height: 20
radius: 3
color: "lightBlue"
Text {
anchors.centerIn: parent
text: index
}
}
}
}
现在我们设置了 10 个数据项,然后定义一个
虽然指定模型项的个数很简单,但实际用处不大。
import QtQuick 2.2
Column {
spacing: 2
Repeater {
model: ["Enterprise", "Colombia", "Challenger", "Discovery", "Endeavour", "Atlantis"]
Rectangle {
width: 100
height: 20
radius: 3
color: "lightBlue"
Text {
anchors.centerIn: parent
text: index +": "+modelData
}
}
}
}
代码运行结果如下:

由于能够使用 JavaScript 数组作为
import QtQuick 2.2
Column {
spacing: 2
Repeater {
model: ListModel {
ListElement { name: "Mercury"; surfaceColor: "gray" }
ListElement { name: "Venus"; surfaceColor: "yellow" }
ListElement { name: "Earth"; surfaceColor: "blue" }
ListElement { name: "Mars"; surfaceColor: "orange" }
ListElement { name: "Jupiter"; surfaceColor: "orange" }
ListElement { name: "Saturn"; surfaceColor: "yellow" }
ListElement { name: "Uranus"; surfaceColor: "lightBlue" }
ListElement { name: "Neptune"; surfaceColor: "lightBlue" }
}
Rectangle {
width: 100
height: 20
radius: 3
color: "lightBlue"
Text {
anchors.centerIn: parent
text: name
}
Rectangle {
anchors.left: parent.left
anchors.verticalCenter: parent.verticalCenter
anchors.leftMargin: 2
width: 16
height: 16
radius: 8
border.color: "black"
border.width: 1
color: surfaceColor
}
}
}
}
运行结果如下图所示:
像上面几段代码中,
import QtQuick 2.2
Column {
spacing: 2
Repeater {
model: 10
delegate: Rectangle {
width: 100
height: 20
radius: 3
color: "lightBlue"
Text {
anchors.centerIn: parent
text: index
}
}
}
}
实际上,这段代码与前面提到的是等价的。
由于 QtQuick 中的模型视图的基本概念同前面的章节没有本质的区别,所以这里不再赘述这部分内容。
将数据从表现层分离的最基本方法是使用
Repeater元素。
Repeater元素可以用于显示一个数组的数据,并且可以很方便地在用户界面进行定位。
Repeater的模型范围很广:从一个整型到网络数据,均可作为其数据模型。
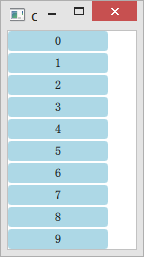
Repeater最简单的用法是将一个整数作为其
model属性的值。这个整型代表
Repeater所使用的模型中的数据个数。例如下面的代码中,
model: 10代表
Repeater的模型有 10 个数据项。
import QtQuick 2.2
Column {
spacing: 2
Repeater {
model: 10
Rectangle {
width: 100
height: 20
radius: 3
color: "lightBlue"
Text {
anchors.centerIn: parent
text: index
}
}
}
}
| 1 2 3 4 5 6 7 8 9 10 11 12 13 14 15 16 17 18 | import QtQuick 2.2 Column { spacing: 2 Repeater { model: 10 Rectangle { width: 100 height: 20 radius: 3 color: "lightBlue" Text { anchors.centerIn: parent text: index } } } } |
Rectangle进行显示。每一个
Rectangle的宽度和高度分别为 100px 和 20px,并且有圆角和浅蓝色背景。
Rectangle中有一个
Text元素为其子元素,
Text文本值为当前项的索引。代码运行结果如下:
虽然指定模型项的个数很简单,但实际用处不大。
Repeater还支持更复杂的方式,例如,把一个 JavaScript 数组作为模型。JavaScript 数组元素可以是任意类型:字符串、数字或对象。在下面的例子中,我们将一个字符串数组作为
Repeater的模型。我们当然可以使用
index获得当前索引,同时,我们也可以使用
modelData访问到数组中的每一个元素的值:
import QtQuick 2.2
Column {
spacing: 2
Repeater {
model: ["Enterprise", "Colombia", "Challenger", "Discovery", "Endeavour", "Atlantis"]
Rectangle {
width: 100
height: 20
radius: 3
color: "lightBlue"
Text {
anchors.centerIn: parent
text: index +": "+modelData
}
}
}
}
| 1 2 3 4 5 6 7 8 9 10 11 12 13 14 15 16 17 18 | import QtQuick 2.2 Column { spacing: 2 Repeater { model: ["Enterprise", "Colombia", "Challenger", "Discovery", "Endeavour", "Atlantis"] Rectangle { width: 100 height: 20 radius: 3 color: "lightBlue" Text { anchors.centerIn: parent text: index +": "+modelData } } } } |
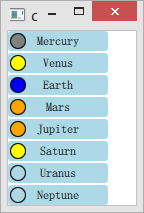
由于能够使用 JavaScript 数组作为
Repeater的模型,而 JavaScript 数组能够以对象作为其元素类型,因而
Repeater就可以处理复杂的数据项,比如带有属性的对象。这种情况其实更为常见。相比普通的 JavaScript 对象,更常用的是
ListElement类型。类似普通 JavaScript 对象,每一个
ListElement可以有任意属性。例如下面的代码示例中,每一个数据项都有一个名字和外观颜色。
import QtQuick 2.2
Column {
spacing: 2
Repeater {
model: ListModel {
ListElement { name: "Mercury"; surfaceColor: "gray" }
ListElement { name: "Venus"; surfaceColor: "yellow" }
ListElement { name: "Earth"; surfaceColor: "blue" }
ListElement { name: "Mars"; surfaceColor: "orange" }
ListElement { name: "Jupiter"; surfaceColor: "orange" }
ListElement { name: "Saturn"; surfaceColor: "yellow" }
ListElement { name: "Uranus"; surfaceColor: "lightBlue" }
ListElement { name: "Neptune"; surfaceColor: "lightBlue" }
}
Rectangle {
width: 100
height: 20
radius: 3
color: "lightBlue"
Text {
anchors.centerIn: parent
text: name
}
Rectangle {
anchors.left: parent.left
anchors.verticalCenter: parent.verticalCenter
anchors.leftMargin: 2
width: 16
height: 16
radius: 8
border.color: "black"
border.width: 1
color: surfaceColor
}
}
}
}
| 1 2 3 4 5 6 7 8 9 10 11 12 13 14 15 16 17 18 19 20 21 22 23 24 25 26 27 28 29 30 31 32 33 34 35 36 37 38 39 40 41 42 | import QtQuick 2.2 Column { spacing: 2 Repeater { model: ListModel { ListElement { name: "Mercury"; surfaceColor: "gray" } ListElement { name: "Venus"; surfaceColor: "yellow" } ListElement { name: "Earth"; surfaceColor: "blue" } ListElement { name: "Mars"; surfaceColor: "orange" } ListElement { name: "Jupiter"; surfaceColor: "orange" } ListElement { name: "Saturn"; surfaceColor: "yellow" } ListElement { name: "Uranus"; surfaceColor: "lightBlue" } ListElement { name: "Neptune"; surfaceColor: "lightBlue" } } Rectangle { width: 100 height: 20 radius: 3 color: "lightBlue" Text { anchors.centerIn: parent text: name } Rectangle { anchors.left: parent.left anchors.verticalCenter: parent.verticalCenter anchors.leftMargin: 2 width: 16 height: 16 radius: 8 border.color: "black" border.width: 1 color: surfaceColor } } } } |
ListElement的每个属性都被
Repeater绑定到实例化的显示项。正如上面代码中显示的那样,这意味着每一个用于显示数据的
Rectangle作用域内都可以访问到
ListElement的
name和
surfaceColor属性。
像上面几段代码中,
Repeater的每一个数据项都使用一个
Rectangle渲染。事实上,这是由于
Repeater具有一个
delegate的默认属性,由于
Rectangle没有显式赋值给任何一个属性,因此它直接成为默认属性
delegate的值,所以才会使用
Rectangle渲染。理解了这一点,我们就可以写出具有显式赋值的代码:
import QtQuick 2.2
Column {
spacing: 2
Repeater {
model: 10
delegate: Rectangle {
width: 100
height: 20
radius: 3
color: "lightBlue"
Text {
anchors.centerIn: parent
text: index
}
}
}
}
| 1 2 3 4 5 6 7 8 9 10 11 12 13 14 15 16 17 18 | import QtQuick 2.2 Column { spacing: 2 Repeater { model: 10 delegate: Rectangle { width: 100 height: 20 radius: 3 color: "lightBlue" Text { anchors.centerIn: parent text: index } } } } |

相关文章推荐
- 5.60的QT移植到arm板(2)
- vs2005编译QT4.5版本
- QT:国内获得授权的QT镜像地址.
- Qt连接Oracle数据库常见问题
- QtQml 应用程序的性能考虑与建议(来自小V的翻译)
- Qt布局管理-堆栈窗体QStackedWidget类
- Qt运行提示QGtkStyle was unable to detect the current GTK+ theme.解决方法
- Qt:QFile类实例源代码(读写文件)
- Qt---QTcpSocket连接http服务器
- Qt学习笔记
- Qt---安装
- Qt下重做右键菜单
- Qt之操作Excel
- RGB32
- 机器人操作系统ROS Indigo 入门学习(9)——理解ROS rqt_console和 roslaunch
- Qt 设置对话框背景(使用调色板,设置它的画刷,画刷可以是图片)
- Qt: qt中获取文件路径和文件名
- QSlider的qss美化
- 关于QProcess的进程中的运行先后测试
- Qt下 QString转char*