Python之路_Day7
2016-06-29 16:21
621 查看
Python之路_Day7_课堂笔记
[b]前期回顾[/b]
一、作业
1、ATM
2、计算器
本期内容
一、模块
1、configparser
2、XML
3、shutil
4、subprocess系统命令
二、面对对象(上)
1、面向对象基础
2、面向对象编程和函数式编程对比
3、面向对象中对象和类的关系
4、面向对象之构造方法
5、面向对象之应用场景实例
6、面向对象之对象中封装对象
7、面向对象之单继承
8、面向对象之多继承
一、模块
1、configparser
用于处理特定格式的文件,其本质上市利用open来操作文件
2、XML
XML是实现不同语言或程序之间进行数据交换的协议,XML文件格式如下:
解析XML
修改节点内容:
由于修改的节点时,均是在内存中进行,其不会影响文件中的内容。所以,如果想要修改,则需要重新将内存中的内容写到文件。
创建XML文档
由于原生保存的XML时默认无缩进,如果想要设置缩进的话, 需要修改保存方式:
3、shutil
高级的 文件、文件夹、压缩包 处理模块
shutil.copyfileobj(fsrc, fdst[, length])
将文件内容拷贝到另一个文件中
shutil.copyfile(src, dst)
拷贝文件
shutil.copymode(src, dst)
仅拷贝权限。内容、组、用户均不变
shutil.copystat(src, dst)
仅拷贝状态的信息,包括:mode bits, atime, mtime, flags
shutil.copy(src, dst)
拷贝文件和权限
shutil.copy2(src, dst)
拷贝文件和状态信息
shutil.ignore_patterns(*patterns)
shutil.copytree(src, dst, symlinks=False, ignore=None)
递归的去拷贝文件夹
shutil.rmtree(path[, ignore_errors[, onerror]])
递归的去删除文件
shutil.move(src, dst)
递归的去移动文件,它类似mv命令,其实就是重命名。
shutil.make_archive(base_name, format,...)
创建压缩包并返回文件路径,例如:zip、tar
base_name: 压缩包的文件名,也可以是压缩包的路径。只是文件名时,则保存至当前目录,否则保存至指定路径
如:www =>保存至当前路径
如:/Users/wupeiqi/www =>保存至/Users/wupeiqi/
format: 压缩包种类,“zip”, “tar”, “bztar”,“gztar”
root_dir: 要压缩的文件夹路径(默认当前目录)
owner: 用户,默认当前用户
group: 组,默认当前组
logger: 用于记录日志,通常是logging.Logger对象
shutil 对压缩包的处理是调用 ZipFile 和 TarFile 两个模块来进行的,详细:
zipfile
处理zip文件的模块
tarfiel
处理tar文件的模块
4、系统命令subprocess
可以执行shell命令的相关模块和函数有:
subprocess.Popen(...)
用于执行复杂的系统命令
参数:
args:shell命令,可以是字符串或者序列类型(如:list,元组)
bufsize:指定缓冲。0 无缓冲,1 行缓冲,其他 缓冲区大小,负值 系统缓冲
stdin, stdout, stderr:分别表示程序的标准输入、输出、错误句柄
preexec_fn:只在Unix平台下有效,用于指定一个可执行对象(callable object),它将在子进程运行之前被调用
close_sfs:在windows平台下,如果close_fds被设置为True,则新创建的子进程将不会继承父进程的输入、输出、错误管道。所以不能将close_fds设置为True同时重定向子进程的标准输入、输出与错误(stdin, stdout, stderr)。
shell:同上
cwd:用于设置子进程的当前目录
env:用于指定子进程的环境变量。如果env = None,子进程的环境变量将从父进程中继承。
universal_newlines:不同系统的换行符不同,True -> 同意使用 \n
startupinfo与createionflags只在windows下有效
将被传递给底层的CreateProcess()函数,用于设置子进程的一些属性,如:主窗口的外观,进程的优先级等等
终端输入的命令分为两种:
输入即可得到输出,如:ifconfig
输入进行某环境,依赖再输入,如:python
二、面向对象(上)

什么时候用面向对象?当某一些函数具有相同参数是,可以使用面向对象的方式,将参数值一次性的封装到对象,以后去对象中取值即可。
self到底是个什么鬼?
self是一个python自动会传值的参数
那个对象执行方法,self就是谁
面向对象三大特性:封装,继承,多态
封装
继承
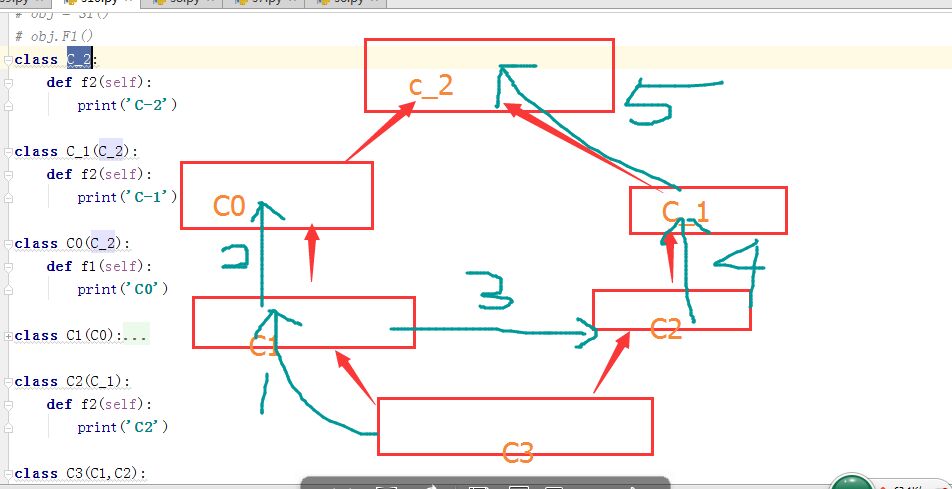
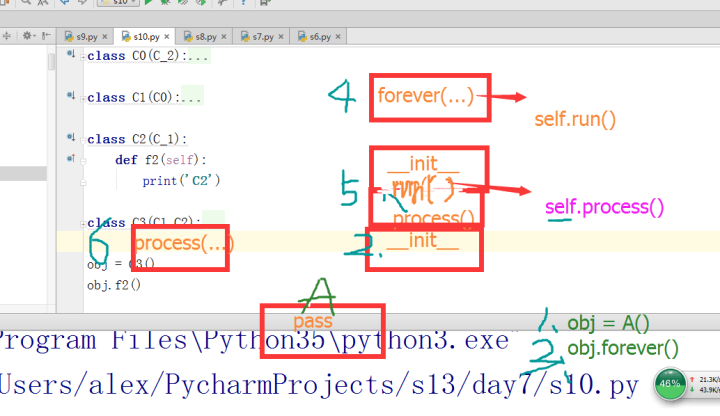
多继承(混乱的继承关系)
作业
选课系统
思路:
管理员:
1、创建老师(爱好,姓名,年龄,资产=0)
class Teacher:
def __init__(self,favor,name,age)
self.favor = favor
self.name = name
self.age = age
self.asset = 0
obj1 = Teacher(...)
obj2 = Teacher(...)
[obj1,obj2,...]
pickle.dump(文件)
2、创建课程()
课程类:
-课程名
-课时费
-负责老师 = obj1
功能:
-上课
--返回课程内容
--负责老师挣钱
学生:
类:
学生》选课
__init__
选课=[课程对象]
上课:
选课
1、生物课
课程对象上课()
鸡汤
电影推荐
PS:之前不小心把第七天笔记删除了,现在补上!

[b]前期回顾[/b]
一、作业
1、ATM
2、计算器
本期内容
一、模块
1、configparser
2、XML
3、shutil
4、subprocess系统命令
二、面对对象(上)
1、面向对象基础
2、面向对象编程和函数式编程对比
3、面向对象中对象和类的关系
4、面向对象之构造方法
5、面向对象之应用场景实例
6、面向对象之对象中封装对象
7、面向对象之单继承
8、面向对象之多继承
一、模块
1、configparser
用于处理特定格式的文件,其本质上市利用open来操作文件
conf文件
[section1]
k1 = 123
k2 = v2
[section2]
k1 = v1
#!/usr/bin/env python
# -.- coding: utf-8 -.-
# By sandler
import configparser
config = configparser.ConfigParser()
config.read("conf",encoding='utf-8')
# 获取所有节点
ret = config.sections()
print(ret)
# 获取指定节点下所有的键值对
ret = config.items('section1')
print(ret)
# 获取指定节点下所有的建
ret = config.options('section1')
print(ret)
# 获取指定节点下指定key的值
v = config.get('section1', 'k1')
# v = config.getint('section1', 'k1')
# v = config.getfloat('section1', 'k1')
# v = config.getboolean('section1', 'k1')
print(v)
# 检查、删除、添加节点
# 检查
has_sec = config.has_section('section1')
print(has_sec)
# 添加节点
config.add_section("SEC_1")
config.write(open('xxxooo', 'w'))
# 删除节点
config.remove_section("SEC_1")
config.write(open('xxxooo', 'w'))
# 检查、删除、设置指定组内的键值对
# 检查
has_opt = config.has_option('section1', 'k1')
print(has_opt)
# 删除
config.remove_option('section1', 'k1')
config.write(open('xxxooo', 'w'))
# 设置
config.set('section1', 'k10', "123")
config.write(open('conf', 'w'))
2、XML
XML是实现不同语言或程序之间进行数据交换的协议,XML文件格式如下:
class Element:
"""An XML element.
This class is the reference implementation of the Element interface.
An element's length is its number of subelements.  That means if you
want to check if an element is truly empty, you should check BOTH
its length AND its text attribute.
The element tag, attribute names, and attribute values can be either
bytes or strings.
*tag* is the element name.  *attrib* is an optional dictionary containing
element attributes. *extra* are additional element attributes given as
keyword arguments.
Example form:
<tag attrib>text<child/>...</tag>tail
"""
当前节点的标签名
tag = None
"""The element's name."""
当前节点的属性
attrib = None
"""Dictionary of the element's attributes."""
当前节点的内容
text = None
"""
Text before first subelement. This is either a string or the value None.
Note that if there is no text, this attribute may be either
None or the empty string, depending on the parser.
"""
tail = None
"""
Text after this element's end tag, but before the next sibling element's
start tag.  This is either a string or the value None.  Note that if there
was no text, this attribute may be either None or an empty string,
depending on the parser.
"""
def __init__(self, tag, attrib={}, **extra):
if not isinstance(attrib, dict):
raise TypeError("attrib must be dict, not %s" % (
attrib.__class__.__name__,))
attrib = attrib.copy()
attrib.update(extra)
self.tag = tag
self.attrib = attrib
self._children = []
def __repr__(self):
return "<%s %r at %#x>" % (self.__class__.__name__, self.tag, id(self))
def makeelement(self, tag, attrib):
创建一个新节点
"""Create a new element with the same type.
*tag* is a string containing the element name.
*attrib* is a dictionary containing the element attributes.
Do not call this method, use the SubElement factory function instead.
"""
return self.__class__(tag, attrib)
def copy(self):
"""Return copy of current element.
This creates a shallow copy. Subelements will be shared with the
original tree.
"""
elem = self.makeelement(self.tag, self.attrib)
elem.text = self.text
elem.tail = self.tail
elem[:] = self
return elem
def __len__(self):
return len(self._children)
def __bool__(self):
warnings.warn(
"The behavior of this method will change in future versions.  "
"Use specific 'len(elem)' or 'elem is not None' test instead.",
FutureWarning, stacklevel=2
)
return len(self._children) != 0 # emulate old behaviour, for now
def __getitem__(self, index):
return self._children[index]
def __setitem__(self, index, element):
# if isinstance(index, slice):
#     for elt in element:
#         assert iselement(elt)
# else:
#     assert iselement(element)
self._children[index] = element
def __delitem__(self, index):
del self._children[index]
def append(self, subelement):
为当前节点追加一个子节点
"""Add *subelement* to the end of this element.
The new element will appear in document order after the last existing
subelement (or directly after the text, if it's the first subelement),
but before the end tag for this element.
"""
self._assert_is_element(subelement)
self._children.append(subelement)
def extend(self, elements):
为当前节点扩展 n 个子节点
"""Append subelements from a sequence.
*elements* is a sequence with zero or more elements.
"""
for element in elements:
self._assert_is_element(element)
self._children.extend(elements)
def insert(self, index, subelement):
在当前节点的子节点中插入某个节点,即:为当前节点创建子节点,然后插入指定位置
"""Insert *subelement* at position *index*."""
self._assert_is_element(subelement)
self._children.insert(index, subelement)
def _assert_is_element(self, e):
# Need to refer to the actual Python implementation, not the
# shadowing C implementation.
if not isinstance(e, _Element_Py):
raise TypeError('expected an Element, not %s' % type(e).__name__)
def remove(self, subelement):
在当前节点在子节点中删除某个节点
"""Remove matching subelement.
Unlike the find methods, this method compares elements based on
identity, NOT ON tag value or contents.  To remove subelements by
other means, the easiest way is to use a list comprehension to
select what elements to keep, and then use slice assignment to update
the parent element.
ValueError is raised if a matching element could not be found.
"""
# assert iselement(element)
self._children.remove(subelement)
def getchildren(self):
获取所有的子节点(废弃)
"""(Deprecated) Return all subelements.
Elements are returned in document order.
"""
warnings.warn(
"This method will be removed in future versions.  "
"Use 'list(elem)' or iteration over elem instead.",
DeprecationWarning, stacklevel=2
)
return self._children
def find(self, path, namespaces=None):
获取第一个寻找到的子节点
"""Find first matching element by tag name or path.
*path* is a string having either an element tag or an XPath,
*namespaces* is an optional mapping from namespace prefix to full name.
Return the first matching element, or None if no element was found.
"""
return ElementPath.find(self, path, namespaces)
def findtext(self, path, default=None, namespaces=None):
获取第一个寻找到的子节点的内容
"""Find text for first matching element by tag name or path.
*path* is a string having either an element tag or an XPath,
*default* is the value to return if the element was not found,
*namespaces* is an optional mapping from namespace prefix to full name.
Return text content of first matching element, or default value if
none was found.  Note that if an element is found having no text
content, the empty string is returned.
"""
return ElementPath.findtext(self, path, default, namespaces)
def findall(self, path, namespaces=None):
获取所有的子节点
"""Find all matching subelements by tag name or path.
*path* is a string having either an element tag or an XPath,
*namespaces* is an optional mapping from namespace prefix to full name.
Returns list containing all matching elements in document order.
"""
return ElementPath.findall(self, path, namespaces)
def iterfind(self, path, namespaces=None):
获取所有指定的节点,并创建一个迭代器(可以被for循环)
"""Find all matching subelements by tag name or path.
*path* is a string having either an element tag or an XPath,
*namespaces* is an optional mapping from namespace prefix to full name.
Return an iterable yielding all matching elements in document order.
"""
return ElementPath.iterfind(self, path, namespaces)
def clear(self):
清空节点
"""Reset element.
This function removes all subelements, clears all attributes, and sets
the text and tail attributes to None.
"""
self.attrib.clear()
self._children = []
self.text = self.tail = None
def get(self, key, default=None):
获取当前节点的属性值
"""Get element attribute.
Equivalent to attrib.get, but some implementations may handle this a
bit more efficiently.  *key* is what attribute to look for, and
*default* is what to return if the attribute was not found.
Returns a string containing the attribute value, or the default if
attribute was not found.
"""
return self.attrib.get(key, default)
def set(self, key, value):
为当前节点设置属性值
"""Set element attribute.
Equivalent to attrib[key] = value, but some implementations may handle
this a bit more efficiently.  *key* is what attribute to set, and
*value* is the attribute value to set it to.
"""
self.attrib[key] = value
def keys(self):
获取当前节点的所有属性的 key
"""Get list of attribute names.
Names are returned in an arbitrary order, just like an ordinary
Python dict.  Equivalent to attrib.keys()
"""
return self.attrib.keys()
def items(self):
获取当前节点的所有属性值,每个属性都是一个键值对
"""Get element attributes as a sequence.
The attributes are returned in arbitrary order.  Equivalent to
attrib.items().
Return a list of (name, value) tuples.
"""
return self.attrib.items()
def iter(self, tag=None):
在当前节点的子孙中根据节点名称寻找所有指定的节点,并返回一个迭代器(可以被for循环)。
"""Create tree iterator.
The iterator loops over the element and all subelements in document
order, returning all elements with a matching tag.
If the tree structure is modified during iteration, new or removed
elements may or may not be included.  To get a stable set, use the
list() function on the iterator, and loop over the resulting list.
*tag* is what tags to look for (default is to return all elements)
Return an iterator containing all the matching elements.
"""
if tag == "*":
tag = None
if tag is None or self.tag == tag:
yield self
for e in self._children:
yield from e.iter(tag)
# compatibility
def getiterator(self, tag=None):
# Change for a DeprecationWarning in 1.4
warnings.warn(
"This method will be removed in future versions.  "
"Use 'elem.iter()' or 'list(elem.iter())' instead.",
PendingDeprecationWarning, stacklevel=2
)
return list(self.iter(tag))
def itertext(self):
在当前节点的子孙中根据节点名称寻找所有指定的节点的内容,并返回一个迭代器(可以被for循环)。
"""Create text iterator.
The iterator loops over the element and all subelements in document
order, returning all inner text.
"""
tag = self.tag
if not isinstance(tag, str) and tag is not None:
return
if self.text:
yield self.text
for e in self:
yield from e.itertext()
if e.tail:
yield e.tail
解析XML
<data>
<country name="Liechtenstein">
<rank updated="yes">2</rank>
<year>2023</year>
<gdppc>141100</gdppc>
<neighbor direction="E" name="Austria" />
<neighbor direction="W" name="Switzerland" />
</country>
<country name="Singapore">
<rank updated="yes">5</rank>
<year>2026</year>
<gdppc>59900</gdppc>
<neighbor direction="N" name="Malaysia" />
</country>
<country name="Panama">
<rank updated="yes">69</rank>
<year>2026</year>
<gdppc>13600</gdppc>
<neighbor direction="W" name="Costa Rica" />
<neighbor direction="E" name="Colombia" />
</country>
</data>
#!/usr/bin/env python
# -.- coding: utf-8 -.-
# By sandler
from xml.etree import ElementTree as ET
tree = ET.parse('xo.xml')
root = tree.getroot()
for child in root:
print(child.tag,child.attrib)
for gradechild in child:
print(gradechild.tag, gradechild.text)
修改节点内容:
由于修改的节点时,均是在内存中进行,其不会影响文件中的内容。所以,如果想要修改,则需要重新将内存中的内容写到文件。
#!/usr/bin/env python
# -.- coding: utf-8 -.-
# By sandler
from xml.etree import ElementTree as ET
############ 解析方式一 ############
# 打开文件,读取XML内容
str_xml = open('xo.xml', 'r').read()
# 将字符串解析成xml特殊对象,root代指xml文件的根节点
root = ET.XML(str_xml)
############ 操作 ############
# 顶层标签
print(root.tag)
# 循环所有的year节点
for node in root.iter('year'):
# 将year节点中的内容自增一
new_year = int(node.text) + 1
node.text = str(new_year)
# 设置属性
node.set('name', 'alex')
node.set('age', '18')
# 删除属性
del node.attrib['name']
############ 保存文件 ############
tree = ET.ElementTree(root)
tree.write("new_xml.xml", encoding='utf-8')
#!/usr/bin/env python
# -.- coding: utf-8 -.-
# By sandler
from xml.etree import ElementTree as ET
############ 解析方式二 ############
# 直接解析xml文件
tree = ET.parse("xo.xml")
# 获取xml文件的根节点
root = tree.getroot()
############ 操作 ############
# 顶层标签
print(root.tag)
# 循环所有的year节点
for node in root.iter('year'):
# 将year节点中的内容自增一
new_year = int(node.text) + 1
node.text = str(new_year)
# 设置属性
node.set('name', 'alex')
node.set('age', '18')
# 删除属性
del node.attrib['name']
############ 保存文件 ############
tree.write("new_xml.xml", encoding='utf-8')创建XML文档
#!/usr/bin/env python
# -.- coding: utf-8 -.-
# By sandler
from xml.etree import ElementTree as ET
# 创建根节点
root = ET.Element("famliy")
# 创建节点大儿子
son1 = ET.Element('son', {'name': '儿1'})
# 创建小儿子
son2 = ET.Element('son', {"name": '儿2'})
# 在大儿子中创建两个孙子
grandson1 = ET.Element('grandson', {'name': '儿11'})
grandson2 = ET.Element('grandson', {'name': '儿12'})
son1.append(grandson1)
son1.append(grandson2)
# 把儿子添加到根节点中
root.append(son1)
root.append(son1)
tree = ET.ElementTree(root)
tree.write('oooo.xml',encoding='utf-8', short_empty_elements=False)
由于原生保存的XML时默认无缩进,如果想要设置缩进的话, 需要修改保存方式:
#!/usr/bin/env python
# -.- coding: utf-8 -.-
# By sandler
from xml.etree import ElementTree as ET
from xml.dom import minidom
def prettify(elem):
"""将节点转换成字符串,并添加缩进。
"""
rough_string = ET.tostring(elem, 'utf-8')
reparsed = minidom.parseString(rough_string)
return reparsed.toprettyxml(indent="\t")
# 创建根节点
root = ET.Element("famliy")
# 创建大儿子
# son1 = ET.Element('son', {'name': '儿1'})
son1 = root.makeelement('son', {'name': '儿1'})
# 创建小儿子
# son2 = ET.Element('son', {"name": '儿2'})
son2 = root.makeelement('son', {"name": '儿2'})
# 在大儿子中创建两个孙子
# grandson1 = ET.Element('grandson', {'name': '儿11'})
grandson1 = son1.makeelement('grandson', {'name': '儿11'})
# grandson2 = ET.Element('grandson', {'name': '儿12'})
grandson2 = son1.makeelement('grandson', {'name': '儿12'})
son1.append(grandson1)
son1.append(grandson2)
# 把儿子添加到根节点中
root.append(son1)
root.append(son1)
raw_str = prettify(root)
f = open("xxxoo.xml",'w',encoding='utf-8')
f.write(raw_str)
f.close()
3、shutil
高级的 文件、文件夹、压缩包 处理模块
shutil.copyfileobj(fsrc, fdst[, length])
将文件内容拷贝到另一个文件中
import shutil
shutil.copyfileobj(open('old.xml','r'), open('new.xml', 'w'))
shutil.copyfile(src, dst)
拷贝文件
shutil.copyfile('f1.log', 'f2.log')shutil.copymode(src, dst)
仅拷贝权限。内容、组、用户均不变
shutil.copymode('f1.log', 'f2.log')shutil.copystat(src, dst)
仅拷贝状态的信息,包括:mode bits, atime, mtime, flags
shutil.copystat('f1.log', 'f2.log')shutil.copy(src, dst)
拷贝文件和权限
import shutil
shutil.copy('f1.log', 'f2.log')
shutil.copy2(src, dst)
拷贝文件和状态信息
import shutil
shutil.copy2('f1.log', 'f2.log')
shutil.ignore_patterns(*patterns)
shutil.copytree(src, dst, symlinks=False, ignore=None)
递归的去拷贝文件夹
import shutil

shutil.copytree('folder1', 'folder2', ignore=shutil.ignore_patterns('*.pyc', 'tmp*'))
shutil.rmtree(path[, ignore_errors[, onerror]])
递归的去删除文件
import shutil
shutil.rmtree('folder1')
shutil.move(src, dst)
递归的去移动文件,它类似mv命令,其实就是重命名。
import shutil
shutil.move('folder1', 'folder3')
shutil.make_archive(base_name, format,...)
创建压缩包并返回文件路径,例如:zip、tar
base_name: 压缩包的文件名,也可以是压缩包的路径。只是文件名时,则保存至当前目录,否则保存至指定路径
如:www =>保存至当前路径
如:/Users/wupeiqi/www =>保存至/Users/wupeiqi/
format: 压缩包种类,“zip”, “tar”, “bztar”,“gztar”
root_dir: 要压缩的文件夹路径(默认当前目录)
owner: 用户,默认当前用户
group: 组,默认当前组
logger: 用于记录日志,通常是logging.Logger对象
#将 /Users/wupeiqi/Downloads/test 下的文件打包放置当前程序目录
import shutil
ret = shutil.make_archive("wwwwwwwwww", 'gztar', root_dir='/Users/wupeiqi/Downloads/test')

#将 /Users/wupeiqi/Downloads/test 下的文件打包放置 /Users/wupeiqi/目录
import shutil
ret = shutil.make_archive("/Users/wupeiqi/wwwwwwwwww", 'gztar', root_dir='/Users/wupeiqi/Downloads/test')
shutil 对压缩包的处理是调用 ZipFile 和 TarFile 两个模块来进行的,详细:
zipfile
处理zip文件的模块
#!/usr/bin/env python
# -.- coding: utf-8 -.-
# By sandler
import zipfile
# 压缩文件
z = zipfile.ZipFile('test_zip.zip', 'w')
z.write('conf')
z.write('config.py')
z.close()
# 解压文件
z = zipfile.ZipFile('test_zip.zip', 'r')
# z.extractall()    # 解压全部文件
for item in z.namelist():
print(item)
z.extract('conf')   # 解压单个文件
z.close()
tarfiel
处理tar文件的模块
#!/usr/bin/env python
# -.- coding: utf-8 -.-
# By sandler
import tarfile
# 压缩
tar = tarfile.open('test_tar.tar','w')
tar.add("E:\\Python\\oldboy_py\\Day7\\xml_1.py", arcname='xml_test1.py')
tar.add("E:\\Python\\oldboy_py\\Day7\\xml_2.py", arcname='xml_test2.py')
tar.close()
# 解压
tar = tarfile.open('test_tar.tar','r')
tar.extractall()  # 可设置解压地址,全部解压
for item in tar.getmembers():
print(item)
obj = tar.getmember('xml_test1.py')
tar.extract(obj)
tar.close()
4、系统命令subprocess
可以执行shell命令的相关模块和函数有:
#!/usr/bin/env python
# -.- coding: utf-8 -.-
# By sandler
import subprocess
# call
# 执行命令,返回状态码
ret = subprocess.call(["ls", "-l"], shell=False)
ret = subprocess.call("ls -l", shell=True)
# check_call
# 执行命令,如果执行状态码是 0 ,则返回0,否则抛异常
subprocess.check_call(["ls", "-l"])
subprocess.check_call("exit 1", shell=True)
# check_output
# 执行命令,如果状态码是 0 ,则返回执行结果,否则抛异常
subprocess.check_output(["echo", "Hello World!"])
subprocess.check_output("exit 1", shell=True)
subprocess.Popen(...)
用于执行复杂的系统命令
参数:
args:shell命令,可以是字符串或者序列类型(如:list,元组)
bufsize:指定缓冲。0 无缓冲,1 行缓冲,其他 缓冲区大小,负值 系统缓冲
stdin, stdout, stderr:分别表示程序的标准输入、输出、错误句柄
preexec_fn:只在Unix平台下有效,用于指定一个可执行对象(callable object),它将在子进程运行之前被调用
close_sfs:在windows平台下,如果close_fds被设置为True,则新创建的子进程将不会继承父进程的输入、输出、错误管道。所以不能将close_fds设置为True同时重定向子进程的标准输入、输出与错误(stdin, stdout, stderr)。
shell:同上
cwd:用于设置子进程的当前目录
env:用于指定子进程的环境变量。如果env = None,子进程的环境变量将从父进程中继承。
universal_newlines:不同系统的换行符不同,True -> 同意使用 \n
startupinfo与createionflags只在windows下有效
将被传递给底层的CreateProcess()函数,用于设置子进程的一些属性,如:主窗口的外观,进程的优先级等等
#!/usr/bin/env python
# -.- coding: utf-8 -.-
# By sandler
import subprocess
# 创建文件夹
ret1 = subprocess.Popen(["mkdir","t1"])
ret2 = subprocess.Popen("mkdir t2", shell=True)
obj = subprocess.Popen("mkdir t3", shell=True, cwd='/home/dev',)
终端输入的命令分为两种:
输入即可得到输出,如:ifconfig
输入进行某环境,依赖再输入,如:python
#!/usr/bin/env python
# -.- coding: utf-8 -.-
# By sandler
import subprocess
obj = subprocess.Popen(["python"], stdin=subprocess.PIPE, stdout=subprocess.PIPE, stderr=subprocess.PIPE, universal_newlines=True)
obj.stdin.write("print(1)\n")
obj.stdin.write("print(2)")
obj.stdin.close()
cmd_out = obj.stdout.read()
obj.stdout.close()
cmd_error = obj.stderr.read()
obj.stderr.close()
print(cmd_out)
print(cmd_error)
# 第二种方法
obj = subprocess.Popen(["python"], stdin=subprocess.PIPE, stdout=subprocess.PIPE, stderr=subprocess.PIPE, universal_newlines=True)
obj.stdin.write("print(1)\n")
obj.stdin.write("print(2)")
out_error_list = obj.communicate()
print(out_error_list)
# 第三种方法
obj = subprocess.Popen(["python"], stdin=subprocess.PIPE, stdout=subprocess.PIPE, stderr=subprocess.PIPE, universal_newlines=True)
out_error_list = obj.communicate('print("hello")')
print(out_error_list)
二、面向对象(上)
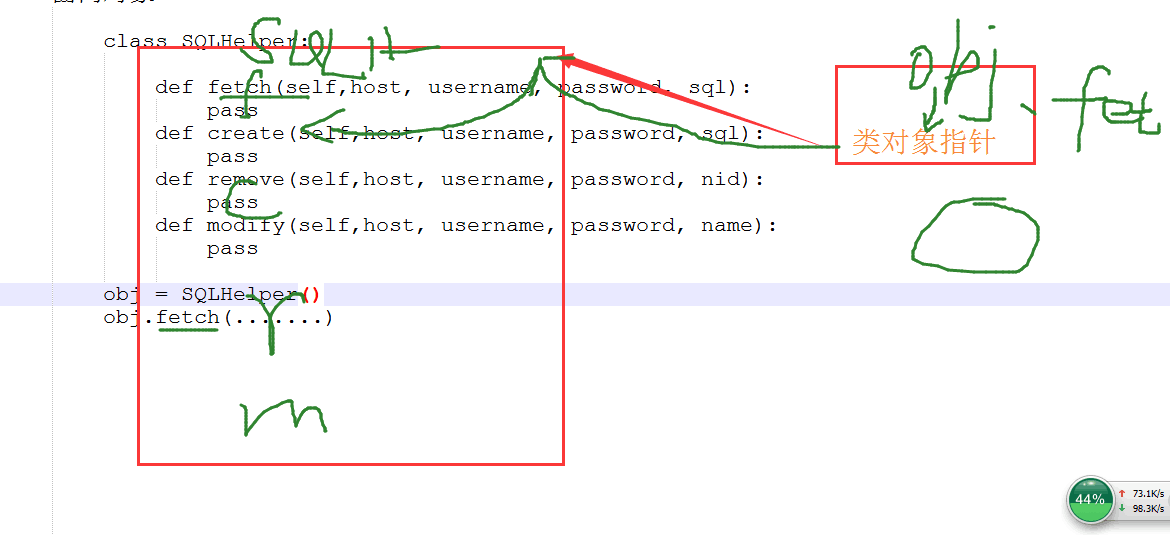
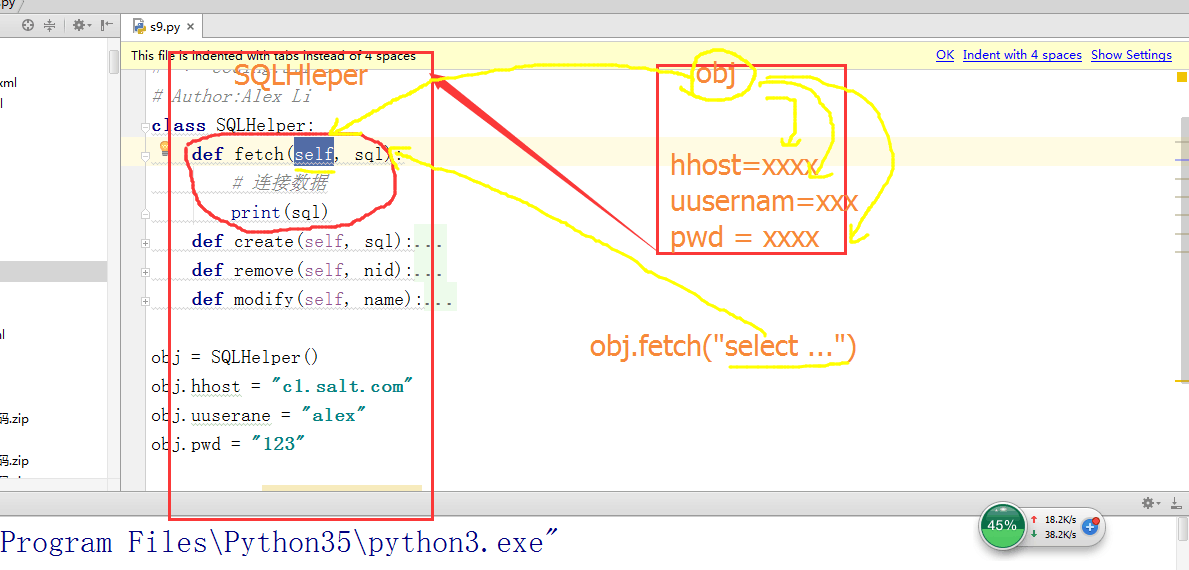
什么时候用面向对象?当某一些函数具有相同参数是,可以使用面向对象的方式,将参数值一次性的封装到对象,以后去对象中取值即可。
#!/usr/bin/env python
# -.- coding: utf-8 -.-
# By sandler
# 面向对象
class SQLHelper:
def fetch(self,sql):
print(self.hhost)
print(self.uuser)
print(self.ppwd)
print(sql)
def create(self,sql):
print(sql)
def remove(self,id):
print(id)
def modify(self,name):
print(name)
obj = SQLHelper()
obj.hhost = "www.test.com" # 封装参数
obj.uuser = "sandler"
obj.ppwd = "1234"
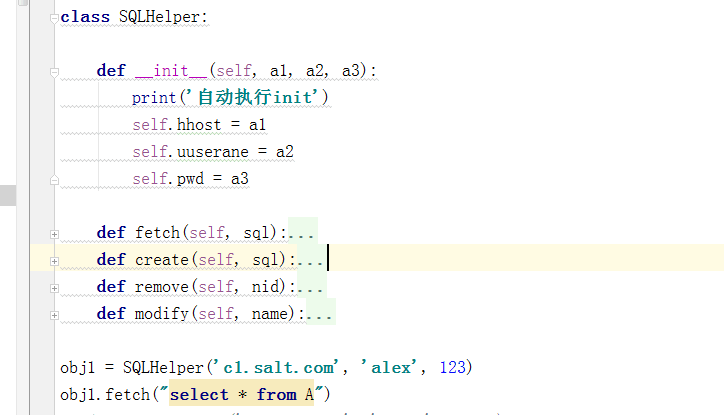
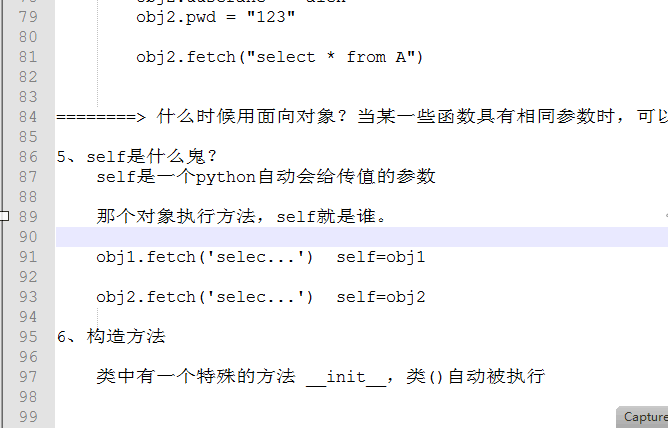
obj.fetch('select * from a;')self到底是个什么鬼?
self是一个python自动会传值的参数
那个对象执行方法,self就是谁
#!/usr/bin/env python
# -.- coding: utf-8 -.-
# By sandler
# 面向对象
class SQLHelper:
def __init__(self,host,user,pwd):
self.hhost = host  # 封装参数
self.uuser = user
self.ppwd = pwd
def fetch(self,sql):
print(self.hhost)
print(self.uuser)
print(self.ppwd)
print(sql)
def create(self,sql):
print(sql)
def remove(self,id):
print(id)
def modify(self,name):
print(name)
obj1 = SQLHelper("www.test.com","sandler",1234)
obj2 = SQLHelper("www.test2.com","sandler",2345)
obj1.fetch('select * from a;')
面向对象三大特性:封装,继承,多态
#!/usr/bin/env python
# -.- coding: utf-8 -.-
# By sandler
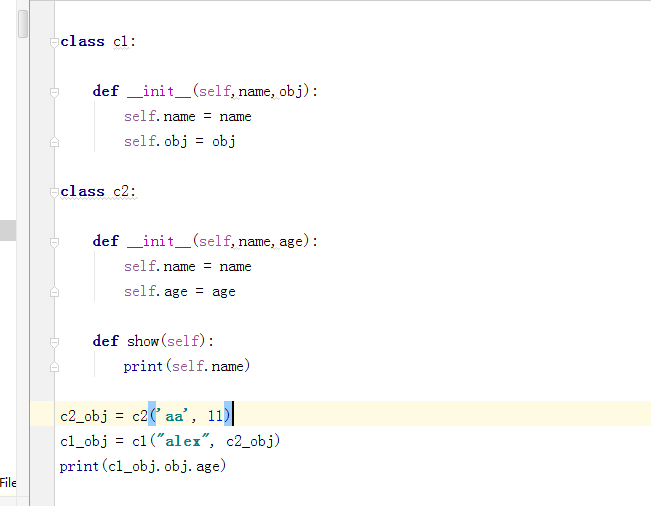
class c1:
def __init__(self,name,obj):
self.name = name
self.obj = obj
class c2:
def __init__(self,name,age):
self.name = name
self.age = age
def show(self):
print(self.name)
c2_obj = c2('aa' , 11)
c1_obj = c1('alex',c2_obj)
print(c1_obj.obj.age)
print(c1_obj.obj.name)
print(c1_obj.name)封装
#!/usr/bin/env python
# -.- coding: utf-8 -.-
# By sandler
# 面向对象
class c1:
def __init__(self,name,obj):
self.name = name
self.obj = obj
class c2:
def __init__(self,name,age):
self.name = name
self.age = age
def show(self):
print(self.name)
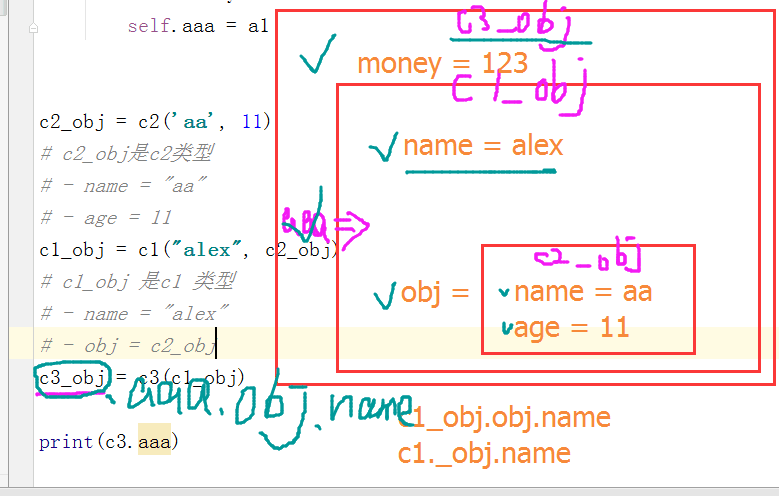
class c3:
def __init__(self,a1):
self.money = 123
self.aaa = a1
c2_obj = c2('aa' , 11)
# c2_obj是c2类型
# - name = 'aa'
# - age = 11
c1_obj = c1('alex',c2_obj)
# c1_obj是c1类型
# - name = 'alex'
# - obj = c2_obj
c3_obj = c3(c1_obj)
# c3_obj是c3类型
# - money = 123
# - aaa = c1_obj
# 通过c3_obj输出c2内的name
print(c3_obj.aaa.obj.name)
# 通过c3_obj输出c2内的show方法
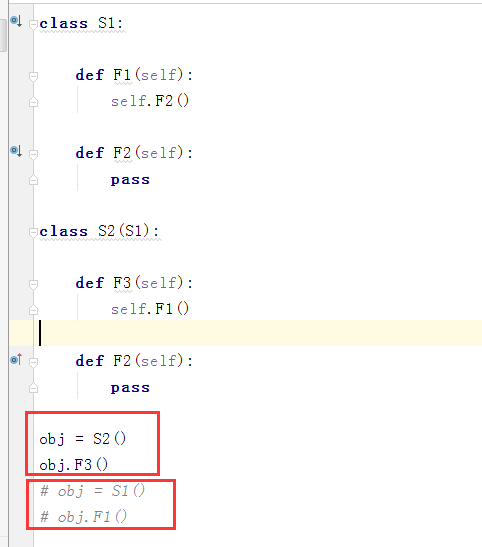
print(c3_obj.aaa.obj.show())继承
#!/usr/bin/env python
# -.- coding: utf-8 -.-
# By sandler
# 类的继承
class F1:
def show(self):
print('show')
def foo(self):
print(self.name)
class F2(F1):
def __init__(self,name):
self.name = name
def bar(self):
print('bar')
obj = F2('yuli')
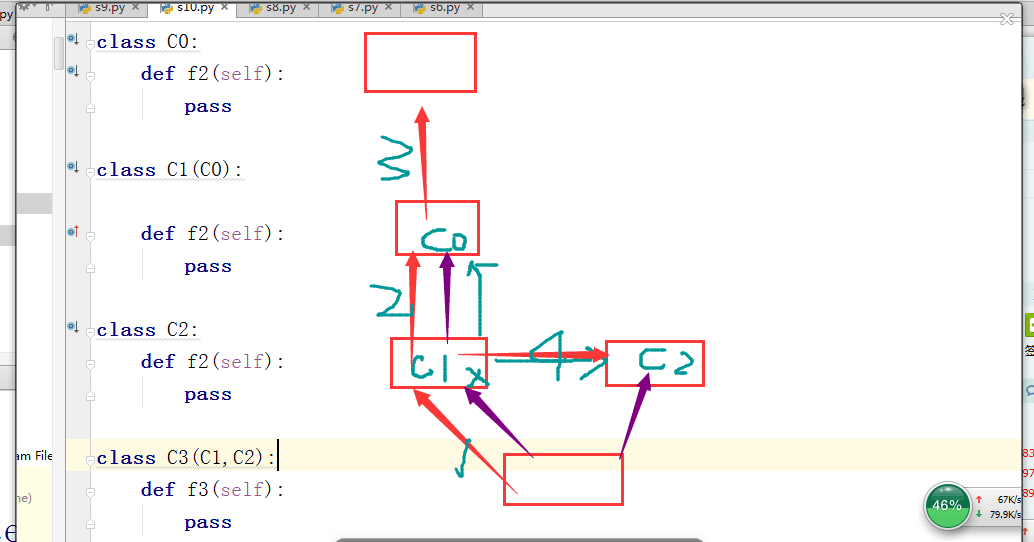
obj.foo()多继承(混乱的继承关系)
作业
选课系统
思路:
管理员:
1、创建老师(爱好,姓名,年龄,资产=0)
class Teacher:
def __init__(self,favor,name,age)
self.favor = favor
self.name = name
self.age = age
self.asset = 0
obj1 = Teacher(...)
obj2 = Teacher(...)
[obj1,obj2,...]
pickle.dump(文件)
2、创建课程()
课程类:
-课程名
-课时费
-负责老师 = obj1
功能:
-上课
--返回课程内容
--负责老师挣钱
学生:
类:
学生》选课
__init__
选课=[课程对象]
上课:
选课
1、生物课
课程对象上课()
鸡汤
电影推荐
PS:之前不小心把第七天笔记删除了,现在补上!

相关文章推荐
- python 计算N天之后的日期
- Python快速排序
- Python 核心编程笔记_Chapter_4_Note_2 内建函数(built-in functions)
- python使用sqlalchemy连接pymysql数据库
- Python之基础篇(二)
- python 中date datetime time 与str的互转
- Python模块——struct
- python 多线程
- __init__(self),self,super,继承杂谈
- Python 核心编程笔记_Chapter_4_Note_1 对象属性
- python multiprocessing 多进程
- Python正则表达式中的 compile,search,group,groups 函数的简单说明
- python django下载大的csv文件
- python画图包seaborn和matplotlib中文字体显示(针对windows系统,,使用ipython notebook)
- Python之路_Day8
- python笔记 - day3
- 支持向量机 smo算法
- Python学习-集合
- PyCharm设置python新建文件 模板修改 设置 文件为python 和utf-8 解决控制台输出乱码
- python笔记