gtest 编译、安装和使用
2016-06-29 15:32
375 查看
本例以 gtest-1.7.0 为例进行讲解。
一、要求:
1. 安装 cmake
二、编译
1. 下载 gtest 源码包,并解压,如:/home/hdc/gtest-1.7.0;
2. 编译 gtest 动态库,进入 gtest-1.7.0 目录,编辑 CMakeLists.txt,修改如下几行:
10 option(BUILD_SHARED_LIBS "Build shared libraries (DLLs)." OFF)
19 option(gtest_build_tests "Build all of gtest's own tests." OFF)
21 option(gtest_build_samples "Build gtest's sample programs." OFF)
将 OFF 修改为 ON,保存并退出。
3. 创建 build 目录,并进入该目录;
4. cmake ..
5. make
6. ls *.so
libgtest_dll.so libgtest_main_no_rtti.so libgtest_main_use_own_tuple.so libgtest.so
libgtest_main_no_exception.so libgtest_main.so libgtest_no_exception.so
7. sudo cp *.so /usr/lib/gtest
8. cd ../include
9. sudo cp -pr gtest /usr/include
10. sudo chown root:root /usr/include/gtest -R
11. sudo chmod u+w /usr/include/gtest -R
12. sudo mkdir /usr/lib/gtest && cd /usr/lib/gtest
13. sudo ln -s libgtest.so libgtest.so.6
14. sudo ln -s libgtest.so libgtest.so.6.0
15. sudo ln -s libgtest_main.so libgtest_main.so.6
16. sudo ln -s libgtest_main.so libgtest_main.so.6.0
三、使用
1. vim func.h
[cpp] view
plain copy


#ifndef FUNC_C
#define FUNC_C
#ifdef __cplusplus
extern "C"
{
#endif
int fac(int nInput);
#ifdef __cplusplus
}
#endif
#endif // FUNC_C
2. vim func.c
[cpp] view
plain copy
#include "func.h"
int fac(int nInput)
{
if(nInput < 0) {
return -1;
}
int nRev = 1;
for(int i = 1; i <= nInput; ++i){
nRev *= i;
}
return nRev;
}
3. vim fac_test.cpp
[cpp] view
plain copy
#include <limits>
#include "func.h"
#include "gtest/gtest.h"
TEST(Fac_test, input_negative){
EXPECT_EQ(-1, fac(-1));
EXPECT_EQ(-1, fac(-2));
EXPECT_EQ(-1, fac(-5));
}
TEST(Fac_test, input_zero){
EXPECT_EQ(1, fac(0));
}
TEST(Fac_test, input_positive){
EXPECT_EQ(1, fac(1));
EXPECT_EQ(2, fac(2));
EXPECT_EQ(6, fac(3));
}
4. vim Makefile
[plain] view
plain copy
CC = gcc
CPP = g++
LINK = g++
CFLAGS = -g -Wall -Werror -Wextra -std=gnu99
CPPFLAGS = -g -Wall -Werror -Wextra
LIBS = -L/usr/lib/gtest -lgtest -lgtest_main
C__SOURCES = $(wildcard *.c)
CPPSOURCES = $(wildcard *.cpp)
OBJECTS = $(patsubst %.c, %.o, $(C__SOURCES)) $(patsubst %.cpp, %.o, $(CPPSOURCES))
TARGET = sample_unittest
first: all
%.o: %.c
$(CC) -c $(CFLAGS) -o $@ $<
%.o: %.cpp
$(CPP) -c $(CPPFLAGS) -o $@ $<
all: $(TARGET)
$(TARGET): $(OBJECTS)
$(LINK) $(CPPFLAGS) $(LIBS) -o $(TARGET) $(OBJECTS)
.PHONY: clean
clean:
rm -f $(TARGET) $(OBJECTS)
5. make
6. export LD_LIBRARY_PATH=$LD_LIBRARY_PATH:/usr/lib/gtest
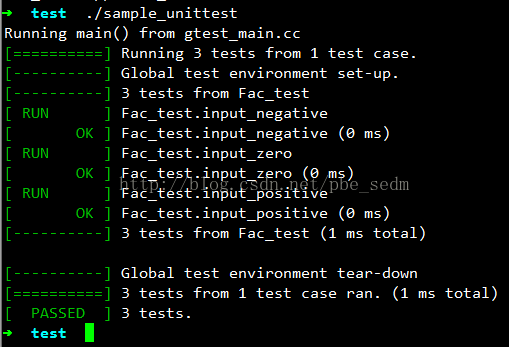
7. ./sample_unittest
一、要求:
1. 安装 cmake
二、编译
1. 下载 gtest 源码包,并解压,如:/home/hdc/gtest-1.7.0;
2. 编译 gtest 动态库,进入 gtest-1.7.0 目录,编辑 CMakeLists.txt,修改如下几行:
10 option(BUILD_SHARED_LIBS "Build shared libraries (DLLs)." OFF)
19 option(gtest_build_tests "Build all of gtest's own tests." OFF)
21 option(gtest_build_samples "Build gtest's sample programs." OFF)
将 OFF 修改为 ON,保存并退出。
3. 创建 build 目录,并进入该目录;
4. cmake ..
5. make
6. ls *.so
libgtest_dll.so libgtest_main_no_rtti.so libgtest_main_use_own_tuple.so libgtest.so
libgtest_main_no_exception.so libgtest_main.so libgtest_no_exception.so
7. sudo cp *.so /usr/lib/gtest
8. cd ../include
9. sudo cp -pr gtest /usr/include
10. sudo chown root:root /usr/include/gtest -R
11. sudo chmod u+w /usr/include/gtest -R
12. sudo mkdir /usr/lib/gtest && cd /usr/lib/gtest
13. sudo ln -s libgtest.so libgtest.so.6
14. sudo ln -s libgtest.so libgtest.so.6.0
15. sudo ln -s libgtest_main.so libgtest_main.so.6
16. sudo ln -s libgtest_main.so libgtest_main.so.6.0
三、使用
1. vim func.h
[cpp] view
plain copy
#ifndef FUNC_C
#define FUNC_C
#ifdef __cplusplus
extern "C"
{
#endif
int fac(int nInput);
#ifdef __cplusplus
}
#endif
#endif // FUNC_C
2. vim func.c
[cpp] view
plain copy
#include "func.h"
int fac(int nInput)
{
if(nInput < 0) {
return -1;
}
int nRev = 1;
for(int i = 1; i <= nInput; ++i){
nRev *= i;
}
return nRev;
}
3. vim fac_test.cpp
[cpp] view
plain copy
#include <limits>
#include "func.h"
#include "gtest/gtest.h"
TEST(Fac_test, input_negative){
EXPECT_EQ(-1, fac(-1));
EXPECT_EQ(-1, fac(-2));
EXPECT_EQ(-1, fac(-5));
}
TEST(Fac_test, input_zero){
EXPECT_EQ(1, fac(0));
}
TEST(Fac_test, input_positive){
EXPECT_EQ(1, fac(1));
EXPECT_EQ(2, fac(2));
EXPECT_EQ(6, fac(3));
}
4. vim Makefile
[plain] view
plain copy
CC = gcc
CPP = g++
LINK = g++
CFLAGS = -g -Wall -Werror -Wextra -std=gnu99
CPPFLAGS = -g -Wall -Werror -Wextra
LIBS = -L/usr/lib/gtest -lgtest -lgtest_main
C__SOURCES = $(wildcard *.c)
CPPSOURCES = $(wildcard *.cpp)
OBJECTS = $(patsubst %.c, %.o, $(C__SOURCES)) $(patsubst %.cpp, %.o, $(CPPSOURCES))
TARGET = sample_unittest
first: all
%.o: %.c
$(CC) -c $(CFLAGS) -o $@ $<
%.o: %.cpp
$(CPP) -c $(CPPFLAGS) -o $@ $<
all: $(TARGET)
$(TARGET): $(OBJECTS)
$(LINK) $(CPPFLAGS) $(LIBS) -o $(TARGET) $(OBJECTS)
.PHONY: clean
clean:
rm -f $(TARGET) $(OBJECTS)
5. make
6. export LD_LIBRARY_PATH=$LD_LIBRARY_PATH:/usr/lib/gtest
7. ./sample_unittest

相关文章推荐
- 如何在word中任意页插入页脚?
- logback用法
- Linux查看系统信息的一些命令以及查看已安装软件包的命令
- Shared storage cannot protect your application from code injection attacks
- 236. Lowest Common Ancestor of a Binary Tree
- elasticsearch 配置详解
- web开发一月总结
- linux运维的发展方向
- AIDL学习笔记(二)----自定义类型,客户端远程调用服务端
- ERROR: While executing gem ... (Errno::EPERM) Operation not permitted - /usr/bin/xcodeproj
- Linux文件系统(1)
- ios 气泡聊天
- Posix mq和SystemV mq区别
- 开源企业管理软件 ONES
- linux找不到动态链接库 .so文件的解决方法
- 大学生在宿舍里,也可以操作的盈利项目,我的故事分享
- Robotium自动化测试框架实用教程(图)
- 简单的手势密码控件
- 清除火狐中存在的input、select的缓存
- php mysqli查询语句返回值类型实例分析