View绘制之layout过程
2016-06-27 23:27
465 查看
这篇博客主要是接着上一篇为大家讲述View绘制的第二步layout(布局)全过程:
首先要为大家普及一些相关知识:
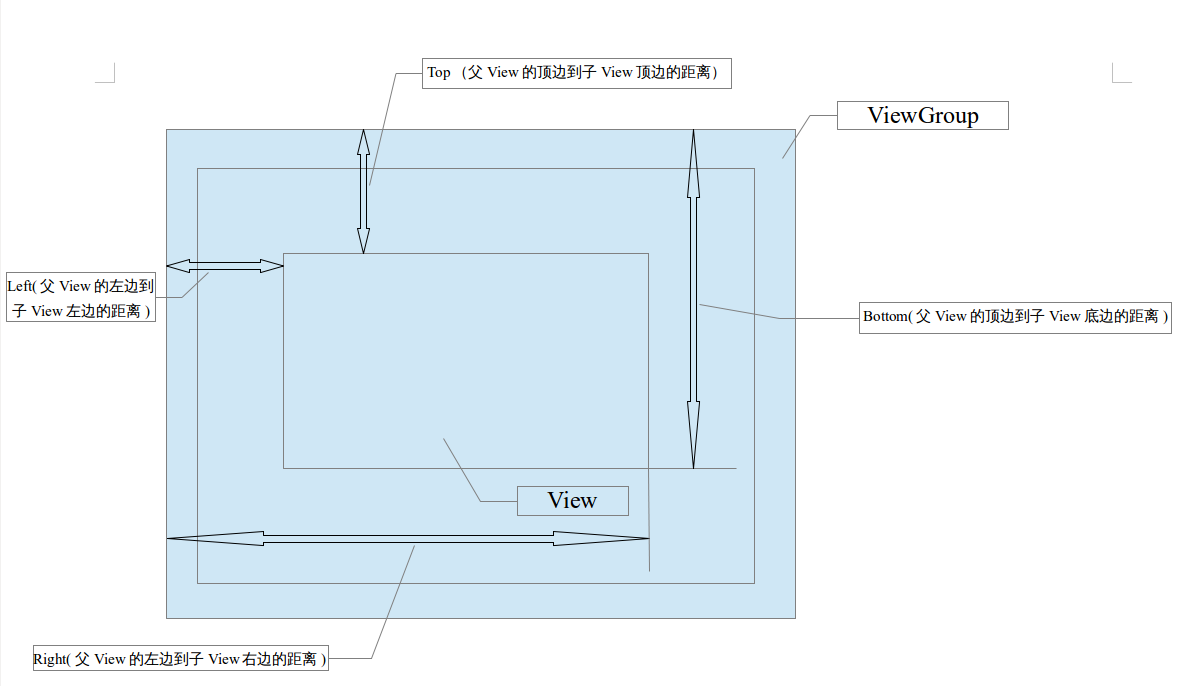
如图所示:

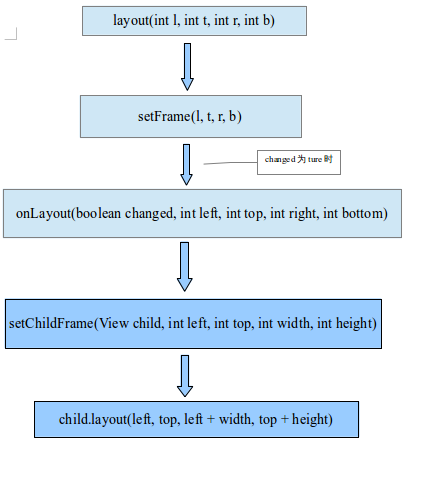
介绍完了这个基础知识,首先为大家呈现一张关于布局的大体流程图(根据LinerLayout)

布局开始的第一步是调用layout方法,源代码如下:
View:
ViewGroup:
在View的layout()方法中
1、第三处首先将该View的Left、Top、Right、Bottom参数上一次的值保存
2、然后调用setFrame(l, t, r, b),我们来看看这个方法的源代码:
3、如果该View的Left、Top、Right、Bottom的参数改变了,将调用onLayout()方法确定其子View的位置,
源代码如下:
这个方法并没有被具体内容,是用来确定该View下面子View的位置,我们选择一下LinerLayout的onLayout()方法看一下源代码:
在LinerLayout的Vertical布局中,childTop在不停叠加,这也是符合逻辑的,因为越是在LinerLayout布局中越往下的View,Top的值应该越大的。最后调用setChildFrame(child, childLeft, childTop + getLocationOffset(child)的方法,去设置这个参数源码如下:
最后又调用View的layout()方法去设置该子View相当于父View的Left、Top、Right、Bottom,从而确定该View的宽高位置,一般来说View的长宽在measure()时就确定了,但是如果在layout()时强行改变也是可以的,调用layout()方法直接设置。在这里解释了为什么说一个View的宽高位置是在layout()时确定的,View的layout()过程在此结束。
首先要为大家普及一些相关知识:
/**
* Left position of this view relative to its parent.
* //当前View的左边位置相对与父元素
* @return The left edge of this view, in pixels.
*/
@ViewDebug.CapturedViewProperty
public final int getLeft() {
return mLeft;
}
/**
* The distance in pixels from the left edge of this view's parent
* to the left edge of this view.
* //从父View的左边到子View左边的距离,单位是pixels
* {@hide}
*/
@ViewDebug.ExportedProperty(category = "layout")
protected int mLeft;/**
* Right position of this view relative to its parent.
* //当前View的右边位置相对于其父元素
* @return The right edge of this view, in pixels.
*/
@ViewDebug.CapturedViewProperty
public final int getRight() {
return mRight;
}/**
* The distance in pixels from the left edge of this view's parent
* to the right edge of this view.
* //从父View的左边到子View右边的距离,单位是pixels
* {@hide}
*/
@ViewDebug.ExportedProperty(category = "layout")
protected int mRight;/**
* Bottom position of this view relative to its parent.
* //当前View的底边位置相对于其父元素
* @return The bottom of this view, in pixels.
*/
@ViewDebug.CapturedViewProperty
public final int getBottom() {
return mBottom;
}/**
* The distance in pixels from the top edge of this view's parent
* to the bottom edge of this view.
* //从父View的顶边到子View底边的距离,单位是pixels
* {@hide}
*/
@ViewDebug.ExportedProperty(category = "layout")
protected int mBottom;/**
* Top position of this view relative to its parent.
* //当前View的顶边位置相对于其父元素
* @return The top of this view, in pixels.
*/
@ViewDebug.CapturedViewProperty
public final int getTop() {
return mTop;
}/**
* The distance in pixels from the top edge of this view's parent
* to the top edge of this view.
* //从父View的顶边到子View顶边的距离,单位是pixels
* {@hide}
*/
@ViewDebug.ExportedProperty(category = "layout")
protected int mTop;如图所示:

介绍完了这个基础知识,首先为大家呈现一张关于布局的大体流程图(根据LinerLayout)

布局开始的第一步是调用layout方法,源代码如下:
View:
//View的layout()方法
public void layout(int l, int t, int r, int b) {
//将View上一次的Left、Top、Bottom、Right的参数保存
int oldL = mLeft;
int oldT = mTop;
int oldB = mBottom;
int oldR = mRight;

//设置View的Left、Top、Bottom、Right的参数,确定View相对于父View的位置
boolean changed = setFrame(l, t, r, b);
if (changed || (mPrivateFlags & LAYOUT_REQUIRED) == LAYOUT_REQUIRED) {

//如果View的Left、Top、Bottom、Right的参数有改变,调用onLayout()
//方法重新确定该View下子View的位置
onLayout(changed, l, t, r, b);
mPrivateFlags &= ~LAYOUT_REQUIRED;

ListenerInfo li = mListenerInfo;
if (li != null && li.mOnLayoutChangeListeners != null) {
ArrayList<OnLayoutChangeListener> listenersCopy =
(ArrayList<OnLayoutChangeListener>)li.mOnLayoutChangeListeners.clone();
int numListeners = listenersCopy.size();
for (int i = 0; i < numListeners; ++i) {
listenersCopy.get(i).onLayoutChange(this, l, t, r, b, oldL, oldT, oldR, oldB);
}
}
}
mPrivateFlags &= ~FORCE_LAYOUT;
}
ViewGroup:
//ViewGroup的layout()方法,基本与View的layout()方法一致
public final void layout(int l, int t, int r, int b) {
if (mTransition == null || !mTransition.isChangingLayout()) {
if (mTransition != null) {
mTransition.layoutChange(this);
}
super.layout(l, t, r, b);
} else {
// record the fact that we noop'd it; request layout when transition finishes
mLayoutSuppressed = true;
}
在View的layout()方法中
1、第三处首先将该View的Left、Top、Right、Bottom参数上一次的值保存
2、然后调用setFrame(l, t, r, b),我们来看看这个方法的源代码:
protected boolean setFrame(int left, int top, int right, int bottom) {
boolean changed = false;

if (DBG) {
Log.d("View", this + " View.setFrame(" + left + "," + top + ","
+ right + "," + bottom + ")");
}

if (mLeft != left || mRight != right || mTop != top || mBottom != bottom) {
//如果Left、Right、Top、Bottom的参数有改变,changed的值即为true,即如果View在父View的位置改变,那么就要调用Layout方法重新确定该View下子View的位置
changed = true;

// Remember our drawn bit
int drawn = mPrivateFlags & DRAWN;

int oldWidth = mRight - mLeft;
int oldHeight = mBottom - mTop;
int newWidth = right - left;
int newHeight = bottom - top;

//该View宽高与原来相比是否有所改变
boolean sizeChanged = (newWidth != oldWidth) || (newHeight != oldHeight);

// Invalidate our old position
invalidate(sizeChanged);

//重新设置该View的Left、Top、Right、Bottom的参数
mLeft = left;
mTop = top;
mRight = right;
mBottom = bottom;
if (mDisplayList != null) {
mDisplayList.setLeftTopRightBottom(mLeft, mTop, mRight, mBottom);
}

mPrivateFlags |= HAS_BOUNDS;

if (sizeChanged) {
if ((mPrivateFlags & PIVOT_EXPLICITLY_SET) == 0) {
// A change in dimension means an auto-centered pivot point changes, too
if (mTransformationInfo != null) {
mTransformationInfo.mMatrixDirty = true;
}
}
//如果View的宽高相当于原来有改变就会回调onSizeChanged()方法
onSizeChanged(newWidth, newHeight, oldWidth, oldHeight);
}

if ((mViewFlags & VISIBILITY_MASK) == VISIBLE) {
// If we are visible, force the DRAWN bit to on so that
// this invalidate will go through (at least to our parent).
// This is because someone may have invalidated this view
// before this call to setFrame came in, thereby clearing
// the DRAWN bit.
mPrivateFlags |= DRAWN;
invalidate(sizeChanged);
// parent display list may need to be recreated based on a change in the bounds
// of any child
invalidateParentCaches();
}

// Reset drawn bit to original value (invalidate turns it off)
mPrivateFlags |= drawn;

mBackgroundSizeChanged = true;
}
return changed;
}
3、如果该View的Left、Top、Right、Bottom的参数改变了,将调用onLayout()方法确定其子View的位置,
源代码如下:
/**
* //当这个View需要重新给它子View设置尺寸和位置的时候会被回调
* Called from layout when this view should
* assign a size and position to each of its children.
*
* //View的派生类应该重写这个方法,给每个子View布局的时候会被回调
* Derived classes with children should override
* this method and call layout on each of
* their children.
* @param changed This is a new size or position for this view
* @param left Left position, relative to parent
* @param top Top position, relative to parent
* @param right Right position, relative to parent
* @param bottom Bottom position, relative to parent
*/
protected void onLayout(boolean changed, int left, int top, int right, int bottom) {
}
这个方法并没有被具体内容,是用来确定该View下面子View的位置,我们选择一下LinerLayout的onLayout()方法看一下源代码:
@Override
protected void onLayout(boolean changed, int l, int t, int r, int b) {
if (mOrientation == VERTICAL) {
layoutVertical(l, t, r, b);
} else {
layoutHorizontal(l, t, r, b);
}
}
void layoutVertical(int left, int top, int right, int bottom) {
final int paddingLeft = mPaddingLeft;
int childTop;
int childLeft;
// Where right end of child should go
final int width = right - left;
int childRight = width - mPaddingRight;
// Space available for child
int childSpace = width - paddingLeft - mPaddingRight;
final int count = getVirtualChildCount();
final int majorGravity = mGravity & Gravity.VERTICAL_GRAVITY_MASK;
final int minorGravity = mGravity & Gravity.RELATIVE_HORIZONTAL_GRAVITY_MASK;
switch (majorGravity) {
case Gravity.BOTTOM:
// mTotalLength contains the padding already
childTop = mPaddingTop + bottom - top - mTotalLength;
break;
// mTotalLength contains the padding already
case Gravity.CENTER_VERTICAL:
childTop = mPaddingTop + (bottom - top - mTotalLength) / 2;
break;
case Gravity.TOP:
default:
childTop = mPaddingTop;
break;
}
for (int i = 0; i < count; i++) {
//确定每一个子View的Left、Top、Right、Bottom的参数
final View child = getVirtualChildAt(i);
if (child == null) {
childTop += measureNullChild(i);
} else if (child.getVisibility() != GONE) {
final int childWidth = child.getMeasuredWidth();
final int childHeight = child.getMeasuredHeight();
final LinearLayout.LayoutParams lp =
(LinearLayout.LayoutParams) child.getLayoutParams();
int gravity = lp.gravity;
if (gravity < 0) {
gravity = minorGravity;
}
final int layoutDirection = getLayoutDirection();
final int absoluteGravity = Gravity.getAbsoluteGravity(gravity, layoutDirection);
switch (absoluteGravity & Gravity.HORIZONTAL_GRAVITY_MASK) {
//不同布局属性会改变childLeft
case Gravity.CENTER_HORIZONTAL:
childLeft = paddingLeft + ((childSpace - childWidth) / 2)
+ lp.leftMargin - lp.rightMargin;
break;
case Gravity.RIGHT:
childLeft = childRight - childWidth - lp.rightMargin;
break;
case Gravity.LEFT:
default:
childLeft = paddingLeft + lp.leftMargin;
break;
}
if (hasDividerBeforeChildAt(i)) {
//如果有分届线,会增加childTop
childTop += mDividerHeight;
}
//该布局的外边距
childTop += lp.topMargin;
//根据这个布局得到Left、Top设置子View的Left、Top、Right、Top参数
setChildFrame(child, childLeft, childTop + getLocationOffset(child),
childWidth, childHeight);
childTop += childHeight + lp.bottomMargin + getNextLocationOffset(child);
i += getChildrenSkipCount(child, i);
}
}
}在LinerLayout的Vertical布局中,childTop在不停叠加,这也是符合逻辑的,因为越是在LinerLayout布局中越往下的View,Top的值应该越大的。最后调用setChildFrame(child, childLeft, childTop + getLocationOffset(child)的方法,去设置这个参数源码如下:
private void setChildFrame(View child, int left, int top, int width, int height) {
child.layout(left, top, left + width, top + height);
}
最后又调用View的layout()方法去设置该子View相当于父View的Left、Top、Right、Bottom,从而确定该View的宽高位置,一般来说View的长宽在measure()时就确定了,但是如果在layout()时强行改变也是可以的,调用layout()方法直接设置。在这里解释了为什么说一个View的宽高位置是在layout()时确定的,View的layout()过程在此结束。
相关文章推荐
- linux命令——scp
- 创建我们第一个Monad
- python安装与使用
- php 数组
- linux的那些事(1)
- VIJOS 1278 My Story Your Song-雨天
- php 源码解析--count
- mysql通过binlog恢复数据
- sencha 打包
- Android中asset文件夹和raw文件夹区别
- 自定义动画状态栏文字
- HTML5音视频播放(Video,Audio)和常见的坑处理
- 欢迎使用CSDN-markdown编辑器
- 关闭或者开启apache的目录浏览
- linux环境内存分配原理 mallocinfo
- HTML readyState 属性 iframe onreadystatechange事件
- linux常用命令总结
- Monad的重点
- margin和padding有关参数图解
- Html5的数据存储
