hadoop 2.x 版本安装与配置
2016-06-26 20:33
274 查看
哈哈,终于把1.x版本的hadoop源码搞明白了,现在开始搞2.x。。。
ubuntu版本12.04 64位
1、创建hadoop管理员账号、ssh无密码登陆、安装JDK可以参考我的另一篇文章http://blog.csdn.net/lfdanding/article/details/45847629,这里就不多说了。。。
2、首先要下载安装hadoop,我下载的是hadoop-2.2.0.tar.gz,这个版本比较稳定。
3、解压hadoop包
4、配置hadoop的hadoop-2.2.0/etc/hadoop下的hadoop-env.sh,core-site.xml,mapred-site.xml,hdfs-site.xml,yarn-site.xml
配置hadoop-2.2.0/etc/hadoop/hadoop-env.sh
vim /home/hadoop/hadoop2.0/hadoop-2.2.0/etc/hadoop/hadoop-env.sh
搜索到JAVA_HOME
把前面的#去掉,加上本系统jdk路径,保存退出
查看本系统的JDK路径,可以通过如下命令
sudo update-alternatives –config java(我的路径是/home/lifeng/jdk1.7.0_79)
配置hadoop-2.2.0/etc/hadoop/core-site.xml
vim /home/hadoop/hadoop2.0/hadoop-2.2.0/etc/hadoop/core-site.xml
将如下 之间的添加进入,保存退出
配置hadoop-2.2.0/etc/hadoop/mapred-site.xml,命令行:
vim /home/hadoop/hadoop2.0/hadoop-2.2.0/etc/hadoop/mapred-site.xml
将如下 之间的添加进入,保存退出
配置hadoop-2.2.0/etc/hadoop/hdfs-site.xml,命令行:
vim /home/hadoop/hadoop2.0/hadoop-2.2.0/etc/hadoop/hdfs-site.xml
将如下 之间的添加进入,保存退出
配置hadoop2.x 特有的配置文件yarn-site.xml
至此hadoop的安装配置已经完毕,稍后的是hadoop的初次运行操作
8、格式化hdfs文件系统
进入hadoop-2.2.0
/bin/hadoop namenode -format
9、启动hadoop服务
hadoop-2.2.0/sbin/hadoop-daemon.sh start namenode
jps
hadoop-2.2.0/sbin/hadoop-daemon.sh start datanode
jps
hadoop-2.2.0/sbin/start-yarn.sh
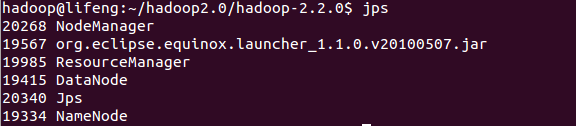
jps是查看java虚拟机运行的java线程
不计jps,有四个hadoop相关线程NodeManager、ResourceManager、DataNode、NameNode,恭喜你,hadoop安装配置成功,运行正常。
注意:如果启动hadoop服务,直接使用hadoop-2.2.0/sbin/start-all.sh ,会将secondyNameNode启动起来,并且会出现The authenticity of host ‘0.0.0.0 (0.0.0.0)’ can’t be established.错误,参考文章http://blog.csdn.net/lglglgl/article/details/46867787
关闭防火墙就好了
hadoop的伪分布模式已经安装成功,再次在伪分布模式下运行一下WordCount来感受MapReduce过程:
这时注意程序是在文件系统dfs运行的,创建的文件也都基于文件系统:
首先在dfs中创建input目录
bin/hadoop fs -mkdir /input
将etc/hadoop中的文件拷贝到dfs中的input
bin/hadoop fs -copyFromLocal etc/hadoop/* /input
在伪分布式模式下运行wordcount
bin/hadoop jar share/hadoop/mapreduce/hadoop-mapreduce-examples-2.2.0.jar wordcount /input /output
检测一下输出信息:
hadoop fs -cat /output/*
然后可以退出hadoop。
sbin/stop-yarn.sh
sbin/stop-dfs.sh
10、然后配置hadoop-eclipse
我没有编译eclipse插件,直接下载的,下载地址,亲测可用http://download.csdn.net/detail/zythy/6735167#comment
然后将下载好的插件hadoop-eclipse-plugin-2.2.0.jar 拷贝到/home/hadoop/hadoop2.0/eclipse/plugins,启动eclipse
./eclipse -clean
配置eclipse
首先是 window->perferences

然后是New Hadoop location,在General配置端口号
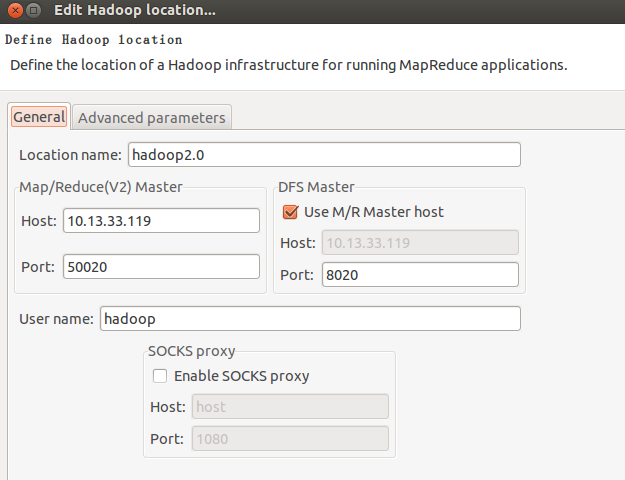
Location name :随便取个名字 比如 hadoop2.0
Map/Reduce(V2) Master :根据 hdfs-site.xml 中配置 dfs.datanode.ipc.address 的值填写,没有配置取默认值50020
DFS Master: Name Node的IP和端口,根据 core-site.xml 中配置 fs.default.name的值填写
ubuntu版本12.04 64位
1、创建hadoop管理员账号、ssh无密码登陆、安装JDK可以参考我的另一篇文章http://blog.csdn.net/lfdanding/article/details/45847629,这里就不多说了。。。
2、首先要下载安装hadoop,我下载的是hadoop-2.2.0.tar.gz,这个版本比较稳定。
3、解压hadoop包
cp hadoop-2.2.0.tar.gz /home/hadoop/hadoop2.0
tar -xzvf hadoop-2.2.0.tar.gz  //生成hadoop-2.2.0
4、配置hadoop的hadoop-2.2.0/etc/hadoop下的hadoop-env.sh,core-site.xml,mapred-site.xml,hdfs-site.xml,yarn-site.xml
配置hadoop-2.2.0/etc/hadoop/hadoop-env.sh
vim /home/hadoop/hadoop2.0/hadoop-2.2.0/etc/hadoop/hadoop-env.sh
搜索到JAVA_HOME
把前面的#去掉,加上本系统jdk路径,保存退出
查看本系统的JDK路径,可以通过如下命令
sudo update-alternatives –config java(我的路径是/home/lifeng/jdk1.7.0_79)
# The java implementation to use.
export JAVA_HOME=/home/lifeng/jdk1.7.0_79
配置hadoop-2.2.0/etc/hadoop/core-site.xml
vim /home/hadoop/hadoop2.0/hadoop-2.2.0/etc/hadoop/core-site.xml
将如下 之间的添加进入,保存退出
<?xml version="1.0" encoding="UTF-8"?>
<?xml-stylesheet type="text/xsl" href="configuration.xsl"?>
<!--
Licensed under the Apache License, Version 2.0 (the "License");
you may not use this file except in compliance with the License.
You may obtain a copy of the License at
 http://www.apache.org/licenses/LICENSE-2.0
Unless required by applicable law or agreed to in writing, software
distributed under the License is distributed on an "AS IS" BASIS,
WITHOUT WARRANTIES OR CONDITIONS OF ANY KIND, either express or implied.
See the License for the specific language governing permissions and
limitations under the License. See accompanying LICENSE file.
-->

<!-- Put site-specific property overrides in this file. -->

<configuration>
<property>
<name>fs.default.name</name>
<value>hdfs://10.13.33.119:8020</value>
</property>
</configuration>
配置hadoop-2.2.0/etc/hadoop/mapred-site.xml,命令行:
vim /home/hadoop/hadoop2.0/hadoop-2.2.0/etc/hadoop/mapred-site.xml
将如下 之间的添加进入,保存退出
<?xml version="1.0"?>
<?xml-stylesheet type="text/xsl" href="configuration.xsl"?>
<!--
Licensed under the Apache License, Version 2.0 (the "License");
you may not use this file except in compliance with the License.
You may obtain a copy of the License at
 http://www.apache.org/licenses/LICENSE-2.0
Unless required by applicable law or agreed to in writing, software
distributed under the License is distributed on an "AS IS" BASIS,
WITHOUT WARRANTIES OR CONDITIONS OF ANY KIND, either express or implied.
See the License for the specific language governing permissions and
limitations under the License. See accompanying LICENSE file.
-->

<!-- Put site-specific property overrides in this file. -->

<configuration>
<property>
<name>mapreduce.framework.name</name>
<value>yarn</value>
</property>
</configuration>
配置hadoop-2.2.0/etc/hadoop/hdfs-site.xml,命令行:
vim /home/hadoop/hadoop2.0/hadoop-2.2.0/etc/hadoop/hdfs-site.xml
将如下 之间的添加进入,保存退出
<?xml version="1.0" encoding="UTF-8"?>
<?xml-stylesheet type="text/xsl" href="configuration.xsl"?>
<!--
Licensed under the Apache License, Version 2.0 (the "License");
you may not use this file except in compliance with the License.
You may obtain a copy of the License at
 http://www.apache.org/licenses/LICENSE-2.0
Unless required by applicable law or agreed to in writing, software
distributed under the License is distributed on an "AS IS" BASIS,
WITHOUT WARRANTIES OR CONDITIONS OF ANY KIND, either express or implied.
See the License for the specific language governing permissions and
limitations under the License. See accompanying LICENSE file.
-->

<!-- Put site-specific property overrides in this file. -->

<configuration>
<property>
<name>dfs.replication</name>
<value>1</value>
</property>
<property>
<name>dfs.namenode.name.dir</name>
<value>/home/hadoop/hadoop2.0/hadoop-2.2.0/dfs/name</value>
</property>
<property>
<name>dfs.datanode.data.dir</name>
<value>/home/hadoop/hadoop2.0/hadoop-2.2.0/dfs/data</value>
</property>
</configuration>
配置hadoop2.x 特有的配置文件yarn-site.xml
<?xml version="1.0"?>
<!--
Licensed under the Apache License, Version 2.0 (the "License");
you may not use this file except in compliance with the License.
You may obtain a copy of the License at
 http://www.apache.org/licenses/LICENSE-2.0
Unless required by applicable law or agreed to in writing, software
distributed under the License is distributed on an "AS IS" BASIS,
WITHOUT WARRANTIES OR CONDITIONS OF ANY KIND, either express or implied.
See the License for the specific language governing permissions and
limitations under the License. See accompanying LICENSE file.
-->
<configuration>

<!-- Site specific YARN configuration properties -->
<property>
<name>yarn.nodemanager.aux-services</name>
<value>mapreduce_shuffle</value>
</property>

</configuration>
至此hadoop的安装配置已经完毕,稍后的是hadoop的初次运行操作
8、格式化hdfs文件系统
进入hadoop-2.2.0
/bin/hadoop namenode -format
9、启动hadoop服务
hadoop-2.2.0/sbin/hadoop-daemon.sh start namenode
jps
hadoop-2.2.0/sbin/hadoop-daemon.sh start datanode
jps
hadoop-2.2.0/sbin/start-yarn.sh
jps是查看java虚拟机运行的java线程
不计jps,有四个hadoop相关线程NodeManager、ResourceManager、DataNode、NameNode,恭喜你,hadoop安装配置成功,运行正常。
注意:如果启动hadoop服务,直接使用hadoop-2.2.0/sbin/start-all.sh ,会将secondyNameNode启动起来,并且会出现The authenticity of host ‘0.0.0.0 (0.0.0.0)’ can’t be established.错误,参考文章http://blog.csdn.net/lglglgl/article/details/46867787
关闭防火墙就好了
ufw disable
hadoop的伪分布模式已经安装成功,再次在伪分布模式下运行一下WordCount来感受MapReduce过程:
这时注意程序是在文件系统dfs运行的,创建的文件也都基于文件系统:
首先在dfs中创建input目录
bin/hadoop fs -mkdir /input
将etc/hadoop中的文件拷贝到dfs中的input
bin/hadoop fs -copyFromLocal etc/hadoop/* /input
在伪分布式模式下运行wordcount
bin/hadoop jar share/hadoop/mapreduce/hadoop-mapreduce-examples-2.2.0.jar wordcount /input /output
检测一下输出信息:
hadoop fs -cat /output/*
然后可以退出hadoop。
sbin/stop-yarn.sh
sbin/stop-dfs.sh
10、然后配置hadoop-eclipse
我没有编译eclipse插件,直接下载的,下载地址,亲测可用http://download.csdn.net/detail/zythy/6735167#comment
然后将下载好的插件hadoop-eclipse-plugin-2.2.0.jar 拷贝到/home/hadoop/hadoop2.0/eclipse/plugins,启动eclipse
./eclipse -clean
配置eclipse
首先是 window->perferences
然后是New Hadoop location,在General配置端口号
Location name :随便取个名字 比如 hadoop2.0
Map/Reduce(V2) Master :根据 hdfs-site.xml 中配置 dfs.datanode.ipc.address 的值填写,没有配置取默认值50020
DFS Master: Name Node的IP和端口,根据 core-site.xml 中配置 fs.default.name的值填写

相关文章推荐
- MyEclipse Web Project转Eclipse Dynamic Web Project
- Windows Clang开发环境备忘
- 傻瓜式用Eclipse连接MySQL数据库
- Eclipse引入jquery报错如何解决
- 让Flex Builder 3.0与Eclipse3.4整合起来
- Eclipse配置Javascript开发环境图文教程
- 使用zend studio for eclipse不能激活代码提示功能的解决办法
- 图解Eclipse j2ee开发环境的搭建过程
- 两种Eclipse部署动态web项目方法
- ext for eclipse插件安装方法
- 解决Fedora14下eclipse进行android开发,ibus提示没有输入窗口的方法详解
- eclipse导入jquery包后报错的解决方法
- Eclipse 格式化代码时不换行与自动换行的实现方法
- Eclipse下jQuery文件报错出现错误提示红叉
- eclipse如何忽略js文件报错(附图)
- eclipse3.2.2 + MyEclipse5.5 + Tomcat5.5.27 配置数据库连接池
- jquery库或JS文件在eclipse下报错问题解决方法
- 什么是eclipse,eclipse的意思解析
- Zend Studio for Eclipse的java.lang.NullPointerException错误的解决方法
- eclipse+myeclipse 环境配置方法