Android自定义Dialog,实现长按ListView删除当中item数据
2016-06-18 17:30
567 查看
在做项目时dialog很常用,很多时候原生的dialog不符合我们的要求,这就需要自己定义自己想要的效果。
要更改dialog的效果,就需要继承Dialog这个类:
显示dialog的方法:
style中的代码:
dialog的背景:
总体就是这几步,显示的风格可以根据需求调整。
MainActiviy代码:
dialog的布局:
效果图:
完整的demo下载地址:自定义dialog实现listview长按删除item数据
要更改dialog的效果,就需要继承Dialog这个类:
/**
* 自定义dialog
*/
class CustomDialog extends Dialog implements
View.OnClickListener {

/**
* 布局文件
**/
int layoutRes;

/**
* 上下文对象
**/
Context context;

/**
* 取消按钮
**/
private Button bt_cancal;

/**
* 删除按钮
**/
private Button bt_delect;

/**
* 位置
*/
private int postion;

public CustomDialog(Context context) {
super(context);
this.context = context;
}

/**
* 自定义布局的构造方法
*
* @param context
* @param resLayout
*/
public CustomDialog(Context context, int resLayout) {
super(context);
this.context = context;
this.layoutRes = resLayout;
}

/**
* 自定义主题及布局的构造方法
*
* @param context
* @param theme
* @param resLayout
* @param postion
*/
public CustomDialog(Context context, int theme, int resLayout,
int postion) {
super(context, theme);
this.context = context;
this.layoutRes = resLayout;
this.postion = postion;
}

@Override
protected void onCreate(Bundle savedInstanceState) {
super.onCreate(savedInstanceState);

// 指定布局
this.setContentView(layoutRes);

// 根据id在布局中找到控件对象
bt_cancal = (Button) findViewById(R.id.bt_cancal);
bt_delect = (Button) findViewById(R.id.bt_delect);

// 为按钮绑定点击事件监听器
bt_cancal.setOnClickListener(this);
bt_delect.setOnClickListener(this);
}

@Override
public void onClick(View v) {
switch (v.getId()) {

// 删除按钮
case R.id.bt_delect:
// 删除数据的方法
deleteItem(postion);
dialog.dismiss();
break;

// 取消按钮
case R.id.bt_cancal:
dialog.dismiss();

default:
break;
}
}
}这里面自定义了三个构造方法,根据参数的不同选择不同的构造方法,我这模版是根据位置删除ListView中的item的内容,如果是删除服务器传来的值,也可以改变成其他参数,大部分都是id。显示dialog的方法:
/**
* 显示提示窗口
* @param position
*/
protected void showLostFindDialog(final int position) {
dialog = new CustomDialog(this, R.style.mystyle,
R.layout.dialog, position);
dialog.show();

}
在Long click时调用就可以了。style中的代码:
<style name="mystyle" parent="@android:style/Theme.Dialog">
<!--Dialog的windowFrame框为无 -->
<item name="android:windowFrame">@null</item>
<!--是否浮现在activity之上-->
<item name="android:windowIsFloating">true</item>
<!--是否半透明-->
<item name="android:windowIsTranslucent">false</item>
<!--是否显示title-->
<item name="android:windowNoTitle">true</item>
<!--设置dialog的背景-->
<item name="android:windowBackground">@drawable/dialog_bg</item>
<!-- 背景是否模糊显示-->
<item name="android:backgroundDimEnabled">true</item>
</style>
dialog的背景:
<shape xmlns:android="http://schemas.android.com/apk/res/android" >
<!--设置渐变色-->
<gradient
android:angle="90"
android:endColor="#ffffff"
android:startColor="#ffffff" />

<solid android:color="#ffffff" />
<!--设置圆角-->
<corners
android:bottomLeftRadius="15px"
android:bottomRightRadius="15px"
android:topLeftRadius="15px"
android:topRightRadius="15px" />

</shape>
总体就是这几步,显示的风格可以根据需求调整。
MainActiviy代码:
public class MainActivity extends AppCompatActivity {
private List<String> mData = new ArrayList<>();
private ListView mListView;
private MyAdapter mAdapter;
private CustomDialog dialog;

@Override
protected void onCreate(Bundle savedInstanceState) {
super.onCreate(savedInstanceState);
setContentView(R.layout.activity_main);
mListView = (ListView) findViewById(R.id.listView);
//添加数据
for (int i = 0; i < 30; i++) {
mData.add("" + i);
}
mAdapter = new MyAdapter(this, mData);
mListView.setAdapter(mAdapter);
//长按删除item
mListView.setOnItemLongClickListener(new AdapterView.OnItemLongClickListener() {
@Override
public boolean onItemLongClick(AdapterView<?> parent, View view, int position, long id) {
showLostFindDialog(position);
return false;
}
});
}

/**
* 显示提示窗口
*
* @param position
*/
protected void showLostFindDialog(final int position) {
dialog = new CustomDialog(this, R.style.mystyle,
R.layout.dialog, position);
dialog.show();

}

/**
* 自定义dialog
*/
class CustomDialog extends Dialog implements
View.OnClickListener {

/**
* 布局文件
**/
int layoutRes;

/**
* 上下文对象
**/
Context context;

/**
* 取消按钮
**/
private Button bt_cancal;

/**
* 删除按钮
**/
private Button bt_delect;

/**
* 收获地址id
*/
private int postion;

public CustomDialog(Context context) {
super(context);
this.context = context;
}

/**
* 自定义布局的构造方法
*
* @param context
* @param resLayout
*/
public CustomDialog(Context context, int resLayout) {
super(context);
this.context = context;
this.layoutRes = resLayout;
}

/**
* 自定义主题及布局的构造方法
*
* @param context
* @param theme
* @param resLayout
* @param postion
*/
public CustomDialog(Context context, int theme, int resLayout,
int postion) {
super(context, theme);
this.context = context;
this.layoutRes = resLayout;
this.postion = postion;
}

@Override
protected void onCreate(Bundle savedInstanceState) {
super.onCreate(savedInstanceState);

// 指定布局
this.setContentView(layoutRes);

// 根据id在布局中找到控件对象
bt_cancal = (Button) findViewById(R.id.bt_cancal);
bt_delect = (Button) findViewById(R.id.bt_delect);

// 为按钮绑定点击事件监听器
bt_cancal.setOnClickListener(this);
bt_delect.setOnClickListener(this);
}

@Override
public void onClick(View v) {
switch (v.getId()) {

// 删除按钮
case R.id.bt_delect:
// 删除数据
deleteItem(postion);
dialog.dismiss();
break;

// 取消按钮
case R.id.bt_cancal:
dialog.dismiss();

default:
break;
}
}
}

/**
* 删除ListView中的数据
*
* @param postion item的位置
*/
private void deleteItem(int postion) {
mData.remove(postion);
mAdapter.notifyDataSetChanged();
}
}
dialog的布局:
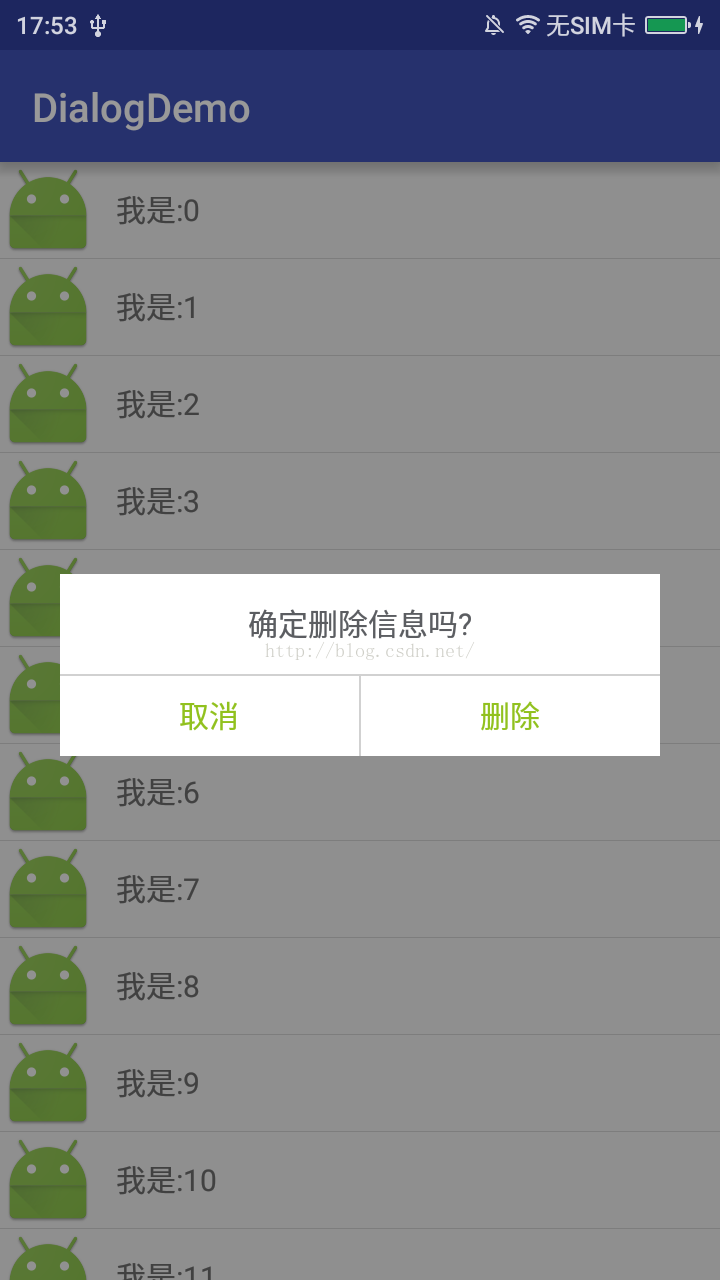
<ScrollView xmlns:android="http://schemas.android.com/apk/res/android"
android:layout_width="300dp"
android:layout_height="wrap_content"
android:layout_gravity="center"
android:background="#ffffff" >

<LinearLayout
android:id="@+id/layout"
android:layout_width="fill_parent"
android:layout_height="wrap_content"
android:layout_gravity="center"
android:orientation="vertical"
android:scrollbars="vertical" >

<TextView
android:layout_width="fill_parent"
android:layout_height="50dp"
android:gravity="center"
android:text="确定删除信息吗?"
android:textColor="#5b5d61"
android:textSize="15sp" />

<LinearLayout
android:layout_width="fill_parent"
android:layout_height="1dip"
android:background="#D1D1D1" />

<LinearLayout
android:layout_width="fill_parent"
android:layout_height="40dp"
android:orientation="horizontal" >

<Button
android:id="@+id/bt_cancal"
android:layout_width="fill_parent"
android:layout_height="fill_parent"
android:layout_weight="1"
android:background="@null"
android:text="取消"
android:textColor="#91c11e"
android:textSize="15dp" />

<LinearLayout
android:layout_width="1dp"
android:layout_height="fill_parent"
android:background="#D1D1D1" />

<Button
android:id="@+id/bt_delect"
android:layout_width="fill_parent"
android:layout_height="fill_parent"
android:layout_weight="1"
android:background="@null"
android:text="删除"
android:textColor="#91c11e"
android:textSize="15dp" />
</LinearLayout>
</LinearLayout>

</ScrollView>
效果图:
完整的demo下载地址:自定义dialog实现listview长按删除item数据

相关文章推荐
- Android 中版本号的设置
- Android-给自定义相机增加贴纸
- Weex Android SDK源码分析之Module(stream)
- Android 自定义控件方法
- 【android】实现图片的三级缓存。工具类
- Android开发60条技术经验总结
- android源码中自带的Pinyin输入法问题
- JFinalAsAndroid(第二天)
- TabLayout
- Android中的LayoutInflater简介
- 安卓日记——玩转Material Design(RecyclerView+CardView篇)
- Android应用开发-Activity
- Android 线性布局
- Android中使用Gradle来构建App项目的入门指南
- 一步步追踪android输入事件(一)
- Android事件分发完全解析之为什么是她
- Android:正常情况下的Activity的生命周期
- Android 利用内容观察者实现短信窃听
- Weex Android SDK源码分析之Module(navigator)
- Android Spinner值不显示,选择列表正常