Spring之IoC容器解析(二)
2016-06-15 19:40
621 查看
Spring之IoC容器解析(二)
外部容器概述原理分析
小结
上一篇讲了内部容器的初始化过程,那么自然这篇就讲讲外部容器的初始化过程。
1.外部容器概述
这里把ApplicationContext该分支成为外部容器,为啥呢,因为在程序中我们很少会直接获取一个BeanFactory来操作,通常都是通过ApplicationContext来做的,Spring把ApplicationContext称为高级IoC容器,确实没错,他不仅有BeanFactory的所有功能,它还具有一些内部容器不具备的功能,比如支持多信息源。好,还是来看看外部容器的层级示意图
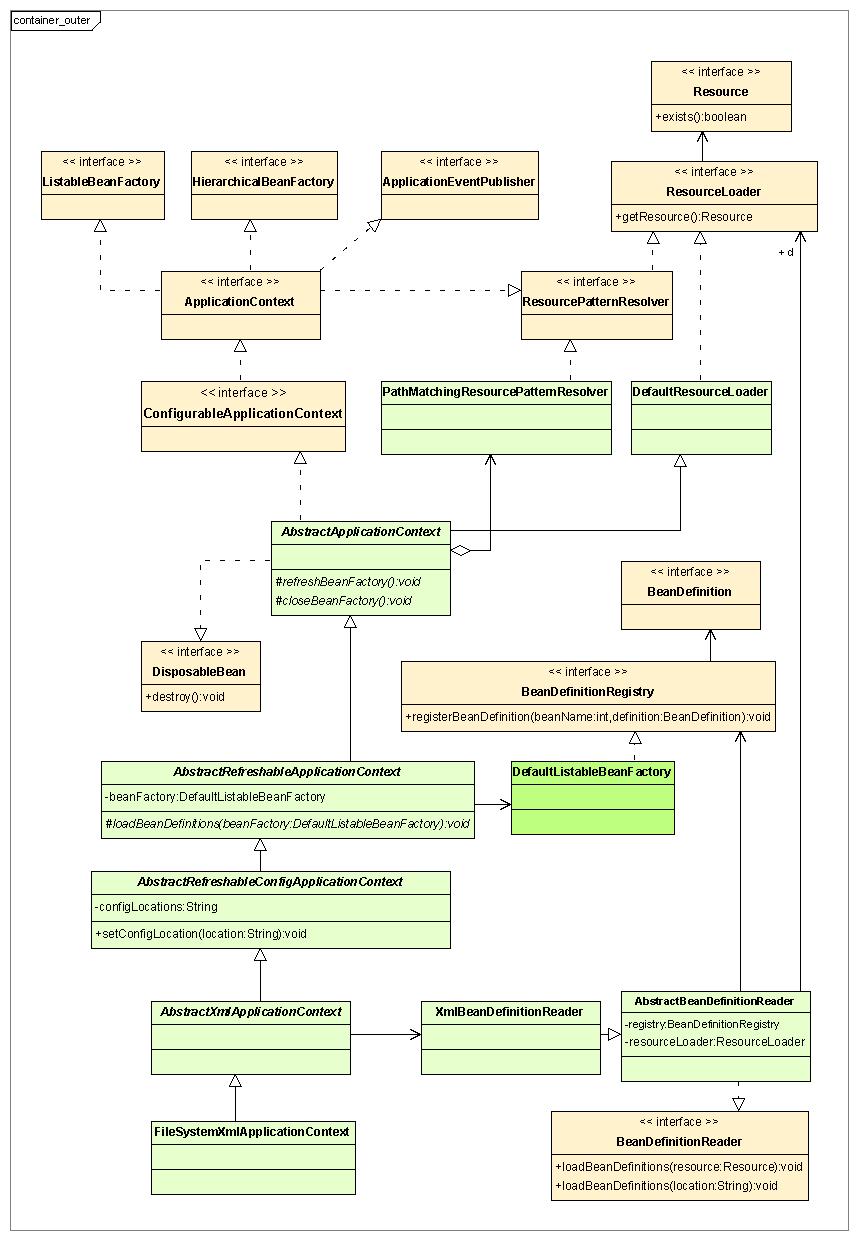
没错,这里ApplicationContext依旧是继承了ListableBeanFactory与HierarchicalBeanFactory,因为我们最基本的功能还是在这几个接口定义的。总体层级看下来,比较不同的就是它解析资源的方式,不过这也是因为他支持多信息源所导致的。可以看到AbstractRefreshableApplicationContext继承了DefaultListableBeanFactory,也就是说明,注册bean等大部分通用操作依旧走的是默认的DefaultListableBeanFactory。相当于是在DefaultListableBeanFactory的基础上扩展。
这里在简单介绍下图中接口或者抽象类的功能:
1.ApplicationContext: 首先是一个外部容器的中心接口,提供应用程序的配置。根据官方释意:一个ApplicationContext提供如下功能:
·用来访问应用程序组件的bean factory方法,其继承自ListableBeanFactory。
·能以通用的方式加载文件资源,其继承自ResourceLoader。
·能够向注册的监听器发布事件,其继承自ApplicationEventPublisher。
·能够解析消息,支持国际化,继承自MessageSource。
·继承自父上下文,后代上下文中的Definition将总能获得优先级,这意味着,例如,一个单亲上下文能够被整个应用程序使用,而每个servlet有它自己的孩子上下文,它独立于其他的servlet。
2.ConfigurableApplicationContext:配置和生命周期方法被封装在这里。
3.AbstractApplicationContext:ApplicationContext的基本抽象实现,提供了BeanFactory的后置processor的注册、应用上下文的双亲维护、资源加载的功能。
4.AbstractRefreshableApplicationContext:官方释义,ApplicationContext的基类的实现,其支持多次refreshs,每次创建一个内部bean工厂实例。通常(但不一定),一个上下文将会由一系列的配置定位来驱动,加载bean definations。
5.AbstractRefreshableConfigApplicationContext:主要为配置文件位置的设置提供入口,即实现了setConfigLocation方法。这就提供了不依赖于Spring的且更灵活、通用的配置注入方式。
6.AbstractXmlApplicationContext:ApplicationContext的便利基类的实现。用于提取包含bean definition信息的XML文档,该文档由XmlBeanDefinitionReader负责解释。
7.FileSystemXmlApplicationContext:这是一个简单的,一站式的便利的ApplicationContext的基本实现。
8.ResourceLoader:加载资源(类路径和文件路径)的策略接口,ApplicationContext需要提供此功能来加载资源。
9.ResourcePatternResolver:解释位置模式的策略接口,其扩展自ResourcePatternResolver接口。
2.原理分析
网上已经有很多资源具体解析了如何从FileSystemXmlApplicationContext启动一个IoC容器,那这里就换个差不多的容器ClassPathXmlApplicationContext来着手说明。先看下ClassPathXmlApplicationContext的入口
/**
* configLocations:资源路径名数组
* refresh:是否自动刷新context
* parent:父context(因为ApplicationContext继承了HierarchicalBeanFactory),可为null
*/
public ClassPathXmlApplicationContext(String[] configLocations, boolean refresh, ApplicationContext parent)
throws BeansException {

super(parent);
//设置资源,该方法在其父类中,就是把传入的资源路径数组设置到父类中
setConfigLocations(configLocations);
if (refresh) {
//最为关键的一步,该方法在AbstractApplicationContext中已经实现
refresh();
}
}
public void refresh() throws BeansException, IllegalStateException {
synchronized (this.startupShutdownMonitor) {
// 容器启动的预先准备,记录容器启动的时间和标记
prepareRefresh();
// 创建BeanFactory,如果已有就销毁,没有就创建。此类实现了对BeanDefinition的装载
//这是重点关注的部分,bean的加载注册也是在这里完成的
ConfigurableListableBeanFactory beanFactory = obtainFreshBeanFactory();
// 配置BeanFactory标准上下文特性,如类装载器,PostProcesser等
prepareBeanFactory(beanFactory);
try {
// 在bean被装载后,提供一个修改BeanFactory的入口
postProcessBeanFactory(beanFactory);
// 调用postProcessBeanFactory
invokeBeanFactoryPostProcessors(beanFactory);
// 注册用于拦截bean创建过程中的BeanPostProcessors
registerBeanPostProcessors(beanFactory);
// Initialize message source for this context.
initMessageSource();
// Initialize event multicaster for this context.
initApplicationEventMulticaster();
// Initialize other special beans in specific context subclasses.
onRefresh();
// 注册监听器
registerListeners();
// 完成容器的初始化,里面的preInstantiateSingletons()完成对单例对象的创建
finishBeanFactoryInitialization(beanFactory);
// Last step: publish corresponding event.
finishRefresh();
}
catch (BeansException ex) {
// Destroy already created singletons to avoid dangling resources.
beanFactory.destroySingletons();
// Reset 'active' flag.
cancelRefresh(ex);
// Propagate exception to caller.
throw ex;
}
}
}既然说了btainFreshBeanFactory()他是bean加载与注册的部分,那就来看看他是怎么做的
protected ConfigurableListableBeanFactory obtainFreshBeanFactory() {
refreshBeanFactory();
ConfigurableListableBeanFactory beanFactory = getBeanFactory();
if (logger.isDebugEnabled()) {
logger.debug("Bean factory for " + getDisplayName() + ": " + beanFactory);
}
return beanFactory;
}
protected final void refreshBeanFactory() throws BeansException {
//如果此时内部的beanfactory已经创建好了,那么销毁已经注册的bean,同时关闭这个factory
if (hasBeanFactory()) {
destroyBeans();//有DefaultListableBeanFactory发起,clear它内部用于维护bean的map有list,同时可clear其父类中用于维护bean与bean之间关系的map,list
closeBeanFactory(); //将内部的beanfactory置空
}
//如果此时内部的beanfactory还没有创建,那么创建一个beanfactory,默认都是DefaultListableBeanFactory
try {
DefaultListableBeanFactory beanFactory = createBeanFactory();
beanFactory.setSerializationId(getId());
//设置这个beanfactory的一些属性,我看了下设置了两个部分  1.是否允许BeanDefinition的覆盖  2.是否允许循环引用
customizeBeanFactory(beanFactory);
//即将开始读取resource,往这个beanfactory里注册BeanDefinition
//这是加载注册bean的入口
loadBeanDefinitions(beanFactory);
//将现在创建好的beanfactory设置为当前持有的beanfactory
synchronized (this.beanFactoryMonitor) {
this.beanFactory = beanFactory;
}
}
catch (IOException ex) {
throw new ApplicationContextException("I/O error parsing bean definition source for " + getDisplayName(), ex);
}
}
接下来看下,是如何获得Resource,进行bean的加载的
protected void loadBeanDefinitions(DefaultListableBeanFactory beanFactory) throws BeansException, IOException {
//跟内部容易一样,要加载资源,那就要定义一个读取资源的读取器,同之前XmlBeanFactory一样也是创建一个XmlBeanDefinitionReader
XmlBeanDefinitionReader beanDefinitionReader = new XmlBeanDefinitionReader(beanFactory);

beanDefinitionReader.setEnvironment(this.getEnvironment());
//从容器的层级模型图中看出,AbstractApplicationContext实现了ResourceLoader,提供了一个默认的DefaultResourceLoader用于加载以不同形式给出的资源路径
//给Reader配置一个ResourceLoader,以读取DefaultResourceLoader加载出来的Resource
beanDefinitionReader.setResourceLoader(this);

//设置一个对应的资源解析器(一个标准的SAX实体)
beanDefinitionReader.setEntityResolver(new ResourceEntityResolver(this));

//如果我们提供了一些自定义的初始化策略,这里可以执行
initBeanDefinitionReader(beanDefinitionReader);

//加载bean的入口
loadBeanDefinitions(beanDefinitionReader);
}

protected void loadBeanDefinitions(XmlBeanDefinitionReader reader) throws BeansException, IOException {
//以Resource方式获得配置文件的资源位置
Resource[] configResources = getConfigResources();
if (configResources != null) {
reader.loadBeanDefinitions(configResources);
}
//以String的方式获得配置文件的位置
String[] configLocations = getConfigLocations();
if (configLocations != null) {
reader.loadBeanDefinitions(configLocations);
}
}
具体以何种方式读取到资源,依据调用构造函数时,使用的是哪一个,那顺便看下构造函数是咋样的。
//主要是这两个

public ClassPathXmlApplicationContext(String[] paths, Class<?> clazz, ApplicationContext parent)
throws BeansException {

super(parent);
Assert.notNull(paths, "Path array must not be null");
Assert.notNull(clazz, "Class argument must not be null");
this.configResources = new Resource[paths.length];
for (int i = 0; i < paths.length; i++) {
this.configResources[i] = new ClassPathResource(paths[i], clazz);
}
refresh();
}

public ClassPathXmlApplicationContext(String[] configLocations, boolean refresh, ApplicationContext parent)
throws BeansException {

super(parent);
setConfigLocations(configLocations);
if (refresh) {
refresh();
}
}
如果用的是第一个,那资源的方式是以Resource的形式获取到的
否则是以String的方式来获取资源位置
第一种方式中需要给出一个Class
Resource方式读取资源
跟之前讲过的外部容器的初始化方式一致,有所不同的是这个加载、注册bean的过程会执行多次。public int loadBeanDefinitions(Resource... resources) throws BeanDefinitionStoreException {
Assert.notNull(resources, "Resource array must not be null");
int counter = 0;
for (Resource resource : resources) {
counter += loadBeanDefinitions(resource);
}
return counter;
}给出多少个资源就执行多少次,同时还记录了总共加载的bean的数量
那么重点讲讲另一种方式加载、注册bean的过程.
同样的,这种方式也会被执行多次,给出多少String形式的资源就执行多少次,同时还记录总共注册了bean的数量。
public int loadBeanDefinitions(String... locations) throws BeanDefinitionStoreException {
Assert.notNull(locations, "Location array must not be null");
int counter = 0;
for (String location : locations) {
counter += loadBeanDefinitions(location);
}
return counter;
}
与另一种给出Resource有所不同的是,使用Resource读取资源时,用的是XmlBeanDefinitionReader,而加载String形式的资源,则是爱AbstractBeanDefinitionReader中实现的
代码太长,一点点看.
ResourceLoader resourceLoader = getResourceLoader();
if (resourceLoader == null) {
throw new BeanDefinitionStoreException(
"Cannot import bean definitions from location [" + location + "]: no ResourceLoader available");
}
public ResourceLoader getResourceLoader() {
return this.resourceLoader;
}
这里很好理解,我们需要获取一个ResourceLoader来将String形式的资源路径加载成Resource
那这个ResourceLoader从哪里来?
在上面refresh过程中,刷新BeanFactory的过程,refreshBeanFactory函数的loadBeanDefinitions子函数内,我们设置将当前context设置成了ResourceLoader.
也就是说,用当前的Context来加载资源,默认使用的是DefaultResourceLoader
继续往下走.
if (resourceLoader instanceof ResourcePatternResolver) {
try {
//将一个或多个指定位置的bean资源,转换成Resource形式的资源
Resource[] resources = ((ResourcePatternResolver) resourceLoader).getResources(location);

//这个明显就是加载bean的过程了
int loadCount = loadBeanDefinitions(resources);
if (actualResources != null) {
for (Resource resource : resources) {
actualResources.add(resource);
}
}
...
//返回了加载的bean的数量
return loadCount;
}
catch (IOException ex) {
...
}
}
来看下他是如何将String类型的资源形式加载成Resource的
跟踪可以看到,最终是在PathMatchingResourcePatternResolver里实现的
public Resource[] getResources(String locationPattern) throws IOException {
Assert.notNull(locationPattern, "Location pattern must not be null");
if (locationPattern.startsWith(CLASSPATH_ALL_URL_PREFIX)) {//以classpath*:开头,以类路径的形式给出
// 判断路径中是否有通配符(*,?)
if (getPathMatcher().isPattern(locationPattern.substring(CLASSPATH_ALL_URL_PREFIX.length()))) {
// 加载符合这些规则的资源  比如 classpath*: **/*DAO.class 这样的路径会走到该分支
return findPathMatchingResources(locationPattern);
}
else {
// 如果路径中没有通配符,那就说明已经给出了具体路径,直接加载
return findAllClassPathResources(locationPattern.substring(CLASSPATH_ALL_URL_PREFIX.length()));
}
}
//else部分解析的不是以classpath*:开头,说明不是以类路径形式给出,而是一个文件路径 file: 这样的形式或者不带有前缀
else {
//直接看第一个:后的路径,拿掉第一个前缀
int prefixEnd = locationPattern.indexOf(":") + 1;
if (getPathMatcher().isPattern(locationPattern.substring(prefixEnd))) {
//同样的拿掉了 前缀: 后如果还有通配符(*,?),继续按规定加载
return findPathMatchingResources(locationPattern);
}
else {
//拿掉了前缀: 后,如果不含通配符;或者没有前缀,说明直接就是个单资源路径
return new Resource[] {getResourceLoader().getResource(locationPattern)};
}
}
}
继续看他是如何加载成Resource的。
本想将整个加载过程拿出来讲的,而且也是与BeanFactory分支比较大的区别之一。但是我看了下代码感觉实在是有点多,拿出来一个个讲太占篇幅。所以就不给出源代码了,直接讲他的过程跟原理。
以String类型给出的资源路径包括三种形式的
1.类路径  例子 classpath*:**/*.xml   classpath*:com/cc/a.xml
2.文件路径 例子 file:C:/myhome/a.xml  file:C:/myhome/*.xml
3.不带前缀的 例子 com/myhome/**/*.xml
首先是类路径,分为两种,一种是带通配符的,一种是不带通配符的.
不带通配符的
不带通配符相当于直接给出了资源文件,不用进行匹配了。所以直接去他所在目录下去找他就好了
例:classpath*:com/cc/a.xml 去classes/com/cc 下去找a.xml文件
classpath*:a.xml 去classes/ 找a.xml文件
带通配符的
这个相对麻烦点,不仅是匹配问题。
例:classpath*:*.xml
因为有通配符,我们先获取资源文件所在目录,这里是classes,所以,他先加载了classes/。
进行匹配是时,将classes下的所有子目录以及classes目录下的直接文件加载进来,然后逐一匹配。
匹配样例: /Users/admin51/git/lwy/target/classes/*.xml 匹配 /Users/admin51/git/lwy/target/classes/login.ftl
可能我们觉得这样就完了,然而并不,因为文件所在目录是classe目录,所以还有一步特殊操作。
它还会把你项目中所引用到的jar包都加载进来,然后把每个jar包下的文件都解析出来,比如com/oracle/tools/packager/Bundler.class。然后与解析出来的文件进行匹配.
匹配样例:*.xml 匹配 com/oracle/tools/packager/Bundler.class
恩,可能会感到奇怪为何直接用*.xml进行匹配,因为我们在匹配前需要根据待匹配资源属性来决定是全路径匹配还是文件名匹配。
比如如果是jar资源,则用文件名进行匹配。如果是文件资源类型,则使用全路径进行匹配
类似的,如果资源是classpath*:templates/*.xml这样的形式,不是直接的classes目录
则,先把classes/templates/加载进来,进行匹配的时候再把classes/templates/ 下全部的文件都加载进来,然后逐一匹配。并不用匹配jar文件,这是比较特殊的一点。
类路径的加载方式说的差不多,文件路径与类路径基本一致
还有一种就是不带前缀的
例: *.xml
com/qwf/*.xml
基本就是这两种情况,一种没有目录,一种有目录。区别在哪里呢。
首先要认识到一点,不带前缀默认就是根目录(classes)
*.xml这种方式进行加载时,直接加载classes/ 目录,然后加载classes/ 下的所有文件进行匹配,当然,jar文件也会被加载进而匹配。
像com/qwf/*.xml这种方式进行加载,默认环境是根目录(classes),加上从这个路径中识别出来的com/qwf/,所以加载目录就成了classes/com/qwf/ ,进行加载时,先加载classes/com/qwf/ 目录,在加载classes/com/qwf/ 目录下所有文件进行匹配。返回匹配成功的资源。
那加载的方式说的差不多了,来说下它是如何进行匹配的。
首先我们使用的目录分隔符是“/”,匹配是,将带匹配资源与目标资源全路径以String形式给出
例:
目标资源:/Users/admin51/git/lwy/target/classes/*.xml
待匹配的:/Users/admin51/git/lwy/target/classes/beans.xml
用split函数将他们分隔开来,形成两个String数组,逐层对比,如果不同,则返回false。
不过我们看到他们前面部分都一样,唯有最后,一个是*.xml,另一个是beans.xml,这里如何匹配。
跟踪程序可以发现,最终匹配是用Java的正则来完成匹配的,beans.xml  与  .*\Q.xml\E 进行匹配
\Q 的意思是引用后面所有的元字符直到遇到;\E 是配合 \Q 而存在的
由此, .*\Q.xml\E 的意思是 .*.xml  以这样的方式进行正则匹配。扩展一下,如果 *.xml 换成 be*.xml,是如何进行匹配的呢
匹配表达式就变成了\Qbe\E.*\Q.xml\E   简化下就是be.*.xml
这是一种匹配情况,另一种是带有**(任意目录)的,这个的话应该比较好理解,举个例子
例:/Users/admin51/git/**/cc/*.xml
/Users/admin51/git/lwy/target/classes/beans.xml
因为是比较到git之后出现**,所以先看下**后面还有没有目录,有的话,像例子中,取出cc,然后观察待匹配资源从git之后,有没有包含cc目录的,若没有,返回false。
如果有或者有多个cc,则从最后一个cc开始继续完成匹配。
若是/Users/admin51/git/**/*.xml 这样的形式,就比较麻烦,需要加载从git开始的每一级目录内的所有文件,比较有没有匹配*.xml的资源。
所以使用ApplicationContext显示加载资源时,不要用类似 **/*.xml 这样的形式,因为会比较非常多的文件。而且很多都是无意义的匹配,拖慢加载速度。
那说到这里,使用ApplicationContext的资源加载获取基本就完成了,而后的步骤就是讲Resource数组内的加载到Document,再从Document加载到BeanDefinition,最后注册到DefaultListableBeanFactory,过程与之前说到内部容器的初始化、注册过程一样了。唯有不同的就是,BeanFactory分支,只对单一Resource进行加载。而ApplicationContext分支则对一组Resource进行加载,这也是体现ApplicationContext作为高级容器的一个特征。
小结
回顾一下ApplicationContext对于资源的加载与注册于BeanFactory分支的区别。1.BeanFactory一次只能加载一个Resource,而ApplicationContext一次可以加载多个Resource
2.BeanFactory与ApplicationContext获取资源的方式不同,BeanFactory直接去找对应资源而ApplicationContext有可能需要进行资源匹配
这里多说一点,比如BeanFactory去加载Resource的时候,一个Resource就是一个Resource。而ApplicationContext可能是从几百个待挑选的Resource中选出了批匹配合格的Resource进行加载。所以,建议如果是显示的调用ApplicationContext进行资源加载的话,不要使用类似”classpath*:*/.xml”这样的形式,因为会白白增加很多无谓的比较。
3.ApplicationContext提供了比BeanFactory更多的功能,这是肯定的,作为一个高级IoC容器,提供的功能肯定要比BeanFactory多一些

相关文章推荐
- 一个jar包里的网站
- 一个jar包里的网站之文件上传
- 一个jar包里的网站之返回对媒体类型
- Spring和ThreadLocal
- Spring Boot 开发微服务
- Spring AOP动态代理-切面
- Spring整合Quartz(JobDetailBean方式)
- Spring整合Quartz(JobDetailBean方式)
- 模拟Spring的简单实现
- Spring整合WebSocket应用示例(上)
- spring+html5实现安全传输随机数字密码键盘
- Spring中属性注入详解
- 监听器获取Spring配置文件的方法
- springmvc 发送ajax出现中文乱码的解决方法汇总
- SpringMVC框架下JQuery传递并解析Json格式的数据是如何实现的
- 详解Java的MyBatis框架和Spring框架的整合运用
- struts2 spring整合fieldError问题
- spring的jdbctemplate的crud的基类dao
- 读取spring配置文件的方法(spring读取资源文件)