Nexus私服搭建、配置、上传snapshot
2016-06-15 17:01
549 查看
博主折腾了很久,终于通过各种看资料, 稍微弄懂了一点私服。现在将自己的理解记录下来。
背景
实验室需要有一个比较大的项目,想要把功能尽可能细分。这里使用maven来管理项目。项目被细分为project-parent、project-war、project-a、project-b。其中后三个项目只是集成parent的pom的一些jar包,并不是模块关系。然后本人搭建了一个私服,想要从私服上下载jar包。
Nexus安装
关于安装教程见私服安装教程和原理
Nexus配置
一、搭建完私服,使用默认账号登录admin/admin123
二、配置repository
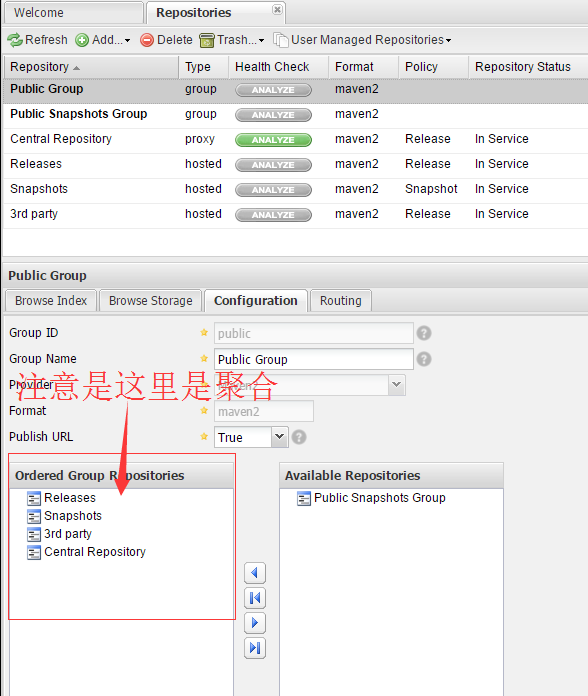
在Views/Repositories–>Repositories里进行配置。
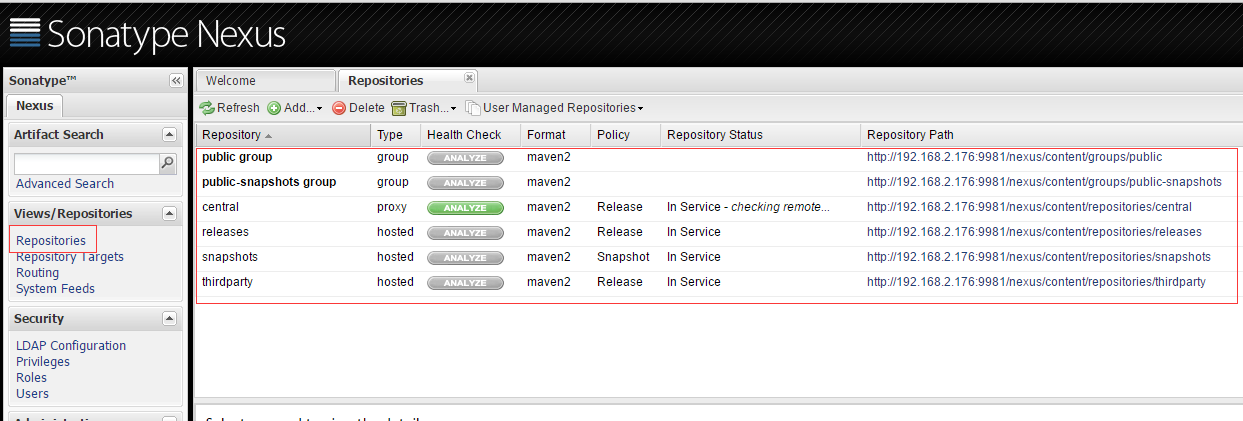
nexus里可以配置3种类型的仓库,分别是proxy、hosted、group
proxy是远程仓库的代理。比如说在nexus中配置了一个central repository的proxy,当用户向这个proxy请求一个artifact,这个proxy就会先在本地查找,如果找不到的话,就会从远程仓库 下载,然后返回给用户,相当于起到一个中转的作用。
hosted是宿主仓库,用户可以把自己的一些构件,deploy到hosted中,也可以手工上传构件到hosted里。比如说oracle的驱动程序,ojdbc6.jar,在central repository是获取不到的,就需要手工上传到hosted里。
group是仓库组,在maven里没有这个概念,是nexus特有的。目的是将上述多个仓库聚合,对用户暴露统一的地址,这样用户就不需要在pom中配置多个地址,只要统一配置group的地址就可以了。
nexus装好之后,已经初始化定义了一些repository,我们熟悉之后,就可以自行删除、新增、编辑。这里博主删了Apache snapshot等。右边那个Repository Path可以点击进去,看到仓库中artifact列表。
三、配置Central Repository
这个代理是最重要的,因为我们大部分依赖的jar包都是从这里下载的。
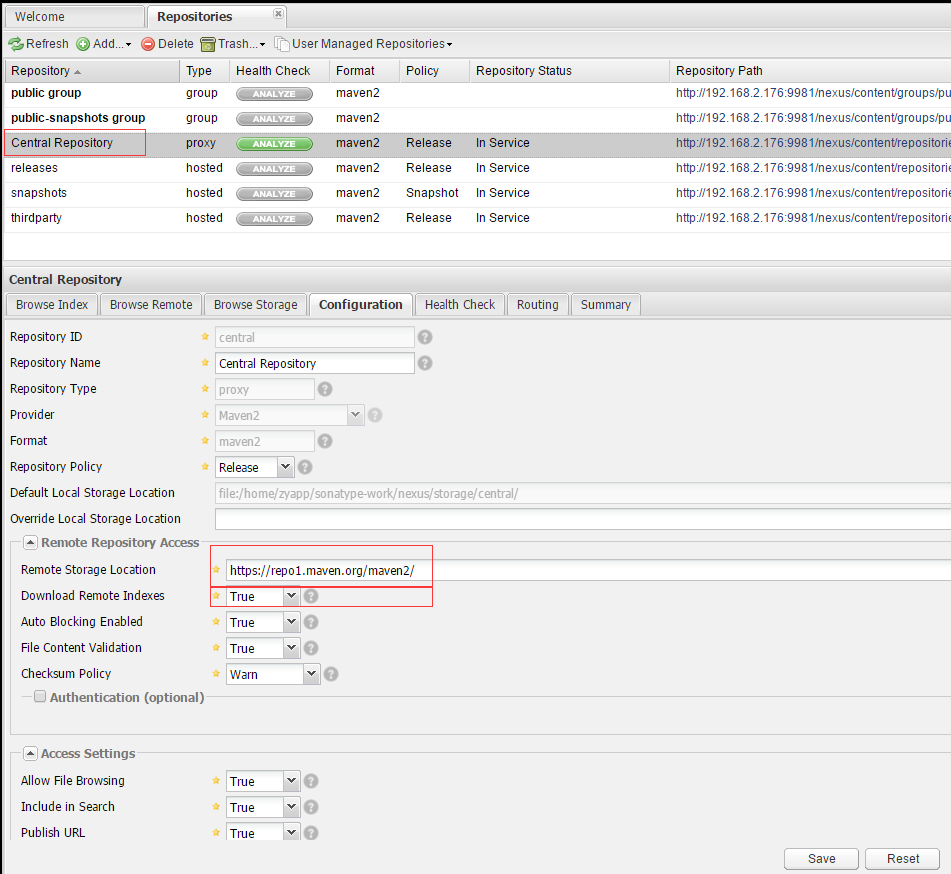
这个代理是nexus预置的,这里已经将需要修改的部分修改。主要是Download Remote Indexes改为true,这样nexus才会从central repository下载索引,才能在nexus中使用artifact search的功能 。网络上有一些其他公开的maven仓库,可以用同样的办法,在nexus中设置proxy,但是并不是所有maven仓库,都提供了nexus index,这种情况下,就无法建立索引了。
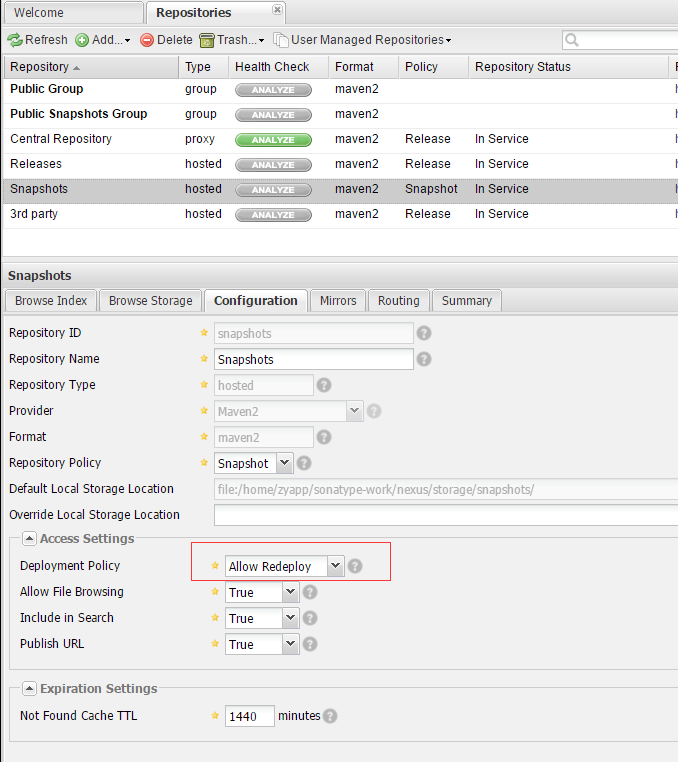
四、配置预置的Hosted Repository
这里预置的三个hosted repository分别是3rd party、Snapshot、Releases。它们的作用分别是:
这里需要修改的是,将Snapshot中的Deployment Policy这个选项设置为Allow Redeploy。Releases和3rd party设置为禁止。
五、配置group repository
group其实是一个虚拟的仓库,通过对实体仓库(proxy、hosted)进行聚合,对外暴露出一个统一的地址,这样在我们引入私服地址的时候,不需要写太多个地址(其实就是central、Releases、3rd party、Snapshot的集合)。
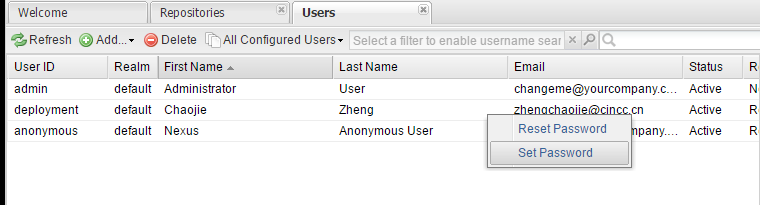
六、配置用户密码
在Security–>Users中配置,在deployment用户上点击右键,选择Set Password,然后设置一个密码,做这个操作是为了后面提交做准备。
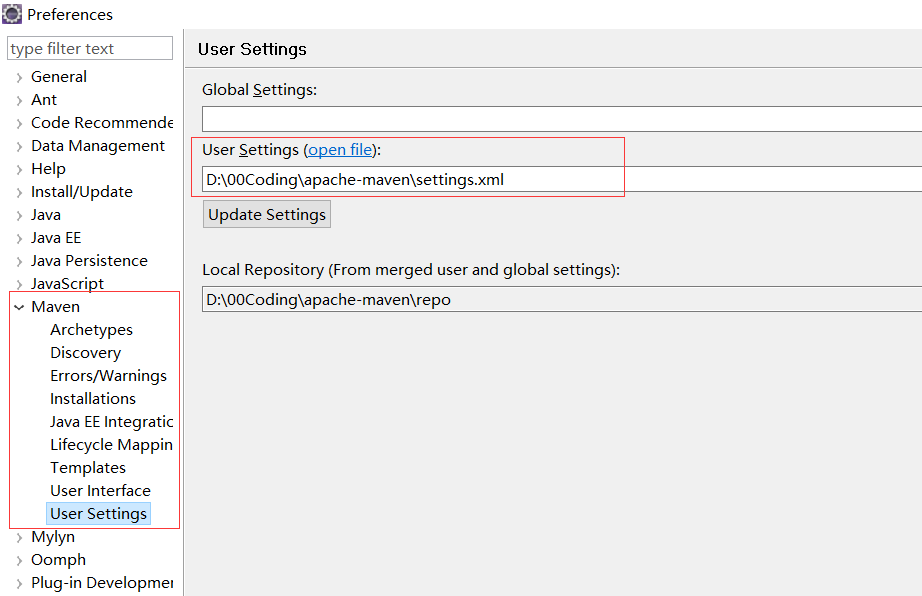
七、配置eclipse的setting.xml
在新版的eclipse中,已经内置了maven插件。找到setting文件。
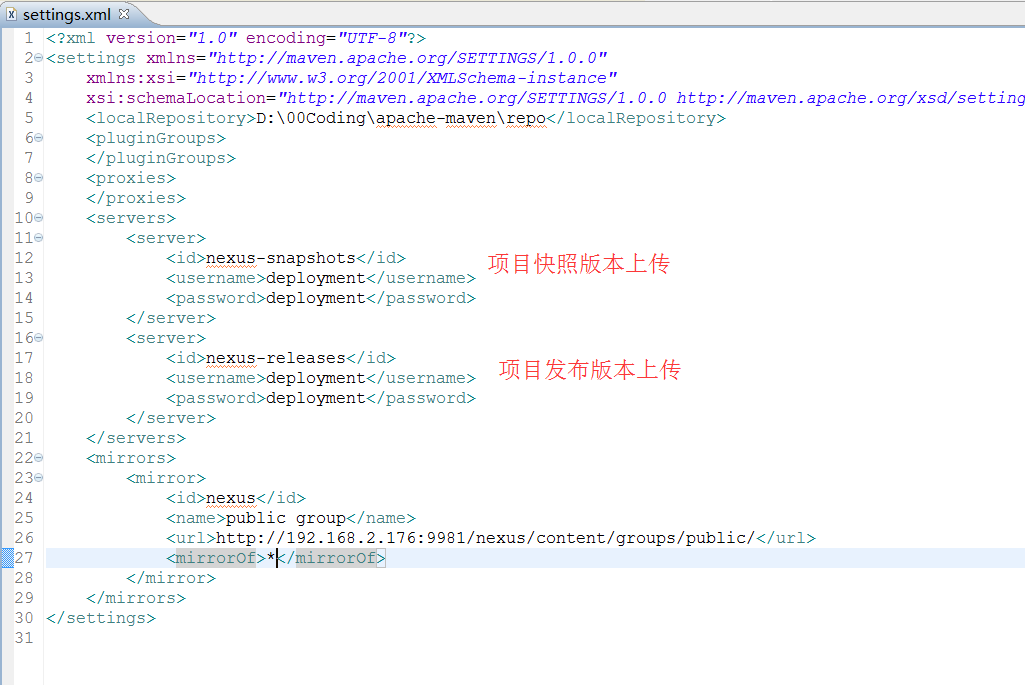
附上setting.xml文件
这里只配置了2个元素mirrors和servers。首先这里配置了一个id为nexus的镜像仓库,地址是前面配置的public group的URL,然后镜像目标是central。
这里插入一个maven源码中的超级pom(maven是一个开源的软件,感兴趣可以查看源码),我们看到里面配置了这样一段:
因此,当本地的maven项目,找不到需要的构件(包括jar包和插件)的时候,默认会到central里获取
所以我们刚刚配置的镜像仓库,mirrorOf也是central,这样本地maven项目对central repository的请求,就会转到镜像仓库上,也就是我们设置的nexus私服上。由于我们在项目的pom里,不会再配置其他的repositories和pluginRepositories元素,所以只要配置一个central的mirror,就足以阻止所有的外网访问。如果pom中还配置了其他的外网仓库,比如jboss repository等,可以把mirrorOf改为*。
至于servers元素,是因为我们把项目内部的构件上传到nexus的仓库中时,nexus会进行权限控制,所以这里需要设置 权限相关的信息。注意这里的id是nexus-snapshots,以及nexus-releases。后面maven工程里的pom设置是一致的。可以在servers里面配置多个server,比如nexus-releases可以对应是发布版本,nexus-Snapshot是项目快照版本。
八、配置maven项目的pom文件
这里parent是打成pom形式,主要是对jar的一些维护。直接看私服部署到私服nexus上的配置吧!
这里配置了distributionManagement元素,其中的id属性的值nexus-snapshots与前面说的settings.xml中的servers元素中的配置必须一致。配置这个的目的,是当执行maven deploy时,才知道要将生成的构件部署到哪个远程仓库上,注意这里的URL填的就不是public group的地址,而是snapshots的地址:
http://192.168.2.176:9981/nexus/content/repositories/snapshots/
但是在nexus中,snapshots也是聚合到public group里的,所以开发人员A提交到snapshots的构件,开发人员B也可以从public group里获取到。
附上parent.pom,包含了一些springmvc需要的依赖。
九、Eclipse上部署Snapshot到私服。
选择你需要部署到私服的项目,首先这个项目应该是一个Snapshot版本。然后右击,选择Run As
保存后,点击Run就可以了。然后在Nexus上的Snapshot仓库里就可以看到啦!就是这么简单。
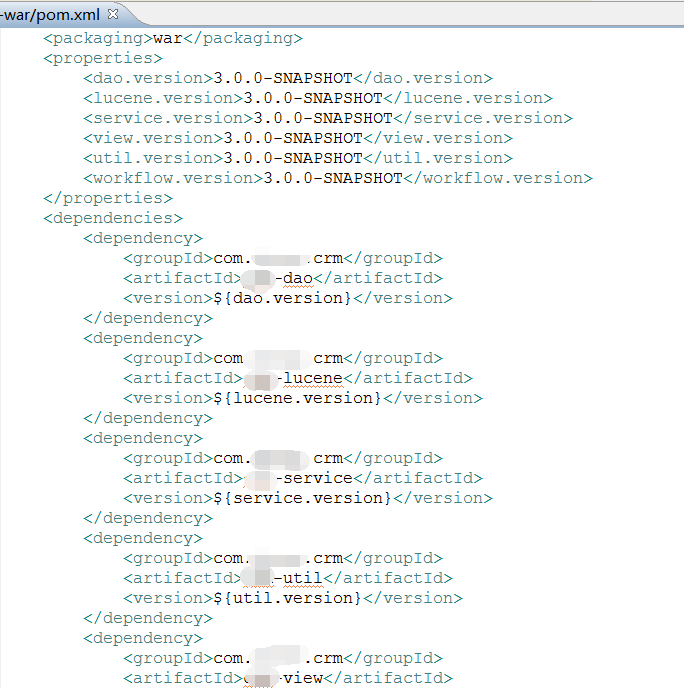
然后在project-war中,和引入其他依赖一下,引入这个Snapshot版本的包就行了。
背景
实验室需要有一个比较大的项目,想要把功能尽可能细分。这里使用maven来管理项目。项目被细分为project-parent、project-war、project-a、project-b。其中后三个项目只是集成parent的pom的一些jar包,并不是模块关系。然后本人搭建了一个私服,想要从私服上下载jar包。
Nexus安装
关于安装教程见私服安装教程和原理
Nexus配置
一、搭建完私服,使用默认账号登录admin/admin123
二、配置repository
在Views/Repositories–>Repositories里进行配置。
nexus里可以配置3种类型的仓库,分别是proxy、hosted、group
proxy是远程仓库的代理。比如说在nexus中配置了一个central repository的proxy,当用户向这个proxy请求一个artifact,这个proxy就会先在本地查找,如果找不到的话,就会从远程仓库 下载,然后返回给用户,相当于起到一个中转的作用。
hosted是宿主仓库,用户可以把自己的一些构件,deploy到hosted中,也可以手工上传构件到hosted里。比如说oracle的驱动程序,ojdbc6.jar,在central repository是获取不到的,就需要手工上传到hosted里。
group是仓库组,在maven里没有这个概念,是nexus特有的。目的是将上述多个仓库聚合,对用户暴露统一的地址,这样用户就不需要在pom中配置多个地址,只要统一配置group的地址就可以了。
nexus装好之后,已经初始化定义了一些repository,我们熟悉之后,就可以自行删除、新增、编辑。这里博主删了Apache snapshot等。右边那个Repository Path可以点击进去,看到仓库中artifact列表。
三、配置Central Repository
这个代理是最重要的,因为我们大部分依赖的jar包都是从这里下载的。
这个代理是nexus预置的,这里已经将需要修改的部分修改。主要是Download Remote Indexes改为true,这样nexus才会从central repository下载索引,才能在nexus中使用artifact search的功能 。网络上有一些其他公开的maven仓库,可以用同样的办法,在nexus中设置proxy,但是并不是所有maven仓库,都提供了nexus index,这种情况下,就无法建立索引了。
四、配置预置的Hosted Repository
这里预置的三个hosted repository分别是3rd party、Snapshot、Releases。它们的作用分别是:
3rd用来保存第三方jar包;
Snapshot用来保存项目组内部的快照;
Releases项目组内部的发布版;
这里需要修改的是,将Snapshot中的Deployment Policy这个选项设置为Allow Redeploy。Releases和3rd party设置为禁止。
五、配置group repository
group其实是一个虚拟的仓库,通过对实体仓库(proxy、hosted)进行聚合,对外暴露出一个统一的地址,这样在我们引入私服地址的时候,不需要写太多个地址(其实就是central、Releases、3rd party、Snapshot的集合)。
六、配置用户密码
在Security–>Users中配置,在deployment用户上点击右键,选择Set Password,然后设置一个密码,做这个操作是为了后面提交做准备。
七、配置eclipse的setting.xml
在新版的eclipse中,已经内置了maven插件。找到setting文件。
附上setting.xml文件
<?xml version="1.0" encoding="UTF-8"?>
<settings xmlns="http://maven.apache.org/SETTINGS/1.0.0"
xmlns:xsi="http://www.w3.org/2001/XMLSchema-instance"
xsi:schemaLocation="http://maven.apache.org/SETTINGS/1.0.0 http://maven.apache.org/xsd/settings-1.0.0.xsd"> <!--本地maven仓库,根据需要修改-->
<localRepository>D:\00Coding\apache-maven\repo</localRepository>
<pluginGroups>
</pluginGroups>
<proxies>
</proxies>
<servers>
<server>
<id>nexus-snapshots</id>
<username>deployment</username>
<password>deployment</password>
</server>
<server>
<id>nexus-releases</id>
<username>deployment</username>
<password>deployment</password>
</server>
</servers>
<mirrors>
<mirror>
<id>nexus</id>
<name>public group</name>
<url>http://192.168.2.176:9981/nexus/content/groups/public/</url>
<mirrorOf>*</mirrorOf>
</mirror>
</mirrors>
</settings>
这里只配置了2个元素mirrors和servers。首先这里配置了一个id为nexus的镜像仓库,地址是前面配置的public group的URL,然后镜像目标是central。
这里插入一个maven源码中的超级pom(maven是一个开源的软件,感兴趣可以查看源码),我们看到里面配置了这样一段:
~~~
<repositories>
<repository>
<id>central</id>
<name>Central Repository</name>
<url>http://repo.maven.apache.org/maven2</url>
<layout>default</layout>
<snapshots>
<enabled>false</enabled>
</snapshots>
</repository>
</repositories>

<pluginRepositories>
<pluginRepository>
<id>central</id>
<name>Central Repository</name>
<url>http://repo.maven.apache.org/maven2</url>
<layout>default</layout>
<snapshots>
<enabled>false</enabled>
</snapshots>
<releases>
<updatePolicy>never</updatePolicy>
</releases>
</pluginRepository>
</pluginRepositories>
~~~
因此,当本地的maven项目,找不到需要的构件(包括jar包和插件)的时候,默认会到central里获取
所以我们刚刚配置的镜像仓库,mirrorOf也是central,这样本地maven项目对central repository的请求,就会转到镜像仓库上,也就是我们设置的nexus私服上。由于我们在项目的pom里,不会再配置其他的repositories和pluginRepositories元素,所以只要配置一个central的mirror,就足以阻止所有的外网访问。如果pom中还配置了其他的外网仓库,比如jboss repository等,可以把mirrorOf改为*。
至于servers元素,是因为我们把项目内部的构件上传到nexus的仓库中时,nexus会进行权限控制,所以这里需要设置 权限相关的信息。注意这里的id是nexus-snapshots,以及nexus-releases。后面maven工程里的pom设置是一致的。可以在servers里面配置多个server,比如nexus-releases可以对应是发布版本,nexus-Snapshot是项目快照版本。
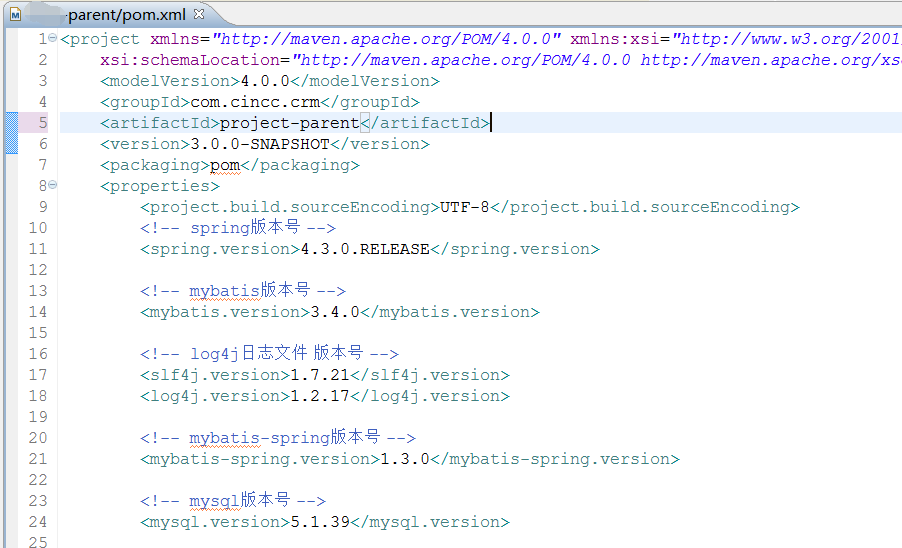
八、配置maven项目的pom文件
这里parent是打成pom形式,主要是对jar的一些维护。直接看私服部署到私服nexus上的配置吧!
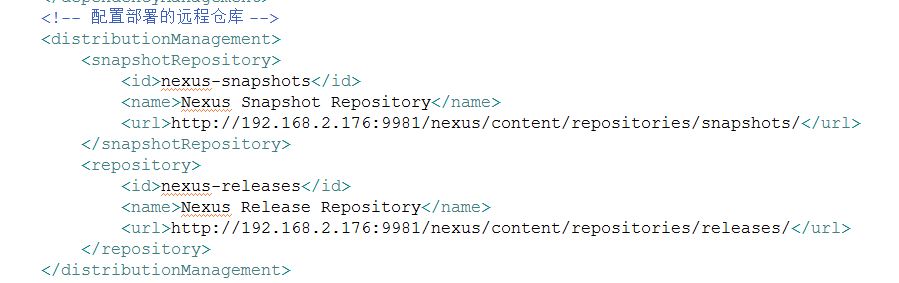
这里配置了distributionManagement元素,其中的id属性的值nexus-snapshots与前面说的settings.xml中的servers元素中的配置必须一致。配置这个的目的,是当执行maven deploy时,才知道要将生成的构件部署到哪个远程仓库上,注意这里的URL填的就不是public group的地址,而是snapshots的地址:
http://192.168.2.176:9981/nexus/content/repositories/snapshots/
但是在nexus中,snapshots也是聚合到public group里的,所以开发人员A提交到snapshots的构件,开发人员B也可以从public group里获取到。
附上parent.pom,包含了一些springmvc需要的依赖。
<project xmlns="http://maven.apache.org/POM/4.0.0" xmlns:xsi="http://www.w3.org/2001/XMLSchema-instance"
xsi:schemaLocation="http://maven.apache.org/POM/4.0.0 http://maven.apache.org/xsd/maven-4.0.0.xsd"> <modelVersion>4.0.0</modelVersion>
<groupId>com.cincc.crm</groupId>
<artifactId>crm-parent</artifactId>
<version>3.0.0-SNAPSHOT</version>
<packaging>pom</packaging>
<properties>
<project.build.sourceEncoding>UTF-8</project.build.sourceEncoding>
<!-- spring版本号 -->
<spring.version>4.3.0.RELEASE</spring.version>

<!-- mybatis版本号 -->
<mybatis.version>3.4.0</mybatis.version>

<!-- log4j日志文件 版本号 -->
<slf4j.version>1.7.21</slf4j.version>
<log4j.version>1.2.17</log4j.version>

<!-- mybatis-spring版本号 -->
<mybatis-spring.version>1.3.0</mybatis-spring.version>

<!-- mysql版本号 -->
<mysql.version>5.1.39</mysql.version>

<!-- com.alibaba druid版本号 -->
<druid.version>1.0.20</druid.version>

<!-- jackson版本号 -->
<jackson.version>2.7.4</jackson.version>

<!-- json版本号 -->
<json.version>1.9.13</json.version>

<!-- lucene版本号 -->
<lucene.version>6.0.1</lucene.version>

<!-- commons-fileupload.version -->
<commons-fileupload.version>1.3.2</commons-fileupload.version>
<!-- servlet版本包 -->
<servlet.version>2.5</servlet.version>

</properties>
<dependencyManagement>
<dependencies>
<!-- junit测试包 -->
<dependency>
<groupId>junit</groupId>
<artifactId>junit</artifactId>
<version>4.11</version>
<scope>test</scope>
</dependency>

<!-- spring核心包 -->
<!-- springframe start -->
<dependency>
<groupId>org.springframework</groupId>
<artifactId>spring-core</artifactId>
<version>${spring.version}</version>
</dependency>

<dependency>
<groupId>org.springframework</groupId>
<artifactId>spring-web</artifactId>
<version>${spring.version}</version>
</dependency>

<dependency>
<groupId>org.springframework</groupId>
<artifactId>spring-oxm</artifactId>
<version>${spring.version}</version>
</dependency>

<dependency>
<groupId>org.springframework</groupId>
<artifactId>spring-tx</artifactId>
<version>${spring.version}</version>
</dependency>

<dependency>
<groupId>org.springframework</groupId>
<artifactId>spring-jdbc</artifactId>
<version>${spring.version}</version>
</dependency>

<dependency>
<groupId>org.springframework</groupId>
<artifactId>spring-webmvc</artifactId>
<version>${spring.version}</version>
</dependency>

<dependency>
<groupId>org.springframework</groupId>
<artifactId>spring-aop</artifactId>
<version>${spring.version}</version>
</dependency>

<dependency>
<groupId>org.springframework</groupId>
<artifactId>spring-context-support</artifactId>
<version>${spring.version}</version>
</dependency>

<dependency>
<groupId>org.springframework</groupId>
<artifactId>spring-test</artifactId>
<version>${spring.version}</version>
</dependency>
<!-- springframe end -->

<!-- mybatis核心包 -->
<dependency>
<groupId>org.mybatis</groupId>
<artifactId>mybatis</artifactId>
<version>${mybatis.version}</version>
</dependency>

<!-- mybatis/spring包 -->
<dependency>
<groupId>org.mybatis</groupId>
<artifactId>mybatis-spring</artifactId>
<version>${mybatis-spring.version}</version>
</dependency>
<!-- mysql驱动包 -->
<dependency>
<groupId>mysql</groupId>
<artifactId>mysql-connector-java</artifactId>
<version>${mysql.version}</version>
</dependency>

<!-- 阿里巴巴数据源包 -->
<dependency>
<groupId>com.alibaba</groupId>
<artifactId>druid</artifactId>
<version>${druid.version}</version>
</dependency>

<!-- jackson -->
<dependency>
<groupId>com.fasterxml.jackson.core</groupId>
<artifactId>jackson-core</artifactId>
<version>${jackson.version}</version>
</dependency>
<dependency>
<groupId>com.fasterxml.jackson.core</groupId>
<artifactId>jackson-databind</artifactId>
<version>${jackson.version}</version>
</dependency>
<dependency>
<groupId>com.fasterxml.jackson.core</groupId>
<artifactId>jackson-annotations</artifactId>
<version>${jackson.version}</version>
</dependency>

<!-- json数据 -->
<dependency>
<groupId>org.codehaus.jackson</groupId>
<artifactId>jackson-mapper-asl</artifactId>
<version>${json.version}</version>
</dependency>

<!-- 日志文件管理包 -->
<!-- log start -->
<dependency>
<groupId>log4j</groupId>
<artifactId>log4j</artifactId>
<version>${log4j.version}</version>
</dependency>
<dependency>
<groupId>org.slf4j</groupId>
<artifactId>slf4j-api</artifactId>
<version>${slf4j.version}</version>
</dependency>
<dependency>
<groupId>org.slf4j</groupId>
<artifactId>slf4j-log4j12</artifactId>
<version>${slf4j.version}</version>
</dependency>
<!-- log end -->

<!-- lucene -->
<dependency>
<groupId>org.apache.lucene</groupId>
<artifactId>lucene-core</artifactId>
<version>${lucene.version}</version>
</dependency>
<!-- commons-fileupload -->
<dependency>
<groupId>commons-fileupload</groupId>
<artifactId>commons-fileupload</artifactId>
<version>${commons-fileupload.version}</version>
</dependency>
<!-- servlet api -->
<dependency>
<groupId>javax.servlet</groupId>
<artifactId>servlet-api</artifactId>
<version>${servlet.version}</version>
<scope>provided</scope>
</dependency>

</dependencies>
</dependencyManagement>
<!-- 配置部署的远程仓库 -->
<distributionManagement>
<snapshotRepository>
<id>nexus-snapshots</id>
<name>Nexus Snapshot Repository</name>
<url>http://192.168.2.176:9981/nexus/content/repositories/snapshots/</url>
</snapshotRepository>
<repository>
<id>nexus-releases</id>
<name>Nexus Release Repository</name>
<url>http://192.168.2.176:9981/nexus/content/repositories/releases/</url>
</repository>
</distributionManagement>
<build>
<plugins>
<plugin>
<groupId>org.apache.maven.plugins</groupId>
<artifactId>maven-compiler-plugin</artifactId>
<configuration>
<source>1.8</source>
<target>1.8</target>
</configuration>
</plugin>
</plugins>
</build>
</project>
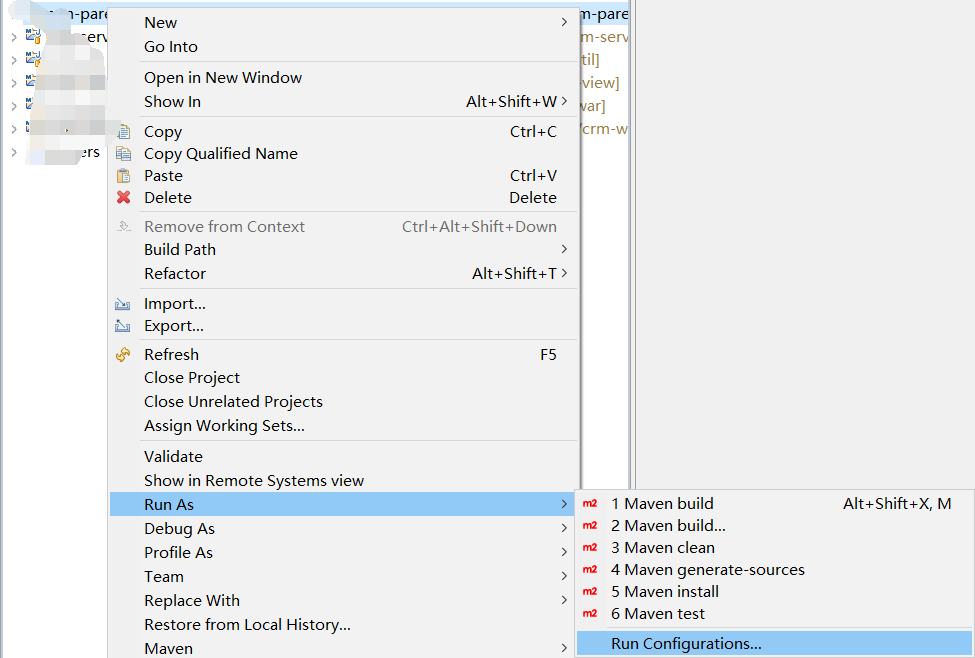
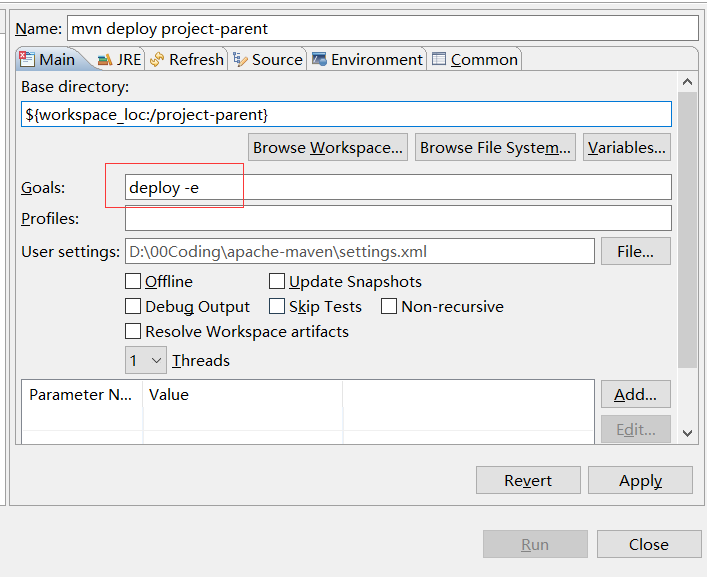
九、Eclipse上部署Snapshot到私服。
选择你需要部署到私服的项目,首先这个项目应该是一个Snapshot版本。然后右击,选择Run As
保存后,点击Run就可以了。然后在Nexus上的Snapshot仓库里就可以看到啦!就是这么简单。
然后在project-war中,和引入其他依赖一下,引入这个Snapshot版本的包就行了。

相关文章推荐
- Python基本运算符
- 更改机器名后,打开TFS提示工作区错误的处理
- iOS 申请加急审核
- 【GDPMS】项目管理实战公益培训第十二期
- C++中类的多态和虚函数的使用
- C语言程序设计第三节课作业
- JavaScript中function的多义性
- 【经验】VMware Tools安装时出现错误提示:Read-only file system
- 如何保护Java程序 防止Java反编译
- 警察与厨师
- mysql大杂烩
- C语言程序设计第二节课作业
- 互联网协议入门
- JavaScript中function的多义性
- Java 自动装箱和自动拆箱注意的问题
- 如何搭建Percona XtraDB Cluster集群
- hql语句拼接的替换方式
- 自由是自尊自爱的前提
- MS15-077 HT Windows字体提权0day 源码+exp
- AndroidAnnotations简单使用