Android滚动选取金额
2016-06-15 16:13
483 查看
UI效果图:
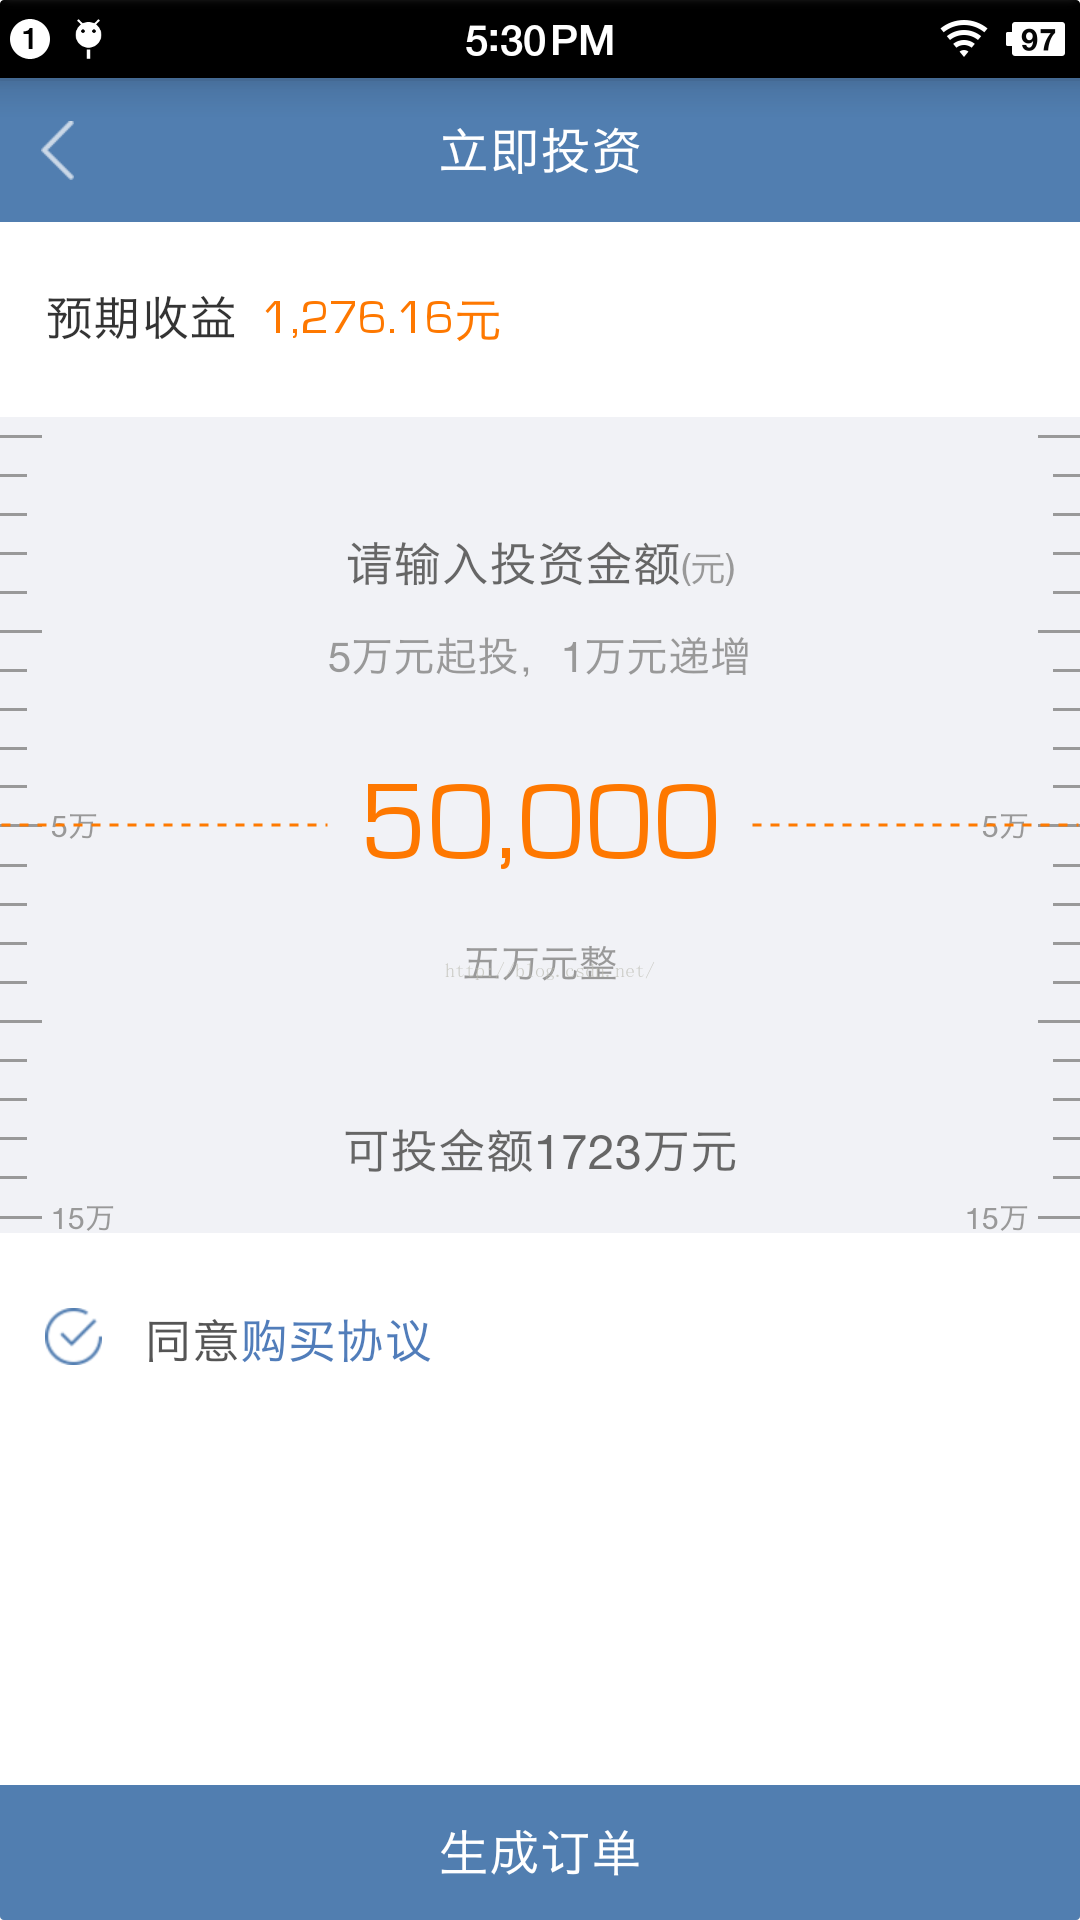
最终的效果是可以滑动刻度来选取金额,并且滑动停止后必须定位到某个金额上,不能停留在中间。
分析:决定用listview来实现上述效果
分析UI图,发现有三种类型的item,短的,长的,还有长的带文字的。
1.listview所用的adapter的实现。
ListAdaptera.java文件
三个布局文件:
item_list.xml文件
item_list2.xml文件
item_list3.xml文件
注意:1.刚刚开始觉得布局文件比较简单,没有必要复用,后来发现如果计算出来的刻度特别多滑动又比较快会卡死。
2.适配方式采用等比例适配。(就是说在720的手机上大小是72px的换到1080的手机上则占108px)。
先粘贴上全部代码,再对代码进行分析
MainActivityt.java类
AndroidManifest.xml文件
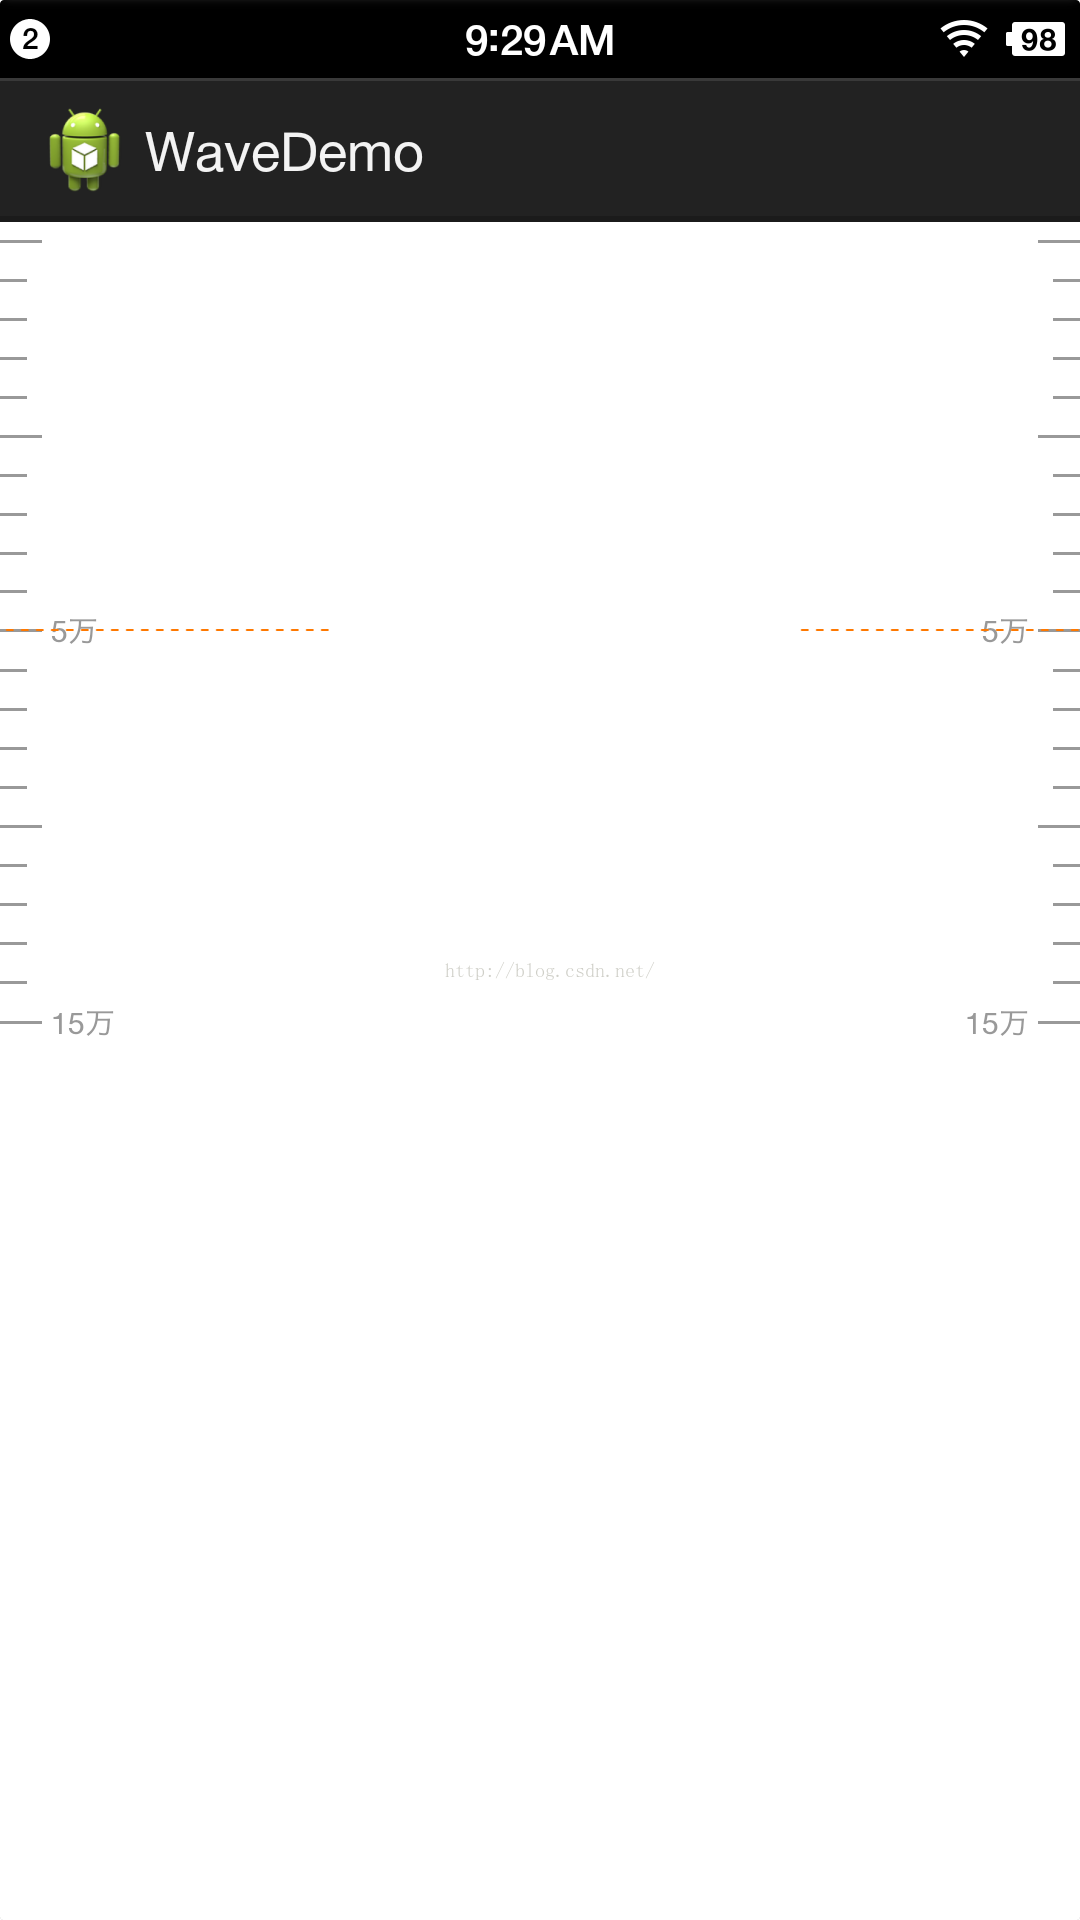
运行效果:
代码分析:
定义listview每个item的高度
首先在刚刚进入页面的时候必须保证起投金额位于位于listview的正中间,此时listview可以向下滑动但是不能向上滑动,所以为了保证起投金额(5万,是adapter数据源(集合)中的第一个数据)位于listview正中间,需要给listview添加个头部,所以5万以上展现出来的效果其实是listview的一个头部。
代码中:
头部的计算稍微复杂一些,因为为了美观,5万的item是一个长的带刻度的,向上必须是四个小刻度再往上就是一个长的不带刻度的。
首先需要知道一个item的范围是多少:
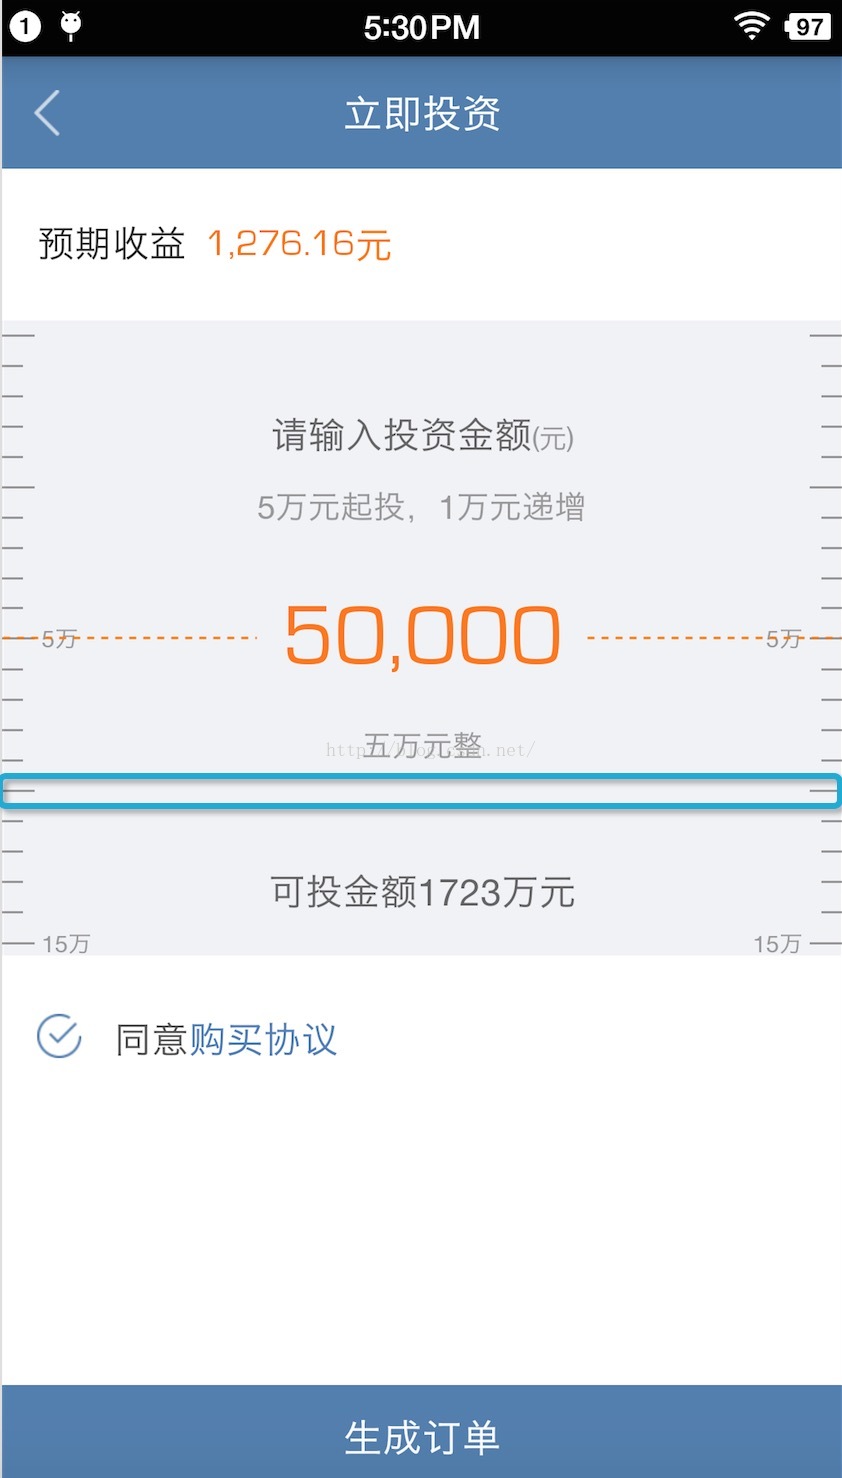
青色框框住的部分是每个item的范围。相当于是每个刻度线在整个item内是居中显示的。
所以在计算头部高度的时候
这里首先添加了半个item的高度,这半个item相当于是5万的那半个
然后计算出剩余部分所需的item条数
int total = (height - itemHeight) / 2 / itemHeight + 1;
由于整形计算会舍弃精度,所以最后加上1
添加listview脚部也是相同的原理,为了能使最大额度(1097)滑到listview中间,所以需要加入脚部,脚部的代码比较简单,不做分析。
核心代码:
然后判断position是不是等于0,等于0说明起投金额(5万)还没有划出屏幕,这段代码的意思是应该滑动静止后应该定位到起投金额,
actualPosition是完全静止后实际的position,记录下来从集合中取数据用。
top==0是初始状态下,向下拖拽listview的情况
-top <= itemHeight / 2是向上拽,但是距离小于item一半的高度
setSelectionFromTop(int position,int y)
@param position Index (starting at 0) of the data item to be selected.
@param y The distance from the top edge of the ListView (plus padding) that the
item will be positioned.
也就是说position是要被选中的item,从0开始,y是距离被选中的item的高度,代码中写的1,是因为listview加了头部,头部算0位置。
(height - itemHeight) / 2
在向下滑动时,top一直为负值,并不断减小(-1,-2,-3,................)
-(top + itemHeight / 2)
这里的itemHeight/2是起投哪个item的下半截高度
---------------------------------分割线-------------------------------------------------分割线--------------------------------------------------分割线------------------------
分析另一种情况
这种情况下的top的绝对值肯定会小于itemHeight的值
这种情况是第一个可见的item不在是第一个item(不是起投的那个item)
--------------------------------------------------------------------------大分割线---------------------------------------------------------------------------------------
滑动停止后使用setSelectionFromTop定位比较生硬,改用smoothScrollToPositionFromTop,只替换方法即可。(需要post才能平滑定位)
类似代码:
listview.post(new Runnable() {
@Override
public void run() {
listview.smoothScrollToPositionFromTop(position + deltaItemNum + 1, (height - itemHeight) / 2,500);
}
});
最终的效果是可以滑动刻度来选取金额,并且滑动停止后必须定位到某个金额上,不能停留在中间。
分析:决定用listview来实现上述效果
分析UI图,发现有三种类型的item,短的,长的,还有长的带文字的。
1.listview所用的adapter的实现。
ListAdaptera.java文件
package com.miduo.financialmanageclient.ui.adapter;

import java.util.List;

import android.content.Context;
import android.content.ClipData.Item;
import android.view.LayoutInflater;
import android.view.View;
import android.view.ViewGroup;
import android.widget.BaseAdapter;
import android.widget.TextView;

import com.miduo.financialmanageclient.R;

/**
* 立即投资页面刻度 本来觉得不用复用了,结果发现会卡死,还是得复用
*
* @author huozhenpeng
*
*/
public class ListAdaptera extends BaseAdapter {

private Context context;
private List<Integer> lists;
private static final int TYPE_ITEM_FIRST = 0;
private static final int TYPE_ITEM_SECOND = 1;
private static final int TYPE_ITEM_THREE = 2;

public ListAdaptera(Context context, List<Integer> lists) {
this.context = context;
this.lists = lists;
}

@Override
public int getCount() {
return lists.size();
}

@Override
public Object getItem(int position) {
return lists.get(position);
}

@Override
public long getItemId(int position) {
return position;
}

@Override
public int getItemViewType(int position) {
if (position == 0 || position % 10 == 0) {
return TYPE_ITEM_FIRST;
} else if (position % 5 == 0) {
return TYPE_ITEM_SECOND;
} else {
return TYPE_ITEM_THREE;
}
}

@Override
public int getViewTypeCount() {
return 3;
}

@Override
public View getView(int position, View convertView, ViewGroup parent) {
ViewHolder viewHolder = null;
int type = getItemViewType(position);
if (convertView == null) {
switch (type) {
case TYPE_ITEM_FIRST:
viewHolder = new ViewHolder();
convertView = LayoutInflater.from(context).inflate(
R.layout.item_list, null);
viewHolder.tv_left = ((TextView) convertView
.findViewById(R.id.tv_left));
viewHolder.tv_right = ((TextView) convertView
.findViewById(R.id.tv_right));
convertView.setTag(viewHolder);
break;
case TYPE_ITEM_SECOND:
convertView = LayoutInflater.from(context).inflate(
R.layout.item_list3, null);
break;
case TYPE_ITEM_THREE:
convertView = LayoutInflater.from(context).inflate(
R.layout.item_list2, null);
break;
default:
break;
}
}
switch (type) {
case TYPE_ITEM_FIRST:
viewHolder = (ViewHolder) convertView.getTag();
viewHolder.tv_left.setText(lists.get(position) + "万");
viewHolder.tv_right.setText(lists.get(position) + "万");
break;
case TYPE_ITEM_SECOND:
break;
case TYPE_ITEM_THREE:
break;
default:
break;
}

return convertView;
}

final static class ViewHolder {
TextView tv_left, tv_right;
}

}
三个布局文件:
item_list.xml文件
<RelativeLayout xmlns:android="http://schemas.android.com/apk/res/android"
android:layout_width="match_parent"
android:layout_height="wrap_content" >

<View
android:id="@+id/view1"
android:layout_centerVertical="true"
android:background="#999999"
android:layout_width="@dimen/px2dp_28"
android:layout_height="@dimen/px2dp_2" />
<TextView
android:id="@+id/tv_left"
android:layout_toRightOf="@id/view1"
android:layout_width="wrap_content"
android:layout_height="wrap_content"
android:layout_centerVertical="true"
android:text="10万"
android:textColor="#999999"
android:textSize="@dimen/px2sp_20"
android:layout_marginLeft="@dimen/px2dp_6"
/>

<View
android:id="@+id/view2"
android:layout_centerVertical="true"
android:background="#999999"
android:layout_width="@dimen/px2dp_28"
android:layout_height="@dimen/px2dp_2"
android:layout_alignParentRight="true" />
<TextView
android:id="@+id/tv_right"
android:layout_width="wrap_content"
android:layout_height="wrap_content"
android:layout_centerVertical="true"
android:text="10万"
android:textColor="#999999"
android:textSize="@dimen/px2sp_20"
android:layout_toLeftOf="@id/view2"
android:layout_marginRight="@dimen/px2dp_6"
/>

</RelativeLayout>
item_list2.xml文件
<RelativeLayout xmlns:android="http://schemas.android.com/apk/res/android"
android:layout_width="match_parent"
android:minHeight="@dimen/px2dp_26"
android:layout_height="@dimen/px2dp_26" >

<View
android:layout_centerVertical="true"
android:background="#999999"
android:layout_width="@dimen/px2dp_18"
android:layout_height="@dimen/px2dp_2" />

<View
android:layout_centerVertical="true"
android:background="#999999"
android:layout_width="@dimen/px2dp_18"
android:layout_height="@dimen/px2dp_2"
android:layout_alignParentRight="true" />

</RelativeLayout>
item_list3.xml文件
<RelativeLayout xmlns:android="http://schemas.android.com/apk/res/android"
android:layout_width="match_parent"
android:minHeight="@dimen/px2dp_26"
android:layout_height="@dimen/px2dp_26" >

<View
android:id="@+id/view1"
android:layout_width="@dimen/px2dp_28"
android:layout_height="@dimen/px2dp_2"
android:layout_centerVertical="true"
android:background="#999999" />

<View
android:id="@+id/view2"
android:layout_width="@dimen/px2dp_28"
android:layout_height="@dimen/px2dp_2"
android:layout_alignParentRight="true"
android:layout_centerVertical="true"
android:background="#999999" />

</RelativeLayout>
注意:1.刚刚开始觉得布局文件比较简单,没有必要复用,后来发现如果计算出来的刻度特别多滑动又比较快会卡死。
2.适配方式采用等比例适配。(就是说在720的手机上大小是72px的换到1080的手机上则占108px)。
先粘贴上全部代码,再对代码进行分析
MainActivityt.java类
package com.example.wavedemo;

import java.util.ArrayList;
import java.util.List;

import android.annotation.SuppressLint;
import android.annotation.TargetApi;
import android.app.Activity;
import android.graphics.Color;
import android.os.Build;
import android.os.Bundle;
import android.util.Log;
import android.view.LayoutInflater;
import android.view.Menu;
import android.view.View;
import android.view.ViewGroup.LayoutParams;
import android.widget.AbsListView;
import android.widget.AbsListView.OnScrollListener;
import android.widget.AdapterView;
import android.widget.AdapterView.OnItemSelectedListener;
import android.widget.LinearLayout;
import android.widget.ListView;
import android.widget.TextView;

public class MainActivityt extends Activity {

private ListView listview;
private List<Integer> lists = new ArrayList<Integer>();
private ListAdaptera adapter;
private int position;
private int top;
private int itemHeight;
private int height;
private int deltaItemNum;// 差距条数
private int remainder;// 余数
// 全部以万为单位
private int startMoney = 5;// 起投金额
private int deltaMoney = 1;// 递增金额
private int canInvestMoney = 1097;// 可投金额
// 补一个头部
private LinearLayout ll_head;
// 补一个footer
private LinearLayout ll_footer;
// 静止之后实际的position
private int actualPosition;

@TargetApi(19)
@Override
protected void onCreate(Bundle savedInstanceState) {
super.onCreate(savedInstanceState);
setContentView(R.layout.activity_maint);
itemHeight = (int) getResources().getDimension(R.dimen.px2dp_26);
height = (int) getResources().getDimension(R.dimen.px2dp_544);
initHead();
initFooter();
// 算出总共有多少个实际的格子(可以滑动到中间位置上的)
for (int i = startMoney; i <= canInvestMoney; i += deltaMoney) {
lists.add(i);
}
adapter = new ListAdaptera(this, lists);
listview = (ListView) this.findViewById(R.id.listview);
listview.addHeaderView(ll_head);
listview.addFooterView(ll_footer);
listview.setAdapter(adapter);
listview.setOnItemSelectedListener(new OnItemSelectedListener() {

@Override
public void onItemSelected(AdapterView<?> parent, View view,
int position, long id) {

}

@Override
public void onNothingSelected(AdapterView<?> parent) {

}
});
listview.setOnScrollListener(new OnScrollListener() {

@SuppressLint("NewApi")
@Override
public void onScrollStateChanged(AbsListView view, int scrollState) {
switch (scrollState) {
case SCROLL_STATE_FLING:// 手指离开屏幕后,惯性滑动

break;
case SCROLL_STATE_IDLE:// 滑动后静止
position = listview.getFirstVisiblePosition();// 第几个item
top = getViewByPosition(position, listview).getTop();
if (position == 0) {
if (top == 0 || -top <= itemHeight / 2)// 定位到起投金额
{
listview.setSelectionFromTop(1,
(height - itemHeight) / 2);
actualPosition = 0;
} else {
listview.setSelectionFromTop(
-(top + itemHeight / 2) / itemHeight + 2,
(height - itemHeight) / 2);
actualPosition = -(top + itemHeight / 2)
/ itemHeight + 1;
}
} else {
deltaItemNum = (height / 2 - (itemHeight + top))
/ itemHeight;
listview.setSelectionFromTop(position + deltaItemNum
+ 1, (height - itemHeight) / 2);
actualPosition = position + deltaItemNum;
}
MToast.showToast(MainActivityt.this,
lists.get(actualPosition) + "万");
showHighLight(actualPosition, listview);
break;
case SCROLL_STATE_TOUCH_SCROLL:// 手指在屏幕上滑动
break;

default:
break;
}

}

@Override
public void onScroll(AbsListView view, int firstVisibleItem,
int visibleItemCount, int totalItemCount) {

}
});
}

@Override
public boolean onCreateOptionsMenu(Menu menu) {
return true;
}

public View getViewByPosition(int pos, ListView listView) {
final int firstListItemPosition = listView.getFirstVisiblePosition();
final int lastListItemPosition = firstListItemPosition
+ listView.getChildCount() - 1;

if (pos < firstListItemPosition || pos > lastListItemPosition) {
return listView.getAdapter().getView(pos, null, listView);
} else {
final int childIndex = pos - firstListItemPosition;
return listView.getChildAt(childIndex);
}
}

/**
* 添加辅助头部
*/
private void initHead() {
ll_head = new LinearLayout(this);
ll_head.setOrientation(LinearLayout.VERTICAL);
AbsListView.LayoutParams params = new AbsListView.LayoutParams(
AbsListView.LayoutParams.MATCH_PARENT,
(height - itemHeight) / 2);
ll_head.setLayoutParams(params);
ll_head.addView(new View(this), 0, new LinearLayout.LayoutParams(
LinearLayout.LayoutParams.MATCH_PARENT, itemHeight / 2));
int total = (height - itemHeight) / 2 / itemHeight + 1;
View view = null;
for (int i = 1; i <= total; i++) {
if (i % 5 == 0) {
view = LayoutInflater.from(this).inflate(R.layout.item_list3,
null);
} else {
view = LayoutInflater.from(this).inflate(R.layout.item_list2,
null);
}
ll_head.addView(view, 0);
}

}

/**
* 添加辅助头部
*/
private void initFooter() {
ll_footer = new LinearLayout(this);
ll_footer.setOrientation(LinearLayout.VERTICAL);
AbsListView.LayoutParams params = new AbsListView.LayoutParams(
AbsListView.LayoutParams.MATCH_PARENT,
(height - itemHeight) / 2);
ll_footer.setLayoutParams(params);
ll_footer.addView(new View(this), 0, new LinearLayout.LayoutParams(
LinearLayout.LayoutParams.MATCH_PARENT, itemHeight / 2));
int total = (height - itemHeight) / 2 / itemHeight + 1;
View view = null;
for (int i = 1; i <= total; i++) {

view = LayoutInflater.from(this).inflate(R.layout.item_list2, null);
ll_footer.addView(view, 0);
}

}

private void showHighLight(int pos, ListView listview) {
View view = getViewByPosition(pos + 1, listview);
TextView tv_left = (TextView) view.findViewById(R.id.tv_left);
TextView tv_right = (TextView) view.findViewById(R.id.tv_right);
if (tv_left != null) {
tv_left.setTextColor(Color.parseColor("#fe7800"));
tv_right.setTextColor(Color.parseColor("#fe7800"));
}
}

}
AndroidManifest.xml文件
<?xml version="1.0" encoding="utf-8"?>
<manifest xmlns:android="http://schemas.android.com/apk/res/android"
package="com.example.wavedemo"
android:versionCode="1"
android:versionName="1.0" >

<uses-sdk
android:minSdkVersion="8"
android:targetSdkVersion="18" />

<application
android:allowBackup="true"
android:icon="@drawable/ic_launcher"
android:label="@string/app_name"
android:theme="@style/AppTheme" >
<activity
android:hardwareAccelerated="false"
android:name="com.example.wavedemo.MainActivityt"
android:label="@string/app_name" >
<intent-filter>
<action android:name="android.intent.action.MAIN" />

<category android:name="android.intent.category.LAUNCHER" />
</intent-filter>
</activity>
<activity android:name="com.example.wavedemo.LoginActivity"></activity>
</application>

</manifest>
运行效果:
代码分析:
定义listview每个item的高度
itemHeight = (int) getResources().getDimension(R.dimen.px2dp_26);
定义listview的总高度
height = (int) getResources().getDimension(R.dimen.px2dp_544);
初始化listview头部
initHead();
初始化listview脚部
initFooter();为什么要给listview添加头部和脚部呢,
首先在刚刚进入页面的时候必须保证起投金额位于位于listview的正中间,此时listview可以向下滑动但是不能向上滑动,所以为了保证起投金额(5万,是adapter数据源(集合)中的第一个数据)位于listview正中间,需要给listview添加个头部,所以5万以上展现出来的效果其实是listview的一个头部。
代码中:
/**
* 添加辅助头部
*/
private void initHead() {
ll_head = new LinearLayout(this);
ll_head.setOrientation(LinearLayout.VERTICAL);
AbsListView.LayoutParams params = new AbsListView.LayoutParams(
AbsListView.LayoutParams.MATCH_PARENT,
(height - itemHeight) / 2);
ll_head.setLayoutParams(params);
ll_head.addView(new View(this), 0, new LinearLayout.LayoutParams(
LinearLayout.LayoutParams.MATCH_PARENT, itemHeight / 2));
int total = (height - itemHeight) / 2 / itemHeight + 1;
View view = null;
for (int i = 1; i <= total; i++) {
if (i % 5 == 0) {
view = LayoutInflater.from(this).inflate(R.layout.item_list3,
null);
} else {
view = LayoutInflater.from(this).inflate(R.layout.item_list2,
null);
}
ll_head.addView(view, 0);
}

}
头部的计算稍微复杂一些,因为为了美观,5万的item是一个长的带刻度的,向上必须是四个小刻度再往上就是一个长的不带刻度的。
首先需要知道一个item的范围是多少:
青色框框住的部分是每个item的范围。相当于是每个刻度线在整个item内是居中显示的。
所以在计算头部高度的时候
AbsListView.LayoutParams params = new AbsListView.LayoutParams(
AbsListView.LayoutParams.MATCH_PARENT,
(height - itemHeight) / 2);
这里首先添加了半个item的高度,这半个item相当于是5万的那半个
ll_head.addView(new View(this), 0, new LinearLayout.LayoutParams(
LinearLayout.LayoutParams.MATCH_PARENT, itemHeight / 2));
然后计算出剩余部分所需的item条数
int total = (height - itemHeight) / 2 / itemHeight + 1;
由于整形计算会舍弃精度,所以最后加上1
添加listview脚部也是相同的原理,为了能使最大额度(1097)滑到listview中间,所以需要加入脚部,脚部的代码比较简单,不做分析。
核心代码:
case SCROLL_STATE_IDLE:// 滑动后静止
position = listview.getFirstVisiblePosition();// 第几个item
top = getViewByPosition(position, listview).getTop();
if (position == 0) {
if (top == 0 || -top <= itemHeight / 2)// 定位到起投金额
{
listview.setSelectionFromTop(1,
(height - itemHeight) / 2);
actualPosition = 0;
} else {
listview.setSelectionFromTop(
-(top + itemHeight / 2) / itemHeight + 2,
(height - itemHeight) / 2);
actualPosition = -(top + itemHeight / 2)
/ itemHeight + 1;
}
} else {
deltaItemNum = (height / 2 - (itemHeight + top))
/ itemHeight;
listview.setSelectionFromTop(position + deltaItemNum
+ 1, (height - itemHeight) / 2);
actualPosition = position + deltaItemNum;
}
MToast.showToast(MainActivityt.this,
lists.get(actualPosition) + "万");
showHighLight(actualPosition, listview);
break;
position = listview.getFirstVisiblePosition();// 第几个item这条代码比较简单,就是第一个可见的item,从0到很大
top = getViewByPosition(position, listview).getTop();得到每个item的top值(Top position of this view relative to its parent.)
然后判断position是不是等于0,等于0说明起投金额(5万)还没有划出屏幕,这段代码的意思是应该滑动静止后应该定位到起投金额,
actualPosition是完全静止后实际的position,记录下来从集合中取数据用。
top==0是初始状态下,向下拖拽listview的情况
-top <= itemHeight / 2是向上拽,但是距离小于item一半的高度
setSelectionFromTop(int position,int y)
@param position Index (starting at 0) of the data item to be selected.
@param y The distance from the top edge of the ListView (plus padding) that the
item will be positioned.
也就是说position是要被选中的item,从0开始,y是距离被选中的item的高度,代码中写的1,是因为listview加了头部,头部算0位置。
(height - itemHeight) / 2)是listview头部的高度,就是说第一个item距离顶部的距离为
(height - itemHeight) / 2
if (top == 0 || -top <= itemHeight / 2)// 定位到起投金额
{
listview.setSelectionFromTop(1,
(height - itemHeight) / 2);
actualPosition = 0;
}
在向下滑动时,top一直为负值,并不断减小(-1,-2,-3,................)
-(top + itemHeight / 2)
这里的itemHeight/2是起投哪个item的下半截高度
else {
listview.setSelectionFromTop(
-(top + itemHeight / 2) / itemHeight + 2,
(height - itemHeight) / 2);
actualPosition = -(top + itemHeight / 2)
/ itemHeight + 1;
}
---------------------------------分割线-------------------------------------------------分割线--------------------------------------------------分割线------------------------
分析另一种情况
这种情况下的top的绝对值肯定会小于itemHeight的值
else {
deltaItemNum = (height / 2 - (itemHeight + top))
/ itemHeight;
listview.setSelectionFromTop(position + deltaItemNum
+ 1, (height - itemHeight) / 2);
actualPosition = position + deltaItemNum;
}
这种情况是第一个可见的item不在是第一个item(不是起投的那个item)
--------------------------------------------------------------------------大分割线---------------------------------------------------------------------------------------
滑动停止后使用setSelectionFromTop定位比较生硬,改用smoothScrollToPositionFromTop,只替换方法即可。(需要post才能平滑定位)
类似代码:
listview.post(new Runnable() {
@Override
public void run() {
listview.smoothScrollToPositionFromTop(position + deltaItemNum + 1, (height - itemHeight) / 2,500);
}
});

相关文章推荐
- 使用C++实现JNI接口需要注意的事项
- Android IPC进程间通讯机制
- Android Manifest 用法
- [转载]Activity中ConfigChanges属性的用法
- Android之获取手机上的图片和视频缩略图thumbnails
- Android之使用Http协议实现文件上传功能
- Android学习笔记(二九):嵌入浏览器
- android string.xml文件中的整型和string型代替
- i-jetty环境搭配与编译
- android之定时器AlarmManager
- android wifi 无线调试
- Android Native 绘图方法
- Android java 与 javascript互访(相互调用)的方法例子
- android 代码实现控件之间的间距
- android FragmentPagerAdapter的“标准”配置
- Android"解决"onTouch和onClick的冲突问题
- android:installLocation简析
- android searchView的关闭事件
- SourceProvider.getJniDirectories