[Android]TextView设置超链接
2016-06-13 20:18
549 查看
在之前,每当我需要点击电话号码跳转至拨打页面,或者点击网站链接打开浏览器,我都是使用intent来帮我完成,但是,其实TextView和<a>标签一样,具有一个属性,使得点击一个链接则可以跳转至你想要的方式。
在xml中实现:
在xml中,TextView具有着autoLink属性,属性值取值范围:phone、web、email、map、all。
在使用时,可以仅仅使用其中的一种值属性。例如:
当然,也可以使用all值,all则包括里面的phone、web、email、map:
下面为all值属性的综合举例:
所有可以被点击的链接都具有下划线,当你点击其时,将分为跳转至浏览器,电话拨号器、email。
在Java代码中实现:
在Java代码中,可以通过设置setAutoLinkMask方法来实现与xml中相同的效果,setAutoLinkMask方法中的取值可以为:
Linkify.WEB_URLS,Linkify.EMAIL_ADDRESSES,Linkify.PHONE_NUMBERS,Linkify.MAP_ADDRESSES,Linkify.ALL
其值作用通过其名字都能清楚的看出。
注意事项:必须先设置setAutoLinkMask方法在设置setText,若倒置则会失效。
示例:
当然,还有一种方式,将TextView先设置setText,再使用Linkify.addLinks方法:
效果和上图一样,就不截图了。
在xml中实现:
在xml中,TextView具有着autoLink属性,属性值取值范围:phone、web、email、map、all。
在使用时,可以仅仅使用其中的一种值属性。例如:
<TextView
android:layout_width="wrap_content"
android:layout_height="wrap_content"
android:autoLink="web"
android:text="博客地址:http://blog.csdn.net/u011596810" />
也可以使用多种值属性:
android:autoLink="web|email|phone"
当然,也可以使用all值,all则包括里面的phone、web、email、map:
android:autoLink="all"不过有个需要注意的是,map值属性现在只支持US的地址编号,国内暂时可以不需要理会这个值属性,具体可以看看这个:http://stackoverflow.com/questions/8767721/how-does-autolinkmap-work
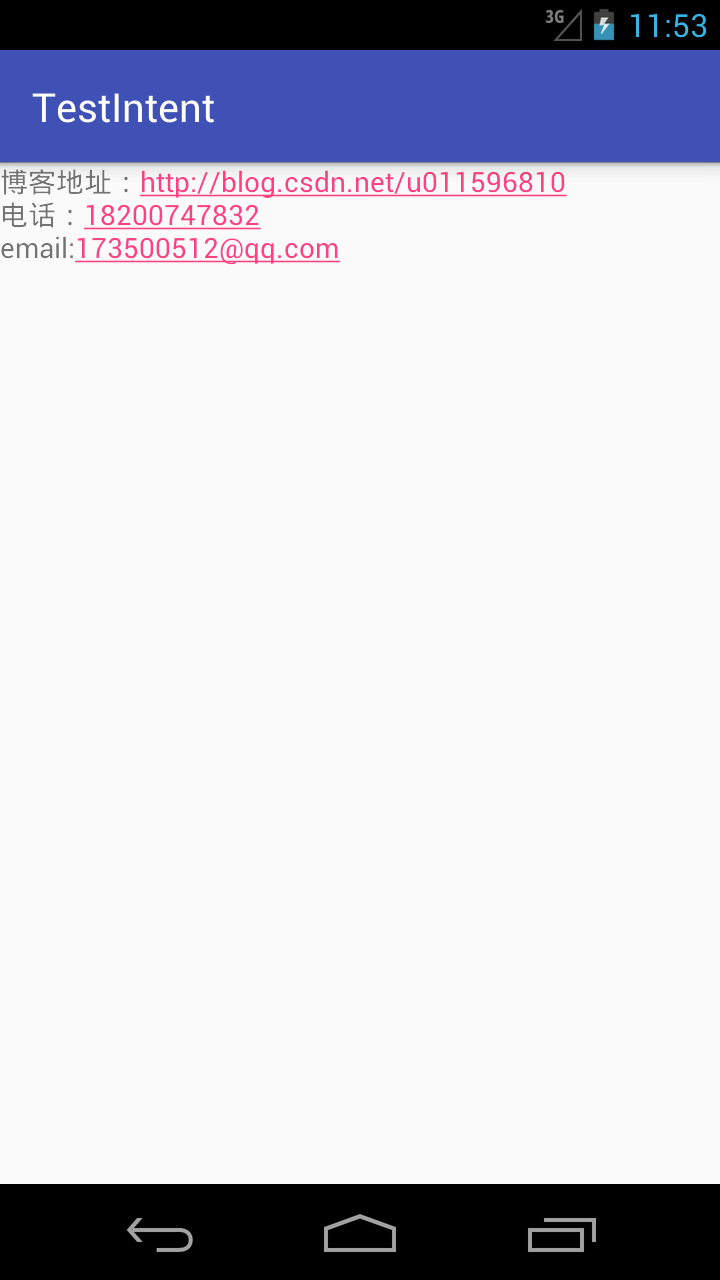
下面为all值属性的综合举例:
<?xml version="1.0" encoding="utf-8"?>
<LinearLayout xmlns:android="http://schemas.android.com/apk/res/android"
xmlns:tools="http://schemas.android.com/tools"
android:layout_width="match_parent"
android:layout_height="match_parent"
android:orientation="vertical"
tools:context="com.xiaoyan.xiejinxiong.testintent.MainActivity">

<TextView
android:layout_width="wrap_content"
android:layout_height="wrap_content"
android:autoLink="all"
android:text="博客地址:http://blog.csdn.net/u011596810\n电话:18200747832\nemail:173500512@qq.com" />

</LinearLayout>
界面效果:
所有可以被点击的链接都具有下划线,当你点击其时,将分为跳转至浏览器,电话拨号器、email。
在Java代码中实现:
在Java代码中,可以通过设置setAutoLinkMask方法来实现与xml中相同的效果,setAutoLinkMask方法中的取值可以为:
Linkify.WEB_URLS,Linkify.EMAIL_ADDRESSES,Linkify.PHONE_NUMBERS,Linkify.MAP_ADDRESSES,Linkify.ALL
其值作用通过其名字都能清楚的看出。
注意事项:必须先设置setAutoLinkMask方法在设置setText,若倒置则会失效。
示例:
public class MainActivity extends Activity {

@Override
protected void onCreate(Bundle savedInstanceState) {
super.onCreate(savedInstanceState);
TextView textView = new TextView(this);
textView.setAutoLinkMask(Linkify.ALL);
textView.setText("博客地址:http://blog.csdn.net/u011596810\\n电话:18200747832\\nemail:173500512@qq.com");
setContentView(textView);
}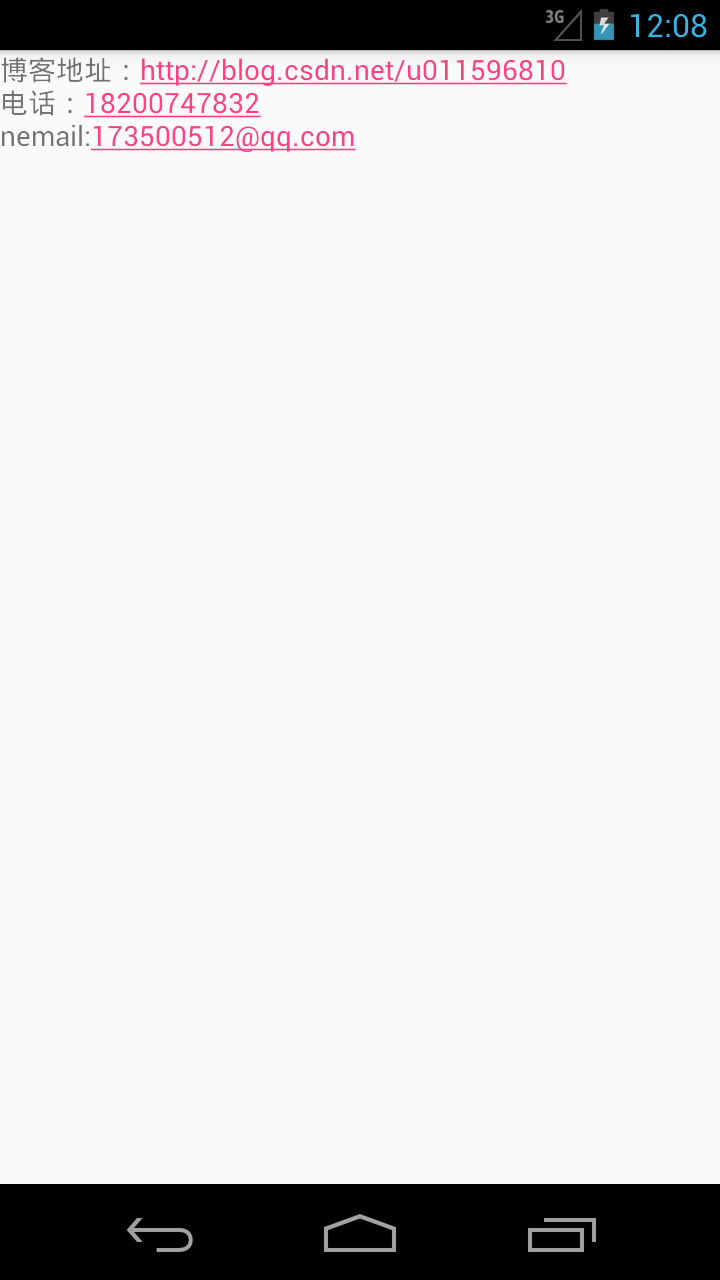
}效果图:当然,还有一种方式,将TextView先设置setText,再使用Linkify.addLinks方法:
public class MainActivity extends Activity {

@Override
protected void onCreate(Bundle savedInstanceState) {
super.onCreate(savedInstanceState);
TextView textView = new TextView(this);
textView.setText("博客地址:http://blog.csdn.net/u011596810\n电话:18200747832\nnemail:173500512@qq.com");
Linkify.addLinks(textView,Linkify.ALL);
setContentView(textView);
}
}
效果和上图一样,就不截图了。

相关文章推荐
- 使用C++实现JNI接口需要注意的事项
- Android IPC进程间通讯机制
- Android Manifest 用法
- [转载]Activity中ConfigChanges属性的用法
- Android之获取手机上的图片和视频缩略图thumbnails
- Android之使用Http协议实现文件上传功能
- Android学习笔记(二九):嵌入浏览器
- android string.xml文件中的整型和string型代替
- i-jetty环境搭配与编译
- android之定时器AlarmManager
- android wifi 无线调试
- Android Native 绘图方法
- Android java 与 javascript互访(相互调用)的方法例子
- android 代码实现控件之间的间距
- android FragmentPagerAdapter的“标准”配置
- Android"解决"onTouch和onClick的冲突问题
- android:installLocation简析
- android searchView的关闭事件
- SourceProvider.getJniDirectories