SSH基本管理和配置文件的使用
2016-06-06 17:45
531 查看
服务端:linl_S IP:10.0.0.15
客户端:lin_C IP:10.0.0.16 SSHD服务 SSH协议:安全外壳协议。为Secure Shell的缩写。SSH为建立在应用层和传输层基础上的安全协议。 sshd服务使用SSH协议可以用来进行远程控制,或在计算机之间传送文件。而实现此功能的传统方式,如telnet(终端仿真协议)都是极为不安全的,并且会使用明文传送密码。 OpenSSH软件包,提供了服务端后台程序和客户端工具,用来加密远程控件和文件传输过程中的数据,并由此来代替原来的类似服务。 安装包 OpenSSH服务需要4个软件包[root@linl_C ~]# ls /mnt/Packages/openssh* /mnt/Packages/openssh-5.3p1-94.el6.x86_64.rpm /mnt/Packages/openssh-clients-5.3p1-94.el6.x86_64.rpm /mnt/Packages/openssh-askpass-5.3p1-94.el6.x86_64.rpm /mnt/Packages/openssh-server-5.3p1-94.el6.x86_64.rpm每个软件包的作用: openssh-5.3p1-94.el6.x86_64.rpm 包含OpenSSH服务器及客户端需要的核心文件 openssh-clients-5.3p1-94.el6.x86_64.rpm OpenSSH客户端软件包 openssh-server-5.3p1-94.el6.x86_64.rpm OpenSSH服务器软件包 查看软件包的详情:
[root@linl_C ~]# rpm -qpi /mnt/Packages/openssh-server-5.3p1-94.el6.x86_64.rpm
warning: /mnt/Packages/openssh-server-5.3p1-94.el6.x86_64.rpm: Header V3 RSA/SHA256 Signature, key ID fd431d51: NOKEY
Name        : openssh-server               Relocations: (not relocatable)
Version     : 5.3p1                             Vendor: Red Hat, Inc.
Release     : 94.el6                        Build Date: Mon 30 Sep 2013 03:08:20 PM CST
Install Date: (not installed)               Build Host: x86-022.build.eng.bos.redhat.com
Group       : System Environment/Daemons    Source RPM: openssh-5.3p1-94.el6.src.rpm
Size        : 689757                           License: BSD
Signature   : RSA/8, Mon 28 Oct 2013 03:12:04 PM CST, Key ID 199e2f91fd431d51
Packager    : Red Hat, Inc. <http://bugzilla.redhat.com/bugzilla>
URL         : http://www.openssh.com/portable.html
Summary     : An open source SSH server daemon
Description :
OpenSSH is a free version of SSH (Secure SHell), a program for logging
into and executing commands on a remote machine. This package contains
the secure shell daemon (sshd). The sshd daemon allows SSH clients to
securely connect to your SSH server.
OpenSSH配置文件 OpenSSH常用配置文件有两个/etc/ssh/ssh_config 和 /etc/ssh/sshd_config ssh_config 为客户端配置文件 sshd_config 为服务端配置文件 服务启动和关闭 方法1:[root@linl_C ~]# service sshd start | restart | stop | status | reload 方法2:[root@linl_C ~]# /etc/init.d/sshd start | restart | stop | status | reload 服务开机自启和关闭
[root@linl_C ~]# chkconfig sshd on | off
[root@linl_C ~]# chkconfig --list sshd
sshd               0:off    1:off    2:on    3:on    4:on    5:on    6:off
SSH远程登录
方法1:ssh [远程主机用户名]@[远程服务器主机名或IP地址]
[root@linl_C ~]# ssh 10.0.0.15            #如果用root进行登录远程主机可以省略用户名
The authenticity of host '10.0.0.15 (10.0.0.15)' can't be established.
RSA key fingerprint is e9:1f:3a:40:e9:79:a9:33:ff:b9:37:23:a6:1f:70:29.
Are you sure you want to continue connecting (yes/no)? yes     #填入完整的“yes”,而不是Y或y而已
Warning: Permanently added '10.0.0.15' (RSA) to the list of known hosts.
root@10.0.0.15's password:
Last login: Thu May 19 11:25:32 2016 from 10.0.0.1
[root@linl_S ~]#          #已经登录到lin_S端
方法2:ssh -l [远程主机用户名] [远程服务器主机名或IP地址]
[root@linl_C ~]# ssh -l root 10.0.0.15     #这里的用户名root不能省略
The authenticity of host '10.0.0.15 (10.0.0.15)' can't be established.
RSA key fingerprint is e9:1f:3a:40:e9:79:a9:33:ff:b9:37:23:a6:1f:70:29.
Are you sure you want to continue connecting (yes/no)? yes
Warning: Permanently added '10.0.0.15' (RSA) to the list of known hosts.
root@10.0.0.15's password:
Last login: Thu May 19 13:53:19 2016 from 10.0.0.1
[root@linl_S ~]#         #已经登录到lin_S端
创建普通用户
[root@linl_S ~]# useradd linypwb
[root@linl_S ~]# echo 123456 |passwd --stdin linypwb
Changing password for user linypwb.
passwd: all authentication tokens updated successfully.
设置主机名
[root@linl_C ~]# vi /etc/hosts
127.0.0.1   localhost localhost.localdomain localhost4 localhost4.localdomain4
::1         localhost localhost.localdomain localhost6 localhost6.localdomain6
10.0.0.15 lin_S lin_S
远程但不登入,直接执行命令 方法1:ssh [远程主机用户名]@[远程服务器主机名或IP地址] [命令]
方法2:ssh -l [远程主机用户名] [远程服务器主机名或IP地址] [命令]
[root@linl_C ~]# ssh linypwb@lin_S date
linypwb@lin_s's password:
Thu May 19 14:37:38 CST 2016
[root@linl_C ~]#                #身份还是root,只是以linypwb的身份在远程主机上执行了一个命令而已
Server Keys记录数据 第一次登录服务器时系统没有保存远程主机的信息,为了确认该主机身份会提示用户是否继续连接,输入yes后登录,这时系统会将远程服务器信息写入用户主目录下的$HOME/.ssh/known_hosts文件中,下次再进行登录时因为保存有该主机信息就不会再提示了。
[root@linl_C ~]# vi .ssh/known_hosts
lin_s ssh-rsa AAAAB3NzaC1yc2EAAAABIwAAAQEAmdWhFkQGgpPhjELJnP5+G6OEJ5+dS3EbISKrctYbxd82USSnYyqiWcxOb7IpMoVltvyvciwf8/6B666fkNAW7WDR89afGL6yrwC8+PB3fwkSg9RPyZw4qGoEGoP/Z5LNa8MzYHf+98pzZ9VllmWUpDkP9lkhqeSMdIRxP5WyK9z1HRdE9N+KbIKjpJBvchchyaBYgwOWArF8Joyz0tyRpf48iXu5/8fizNNWnHNvC6IZDRqu8DdphGyAFPksW/1DXN5eSmMYbPo2R2OGEfEvdt3xSSsoK2Vws6osFma19E7tb2zd4BTmOYiLJtgmzVkGFdgk5a/q4jgWHTdi6C+wjw==
SSHD 服务配置文件 注:参数前面有#,表示是默认值,也表示注释。 备份配置文件
[root@linl_S ~]# cp /etc/ssh/sshd_config{,.bak} #修改配置文件前,尽量备份文件,以便出错能够及时恢复
/etc/ssh/sshd_config 配置文件 P1149
1)#Port 22
# SSH 预设使用 22 这个 port,也可以使用多个 port,即重复使用 port 这个设定项目!
#例如想要开放 sshd 端口为 22 和 222,则多加一行内容为: Port 222 即可
#然后重新启动 sshd 这样就好了。建议大家修改 port number 为其它端口,防止别人暴力破解。
例:修改 sshd 服务监听的端口为22和222
[root@linl_S ~]# vi /etc/ssh/sshd_config
...
#Port 22
Port 22                         #监听端口22
Port 222                        #监听端口222
#AddressFamily any
#ListenAddress 0.0.0.0
#ListenAddress ::
...
[root@linl_S ~]# service sshd restart         #重启sshd服务
Stopping sshd:                                             [  OK  ]
Starting sshd:                                             [  OK  ]
[root@linl_S ~]# netstat -anptu |grep ssh     #查看sshd监听端口
tcp        0      0 0.0.0.0:22                  0.0.0.0:*                   LISTEN      3549/sshd
tcp        0      0 0.0.0.0:222                 0.0.0.0:*                   LISTEN      3549/sshd
tcp        0     52 10.0.0.15:22                10.0.0.1:57030              ESTABLISHED 2574/sshd
tcp        0      0 :::22                       :::*                        LISTEN      3549/sshd
tcp        0      0 :::222                      :::*                        LISTEN      3549/sshd      [code]
指定port来远程登录 方法1:ssh [远程主机用户名]@[远程服务器主机名或IP地址] -p [port] 方法2:ssh -p [port] [远程主机用户名]@[远程服务器主机名或IP地址]
[root@linl_C ~]# ssh lin_S -p 222 #如果用root进行登录远程主机可以省略用户名 root@lin_s's password: Last login: Thu May 19 14:31:03 2016 from 10.0.0.16 [root@linl_S ~]# #已经登录到lin_S端2)#ListenAddress 0.0.0.0 #设置 sshd 监听的主机适配卡 IP 地址。0.0.0.0 表示侦听所有地址 #例子:如果有两个 IP (网卡),分别是10.0.0.14 及10.0.0.15 ,那么只想要开放10.0.0.14 时,就可以写如同下面的样式: ListenAddress 10.0.0.14 #只监听来自10.0.0.14 这个 IP 的 ssh 联机。 例:添加一块网卡,设置只监听新增的这块网卡 1、虚拟机内添加网卡
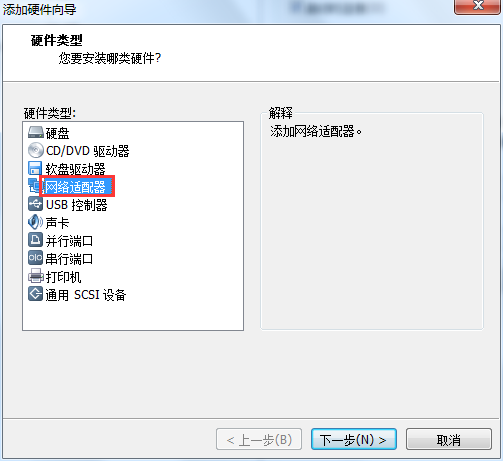 2、编辑新增网卡信息,并重启网络服务
[root@linl_S ~]# vi /etc/sysconfig/network-scripts/ifcfg-eth1        #编辑网卡信息,以下均为必要项
DEVICE=eth1
ONBOOT=yes
BOOTPROTO=static
IPADDR=10.0.0.14
PREFIX=24
GATEWAY=10.0.0.1
DNS1=8.8.8.8
NETMASK=255.255.255.0
[root@linl_S ~]# service network restart            #重启网络服务
Shutting down interface eth0:                              [  OK  ]
Shutting down loopback interface:                          [  OK  ]
Bringing up loopback interface:                            [  OK  ]
Bringing up interface eth0:  Determining if ip address 10.0.0.15 is already in use for device eth0...
[  OK  ]
Bringing up interface eth1:  Determining if ip address 10.0.0.14 is already in use for device eth1...
[  OK  ]
3、修改配置监听 IP,并重启 sshd 服务
[root@linl_S ~]# vi /etc/ssh/sshd_config           #修改监听IP
...
#Port 22
#AddressFamily any
#ListenAddress 0.0.0.0
ListenAddress 10.0.0.14
#ListenAddress ::
...
[root@linl_S ~]# service sshd restart              #重启ssh服务
Stopping sshd:                                             [  OK  ]
Starting sshd:                                             [  OK  ]
[root@linl_S ~]# netstat -anptu |grep sshd         #查看监听情况
tcp        0      0 10.0.0.14:22                0.0.0.0:*                   LISTEN      4284/sshd
4、lin_C 客户端远程测试
[root@linl_C ~]# ssh lin_S
ssh: connect to host lin_S port 22: Connection refused    #提示拒绝连接
[root@linl_C ~]# ssh 10.0.0.14                            #连接监听IP则可以
The authenticity of host '10.0.0.14 (10.0.0.14)' can't be established.
RSA key fingerprint is e9:1f:3a:40:e9:79:a9:33:ff:b9:37:23:a6:1f:70:29.
Are you sure you want to continue connecting (yes/no)? yes
Warning: Permanently added '10.0.0.14' (RSA) to the list of known hosts.
root@10.0.0.17's password:
Last login: Thu May 19 16:18:50 2016
[root@linl_S ~]#                         #已经登录到lin_S
3)Protocal 2 #选择的 SSH 协议版本,可以是1也可以是2,CentOS5.x预设是仅支援V2 #如果要同时支持两者,就必须要使用 2,1 这个分隔了(Protocal 2,1)!
[root@linl_S ~]# vi /etc/ssh/sshd_config
#Protocol 2
Protocol 2,1
4)Pricate Key 说明主机的 Private Key 放置的档案,预设使用下面的档案即可!
# HostKey for protocol version 1
#HostKey /etc/ssh/ssh_host_key        #SSH v1使用的私钥
# HostKeys for protocol version 2
#HostKey /etc/ssh/ssh_host_rsa_key    #SSH v2使用的RSA私钥
#HostKey /etc/ssh/ssh_host_dsa_key    #SSH v2使用的DSA私钥
5)SyslogFacility AUTHPRIV 关于登录文件的讯息数据放置与 daemon 的名称!
# 当有人使用 SSH 登入系统的时候,SSH 会记录信息,这个信息要记录的类型为AUTHPRIV。
#查看日志配置文件,得知:sshd服务日志存放在:/var/log/secure[root@linl_S ~]# vim /etc/rsyslog.conf # The authpriv file has restricted access. authpriv.* /var/log/secure
6)#LogLevel INFO # 登录记录的等级!INFO级别以上。 7)#ServerKeyBits 1024
# 定义Server key 的长度,默认是1024 8)安全设定项
#PermitRootLogin yes          #是否允许root登入!预设是允许的,但是建议设定成no!
#PermitEmptyPasswords no      #若上面那一项设定为yes的话,这一项就最好设定为no  这个项目在是否允许以空的密码登入!当然不允许!
#PasswordAuthentication yes   #是否允许使用密码验证,默认为允许
#StrictModes yes              #当使用者的 host key 改变之后,Server 就不接受联机,可以抵挡部分的木马程序!
#PubkeyAuthentication yes     #是否允许Public Key?当然允许啦!仅针对version 2
#LoginGraceTime 2m #grace 优雅
# 当使用者连上 SSH server 之后,会出现输入密码的画面,在该画面中,
# 在多久时间内没有成功连上 SSH server 就强迫断线!若无单位则默认时间为秒! 例:将LoginGraceTime 2m 改为:LoginGraceTime 5[root@lin_C ~]# ssh lin_S root@lin_s's password: #停留5秒后,再次输入,结果断开 Connection closed by lin_S
#PrintMotd yes 打印出/etc/motd 这个文档的内容。 例:/etc/motd写入内容,客户端远程测试效果
[root@linl_S ~]# echo "欢迎登录本系统,所有操作都将有记录" > /etc/motd
[root@linl_C ~]# ssh lin_S        #在lin_C 客户端测试访问lin_S
root@lin_s's password:
Last login: Thu May 19 17:59:06 2016 from 10.0.0.16
欢迎登录本系统,所有操作都将有记录    #打印出了/etc/motd 中的内容
[root@linl_S ~]#
# PrintLastLog yes
# 显示上次登入的信息!预设也是 yes!
Last login: Wed Mar 23 22:12:58 2016 from 192.168.1.100
#改:PrintLastLog yes 为:PrintLastLog no 就不显示这个信息

相关文章推荐
- R中出现错误 plot.new() : figure margins too large
- Google Android开发者文档系列-创建有内容分享特性的应用之请求共享文件
- Redis 在windows环境下安装
- 如何利用代理知识去提升一个网站的流量
- linux命令行发送带附件的邮件
- 嵌入式软件工程师
- 费控排查方法
- 作业7
- Cocoapods完整使用篇
- mipi 调试经验
- PowerDesigner生成Excel版本的数据库文件
- Java线程之FutureTask与Future浅析
- 面试:字符串: 提取单词(2)
- 工作中遇到的问题--eclipse没有方法提示
- 国产自动安装软件cloudboot
- 如何在wordpress上增加文件上传的大小限制(多种实现方法)
- 过滤器与拦截器区别
- iOS开发runtime实现任意界面跳转
- AUTORUN.INF 原理
- CSS盒模型