HDFS中心缓存管理
2016-05-22 19:45
477 查看
前言
众所周知,HDFS作为一个分布式文件系统.存储着海量的数据,每天的IO读写操作次数当然是非常高的.所以在之前的文章中,我们提到了用HDFS的异构存储来做冷热数据的分类存储,但比较好的一点是,他们还是隶属于同一个集群.那么问题来了,是否我还可以做进一步的改进,优化呢,因为有的数据文件访问在某个时间段是大家公用的,访问频率甚至比一般的热点文件还要高很多.但是过了那个时间点,就又会变为普通的文件.本文就来分享HDFS对于这一需求点的解决方案,HDFS中心缓存管理.这一方面的功能属性,可能也被很多人所忽视了.HDFS缓存适用场景
首先,我们先要了解HDFS的缓存所适用的场景,换句话说,他能解决我们哪些具体的问题.缓存HDFS中的热点公共资源文件和短期临时的热点数据文件
第一种case: 公共资源文件. 这些文件可以是一些存放于HDFS中的依赖资源jar包,或是一些算法学习依赖.so文件等等.像这类的数据文件,放在HDFS上的好处是,我可以在HDFS上全局共享嘛,不用到本地机器上去依赖,而且好管理,我可以直接更新到HDFS上.但是这种场景更好的做法是把它做成distributed cache,否则在程序中将会发送大量的请求到NameNode中去获取这些资源文件的和内容.而且这种请求量是非常恐怖的,不是说请求一次就够了,而是调用一次,请求一次.
第二种case: 短期临时的热点数据文件.比如集群中每天需要统计的报表数据,需要读取前一天的或是最近一周的数据做离线分析,但是过了这个期限内的基本就很少再用到了,就可以视为冷数据了.那么这个时候就可以把符合这个时间段的数据做缓存处理,然后过期了,就直接从缓存中清除.
以上2种场景,都是HDFS Cache非常适用的场景.
HDFS缓存的结构设计
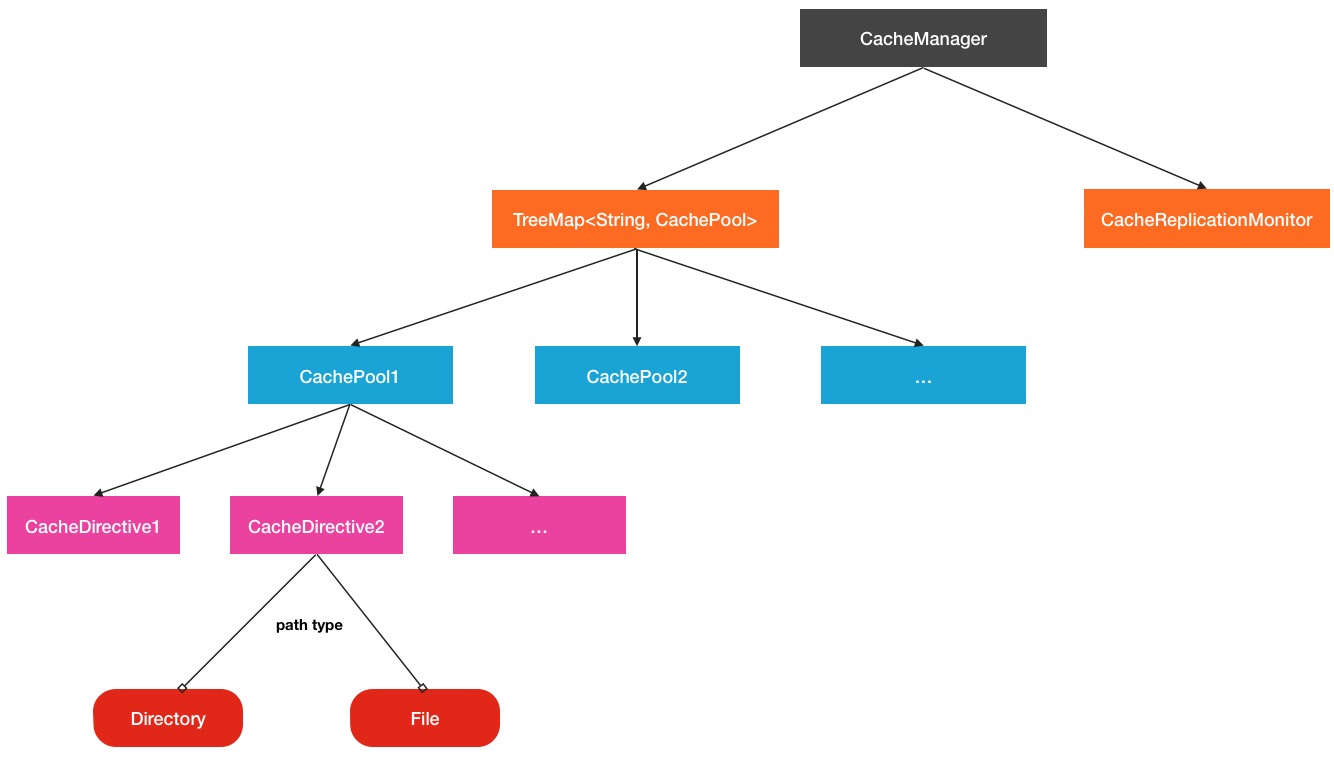
在HDFS中,最终缓存的本质上还是一个INodeFile文件.但是在逻辑上,引出了下面几个概念.CacheDirective
CacheDirective是缓存的基本单元,但是这里cacheDirective不一定是一个目录,也可以是一个文件.其中包括以下主要的变量:public final class CacheDirective implements IntrusiveCollection.Element {
// 惟一标识Id
private final long id;
// 目标缓存路径
private final String path;
// 对应路径的文件副本数
private final short replication;
// 所属CachePool
private CachePool pool;
// 过期时间
private final long expiryTime;
// 相关统计指标
private long bytesNeeded;
private long bytesCached;
private long filesNeeded;
private long filesCached;
...在这里,我们看到了一个新的概念,CachePool,可以得出下面一个结论:
CacheDirective属于对应的CachePool缓存池
CachePool
下面就是CachePool概念的定义了public final class CachePool {
// 缓存池名称
@Nonnull
private final String poolName;
// 所属用户名
@Nonnull
private String ownerName;
// 所属组名
@Nonnull
private String groupName;
// 缓存池权限
/**
* Cache pool permissions.
*
* READ permission means that you can list the cache directives in this pool.
* WRITE permission means that you can add, remove, or modify cache directives
* in this pool.
* EXECUTE permission is unused.
*/
@Nonnull
private FsPermission mode;
// 缓存池最大允许缓存字节数
/**
* Maximum number of bytes that can be cached in this pool.
*/
private long limit;
// 过期时间
/**
* Maximum duration that a CacheDirective in this pool remains valid,
* in milliseconds.
*/
private long maxRelativeExpiryMs;
// 变量统计相关值
private long bytesNeeded;
private long bytesCached;
private long filesNeeded;
private long filesCached;
...
// 缓存对象列表
@Nonnull
private final DirectiveList directiveList = new DirectiveList(this);
...我们可以看到,在cachePool中,也确实维护了一个cacheDirective缓存单元列表.而这些cachePool缓存池则是被CacheManager所掌管.CacheManager在这里就好比是一个总管理者的角色.当然,在CacheManager中还有运行着一个很重要的服务,就是CacheReplicationMonitor,这个监控程序会周期扫描当前的最新的缓存路径,并分发到对应的DataNode节点上,这个线程服务在后面还会具体提到.所以HDFS Cache的总的结构关系如下图所示:
HDFS缓存管理机制分析
其实之前本人已经写过一篇关于HDFS缓存管理机制方面的文章,HDFS缓存机制,但是现在来看,还并不是很全面,之前的文章完全遗漏了CacheAdmin这块的东西.所以在本小节中,要补充2方面的分析介绍.CacheAdmin CLI命令在CacheManager的实现
CacheMAnager的CacheReplicationMonitor如何将目标缓存文件缓存到DataNode中
下面先来看第一点涉及到的内容
CacheAdmin CLI命令在CacheManager的实现
在CacheAdmin中的每个操作命令,最后通过RPC调用都会对应到CacheManager的一个具体操作方法.所以在此过程中,要解决下面几个主要疑点:CacheManager维护了怎样的CachePool列表,CacheDirective关系
添加新的CacheDirective,CachePool有哪些特殊的细节
对于第一个问题,CacheManager确实维护了多种映射关系的CachePool,CacheDirective列表关系,如下:
public final class CacheManager {
...
// CacheDirective id对CacheDirective的映射关系
/**
* Cache directives, sorted by ID.
*
* listCacheDirectives relies on the ordering of elements in this map
* to track what has already been listed by the client.
*/
private final TreeMap<Long, CacheDirective> directivesById =
new TreeMap<Long, CacheDirective>();
//缓存路径对CacheDirective列表的映射关系,说明一个文件/目录路径可以同时被多次缓存
...
/**
* Cache directives, sorted by path
*/
private final TreeMap<String, List<CacheDirective>> directivesByPath =
new TreeMap<String, List<CacheDirective>>();
// 缓存池名称对CachePool的映射
/**
* Cache pools, sorted by name.
*/
private final TreeMap<String, CachePool> cachePools =
new TreeMap<String, CachePool>();
...以上的3大映射关系就是CacheManager对象中存储着的,第二条关系缓存路径对缓存对象列表的映射是一开始我感到奇怪的,后来发现,对同一个缓存路径,是可以多次缓存的.由于定义了这3类结构关系,所以在添加CacheDirective实例对象时候会涉及到一些更新操作.以addDirective方法为例
public CacheDirectiveInfo addDirective(
CacheDirectiveInfo info, FSPermissionChecker pc, EnumSet<CacheFlag> flags)
throws IOException {
assert namesystem.hasWriteLock();
CacheDirective directive;
try {
// 获取所属缓存池
CachePool pool = getCachePool(validatePoolName(info));
// 验证是否有权限
checkWritePermission(pc, pool);
// 验证缓存路径
String path = validatePath(info);
// 验证副本数
short replication = validateReplication(info, (short)1);
// 验证过期时间
long expiryTime = validateExpiryTime(info, pool.getMaxRelativeExpiryMs());
// Do quota validation if required
// 如果带上了force参数,就要验证CachePool是否还有剩余空间添加新的缓存
if (!flags.contains(CacheFlag.FORCE)) {
checkLimit(pool, path, replication);
}
// All validation passed
// Add a new entry with the next available ID.
// 获取下一个Id
long id = getNextDirectiveId();
// 构建新的CacheDirective实例
directive = new CacheDirective(id, path, replication, expiryTime);
// 进行添加操作
addInternal(directive, pool);
} catch (IOException e) {
...
}在上面的方法中,有一个步骤比较特殊,就是force参数处理时候的空间限制问题,默认CachePool是unlimit不受限的.然后在addInternal中就会涉及到存储关系的更新.
private void addInternal(CacheDirective directive, CachePool pool) {
boolean addedDirective = pool.getDirectiveList().add(directive);
assert addedDirective
// 添加新的id->directive
directivesById.put(directive.getId(), directive);
String path = directive.getPath();
List<CacheDirective> directives = directivesByPath.get(path);
if (directives == null) {
directives = new ArrayList<CacheDirective>(1);
directivesByPath.put(path, directives);
}
//在找到的path对应的directives list中添加新的directive
directives.add(directive);
// 更新新的统计值
// Fix up pool stats
CacheDirectiveStats stats =
computeNeeded(directive.getPath(), directive.getReplication());
directive.addBytesNeeded(stats.getBytesNeeded());
directive.addFilesNeeded(directive.getFilesNeeded());
// 然后设置需要重扫描,因为缓存目录已经被更新了
setNeedsRescan();
}
类似的还有添加CachePool的操作,代码如下:
public CachePoolInfo addCachePool(CachePoolInfo info)
throws IOException {
assert namesystem.hasWriteLock();
CachePool pool;
try {
CachePoolInfo.validate(info);
// 获取缓存池名称
String poolName = info.getPoolName();
pool = cachePools.get(poolName);
// 如果获取到的缓存池不为空,说明已经存在,抛异常
if (pool != null) {
throw new InvalidRequestException("Cache pool " + poolName
+ " already exists.");
}
// 在default cachepool的基础上构造出新的cachepool
pool = CachePool.createFromInfoAndDefaults(info);
// 添加到CachePool存储关系列表中
cachePools.put(pool.getPoolName(), pool);
} catch (IOException e) {
LOG.info("addCachePool of " + info + " failed: ", e);
throw e;
}
LOG.info("addCachePool of {} successful.", info);
return pool.getInfo(true);
}
当然在CacheManager还有其他modifyCacheDirective和list的操作,在逻辑上没有什么特殊之处,这里就不展开过多的介绍了.写到这里,再回头看CacheManager维护的3种存储关系,还是有一定的巧妙之处的,为什么这么说呢?
CacheManager通过id,path到CacheDirective, CacheDirective列表和name到CachePool的多个映射关系,使得原本逻辑上的父子关系平级化了,更方便了多条件的灵活查询.比如说我通过id去找对应的缓存对象,就不需要重新遍历的去找了.
CacheReplicationMonitor缓存监控服务
如果把上一小节中的CacheManger的缓存添加删除操作比喻为一个工厂中的零件加工,那么CacheReplicationMonitor服务就好比是一个强大的发动机,它会将这些零件经过完美的处理并分配的对应的场合中去.可以说,CacheReplicationMonitor是一个指挥者的角色.但是这个”指挥者”也同样被”大管家”CacheManager所掌管,并控制着他的服务开启与关闭
public final class CacheManager {
...
// CacheManager中的CacheReplicationMonitor监控服务
/**
* The CacheReplicationMonitor.
*/
private CacheReplicationMonitor monitor;
CacheReplicationMonitor监控线程,正如其名称所代表的含义:
缓存副本块的监控服务.
因为是一个Monitor类型的监控程序,所以里面一定会循环的执行特定的操作.而操作的对象就是CacheBlock缓存块,在CacheReplicationMonitor中定义如下.
public class CacheReplicationMonitor extends Thread implements Closeable {
...
// 当前的需要缓存的目标缓存块集合
private final GSet<CachedBlock, CachedBlock> cachedBlocks;
...
接着进入其run方法.
public void run() {
long startTimeMs = 0;
Thread.currentThread().setName("CacheReplicationMonitor(" +
System.identityHashCode(this) + ")");
LOG.info("Starting CacheReplicationMonitor with interval " +
intervalMs + " milliseconds");
try {
long curTimeMs = Time.monotonicNow();
// 主循环
while (true) {
lock.lock();
try {
// 是否进行下一次rescan扫描的逻辑判断
while (true) {
if (shutdown) {
LOG.info("Shutting down CacheReplicationMonitor");
return;
}
if (completedScanCount < neededScanCount) {
LOG.debug("Rescanning because of pending operations");
break;
}
long delta = (startTimeMs + intervalMs) - curTimeMs;
if (delta <= 0) {
LOG.debug("Rescanning after {} milliseconds", (curTimeMs - startTimeMs));
break;
}
doRescan.await(delta, TimeUnit.MILLISECONDS);
curTimeMs = Time.monotonicNow();
}
} finally {
lock.unlock();
}
startTimeMs = curTimeMs;
mark = !mark;
// 执行新的扫描操作
rescan();
...
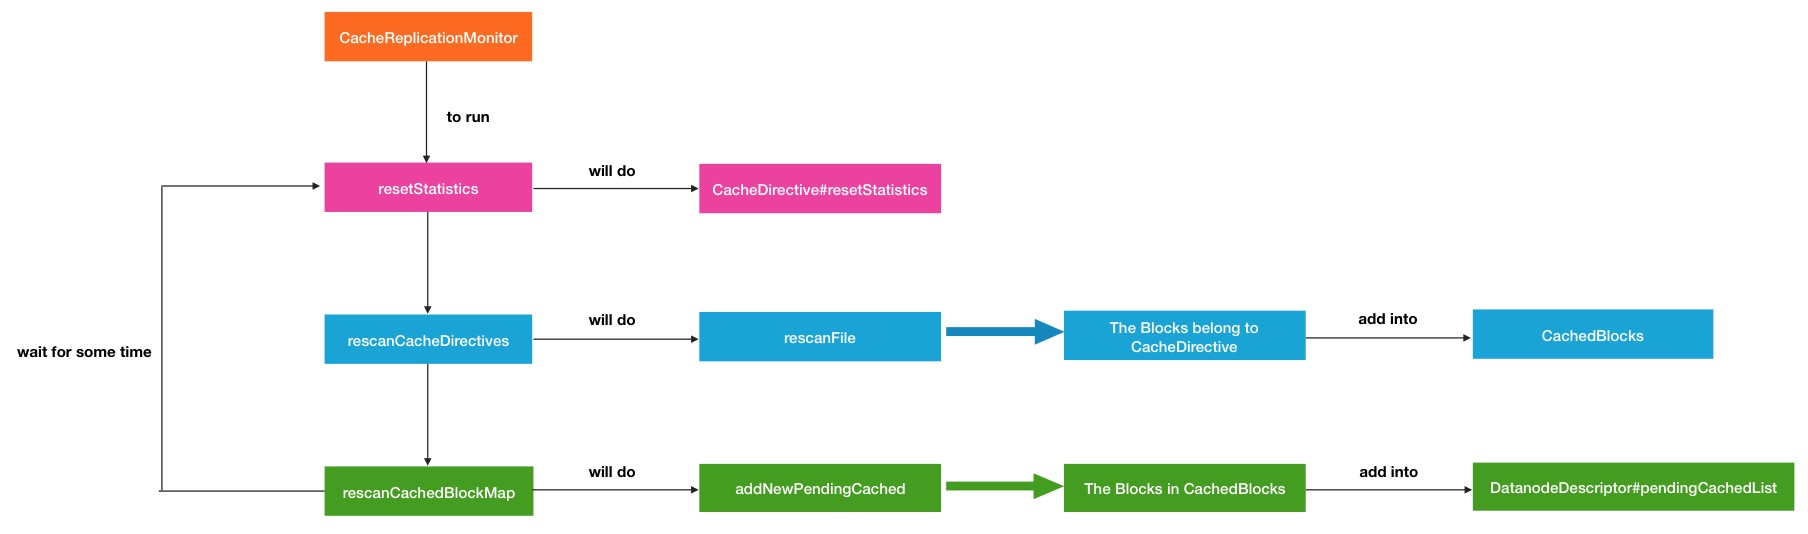
}所以rescan方法才是我们最核心的操作,进入此方法.
private void rescan() throws InterruptedException {
scannedDirectives = 0;
scannedBlocks = 0;
try {
...
// 重置统计计数值
resetStatistics();
// 重新扫描缓存目录单元
rescanCacheDirectives();
// 重新扫描当前CacheBlock缓存块
rescanCachedBlockMap();
blockManager.getDatanodeManager().resetLastCachingDirectiveSentTime();
} finally {
namesystem.writeUnlock();
}
}
在rescan内部,会进行主要3大部分的操作.
第一部分,resetStatistics重置统计变量计数值.因为要进行完全新一轮的缓存过程,所以CachePool以及其所包含的CacheDirective都要重新计数.代码执行过程如下:
private void resetStatistics() {
for (CachePool pool: cacheManager.getCachePools()) {
pool.resetStatistics();
}
for (CacheDirective directive: cacheManager.getCacheDirectives()) {
directive.resetStatistics();
}
}
第二部分,rescanCacheDirectives,在这个过程中,就会扫描之前保存在CacheManager中的那些CacheDirectives.
具体操作如下:
private void rescanCacheDirectives() {
FSDirectory fsDir = namesystem.getFSDirectory();
final long now = new Date().getTime();
// 获取CacheManager中保存的全部的CacheDirective缓存对象
for (CacheDirective directive : cacheManager.getCacheDirectives()) {
scannedDirectives++;
// Skip processing this entry if it has expired
// 跳过已经过期的的CacheDirective
if (directive.getExpiryTime() > 0 && directive.getExpiryTime() <= now) {
LOG.debug("Directive {}: the directive expired at {} (now = {})",
directive.getId(), directive.getExpiryTime(), now);
continue;
}
String path = directive.getPath();
INode node;
try {
// 获取CacheDirective缓存路径所代表的INode对象
node = fsDir.getINode(path);
} catch (UnresolvedLinkException e) {
// We don't cache through symlinks
LOG.debug("Directive {}: got UnresolvedLinkException while resolving "
+ "path {}", directive.getId(), path
);
continue;
}
if (node == null)  {
LOG.debug("Directive {}: No inode found at {}", directive.getId(),
path);
} else if (node.isDirectory()) {
// 如果此路径代表的是目录
INodeDirectory dir = node.asDirectory();
ReadOnlyList<INode> children = dir
.getChildrenList(Snapshot.CURRENT_STATE_ID);
for (INode child : children) {
if (child.isFile()) {
// 则进行扫描文件
rescanFile(directive, child.asFile());
}
}
} else if (node.isFile()) {
// 如果是文件则直接进行扫描
rescanFile(directive, node.asFile());
} else {
LOG.debug("Directive {}: ignoring non-directive, non-file inode {} ",
directive.getId(), node);
}
}
}
这里继续进入rescanFile的操作方法
private void rescanFile(CacheDirective directive, INodeFile file) {
// 获取文件所包含的block信息
BlockInfo[] blockInfos = file.getBlocks();

// Increment the "needed" statistics
directive.addFilesNeeded(1);
// We don't cache UC blocks, don't add them to the total here
// 计算缓存需要的字节大小,不包括正在被写的块
long neededTotal = file.computeFileSizeNotIncludingLastUcBlock() *
directive.getReplication();
directive.addBytesNeeded(neededTotal);

// The pool's bytesNeeded is incremented as we scan. If the demand
// thus far plus the demand of this file would exceed the pool's limit,
// do not cache this file.
CachePool pool = directive.getPool();
// 如果缓存池所需要缓存的空间大小超过限制,则返回
if (pool.getBytesNeeded() > pool.getLimit()) {
LOG.debug("Directive {}: not scanning file {} because " +
"bytesNeeded for pool {} is {}, but the pool's limit is {}",
directive.getId(),
file.getFullPathName(),
pool.getPoolName(),
pool.getBytesNeeded(),
pool.getLimit());
return;
}

long cachedTotal = 0;
// 遍历目标缓存文件所拥有的block
for (BlockInfo blockInfo : blockInfos) {
if (!blockInfo.getBlockUCState().equals(BlockUCState.COMPLETE)) {
// We don't try to cache blocks that are under construction.
LOG.trace("Directive {}: can't cache block {} because it is in state "
+ "{}, not COMPLETE.", directive.getId(), blockInfo,
blockInfo.getBlockUCState()
);
continue;
}
// 构造CacheBlock
Block block = new Block(blockInfo.getBlockId());
CachedBlock ncblock = new CachedBlock(block.getBlockId(),
directive.getReplication(), mark);
CachedBlock ocblock = cachedBlocks.get(ncblock);
if (ocblock == null) {
// 如果目标缓存列表中不存在,则进行添加
cachedBlocks.put(ncblock);
ocblock = ncblock;
} else {
// 如果存在,则进行相关变量更新
...
ocblock.setReplicationAndMark(directive.getReplication(), mark);
}
}
LOG.trace("Directive {}: setting replication for block {} to {}",
directive.getId(), blockInfo, ocblock.getReplication());
}
...
}
可以将上述操作提取成下面几个过程:
1.获取缓存文件所拥有的Block组信息
2.判断CachePool的缓存大小是否超过限制
3.遍历Block,并根据Block块构造CacheBlock缓存块
4.CacheBlocks列表中没有存在则直接添加,否则进行部分信息的更新
可能这里有人会有疑问,为什么CacheBlocks可能已经包含目标缓存块的呢,2种情况:
第一种情况.当前目标缓存块在上一轮由于种种条件受限,没有被缓存出去,所以就没有被remove掉.
第二种情况,此缓存块已经被缓存到DataNode上,后来经过DataNode的cacheBlockReport又上报到CacheManager的缓存列表种了.而CacheReplicationMonitor处理的就是CacheManager种的CacheBlocks.
那么问题又来了,既然CacheBlocks已经包含已经缓存的块了,是否会造成Block块重复缓存的现象,造成内存的浪费呢?在下个部分rescanCachedBlockMap种给了我们答案.
第三部分,rescanCachedBlockMap的过程是resan内部3个方法种逻辑处理最为复杂的.下面分段来分析.
首先会做一些前期的操作,如下
private void rescanCachedBlockMap() {
// Remove pendingCached blocks that will make DN out-of-capacity.
// 移除DN中的那些会耗尽DN缓存空间的待缓存块,
// ...
// 遍历目标缓存块列表
for (Iterator<CachedBlock> cbIter = cachedBlocks.iterator();
cbIter.hasNext(); ) {
scannedBlocks++;
CachedBlock cblock = cbIter.next();
// 获取目标缓存块不同缓存状态的节点列表
List<DatanodeDescriptor> pendingCached =
cblock.getDatanodes(Type.PENDING_CACHED);
List<DatanodeDescriptor> cached =
cblock.getDatanodes(Type.CACHED);
List<DatanodeDescriptor> pendingUncached =
cblock.getDatanodes(Type.PENDING_UNCACHED);
...
然后根据上述当前缓存块的各个不同缓存状态的信息,来计算对于当前块的缓存数目信息,进行下面2个部分的处理
...
// 如果当前缓存数已经满足需要缓存的数量,则删除当前准备缓存的块
if (numCached >= neededCached) {
// If we have enough replicas, drop all pending cached.
for (Iterator<DatanodeDescriptor> iter = pendingCached.iterator();
iter.hasNext(); ) {
DatanodeDescriptor datanode = iter.next();
datanode.getPendingCached().remove(cblock);
iter.remove();
LOG.trace("Block {}: removing from PENDING_CACHED for node {} "
+ "because we already have {} cached replicas and we only" +
" need {}",
cblock.getBlockId(), datanode.getDatanodeUuid(), numCached,
neededCached
);
}
}
// 如果当前缓存块还未达到目标需要的缓存数,则移动待unCache的Block
if (numCached < neededCached) {
// If we don't have enough replicas, drop all pending uncached.
for (Iterator<DatanodeDescriptor> iter = pendingUncached.iterator();
iter.hasNext(); ) {
DatanodeDescriptor datanode = iter.next();
datanode.getPendingUncached().remove(cblock);
iter.remove();
LOG.trace("Block {}: removing from PENDING_UNCACHED for node {} "
+ "because we only have {} cached replicas and we need " +
"{}", cblock.getBlockId(), datanode.getDatanodeUuid(),
numCached, neededCached
);
}
}
然后添加额外一定数目还需要cache的block或还需要unCached的Block
if (neededUncached > 0) {
// 添加需要unCache数目的Block
addNewPendingUncached(neededUncached, cblock, cached,
pendingUncached);
} else {
int additionalCachedNeeded = neededCached -
(numCached + pendingCached.size());
// 同时添加剩余数目的缓存块到pendingCached列表种
if (additionalCachedNeeded > 0) {
addNewPendingCached(additionalCachedNeeded, cblock, cached,
pendingCached);
}
}
如果前面的条件都已经满足了,则当前遍历的目标CacheBlock会被remove掉
// 如果任何条件都满足了,则把目标缓存块进行移除
if ((neededCached == 0) &&
pendingUncached.isEmpty() &&
pendingCached.isEmpty()) {
// we have nothing more to do with this block.
LOG.trace("Block {}: removing from cachedBlocks, since neededCached "
+ "== 0, and pendingUncached and pendingCached are empty.",
cblock.getBlockId()
);
cbIter.remove();
}以上所有的比较核心是neededCached,而这个值本质上就是缓存目标块的自身副本数.所以看完了这部分的过程,之前提出的重复缓存的问题自然也就解决了.下面是Rescan的过程图:
HDFS CacheAdmin命令使用
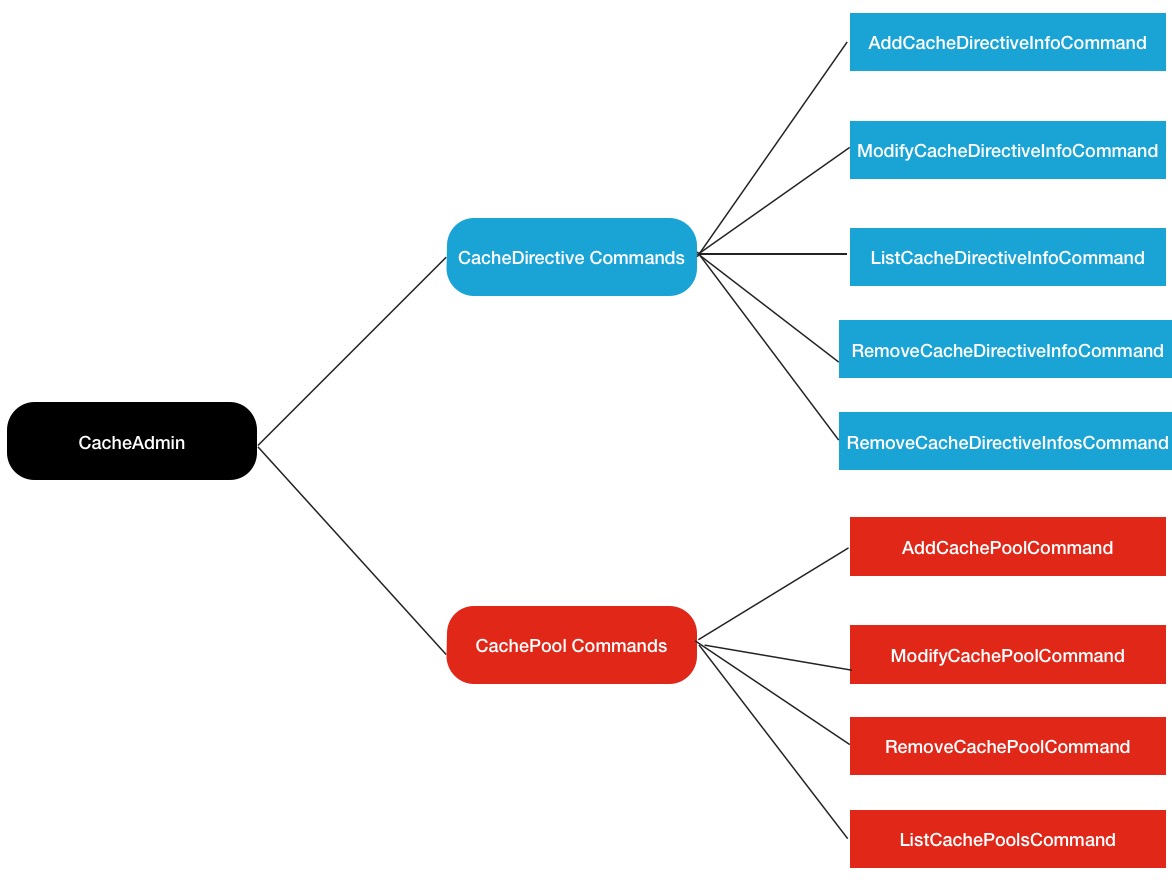
最后一个模块介绍HDFS专门针对缓存块操作的相关命令使用,这些命令都集中在hdfs cacheadmin命令下,在hadoop客户端中输入如下指令,就会弹出所有使用命令:$ hdfs cacheadmin Usage: bin/hdfs cacheadmin [COMMAND] [-addDirective -path <path> -pool <pool-name> [-force] [-replication <replication>] [-ttl <time-to-live>]] [-modifyDirective -id <id> [-path <path>] [-force] [-replication <replication>] [-pool <pool-name>] [-ttl <time-to-live>]] [-listDirectives [-stats] [-path <path>] [-pool <pool>] [-id <id>] [-removeDirective <id>] [-removeDirectives -path <path>] [-addPool <name> [-owner <owner>] [-group <group>] [-mode <mode>] [-limit <limit>] [-maxTtl <maxTtl>] [-modifyPool <name> [-owner <owner>] [-group <group>] [-mode <mode>] [-limit <limit>] [-maxTtl <maxTtl>]] [-removePool <name>] [-listPools [-stats] [<name>]] [-help <command-name>]
以上命令中除了最后一个-help帮助命令之外的其余9个命令都是与缓存操作相关的命令.所以可以分为2大类,1个是CachePool相关的,另1个是CacheDirective相关的,结构图如下
下面演示一下我在测试集群中的操作:
首先,我需要新建一个CachePool
$ hdfs cacheadmin -addPool zhexuan_test_pool
Successfully added cache pool zhexuan_test_pool.
然后用listPool显示一下是否创建成功
$ hdfs cacheadmin -listPools
Found 1 result.
NAME               OWNER  GROUP  MODE            LIMIT  MAXTTL
zhexuan_test_pool  data   data   rwxr-xr-x   unlimited   never
然后我需要挑选一个目标缓存的文件或目录,比如下面这个临时文件
-rwx------ 2 zhexuan supergroup 781 2016-04-15 10:51 /tmp/zhexuan_file
调用addCacheDirective命令带上必要的参数加入当刚刚我建立的test_pool缓存池中.
$ hdfs cacheadmin -addDirective  -path /tmp/zhexuan_file -pool zhexuan_test_pool
Added cache directive 1
同样进行list查询
$ hdfs cacheadmin -listDirectives -pool zhexuan_test_pool -stats
Found 1 entry
ID POOL                REPL EXPIRY  PATH                BYTES_NEEDED  BYTES_CACHED  FILES_NEEDED  FILES_CACHED
1 zhexuan_test_pool      1 never   /tmp/zhexuan_file            781             0             1             0
以上这些添加cachePool,cacheDirective的操作都结束了之后是否就意味着操作结束了呢,No!,其实还有一步很重要的操作,就是开启DataNoded的缓存功能,默认是关闭的.需要配置此属性值
<property>
<name>dfs.datanode.max.locked.memory</name>
<value>0</value>
<description>
The amount of memory in bytes to use for caching of block replicas in
memory on the datanode. The datanode's maximum locked memory soft ulimit
(RLIMIT_MEMLOCK) must be set to at least this value, else the datanode
will abort on startup.

By default, this parameter is set to 0, which disables in-memory caching.

If the native libraries are not available to the DataNode, this
configuration has no effect.
</description>
</property>
而且要设定能符合机器条件的内存大小,以便缓存块的存放.相信大家合理的使用HDFS Cache缓存功能,一定会对集群的性能提升有很大的帮助作用.
相关链接
1.http://hadoop.apache.org/docs/r2.7.2/hadoop-project-dist/hadoop-hdfs/CentralizedCacheManagement.html2.http://blog.csdn.net/androidlushangderen/article/details/50818302

相关文章推荐
- Spark优化:禁止应用程序将依赖的Jar包传到HDFS
- Spark兼容Hive入门解析
- flume学习(五):flume将log4j日志数据写入到hdfs
- HDFS的搭建
- HDFS文件系统操作命令
- HDFS数据的读写过程
- HDFS文件存储组织
- HDFS文件和HIVE表的一些操作
- HDFS机架感知功能原理(rack awareness)
- 在使用Spark Streaming向HDFS中保存数据时,文件内容会被覆盖掉的解决方案
- Spark读取HDFS文件
- HDFS相关概念
- HDFS 综述
- Flume-ng HDFS Sink “丢数据”
- Flume-ng HDFS sink原理解析
- [HDFS]HDFS的运行原理
- hadoop源码阅读之FileSystem简记
- Linkedin Camus,从Kafka到HDFS的数据传输管道
- Fix Corrupt Blocks on HDFS
- 【漫画解读】HDFS存储原理(转载)