第九章:逻辑卷LVM
2016-05-08 09:30
337 查看
第九章:逻辑卷LVM
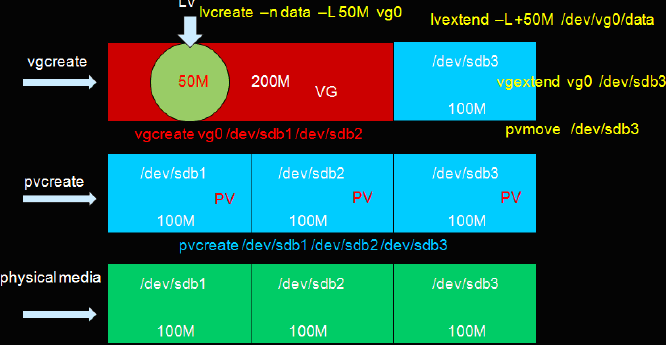
现实生产环境中,经常会遇到磁盘空间不够用的情况,无论规划的多么好,最终还是会遇到这种情况。所以说,磁盘分区没有一个标准的格式,只能根据自己的服务器应用来适当进行划分。那么遇到这样的问题我们如何解决呢?本章我们就来介绍解决之法—逻辑卷管理(LVM)。LVM(Logical VolumeManager),通过这种技术可以随意扩大或缩小磁盘或分区的容量。LVM的实现是把磁盘、分区或RAID设备通过软件组合成一块独立的VG,然后将这个VG再进行划分LV,这时候的LV就相当于一个分区了,需要先格式化,然后挂载到系统中使用。LV能自由伸缩,关键是底层的PE在起作用。
1.相关概念
Physical Extend:PEPE就像我们前面所说的磁盘的BLOCK,而这个的大小同样会影响到VG的大小 Physical Volume:PV
在分区的时候,有个分区转换的LVM标识(8e),要做LVM,就必须把分区类型转换成8e,然后再用pvcreate将分区转换成PV,Pv是创建VG的前提
Volume Group:VG
所谓的VG,就是把多个PV组合成一个更大的磁盘,这就是VG
Logical Volume:LV
要使用VG,就必须把VG分成LV,LV就可以看做是分区了。当然分区后需要格式化才能挂载使用。
2.创建LVM
2.1.创建分区并格式化
| [root@freeit ~]# fdisk /dev/sda Welcome to fdisk (util-linux 2.23.2). Changes will remain in memory only, until you decide to write them. Be careful before using the write command. Command (m for help): n Partition type: p primary (2 primary, 0 extended, 2 free) e extended Select (default p): p Partition number (3,4, default 3): 3 //创建一个主分区,分区号3 First sector (127502336-209715199, default 127502336): Using default value 127502336 Last sector, +sectors or +size{K,M,G} (127502336-209715199, default 209715199): +300M //分区给300M空间 Partition 3 of type Linux and of size 300 MiB is set Command (m for help): t Partition number (1-3, default 3): 3 Hex code (type L to list all codes): 8e Changed type of partition 'Linux' to 'Linux LVM' //格式化为LVM格式才能创建LVM逻辑分区 Command (m for help): p Disk /dev/sda: 107.4 GB, 107374182400 bytes, 209715200 sectors Units = sectors of 1 * 512 = 512 bytes Sector size (logical/physical): 512 bytes / 512 bytes I/O size (minimum/optimal): 512 bytes / 512 bytes Disk label type: dos Disk identifier: 0x000b2b59 Device Boot Start End Blocks Id System /dev/sda1 * 2048 411647 204800 83 Linux /dev/sda2 411648 127502335 63545344 8e Linux LVM /dev/sda3 127502336 128116735 307200 8e Linux LVM Command (m for help): w The partition table has been altered! Calling ioctl() to re-read partition table. WARNING: Re-reading the partition table failed with error 16: Device or resource busy. The kernel still uses the old table. The new table will be used at the next reboot or after you run partprobe(8) or kpartx(8) Syncing disks. |
| ----------------------------------------------fdisk命令查看------------------------------------------------ [root@freeit ~]# fdisk -l /dev/sda Disk /dev/sda: 107.4 GB, 107374182400 bytes, 209715200 sectors Units = sectors of 1 * 512 = 512 bytes Sector size (logical/physical): 512 bytes / 512 bytes I/O size (minimum/optimal): 512 bytes / 512 bytes Disk label type: dos Disk identifier: 0x000b2b59 Device Boot Start End Blocks Id System /dev/sda1 * 2048 411647 204800 83 Linux /dev/sda2 411648 127502335 63545344 8e Linux LVM /dev/sda3 127502336 128116735 307200 8e Linux LVM -------------------------------------------------查看分区表------------------------------------------------------- [root@freeit ~]# cat /proc/partitions major minor #blocks name 2 0 4 fd0 11 0 4139008 sr0 8 0 104857600 sda 8 1 204800 sda1 8 2 63545344 sda2 //分区表中没有新创建的分区。原因前面【创建分区】中已经描述过 |
| [root@freeit ~]# partprobe /dev/sda [root@freeit ~]# cat /proc/partitions major minor #blocks name 2 0 4 fd0 11 0 4139008 sr0 8 0 104857600 sda 8 1 204800 sda1 8 2 63545344 sda2 8 3 307200 sda3 |
| [root@freeit ~]# mkfs.xfs /dev/sda3 mkfs.xfs: /dev/sda3 appears to contain an existing filesystem (ext4). mkfs.xfs: Use the -f option to force overwrite. //现在分区为ext4格式,要格式化为xfs必须加-f参数强制更改 [root@freeit ~]# mkfs.xfs /dev/sda3 -f meta-data=/dev/sda3 isize=256 agcount=4, agsize=19200 blks = sectsz=512 attr=2, projid32bit=1 = crc=0 data = bsize=4096 blocks=76800, imaxpct=25 = sunit=0 swidth=0 blks naming =version 2 bsize=4096 ascii-ci=0 ftype=0 log =internal log bsize=4096 blocks=853, version=2 = sectsz=512 sunit=0 blks, lazy-count=1 realtime =none extsz=4096 blocks=0, rtextents=0 |
2.2.创建PV
| ---------------------------------------------------查看当前PV设备---------------------------------------------- [root@freeit ~]# pvscan PV /dev/sda2 VG rhel lvm2 [60.60 GiB / 4.00 MiB free] Total: 1 [60.60 GiB] / in use: 1 [60.60 GiB] / in no VG: 0 [0 ] //现在只有一个PV,设备为/dev/sda2----------------------------------------------------创建新PV---------------------------------------------------------- [root@freeit ~]# pvcreate /dev/sda3 WARNING: xfs signature detected on /dev/sda3 at offset 0. Wipe it? [y/n] y Wiping xfs signature on /dev/sda3. Physical volume "/dev/sda3" successfully created //创建成功,用如下命令查看PV设备详细信息[root@freeit ~]# pvdisplay --- Physical volume --- PV Name /dev/sda2 VG Name rhel PV Size 60.60 GiB / not usable 4.00 MiB Allocatable yes PE Size 4.00 MiB Total PE 15513 Free PE 1 Allocated PE 15512 PV UUID IbOL5W-geH1-EVwe-N8iZ-UDR3-R19N-3X1IMD "/dev/sda3" is a new physical volume of "300.00 MiB" --- NEW Physical volume --- PV Name /dev/sda3 VG Name PV Size 300.00 MiB Allocatable NO PE Size 0 Total PE 0 Free PE 0 Allocated PE 0 PV UUID 7eB3tB-Svbb-arLo-lY5x-innE-uzVd-l01dy1 |
2.3.创建vg
| [root@freeit ~]# vgcreate vg01 /dev/sda3 Volume group "vg01" successfully created [root@freeit ~]# vgdisplay --- Volume group --- VG Name vg01 //新创建的VG System ID Format lvm2 Metadata Areas 1 Metadata Sequence No 1 VG Access read/write VG Status resizable MAX LV 0 Cur LV 0 Open LV 0 Max PV 0 Cur PV 1 Act PV 1 VG Size 296.00 MiB PE Size 4.00 MiB //PE为4M Total PE 74 Alloc PE / Size 0 / 0 Free PE / Size 74 / 296.00 MiB VG UUID tJn6ta-Wy9F-v9oi-jqCJ-21ME-j5K0-vTEOzP --- Volume group --- VG Name rhel System ID Format lvm2 Metadata Areas 1 Metadata Sequence No 3 VG Access read/write VG Status resizable MAX LV 0 Cur LV 2 Open LV 2 Max PV 0 Cur PV 1 Act PV 1 VG Size 60.60 GiB PE Size 4.00 MiB Total PE 15513 Alloc PE / Size 15512 / 60.59 GiB Free PE / Size 1 / 4.00 MiB |
从上例可以看出,PE大小为4M。如果要更改PE大小,在创建VG时,要加上-s参数
如下:把PE大小改为8M
| [root@freeit ~]# vgcreate -s 8M vg01 /dev/sda3 |
2.4.创建LVM
例:创建一个大小为100M的LV逻辑卷| [root@freeit ~]# lvcreate -L 100M -n gyhlv vg01 WARNING: xfs signature detected on /dev/vg01/gyhlv at offset 0. Wipe it? [y/n] y Wiping xfs signature on /dev/vg01/gyhlv. Logical volume "gyhlv" created [root@freeit ~]# lvdisplay --- Logical volume --- LV Path /dev/vg01/gyhlv //此为新创建的LVM逻辑卷 LV Name gyhlv VG Name vg01 LV UUID a6YMV1-1uRl-oRWx-nH5W-502N-m3l7-wLPv7Z LV Write Access read/write LV Creation host, time freeit.example.com, 2015-05-06 17:43:31 +0800 LV Status available # open 0 LV Size 100.00 MiB //大小100M Current LE 25 //25个PE大小 Segments 1 Allocation inherit Read ahead sectors auto - currently set to 8192 Block device 253:2 …… |
如果创建LV是以PE数来创建,那么要把-L改为-l,后面直接跟数字,表明PE的多少。创建好的LV分区大小为[(PE数)*(-l后面的数字)]。
这样,LV就创建好了,接下来就可以与普通分区一样进行格式化并挂载使用了。
例:把/dev/vg01/gyhlv格式化为xfs格式并挂载到/opt下
| [root@freeit ~]# mkfs.xfs /dev/vg01/gyhlv meta-data=/dev/vg01/gyhlv isize=256 agcount=4, agsize=6400 blks = sectsz=512 attr=2, projid32bit=1 = crc=0 data = bsize=4096 blocks=25600, imaxpct=25 = sunit=0 swidth=0 blks naming =version 2 bsize=4096 ascii-ci=0 ftype=0 log =internal log bsize=4096 blocks=853, version=2 = sectsz=512 sunit=0 blks, lazy-count=1 realtime =none extsz=4096 blocks=0, rtextents=0 [root@freeit ~]# mount /dev/vg01/gyhlv /opt/ [root@freeit ~]# df Filesystem 1K-blocks Used Available Use% Mounted on /dev/mapper/rhel-root 61410000 3223900 58186100 6% / devtmpfs 496084 0 496084 0% /dev tmpfs 505392 0 505392 0% /dev/shm tmpfs 505392 7116 498276 2% /run tmpfs 505392 0 505392 0% /sys/fs/cgroup /dev/sda1 201388 106044 95344 53% /boot /dev/mapper/vg01-gyhlv 98988 5280 93708 6% /opt |
3.LV在线拉申
在学习RHEL5.x%6.x时,LV可以在线拉大,并且可以离线减小。但是,RHEL7中,目前只能在线拉大,不能离线减小。所以,本章我们只介绍如何把xfs格式的LV在线拉大。现在,假设之前创建的100M LV空间已经不够用了,需要扩大,要怎么办呢?
3.1.直接使用剩余的VG空间
因为vg01中还剩余有200M空间,所以,我们直接从vg01中划分空间即可例:把创建好的/dev/vg01/gyhlv由之前的100M拉大到200M
| ----------------------------------------------------查看现在分区大小------------------------------------------- [root@freeit ~]# df -h Filesystem Size Used Avail Use% Mounted on /dev/mapper/rhel-root 59G 3.1G 56G 6% / devtmpfs 485M 0 485M 0% /dev tmpfs 494M 0 494M 0% /dev/shm tmpfs 494M 7.xM 487M 2% /run tmpfs 494M 0 494M 0% /sys/fs/cgroup /dev/sda1 197M 104M 94M 53% /boot /dev/mapper/vg01-gyhlv 97M 5.2M 92M 6% /opt --------------------------------------------------在线拉大到200M-------------------------------------------------- [root@freeit ~]# lvextend -L 200M /dev/vg01/gyhlv Extending logical volume gyhlv to 200.00 MiB Logical volume gyhlv successfully resized 注:拉伸到200M,直接-L 200M,或者用-L +100M。“+”就是说在原来的基础上加多少。而不加“+”就表示这个LV的空间是多少 [root@freeit ~]# df -h Filesystem Size Used Avail Use% Mounted on /dev/mapper/rhel-root 59G 3.1G 56G 6% / devtmpfs 485M 0 485M 0% /dev tmpfs 494M 0 494M 0% /dev/shm tmpfs 494M 7.xM 487M 2% /run tmpfs 494M 0 494M 0% /sys/fs/cgroup /dev/sda1 197M 104M 94M 53% /boot /dev/mapper/vg01-gyhlv 97M 5.2M 92M 6% /opt //如上,拉大之后,再次查看,并没有变化,还是之前的100M。 |
| ---------------------------------------------使用resize2fs会报错-------------------------------------------- [root@freeit ~]# resize2fs /dev/vg01/gyhlv resize2fs 1.42.9 (28-Dec-2013) resize2fs: Bad magic number in super-block while trying to open /dev/vg01/gyhlv Couldn't find valid filesystem superblock. -----------------------------------------------使用xfs相关命令--------------------------------------------------- [root@freeit ~]# xfs_growfs /dev/vg01/gyhlv meta-data=/dev/mapper/vg01-gyhlv isize=256 agcount=4, agsize=6400 blks = sectsz=512 attr=2, projid32bit=1 = crc=0 data = bsize=4096 blocks=25600, imaxpct=25 = sunit=0 swidth=0 blks naming =version 2 bsize=4096 ascii-ci=0 ftype=0 log =internal bsize=4096 blocks=853, version=2 = sectsz=512 sunit=0 blks, lazy-count=1 realtime =none extsz=4096 blocks=0, rtextents=0 data blocks changed from 25600 to 51200 [root@freeit ~]# df -h Filesystem Size Used Avail Use% Mounted on /dev/mapper/rhel-root 59G 3.1G 56G 6% / devtmpfs 485M 0 485M 0% /dev tmpfs 494M 0 494M 0% /dev/shm tmpfs 494M 7.xM 487M 2% /run tmpfs 494M 0 494M 0% /sys/fs/cgroup /dev/sda1 197M 104M 94M 53% /boot /dev/mapper/vg01-gyhlv 197M 5.3M 192M 3% /opt //如上,空间被拉伸了 |
3.1.扩容PV,拉伸LV
现在,假设空间又不够用了,还需要200M的空间,但此时原有的VG空间已经不够用了,还剩余100M| [root@freeit ~]# vgdisplay --- Volume group --- VG Name vg01 System ID Format lvm2 Metadata Areas 1 Metadata Sequence No 3 VG Access read/write VG Status resizable MAX LV 0 Cur LV 1 Open LV 1 Max PV 0 Cur PV 1 Act PV 1 VG Size 296.00 MiB PE Size 4.00 MiB Total PE 74 Alloc PE / Size 50 / 200.00 MiB Free PE / Size 24 / 96.00 MiB //剩余大概100M空间 VG UUID tJn6ta-Wy9F-v9oi-jqCJ-21ME-j5K0-vTEOzP |
| ---------------------------------------------------创建新分区------------------------------------------------ [root@freeit ~]# fdisk /dev/sda Welcome to fdisk (util-linux 2.23.2). Changes will remain in memory only, until you decide to write them. Be careful before using the write command. Command (m for help): n Partition type: p primary (3 primary, 0 extended, 1 free) e extended Select (default e): p Selected partition 4 First sector (128116736-209715199, default 128116736): Using default value 128116736 Last sector, +sectors or +size{K,M,G} (128116736-209715199, default 209715199): //直接回车,就是默认使用剩下的所有空间 Using default value 209715199 Partition 4 of type Linux and of size 38.9 GiB is set Command (m for help): t Partition number (1-4, default 4): 4 Hex code (type L to list all codes): 8e Changed type of partition 'Linux' to 'Linux LVM' Command (m for help): p Disk /dev/sda: 107.4 GB, 107374182400 bytes, 209715200 sectors Units = sectors of 1 * 512 = 512 bytes Sector size (logical/physical): 512 bytes / 512 bytes I/O size (minimum/optimal): 512 bytes / 512 bytes Disk label type: dos Disk identifier: 0x000b2b59 Device Boot Start End Blocks Id System /dev/sda1 * 2048 411647 204800 83 Linux /dev/sda2 411648 127502335 63545344 8e Linux LVM /dev/sda3 127502336 128116735 307200 8e Linux LVM /dev/sda4 128116736 209715199 40799232 8e Linux LVM Command (m for help): w The partition table has been altered! Calling ioctl() to re-read partition table. WARNING: Re-reading the partition table failed with error 16: Device or resource busy. The kernel still uses the old table. The new table will be used at the next reboot or after you run partprobe(8) or kpartx(8) Syncing disks. [root@freeit ~]# partprobe /dev/sda //把分区信息写进内核 [root@freeit ~]# cat /proc/partitions major minor #blocks name 2 0 4 fd0 11 0 4139008 sr0 8 0 104857600 sda 8 1 204800 sda1 8 2 63545344 sda2 8 3 307200 sda3 8 4 40799232 sda4 ---------------------------------------------------扩容PV空间---------------------------------------------- [root@freeit ~]# pvcreate /dev/sda4 Physical volume "/dev/sda4" successfully created [root@freeit ~]# pvdisplay …… "/dev/sda4" is a new physical volume of "38.91 GiB" --- NEW Physical volume --- PV Name /dev/sda4 VG Name PV Size 38.91 GiB Allocatable NO PE Size 0 Total PE 0 Free PE 0 Allocated PE 0 PV UUID tagIpw-eeBz-vFSS-qI1B-eK0b-cBiJ-2XBebq ---------------------------------------------------扩容VG空间---------------------------------------------- [root@freeit ~]# vgextend vg01 /dev/sda4 Volume group "vg01" successfully extended [root@freeit ~]# vgdisplay --- Volume group --- VG Name vg01 System ID Format lvm2 Metadata Areas 2 Metadata Sequence No 4 VG Access read/write VG Status resizable MAX LV 0 Cur LV 1 Open LV 1 Max PV 0 Cur PV 2 Act PV 2 VG Size 39.20 GiB PE Size 4.00 MiB Total PE 10034 Alloc PE / Size 50 / 200.00 MiB Free PE / Size 9984 / 39.00 GiB //vg01扩容成功 VG UUID tJn6ta-Wy9F-v9oi-jqCJ-21ME-j5K0-vTEOzP …… 接下来,可以直接在VG的基础上拉大lv了 ---------------------------------------------------拉大LV,再添加200M空间------------------------------ [root@freeit ~]# lvextend -L +200M /dev/vg01/gyhlv Extending logical volume gyhlv to 400.00 MiB Logical volume gyhlv successfully resized [root@freeit ~]# xfs_growfs /dev/vg01/gyhlv meta-data=/dev/mapper/vg01-gyhlv isize=256 agcount=8, agsize=6400 blks = sectsz=512 attr=2, projid32bit=1 = crc=0 data = bsize=4096 blocks=51200, imaxpct=25 = sunit=0 swidth=0 blks naming =version 2 bsize=4096 ascii-ci=0 ftype=0 log =internal bsize=4096 blocks=853, version=2 = sectsz=512 sunit=0 blks, lazy-count=1 realtime =none extsz=4096 blocks=0, rtextents=0 data blocks changed from 51200 to 102400 -----------------------------------------------验证结果--------------------------------------------------- [root@freeit ~]# df -h Filesystem Size Used Avail Use% Mounted on /dev/mapper/rhel-root 59G 3.1G 56G 6% / devtmpfs 485M 0 485M 0% /dev tmpfs 494M 0 494M 0% /dev/shm tmpfs 494M 7.xM 487M 2% /run tmpfs 494M 0 494M 0% /sys/fs/cgroup /dev/sda1 197M 104M 94M 53% /boot /dev/mapper/vg01-gyhlv 397M 5.6M 392M 2% /opt //397M,即400M,拉伸成功 |

相关文章推荐
- 基于 Red Hat 的发行版 Oracle Linux 正式发布Oracle Linux 7.1
- 在Linux中使用LVM构建灵活的磁盘存储(第一部分)
- Linux培训笔记:LVM实验
- 基于 Red Hat 的发行版 Oracle Linux 正式发布Oracle Linux 7.1
- 逻辑卷管理(LVM) Linux 用户指南
- 图解RedHat AS4.0硬盘版安装教程
- 在RedHat下安装apache jserv 1.1.2方法
- redhat下apache+php+mysql+imap+ldap+jdk+tomcat的安装
- redhat Server release 5.2 安装配置简明教程
- Redhat Linux下Bind的快速安装
- HP服务器用户安装REDHAT 5.5手册在线图文教程
- Redhat 6.5下MySQL5.6集群配置方法完整版
- 在RedHat系统上安装JDK与Tomcat的步骤
- Glusterfs:趋于成熟的集群文件系统
- openci服务器搭建笔记
- redhat6.3部署gitlab
- 建立共享存储实验记录
- 什么是逻辑分区管理 LVM ,如何在Ubuntu中使用?