Linux动态库(一)
2016-05-08 00:00
465 查看
摘要: 写了一个C++的运行时加载动态库的例子。
起因
博主在以Linux下做开发。在软件需求中,需要动态库带来的灵活性。
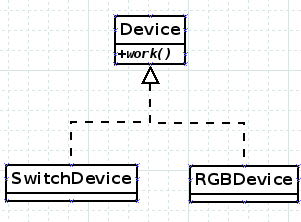
比如说博主主导的智能主机的开发。它需要支持很多种类的设备控制,如普通的开关灯、RGB灯、窗帘、百叶窗等等。我们将这些设备抽象成Device类,具体的设备就从这个类上派生出来。每支持一个新设备就派生一个Device的子类进行具体能力的实现。如下:
如果我们在代码里将其写死。那么,将来我们每新添一个设备,我们都得更换整个应用程序。升级程序有风险,而且在升级过程中主机是会停止服务的。
那么,能不能在不停止应用程序的情况下直接支持新的设备的呢?我想是能的,用动态库实现的插件思想来做。当主机发现一个种类的设备,比如:门锁。主机之前并不认识,它便会拿着设备的model_id去向服务器请求其“驱动”。而这个驱动,则是该设备从Device派生的类DoorlockDevice的动态库文件 doorlock_device.so。主机将该动态库加载进来,并实例化其DoorlockDevice对象。于是,主机就可以正常控制门锁了。
这样做除了灵活以外,还有另一个优点:通常用户的智能家居系统中只有两三种设备,如果将死在代码里或者静态链接。主机程序在加载的时候会将100多个设备代码加载到内存中运行。这对于内存匮乏的嵌入式系统而言,这是莫大的浪费。如果采用动态库加载方式,主机程序不需要在启动的时候将所有的设备驱动加载到内存运行,而是按需加载。如此可以大大地节省内存开销。
于是,我一定要好好研究一下动态库加载与插件模式。
文件组织结构:
plugins/device.{h,cpp} 定义了设备的接口:
plugins/device.h
plugins/device.cpp
定义的比较简单,就一个方法:work()
plugins/devices/ 目录下为Device的两个派生类:
RGBDevice类
SwitchDevice类
上面两个类的cpp里,我们都定义了一个create() 函数。它是用来创建一个对应的对象的。对于动态库里的对象,我们不能用new来创建。因为在编译main程序时,编译器根本就不知道如果new RGBDevice。
我们也不能提前在编译main程序时包含rgb_device.h(我们那时可能就不知道会有这个一个类)。综上,我们需要一个动态库内部指定的函数来创建。
plugins/Makefile的内容如下:
博主不太精于写Makefile,只能写成这样了。见笑了~
大致是这样的,每个派生类都要单独编译成一个libxxxx.so文件。如rgb_device,编译命令是:g++ -shared -o librgb_device.so -fPIC device/rgb_device.cpp device.cpp
为什么要加device.cpp ?因为RGBDevice继承于Device,而Device有自己的方法。如果编译时不加device.cpp,那么RGBDevice在链接时,不知道该怎么执行继承于Device的成员函数了。
好了,在plugins/下make一下,正常情况下,两个动态库就生成了。
下面看看main中如何加载动态库:
main.cpp
Makefile
注意:在链接main时,一定要添加 -ldl,否则不能支持dlopen, dlsym, dlclose 函数。
make 之后,运行结果:
将
换成:
后再运行,结果是:
可见动态的效果了。如果我们将动态库名写在配置文件里。那么,只要修改一下配置文件,那么运行的效果就不同了。
这只是实现上面我的设想的第一步。后面再研究动态库的插件。
下次见!
起因
博主在以Linux下做开发。在软件需求中,需要动态库带来的灵活性。比如说博主主导的智能主机的开发。它需要支持很多种类的设备控制,如普通的开关灯、RGB灯、窗帘、百叶窗等等。我们将这些设备抽象成Device类,具体的设备就从这个类上派生出来。每支持一个新设备就派生一个Device的子类进行具体能力的实现。如下:
如果我们在代码里将其写死。那么,将来我们每新添一个设备,我们都得更换整个应用程序。升级程序有风险,而且在升级过程中主机是会停止服务的。
那么,能不能在不停止应用程序的情况下直接支持新的设备的呢?我想是能的,用动态库实现的插件思想来做。当主机发现一个种类的设备,比如:门锁。主机之前并不认识,它便会拿着设备的model_id去向服务器请求其“驱动”。而这个驱动,则是该设备从Device派生的类DoorlockDevice的动态库文件 doorlock_device.so。主机将该动态库加载进来,并实例化其DoorlockDevice对象。于是,主机就可以正常控制门锁了。
这样做除了灵活以外,还有另一个优点:通常用户的智能家居系统中只有两三种设备,如果将死在代码里或者静态链接。主机程序在加载的时候会将100多个设备代码加载到内存中运行。这对于内存匮乏的嵌入式系统而言,这是莫大的浪费。如果采用动态库加载方式,主机程序不需要在启动的时候将所有的设备驱动加载到内存运行,而是按需加载。如此可以大大地节省内存开销。
于是,我一定要好好研究一下动态库加载与插件模式。
正题
好了,回归正题。下面是一个非常简单的例子,看看是如何实现的:文件组织结构:
.
├── main.cpp
├── Makefile
└── plugins
├── device.cpp
├── device.h
├── devices
│   ├── rgb_device.cpp
│   ├── rgb_device.h
│   ├── switch_device.cpp
│   └── switch_device.h
└── Makefile
plugins/device.{h,cpp} 定义了设备的接口:
plugins/device.h
#ifndef DEVICE_H_20160508
#define DEVICE_H_20160508

class Device {
public:
Device();
virtual ~Device();

public:
virtual void work() = 0;
};

typedef Device* create_func_t();

#endif //DEVICE_H_20160508
plugins/device.cpp
#include "device.h"
#include <iostream>
using namespace std;

Device::Device() {
cout << "Device construct" << endl;
}

Device::~Device() {
cout << "Device destruct" << endl;
}
定义的比较简单,就一个方法:work()
plugins/devices/ 目录下为Device的两个派生类:
RGBDevice类
#ifndef RGB_DEVICE_H_20160508
#define RGB_DEVICE_H_20160508

#include "../device.h"

class RGBDevice: public Device {
public:
virtual void work();
};

#endif //RGB_DEVICE_H_20160508
#include "rgb_device.h"
#include <iostream>
using namespace std;
extern "C" Device* create() {
return new RGBDevice;
}
void RGBDevice::work() {
cout << "RGB work" << endl;
}SwitchDevice类
#ifndef SWITCH_DEVICE_H_20160508
#define SWITCH_DEVICE_H_20160508

#include "../device.h"

class SwitchDevice: public Device {
public:
virtual void work();
};

#endif //SWITCH_DEVICE_H_20160508
#include "switch_device.h"
#include <iostream>
using namespace std;
extern "C" Device* create() {
return new SwitchDevice;
}
void SwitchDevice::work() {
cout << "SwitchDevice work" << endl;
}上面两个类的cpp里,我们都定义了一个create() 函数。它是用来创建一个对应的对象的。对于动态库里的对象,我们不能用new来创建。因为在编译main程序时,编译器根本就不知道如果new RGBDevice。
我们也不能提前在编译main程序时包含rgb_device.h(我们那时可能就不知道会有这个一个类)。综上,我们需要一个动态库内部指定的函数来创建。
plugins/Makefile的内容如下:
CFLAGS+=-shared -fPIC
CXXFLAGS+=$(CFLAGS)

all: librgb_device.so libswitch_device.so

librgb_device.so: devices/rgb_device.cpp device.cpp
$(CXX) $(CXXFLAGS) -o $@ $^

libswitch_device.so: devices/switch_device.cpp device.cpp
$(CXX) $(CXXFLAGS) -o $@ $^

clean:
-rm -f lib*.so
博主不太精于写Makefile,只能写成这样了。见笑了~
大致是这样的,每个派生类都要单独编译成一个libxxxx.so文件。如rgb_device,编译命令是:g++ -shared -o librgb_device.so -fPIC device/rgb_device.cpp device.cpp
为什么要加device.cpp ?因为RGBDevice继承于Device,而Device有自己的方法。如果编译时不加device.cpp,那么RGBDevice在链接时,不知道该怎么执行继承于Device的成员函数了。
好了,在plugins/下make一下,正常情况下,两个动态库就生成了。
下面看看main中如何加载动态库:
main.cpp
#include <dlfcn.h>
#include <iostream>
#include "device.h"

using namespace std;

int main() {
cout << "start" << endl;

void *handle = dlopen("./plugins/libswitch_device.so", RTLD_NOW);
if (handle == NULL) {
cerr << dlerror() << endl;
return 0;
}

create_func_t *func = (create_func_t*)dlsym(handle, "create");
if (func != NULL) {
Device *d = (*func)();
if (d != NULL) {
d->work();
delete d;
} else
cerr << "can't find [create] func" << endl;
}

dlclose(handle);
handle = NULL;

cout << "done" << endl;
return 0;
}
Makefile
all: test
make -C plugins all

test: main.cpp
$(CXX) -o $@ $^ -I./plugins/ -ldl

clean:
make -C plugins clean
-rm test
注意:在链接main时,一定要添加 -ldl,否则不能支持dlopen, dlsym, dlclose 函数。
make 之后,运行结果:
start
Device construct
SwitchDevice work
Device destruct
done
将
dlopen("./plugins/libswitch_device.so", RTLD_NOW)换成:
dlopen("./plugins/librgb_device.so", RTLD_NOW)后再运行,结果是:
start
Device construct
RGB work
Device destruct
done
可见动态的效果了。如果我们将动态库名写在配置文件里。那么,只要修改一下配置文件,那么运行的效果就不同了。
这只是实现上面我的设想的第一步。后面再研究动态库的插件。
下次见!

相关文章推荐
- Linux socket 初步
- 使用C++实现JNI接口需要注意的事项
- Linux Kernel 4.0 RC5 发布!
- linux lsof详解
- linux 文件权限
- Linux 执行数学运算
- 10 篇对初学者和专家都有用的 Linux 命令教程
- Linux 与 Windows 对UNICODE 的处理方式
- Ubuntu12.04下QQ完美走起啊!走起啊!有木有啊!
- 解決Linux下Android开发真机调试设备不被识别问题
- 运维入门
- 运维提升
- Linux 自检和 SystemTap
- Ubuntu Linux使用体验
- c语言实现hashmap(转载)
- Linux 信号signal处理机制
- linux下mysql添加用户
- 关于指针的一些事情