1.3Python快速入门
2016-04-26 00:00
453 查看
Python过程型程序设计快速入门
核心数据类型:
基本数据类型:数字、字符串
数字
整形:整数、布尔数
浮点型
字符型
组合数据类型:
序列:
列表:list
元组:tuple
字符串:string
字典:
可变类型,dict
集合
set
表达式:“某事”
由一个或多个操作数,以及0个或多个以上的运行符组成,可以通过计算得到一个值,对象,方法或名称空间;
表达式的操作符:in, not, in,is,is not
< ,> , == , !=
+,-,*,/,%,**
li[i]
x.method()
x.attr
(…)
[…]
{…}
语句:做“某事”
声明变量、赋值、方法调用、循环访问集合、选择分支;
语句在程序中的执行顺序称为“控制流”,或“执行流”
if , while ,for , try
def, pass, class, return
break, continue
from, import
变量名的命名法则:
只能包含字母、数字和下划线,且不能以数字开头;
区分大小写;禁止使用保留字;
程序结构与控制流:
Python的布尔测试:
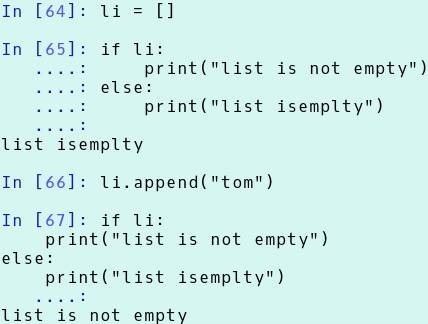
(1)任何的非零数字或非空对象都为真”true”
(2)数字零,空对象以及特殊对象None都为“False”
(3)比较和相等测试会递归的应用在数据结构;会返回“True”或“False”
(4)and 和 or,运算符会返回“真”或“假”的操作对象
选择执行
if CONDITION:
suite
if CONDITION:
suite1
else:
suite2
if CONDITION1:
suite1
elif CONDITION2:
suite2
...
else:
suiten
>>> num = 0
>>> if num:
print("Condition is True")
>>> num = 1
>>> if num:
print("Condition is True")
Condition is True

if/else的三元表达式:
expression1 if CONDITION else expression2

循环执行:
while,for
while BOOLEAN_EXPRESSION:
while_suite
while BOOLEAN_EXPRESSION:
while_suite
else:
else_suite
运行到while,即测试其后的条件;为“True”时,则执行一遍循环体,结束之后再运行BOOLEAN_EXPRESSION;
else为可选;
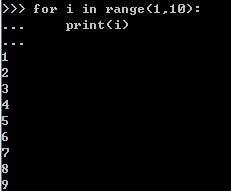
for expression in iterable:
for_suite
else:
else_suite
else也是可选的
控制:
continue
break
前面的都是Windows下的 Python shell

列表解析:Python迭代机制的一种应用,用于实现创建新列表;

[expression for iter_var in iterable_object]
[expression for iter_var in iterable_object if condition]
In [29]: [i ** 2 for i in li if i != 6]
Out[29]: [1, 4, 9, 16, 25, 49, 64]
Python缩进非常重要,4个空白
In [31]: m = 35

文件系统和文件
文件系统是OS用于明确磁盘或分区上的文件的方法和数据结构--即在磁盘上组织文件的方法
计算机文件(或称文件、电脑档案、档案),是存储在某种长期存储设备或临时存储设备中的一段数据流,并且归属于计算机文件系统管理之下
概括来讲
文件是计算机中由OS管理的具有名字的存储区域
在Linux系统上,文件被看做是字节序列
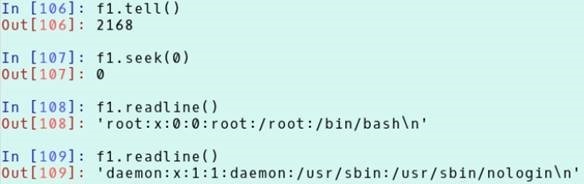
Python内置函数open()用于打开文件和创建文件对象
open(name[,mode[,bufsize]])
open方法可以接收三个参数:文件名、模式和缓冲区参数
open函数返回的是一个文件对象
mode:指定文件的打开模式
bufsize:定义输出缓存
0表示无输出缓存
1表示使用缓冲
负数表示使用系统默认设置
证书表示使用近似指定大小的缓冲
文件的打开模式
简单模式
r:只读
open(”/var/log/message.log”,’r’)
w:写入
a:附加
在模式后使用“+”表示同时支持输入、输出操作
如r+, w+和a+
在模式后附加”b”表示以二进制方式打开
如rb,wb++
文件的方法


Python的函数
函数的基础概念
函数是Python为了代码最大程度地重用和最小代码冗余而提供的基本程序结构
函数是一种设计工具,它能让程序员将复杂的系统分解为可管理的部件
函数用于将相关功能打包并参数化
在Python中可以创建4种函数:
全局函数:定义在模块中
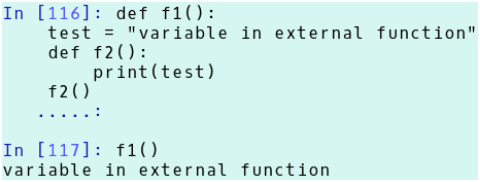
局部函数:嵌套于其他函数中
lambda函数:表达式
方法:与特定数据类型关联的函数,并且只能与数据类型关联一起使用
Python提供了很多内置函数
语法
def functionName(parameters)
suite
一些相关的概念
def是一个可执行语句
因此可以出现在任何能够使用语句的地方,甚至可以嵌套于其他语句,例如if或while中
def创建一个对象并将其赋值给一个变量名(即函数名)
return用于返回结果对象,其为可选;无return语句的函数自动返回None对象
返回多个值时,彼此间使用逗号分隔,且组合为元组形式返回一个对象
def语句运行之后,可以在程序中通过函数后附加括号进行调用
函数的定义方式:
def functionName(arg1,arg2,...):
function_suite
创建函数对象,并将其赋值给一个变量名(函数名)
return ,None

变量名解析:LEGB原则
变量名引用分三个作用域进行:首先是本地、之后是函数内、接着是全局,最后是内置;
Python模块
可以将代码量较大的程序分隔成多个有组织的、彼此独立但又能互相交互的代码片段,这些自我包含的有组织的代码段就是模块
模块在物理形式上表现为以.py结尾的代码文件
一个文件被看作一个独立的模块,一个模块也可以被看作是一个文件
模块的文件名就是模块的名字加上扩展名.py
每个模块都有自己的名称空间
Python允许“导入”其它模块以实现代码重用,从而实现了将独立的代码文件组织成更大的程序系统
Python中,模块也是对象
在一个模块的顶层定义的所有变量都在被导入时成为了被导入模块的属性
Python程序架构
一个Python程序通常包括一个顶层程序文件和其他的模块文件(0个、1个或多个)
顶层文件:包含了程序的主要控制流程
模块文件: 为顶层文件或其他模块提供各种功能性组件
模块首次导入(或重载)时,Python会立即执行模块文件的顶层程序代码(不在函数内的代码),而位于函数主体内的代码直到函数被调用后才会执行

模块的执行环境
模块是被导入的,但模块也可以导入和使用其他模块,这些模块可以用Python或其他编程语言写成
模块可内含变量、函数以及类来进行其工作,而函数和类可以包含变量和其它元素

模块:
程序文件:mod_name.py
import mod_name
模块中的顶层代码会被执行;模块会引入新的名称空间;
mod_name.
导入模块
在导入模块时只能使用模块名,而不能使用带.py后缀的模块文件名
import语句
导入指定的整个模块,包括生成一个以模块名命名的名称空间
import module1[,module2[,…moduleN]]
建议一个import语句只导入一个模块
import module as module_alias
from import语句
常用于只导入指定模块的部分属性至当前名称空间
from module import name1[,name2[,…nameN]]
import工作机制
import语句导入指定的模块时会执行三个步骤
找到模块文件
在指定的路径下搜索模块文件
编译成字节码
文件导入时就会编译,因此,顶层文件的.pyc字节码文件在内部使用后会被丢弃,只有被导入的文件才会留下.pyc文件
执行模块的代码来创建其所定义的对象
模块文件中的所有语句会一次执行,从头至尾,而此步骤中任何对变量名的赋值运算,都会产生所得到的模块文件的属性
注意:模块只在第一次导入时才会执行如上步骤:
后续的导入操作只不过是提取内存中已加载的模块对象
reload()可用于重新加载模块
模块搜索
Python解释器在import模块时必须先找到对应的模块文件
程序的主目录
PYTHONPATH目录(如果设置了此变量)
标准链接库目录
任何.pth文件的内容(如果存在.pth文件)
这四个组件组合起来即为sys.path所包含的路径,而Python会选择在搜索路径中的第一个符合导入文件的文件
>>> import sys
>>> sys.path
['', '/root/.pyenv/versions/3.4.2/lib/python34.zip', '/root/.pyenv/versions/3.4.2/lib/python3.4', '/root/.pyenv/versions/3.4.2/lib/python3.4/plat-linux', '/root/.pyenv/versions/3.4.2/lib/python3.4/lib-dynload', '/root/.pyenv/versions/3.4.2/lib/python3.4/site-packages', '/root/.pyenv/versions/3.4.2/lib/python3.4/site-packages/IPython/extensions']
Python类与面向对象
面向对象编程(OOP)
面向对象的核心概念
所有编程语言的最终目的都是提供一种抽象方法
在机器模型(“解空间”或“方案空间”)与实际解决的问题模型(“问题空间”)之间,程序员必须建立一种联系
面向过程:程序 = 算法 + 数据结构
面向对象:将问题空间中的元素以及它们在解空间中的表示抽象为对象,并允许通过问题来描述问题而不是方案
可以把实例想象成一种新型变量,它保存着数据,但可以对自身的数据执行操作
类型由状态集合(数据)和转换这些状态的操作集合组成
类抽象
类:定义了被多个同一类型对象共享的结构和行为(数据和代码)
类的数据和代码:即类的成员
数据:成员变量或实例变量
成员方法:简称为方法,是操作数据的代码,用于定义如何使用成员变量;因此一个类的行为和接口是通过方法来定义的
方法和变量:
私有:内部使用
公共:外部可用
面向对象的程序设计
所有东西都是对象
程序是一大堆对象的组合
通过消息传递,各对象知道自己该做什么
消息:即调用请求,它调用的是从属于目标对象的一个方法
每个对象都有自己的存储空间,并可容纳其他对象
通过封装现有对象,可以制作成新型对象
每个对象都属于某一类型
类型,也即类
对象是类的实例
类的一个重要特性为“能发什么样的消息给它”
同一个类的所有对象都能接收相同的消息
对象接口
定义一个类后,可以根据需要实例化出多个对象
如何利用对象完成真正有用的工作?
必须有一种办法能向对象发出请求,令其做一些事情
每个对象仅能接收特定的请求
能向对象发送的请求由其“接口”进行定义
对象的“类型”或“类”则规定了它的接口形式
类间关系
依赖(“uses a”)
一个类的方法操纵另一个类的对象
聚合(“has a”)
类A的对象包含类B的对象
继承(“is a”)
描述特殊与一般关系
面向对象编程的原则
面向对象的模型机制有3个原则:封装、继承、多态
封装(encapsulation)
隐藏实现方案细节
将代码及其处理的数据绑定在一起的一种编程机制,用于保证程序和数据不受外部干扰且不会被误用
多态性
允许一个接口被多个通用的类动作使用的特性,具体使用哪个动作与应用场合相关
“一个接口,多个方法”
用于为一组相关的动作设计一个通用的接口,以降低程序复杂性
Python类和实例
类是一种数据结构,可用于创建实例
一般情况下,类封装了数据和可用于改数据的方法
Python类是一个可调用对象,即类对象
Python2.2之后,类是一种自定义类型,而实例则是声明某个自定义类型的变量
实例初始化
通过调用类来创建实例
instance = ClassName(args..)
类在实例化时可以使用__init__的__del__两个特殊方法
Python中创建类
类 :
class ClassName():
class_suite
例子

class语句内,任何赋值语句都会创建类属性
一般,方法的第一个参数被命名为self,这仅仅是一个约定:对Python而言,名称self绝对没有任何特殊含义。(但是请注意:如果不遵循这个约定,对其他Python程序员而言你的代码可读性就会变差,而且有些类查看器程序也可能是遵循此约定编写的。)
每个实例对象都会继承类的属性并获得自己的名称空间
In [5]: class FirstClass:
name = "tom"
def show(self):
print(self.name)
...:
In [6]: a = FirstClass()
In [7]: a.name
Out[7]: 'tom'
In [8]: a.show()
tom
异常:
运行时错误:
try:
try_suite
except Exception1:
...
except
...
安装库
setup.py
运行 python setup.py install
Python3
help("modules") 查看当前系统安装了哪些模块
import socket
help(socket)
import socketserver
help(socketserver)
安装pip python-pip 是epel源下的rpm包
# pip3 list
decorator (4.0.9)
ipython (4.1.1)
ipython-genutils (0.1.0)
path.py (8.1.2)
pexpect (4.0.1)
pickleshare (0.6)
pip (1.5.6)
ptyprocess (0.5.1)
setuptools (20.2.2)
simplegeneric (0.8.1)
traitlets (4.1.0)
pip是一个安装和管理 Python 包的工具 ,是easy_install的替代品。
# pip3 install PyMySQL 与mysql连接相关的库
Downloading/unpacking PyMySQL
http://pypi.douban.com/simple/PyMySQL/ uses an insecure transport scheme (http). Consider using https if pypi.douban.com has it available
Downloading PyMySQL-0.7.2-py2.py3-none-any.whl (76kB): 76kB downloaded
Installing collected packages: PyMySQL
Successfully installed PyMySQL
Cleaning up...
In [1]: import pymysql
In [2]: pymysql.
pymysql.BINARY pymysql.Error pymysql.ProgrammingError pymysql.apilevel pymysql.get_client_info
pymysql.Binary pymysql.FIELD_TYPE pymysql.ROWID pymysql.charset pymysql.install_as_MySQLdb
pymysql.Connect pymysql.IntegrityError pymysql.STRING pymysql.connect pymysql.optionfile
pymysql.Connection pymysql.InterfaceError pymysql.TIME pymysql.connections pymysql.paramstyle
pymysql.DATE pymysql.InternalError pymysql.TIMESTAMP pymysql.constants pymysql.sys
pymysql.DATETIME pymysql.MySQLError pymysql.Time pymysql.converters pymysql.thread_safe
pymysql.DBAPISet pymysql.NULL pymysql.TimeFromTicks pymysql.cursors pymysql.threadsafety
pymysql.DataError pymysql.NUMBER pymysql.Timestamp pymysql.err pymysql.times
pymysql.DatabaseError pymysql.NotSupportedError pymysql.TimestampFromTicks pymysql.escape_dict pymysql.util
pymysql.Date pymysql.OperationalError pymysql.VERSION pymysql.escape_sequence pymysql.version_info
pymysql.DateFromTicks pymysql.PY2 pymysql.Warning pymysql.escape_string
# pip3 install paramiko 基于ssh实现远程管理的
paramiko是用python语言写的一个模块,遵循SSH2协议,支持以加密和认证的方式,进行远程服务器的连接。
使用paramiko可以很好的解决以下问题:
需要使用windows客户端,
远程连接到Linux服务器,查看上面的日志状态,批量配置远程服务器,文件上传,文件下载等
ipython3
In [1]: import paramiko
In [2]: paramiko.
Display all 100 possibilities? (y or n)
基于socket通信的简单代码
socket:
Server: listen socket
Client: connect socket
起两个回话
一个client,一个server
In [2]: import socket
In [3]: help(socket)
In [4]: dir(socket) 查看可调用方法和可调用属性
Out[4]:
['AF_APPLETALK',
'AF_ASH',
'AF_ATMPVC',
In [6]: help(socket.socket)
In [7]: s = socket.soc
socket.socket socket.socketpair
In [7]: s = socket.socket() 创建一个套接字
In [8]: s.bind(('127.0.0.1',3008)) 绑定在本机的3008端口
In [9]: s.listen(10) 监听
另一个
# ss -tnlp
LISTEN 0 10 127.0.0.1:3008 *:* users:(("ipython",64056,7))
阻塞方式接受客户端连接
sc,client = s.accept() 等待客户端连接并发送数据过来
In [10]: sc,client = s.accept()
另一个
In [1]: import socket
In [2]: c = socket.socke
socket.socket socket.socketpair
In [2]: c = socket.socket()
In [3]: c.co
c.connect c.connect_ex
In [3]: c.connect(('127.0.0.1',3008)) 连接后,server阻塞结束
S
In [11]: print
print
In [11]: print(sc)
<socket.socket fd=8, family=AddressFamily.AF_INET, type=SocketType.SOCK_STREAM, proto=0, laddr=('127.0.0.1', 3008), raddr=('127.0.0.1', 59846)> sc是一个套接字
In [12]: print(client)
('127.0.0.1', 59846) 客户端地址使用随机端口进行连接
再开一个新回话
# ss -tan
ESTAB 0 0 127.0.0.1:3008 127.0.0.1:59846
ESTAB 0 0 127.0.0.1:59846 127.0.0.1:3008
一个来回两个连接
S
基于套接字文件来进行数据接收,将数据保存在data中。使用1024的缓存来接收
In [13]: data = sc.recv(1024) 会处于阻塞状态中
C
发送数据,基于二进制字节编码
In [4]: c.send(b"from client") b是基于二进制编码
Out[4]: 11
数据发送完成后,server阻塞就停止了
S
In [14]: print(data)
b'from client' 可以看到客户端发来的数据了
解码后来显示
In [15]: print(data.decode()) 不会显示其原始格式
from client
可以通过open打开一个文件,把接收的数据都放入到文件中
C
关闭连接
In [5]: c.close()
# ss -tan
LISTEN 0 10 127.0.0.1:3008 *:*
CLOSE-WAIT 1 0 127.0.0.1:3008 127.0.0.1:59846
FIN-WAIT-2 0 0 127.0.0.1:59846 127.0.0.1:3008
S
关闭连接
In [16]: s.close()
# ss -tan
CLOSE-WAIT 1 0 127.0.0.1:3008 127.0.0.1:59846
超时以后,两边都直接断开
安装mysql-server程序
yum install -y mysql-server
# service mysqld start
# mysql -u root
mysql> create database testdb;
Query OK, 1 row affected (0.00 sec)
mysql> grant all on testdb.* to 'testuser'@'127.0.0.1' identified by 'testpass';
Query OK, 0 rows affected (0.01 sec)
mysql> flush privileges;
Query OK, 0 rows affected (0.01 sec)
# mysql -utestuser -h127.0.0.1 -p
Enter password:
Welcome to the MySQL monitor. Commands end with ; or \g.
Your MySQL connection id is 3
Server version: 5.1.73 Source distribution
Copyright (c) 2000, 2013, Oracle and/or its affiliates. All rights reserved.
Oracle is a registered trademark of Oracle Corporation and/or its
affiliates. Other names may be trademarks of their respective
owners.
Type 'help;' or '\h' for help. Type '\c' to clear the current input statement.
mysql>
Python连接mysql
In [17]: import pymysql
In [18]: help(pymysql)
CLASSES
builtins.object
Connection
EOFPacketWrapper
LoadLocalFile
LoadLocalPacketWrapper
MySQLResult
MysqlPacket
FieldDescriptorPacket
OKPacketWrapper
RandStruct_323
class Connection(builtins.object)
| Representation of a socket with a mysql server.
|
| The proper way to get an instance of this class is to call
| connect().
|
| Methods defined here:
|
| __del__(self)
|
| __enter__(self)
| Context manager that returns a Cursor
|
| __exit__(self, exc, value, traceback)
| On successful exit, commit. On exception, rollback
|
| __init__(self, host=None, user=None, password='', database=None, port=3306, unix_socket=None, charset='', sql_mode=None, read_default_file=None, c
onv={0: <class 'decimal.Decimal'>, 1: <class 'int'>, 2: <class 'int'>, 3: <class 'int'>, 4: <class 'float'>, 5: <class 'float'>, 7: <function convert_mysq
l_timestamp at 0x7f96a10e07b8>, 8: <class 'int'>, 9: <class 'int'>, 10: <function convert_date at 0x7f96a10e0730>, 11: <function convert_timedelta at 0x7f
96a10e0620>, 12: <function convert_datetime at 0x7f96a10e0598>, 13: <class 'int'>, 15: <function through at 0x7f96a10e08c8>, 16: <function through at 0x7f
96a10e08c8>, 246: <class 'decimal.Decimal'>, 248: <function convert_set at 0x7f96a10e0840>, 249: <function through at 0x7f96a10e08c8>, 250: <function thro
ugh at 0x7f96a10e08c8>, 251: <function through at 0x7f96a10e08c8>, 252: <function through at 0x7f96a10e08c8>, 253: <function through at 0x7f96a10e08c8>, 2
54: <function through at 0x7f96a10e08c8>}, use_unicode=None, client_flag=0, cursorclass=<class 'pymysql.cursors.Cursor'>, init_command=None, connect_timeo
ut=None, ssl=None, read_default_group=None, compress=None, named_pipe=None, no_delay=None, autocommit=False, db=None, passwd=None, local_infile=False, max
_allowed_packet=16777216, defer_connect=False, auth_plugin_map={})
In [22]: conn = pymysql.connect(host = '127.0.0.1',port = 3306,user = 'testuser',password = 'testpass',db = 'testdb')
In [23]: conn.
conn.DataError conn.character_set_name conn.escape_string conn.password conn.set_charset
conn.DatabaseError conn.charset conn.get_autocommit conn.ping conn.show_warnings
conn.Error conn.client_flag conn.get_host_info conn.port conn.socket
conn.IntegrityError conn.close conn.get_proto_info conn.protocol_version conn.sql_mode
conn.InterfaceError conn.commit conn.get_server_info conn.query conn.ssl
conn.InternalError conn.connect conn.host conn.rollback conn.thread_id
conn.NotSupportedError conn.connect_timeout conn.host_info conn.salt conn.unix_socket
conn.OperationalError conn.cursor conn.init_command conn.select_db conn.use_unicode
conn.ProgrammingError conn.cursorclass conn.insert_id conn.server_capabilities conn.user
conn.Warning conn.db conn.kill conn.server_charset conn.write_packet
conn.affected_rows conn.decoders conn.literal conn.server_language
conn.autocommit conn.encoders conn.max_allowed_packet conn.server_status
conn.autocommit_mode conn.encoding conn.next_result conn.server_thread_id
conn.begin conn.escape conn.open conn.server_version
向mysql中创建和取数据,需要先创建一个游标
In [23]: cur = conn.cursor()
In [24]: cur.
cur.DataError cur.InternalError cur.arraysize cur.execute执行命令 cur.max_stmt_length cur.scroll
cur.DatabaseError cur.NotSupportedError cur.callproc cur.executemany执行大量命令 cur.mogrify cur.setinputsizes
cur.Error cur.OperationalError cur.close cur.fetchall cur.nextset cur.setoutputsizes
cur.IntegrityError cur.ProgrammingError cur.connection cur.fetchmany cur.rowcount
cur.InterfaceError cur.Warning cur.description cur.fetchone cur.rownumber
In [27]: cur.execute("""create table if not exists tb1 (id int auto_increment not null primary key,name varchar(30) not null,email varchar(100) not null)""")
Out[27]: 0
查看表是否创建成功
[root@iptables1 ~]# mysql -utestuser -h127.0.0.1 -p
Enter password:
Welcome to the MySQL monitor. Commands end with ; or \g.
Your MySQL connection id is 5
Server version: 5.1.73 Source distribution
Copyright (c) 2000, 2013, Oracle and/or its affiliates. All rights reserved.
Oracle is a registered trademark of Oracle Corporation and/or its
affiliates. Other names may be trademarks of their respective
owners.
Type 'help;' or '\h' for help. Type '\c' to clear the current input statement.
mysql> use testdb
Reading table information for completion of table and column names
You can turn off this feature to get a quicker startup with -A
Database changed
mysql> show tables;
+------------------+
| Tables_in_testdb |
+------------------+
| tb1 |
+------------------+
1 row in set (0.01 sec)
mysql>
往表中写数据
In [29]: cur.execute("insert into tb1 (name,email) values ("tom","hello@gmail.com")")
File "<ipython-input-29-f77d021f3652>", line 1
cur.execute("insert into tb1 (name,email) values ("tom","hello@gmail.com")") 使用单引号
^
SyntaxError: invalid syntax
In [30]: cur.execute("insert into tb1 (name,email) values ('tom','hello@gmail.com')")
Out[30]: 1
mysql> select * from tb1; 由于这里是myisam引擎,没有事务,创建后,这里马上就可以查看了,如果是innodb存储引擎则,需要在事务提交后,才能查看到的
+----+------+-----------------+
| id | name | email |
+----+------+-----------------+
| 1 | tom | hello@gmail.com |
+----+------+-----------------+
1 row in set (0.00 sec)
In [31]: cur.execute("insert into tb1 (name,email) values ('jerry','jerry@gmail.com')")
Out[31]: 1
mysql> select * from tb1;
+----+-------+-----------------+
| id | name | email |
+----+-------+-----------------+
| 1 | tom | hello@gmail.com |
| 2 | jerry | jerry@gmail.com |
+----+-------+-----------------+
2 rows in set (0.00 sec)
ins_sql = "insert into tb1 (name,email) values (%s,%s)"
values = (("comyn","comyn@gmail.com"),("derek","derek@gmail.com"))
cur.executemany(ins_sql, values)
comn.commit() 提交所有的修改
In [33]: ins_sql = "insert into tb1 (name,email) values (%s,%s)"
In [34]: values = (("comyn","comyn@gmail.com"),("derek","derek@gmail.com"))
In [35]: cur.executemany(ins)
%install_default_config %install_ext %install_profiles ins_sql install.log install.log.syslog
In [35]: cur.executemany(ins_sql,values)
Out[35]: 2
mysql> select * from tb1;
+----+-------+-----------------+
| id | name | email |
+----+-------+-----------------+
| 1 | tom | hello@gmail.com |
| 2 | jerry | jerry@gmail.com |
| 3 | jerry | jerry@gmail.com |
| 4 | comyn | comyn@gmail.com |
| 5 | derek | derek@gmail.com |
+----+-------+-----------------+
5 rows in set (0.00 sec)
In [36]: conn.commit()
In [37]: cur.execute("select * from tb1") 显示有5行数据返回
Out[37]: 5
所有数据取出放在data中
In [38]: data = cur.fetchall()
In [39]: data
Out[39]:
((1, 'tom', 'hello@gmail.com'),
(2, 'jerry', 'jerry@gmail.com'),
(3, 'jerry', 'jerry@gmail.com'),
(4, 'comyn', 'comyn@gmail.com'),
(5, 'derek', 'derek@gmail.com'))
In [40]: print(data)
((1, 'tom', 'hello@gmail.com'), (2, 'jerry', 'jerry@gmail.com'), (3, 'jerry', 'jerry@gmail.com'), (4, 'comyn', 'comyn@gmail.com'), (5, 'derek', 'derek@gmail.com'))
In [41]: if data:
....: for record in data:
....: print(record)
....:
(1, 'tom', 'hello@gmail.com')
(2, 'jerry', 'jerry@gmail.com')
(3, 'jerry', 'jerry@gmail.com')
(4, 'comyn', 'comyn@gmail.com')
(5, 'derek', 'derek@gmail.com')
paramiko
import paramiko
help(paramiko.SSHClient)
In [42]: import paramiko
In [43]: ssh = paramiko.SSHClient()
In [44]: ssh.
ssh.close ssh.get_host_keys ssh.load_host_keys ssh.save_host_keys
ssh.connect ssh.get_transport ssh.load_system_host_keys ssh.set_log_channel
ssh.exec_command ssh.invoke_shell ssh.open_sftp ssh.set_missing_host_key_policy
In [45]: help(ssh.set)
ssh.set_log_channel ssh.set_missing_host_key_policy
In [45]: help(ssh.set_missing_host_key_policy)
Help on method set_missing_host_key_policy in module paramiko.client:
set_missing_host_key_policy(policy) method of paramiko.client.SSHClient instance
Set the policy to use when connecting to a server that doesn't have a
host key in either the system or local `.HostKeys` objects. The
default policy is to reject all unknown servers (using `.RejectPolicy`).
You may substitute `.AutoAddPolicy` or write your own policy class.
:param .MissingHostKeyPolicy policy:
the policy to use when receiving a host key from a
previously-unknown server
In [46]: ssh.set_missing_host_key_policy(paramiko.AutoAddPolicy())
In [47]: ssh.connect("192.168.16.36",username="root",password="123456")
In [48]: 已经连接上了
可以在远程主机上运行命令了
In [48]: ssh.exec_command("whoami")
Out[48]:
(<paramiko.ChannelFile from <paramiko.Channel 0 (open) window=2097152 -> <paramiko.Transport at 0xa0bb9be0 (cipher aes128-ctr, 128 bits) (active; 1 open channel(s))>>>,
<paramiko.ChannelFile from <paramiko.Channel 0 (open) window=2097152 -> <paramiko.Transport at 0xa0bb9be0 (cipher aes128-ctr, 128 bits) (active; 1 open channel(s))>>>,
<paramiko.ChannelFile from <paramiko.Channel 0 (open) window=2097152 -> <paramiko.Transport at 0xa0bb9be0 (cipher aes128-ctr, 128 bits) (active; 1 open channel(s))>>>)
返回的结果都保存在了一个对象上,有三个 标准输入、标准输出、标准错误
In [49]: stdin,stdout,stderr=ssh.exec_command("whoami")
In [50]: stdout.
stdout.FLAG_APPEND stdout.FLAG_WRITE stdout.closed stdout.seek
stdout.FLAG_BINARY stdout.SEEK_CUR stdout.flush stdout.tell
stdout.FLAG_BUFFERED stdout.SEEK_END stdout.newlines stdout.write
stdout.FLAG_LINE_BUFFERED stdout.SEEK_SET stdout.read stdout.writelines
stdout.FLAG_READ stdout.channel stdout.readline stdout.xreadlines
stdout.FLAG_UNIVERSAL_NEWLINE stdout.close stdout.readlines
In [50]: stdout.readline
Out[50]: <bound method ChannelFile.readline of <paramiko.ChannelFile from <paramiko.Channel 1 (closed) -> <paramiko.Transport at 0xa0bb9be0 (cipher aes128-ctr, 128 bits) (active; 0 open channel(s))>>>>
In [51]: stdout.readline()
Out[51]: 'root\n'
In [53]: stdin,stdout,stderr=ssh.exec_command("whoami")
In [54]: stdout.readli
stdout.readline stdout.readlines
In [54]: stdout.readlines()
Out[54]: ['root\n']
In [55]: stdin,stdout,stderr=ssh.exec_command("whoami")
In [56]: stdout.read()
Out[56]: b'root\n'
In [57]: stdin,stdout,stderr=ssh.exec_command("whoami")
In [58]: stdout.read().decode()
Out[58]: 'root\n'
远程服务器获取文件到本地
In [59]: ssh.
ssh.close ssh.get_host_keys ssh.load_host_keys ssh.save_host_keys
ssh.connect ssh.get_transport ssh.load_system_host_keys ssh.set_log_channel
ssh.exec_command ssh.invoke_shell ssh.open_sftp ssh.set_missing_host_key_policy
In [59]: ftp = ssh.open_sftp() 生成ftp连接对象,需要先安装一下ftp工具
In [60]: ftp.
ftp.chdir ftp.from_transport ftp.listdir ftp.mkdir ftp.readlink ftp.sock ftp.unlink
ftp.chmod ftp.get ftp.listdir_attr ftp.normalize ftp.remove ftp.stat ftp.utime
ftp.chown ftp.get_channel ftp.listdir_iter ftp.open ftp.rename ftp.symlink
ftp.close ftp.getcwd ftp.logger ftp.put ftp.request_number ftp.truncate
ftp.file ftp.getfo ftp.lstat ftp.putfo ftp.rmdir ftp.ultra_debug
获取帮助
In [60]: help(ftp.get)
get(remotepath, localpath, callback=None) method of paramiko.sftp_client.SFTPClient instance
Copy a remote file (``remotepath``) from the SFTP server to the local
host as ``localpath``. Any exception raised by operations will be
passed through. This method is primarily provided as a convenience.
:param str remotepath: the remote file to copy
:param str localpath: the destination path on the local host
:param callable callback:
optional callback function (form: ``func(int, int)``) that accepts
the bytes transferred so far and the total bytes to be transferred
.. versionadded:: 1.4
.. versionchanged:: 1.7.4
Added the ``callback`` param
In [6]: ftp.get('/etc/rsyncd.conf','/tmp/rsyncd.conf.paramiko')
# ls /tmp/ rsyncd.conf.paramiko
上传一个文件到远程的服务器上
In [7]: ftp.put('/etc/hosts','/tmp/hosts.paramiko')
Out[7]: <SFTPAttributes: [ size=158 uid=0 gid=0 mode=0o100644 atime=1460449355 mtime=1460449355 ]>
# ls /tmp/
hosts.paramiko 上传成功了
# rm /tmp/hosts.paramiko
rm: remove regular file `/tmp/hosts.paramiko'? y
In [8]: res = ftp.put('/etc/hosts','/tmp/hosts.paramiko')
In [9]: if res:
...: print("successful")
...:
successful
# ls /tmp/
hosts.paramiko
ftp连接结束后,可以关闭
In [10]: ftp.close()
In [11]: ssh.close()
核心数据类型:
基本数据类型:数字、字符串
数字
整形:整数、布尔数
浮点型
字符型
组合数据类型:
序列:
列表:list
元组:tuple
字符串:string
字典:
可变类型,dict
集合
set
表达式:“某事”
由一个或多个操作数,以及0个或多个以上的运行符组成,可以通过计算得到一个值,对象,方法或名称空间;
表达式的操作符:in, not, in,is,is not
< ,> , == , !=
+,-,*,/,%,**
li[i]
x.method()
x.attr
(…)
[…]
{…}
语句:做“某事”
声明变量、赋值、方法调用、循环访问集合、选择分支;
语句在程序中的执行顺序称为“控制流”,或“执行流”
if , while ,for , try
def, pass, class, return
break, continue
from, import
变量名的命名法则:
只能包含字母、数字和下划线,且不能以数字开头;
区分大小写;禁止使用保留字;
程序结构与控制流:
Python的布尔测试:
(1)任何的非零数字或非空对象都为真”true”
(2)数字零,空对象以及特殊对象None都为“False”
(3)比较和相等测试会递归的应用在数据结构;会返回“True”或“False”
(4)and 和 or,运算符会返回“真”或“假”的操作对象
选择执行
if CONDITION:
suite
if CONDITION:
suite1
else:
suite2
if CONDITION1:
suite1
elif CONDITION2:
suite2
...
else:
suiten
>>> num = 0
>>> if num:
print("Condition is True")
>>> num = 1
>>> if num:
print("Condition is True")
Condition is True
if/else的三元表达式:
expression1 if CONDITION else expression2

循环执行:
while,for
while BOOLEAN_EXPRESSION:
while_suite
while BOOLEAN_EXPRESSION:
while_suite
else:
else_suite
运行到while,即测试其后的条件;为“True”时,则执行一遍循环体,结束之后再运行BOOLEAN_EXPRESSION;
else为可选;
for expression in iterable:
for_suite
else:
else_suite
else也是可选的
控制:
continue
break
前面的都是Windows下的 Python shell
列表解析:Python迭代机制的一种应用,用于实现创建新列表;

[expression for iter_var in iterable_object]
[expression for iter_var in iterable_object if condition]
In [29]: [i ** 2 for i in li if i != 6]
Out[29]: [1, 4, 9, 16, 25, 49, 64]
Python缩进非常重要,4个空白
In [31]: m = 35

文件系统和文件
文件系统是OS用于明确磁盘或分区上的文件的方法和数据结构--即在磁盘上组织文件的方法
计算机文件(或称文件、电脑档案、档案),是存储在某种长期存储设备或临时存储设备中的一段数据流,并且归属于计算机文件系统管理之下
概括来讲
文件是计算机中由OS管理的具有名字的存储区域
在Linux系统上,文件被看做是字节序列
Python内置函数open()用于打开文件和创建文件对象
open(name[,mode[,bufsize]])
open方法可以接收三个参数:文件名、模式和缓冲区参数
open函数返回的是一个文件对象
mode:指定文件的打开模式
bufsize:定义输出缓存
0表示无输出缓存
1表示使用缓冲
负数表示使用系统默认设置
证书表示使用近似指定大小的缓冲
文件的打开模式
简单模式
r:只读
open(”/var/log/message.log”,’r’)
w:写入
a:附加
在模式后使用“+”表示同时支持输入、输出操作
如r+, w+和a+
在模式后附加”b”表示以二进制方式打开
如rb,wb++
文件的方法


Python的函数
函数的基础概念
函数是Python为了代码最大程度地重用和最小代码冗余而提供的基本程序结构
函数是一种设计工具,它能让程序员将复杂的系统分解为可管理的部件
函数用于将相关功能打包并参数化
在Python中可以创建4种函数:
全局函数:定义在模块中
局部函数:嵌套于其他函数中
lambda函数:表达式
方法:与特定数据类型关联的函数,并且只能与数据类型关联一起使用
Python提供了很多内置函数
语法
def functionName(parameters)
suite
一些相关的概念
def是一个可执行语句
因此可以出现在任何能够使用语句的地方,甚至可以嵌套于其他语句,例如if或while中
def创建一个对象并将其赋值给一个变量名(即函数名)
return用于返回结果对象,其为可选;无return语句的函数自动返回None对象
返回多个值时,彼此间使用逗号分隔,且组合为元组形式返回一个对象
def语句运行之后,可以在程序中通过函数后附加括号进行调用
函数的定义方式:
def functionName(arg1,arg2,...):
function_suite
创建函数对象,并将其赋值给一个变量名(函数名)
return ,None

变量名解析:LEGB原则
变量名引用分三个作用域进行:首先是本地、之后是函数内、接着是全局,最后是内置;

Python模块
可以将代码量较大的程序分隔成多个有组织的、彼此独立但又能互相交互的代码片段,这些自我包含的有组织的代码段就是模块
模块在物理形式上表现为以.py结尾的代码文件
一个文件被看作一个独立的模块,一个模块也可以被看作是一个文件
模块的文件名就是模块的名字加上扩展名.py
每个模块都有自己的名称空间
Python允许“导入”其它模块以实现代码重用,从而实现了将独立的代码文件组织成更大的程序系统
Python中,模块也是对象
在一个模块的顶层定义的所有变量都在被导入时成为了被导入模块的属性
Python程序架构
一个Python程序通常包括一个顶层程序文件和其他的模块文件(0个、1个或多个)
顶层文件:包含了程序的主要控制流程
模块文件: 为顶层文件或其他模块提供各种功能性组件
模块首次导入(或重载)时,Python会立即执行模块文件的顶层程序代码(不在函数内的代码),而位于函数主体内的代码直到函数被调用后才会执行

模块的执行环境
模块是被导入的,但模块也可以导入和使用其他模块,这些模块可以用Python或其他编程语言写成
模块可内含变量、函数以及类来进行其工作,而函数和类可以包含变量和其它元素

模块:
程序文件:mod_name.py
import mod_name
模块中的顶层代码会被执行;模块会引入新的名称空间;
mod_name.
导入模块
在导入模块时只能使用模块名,而不能使用带.py后缀的模块文件名
import语句
导入指定的整个模块,包括生成一个以模块名命名的名称空间
import module1[,module2[,…moduleN]]
建议一个import语句只导入一个模块
import module as module_alias
from import语句
常用于只导入指定模块的部分属性至当前名称空间
from module import name1[,name2[,…nameN]]
import工作机制
import语句导入指定的模块时会执行三个步骤
找到模块文件
在指定的路径下搜索模块文件
编译成字节码
文件导入时就会编译,因此,顶层文件的.pyc字节码文件在内部使用后会被丢弃,只有被导入的文件才会留下.pyc文件
执行模块的代码来创建其所定义的对象
模块文件中的所有语句会一次执行,从头至尾,而此步骤中任何对变量名的赋值运算,都会产生所得到的模块文件的属性
注意:模块只在第一次导入时才会执行如上步骤:
后续的导入操作只不过是提取内存中已加载的模块对象
reload()可用于重新加载模块
模块搜索
Python解释器在import模块时必须先找到对应的模块文件
程序的主目录
PYTHONPATH目录(如果设置了此变量)
标准链接库目录
任何.pth文件的内容(如果存在.pth文件)
这四个组件组合起来即为sys.path所包含的路径,而Python会选择在搜索路径中的第一个符合导入文件的文件
>>> import sys
>>> sys.path
['', '/root/.pyenv/versions/3.4.2/lib/python34.zip', '/root/.pyenv/versions/3.4.2/lib/python3.4', '/root/.pyenv/versions/3.4.2/lib/python3.4/plat-linux', '/root/.pyenv/versions/3.4.2/lib/python3.4/lib-dynload', '/root/.pyenv/versions/3.4.2/lib/python3.4/site-packages', '/root/.pyenv/versions/3.4.2/lib/python3.4/site-packages/IPython/extensions']
Python类与面向对象
面向对象编程(OOP)
面向对象的核心概念
所有编程语言的最终目的都是提供一种抽象方法
在机器模型(“解空间”或“方案空间”)与实际解决的问题模型(“问题空间”)之间,程序员必须建立一种联系
面向过程:程序 = 算法 + 数据结构
面向对象:将问题空间中的元素以及它们在解空间中的表示抽象为对象,并允许通过问题来描述问题而不是方案
可以把实例想象成一种新型变量,它保存着数据,但可以对自身的数据执行操作
类型由状态集合(数据)和转换这些状态的操作集合组成
类抽象
类:定义了被多个同一类型对象共享的结构和行为(数据和代码)
类的数据和代码:即类的成员
数据:成员变量或实例变量
成员方法:简称为方法,是操作数据的代码,用于定义如何使用成员变量;因此一个类的行为和接口是通过方法来定义的
方法和变量:
私有:内部使用
公共:外部可用
面向对象的程序设计
所有东西都是对象
程序是一大堆对象的组合
通过消息传递,各对象知道自己该做什么
消息:即调用请求,它调用的是从属于目标对象的一个方法
每个对象都有自己的存储空间,并可容纳其他对象
通过封装现有对象,可以制作成新型对象
每个对象都属于某一类型
类型,也即类
对象是类的实例
类的一个重要特性为“能发什么样的消息给它”
同一个类的所有对象都能接收相同的消息
对象接口
定义一个类后,可以根据需要实例化出多个对象
如何利用对象完成真正有用的工作?
必须有一种办法能向对象发出请求,令其做一些事情
每个对象仅能接收特定的请求
能向对象发送的请求由其“接口”进行定义
对象的“类型”或“类”则规定了它的接口形式
类间关系
依赖(“uses a”)
一个类的方法操纵另一个类的对象
聚合(“has a”)
类A的对象包含类B的对象
继承(“is a”)
描述特殊与一般关系
面向对象编程的原则
面向对象的模型机制有3个原则:封装、继承、多态
封装(encapsulation)
隐藏实现方案细节
将代码及其处理的数据绑定在一起的一种编程机制,用于保证程序和数据不受外部干扰且不会被误用
多态性
允许一个接口被多个通用的类动作使用的特性,具体使用哪个动作与应用场合相关
“一个接口,多个方法”
用于为一组相关的动作设计一个通用的接口,以降低程序复杂性
Python类和实例
类是一种数据结构,可用于创建实例
一般情况下,类封装了数据和可用于改数据的方法
Python类是一个可调用对象,即类对象
Python2.2之后,类是一种自定义类型,而实例则是声明某个自定义类型的变量
实例初始化
通过调用类来创建实例
instance = ClassName(args..)
类在实例化时可以使用__init__的__del__两个特殊方法
Python中创建类
类 :
class ClassName():
class_suite
例子

class语句内,任何赋值语句都会创建类属性
一般,方法的第一个参数被命名为self,这仅仅是一个约定:对Python而言,名称self绝对没有任何特殊含义。(但是请注意:如果不遵循这个约定,对其他Python程序员而言你的代码可读性就会变差,而且有些类查看器程序也可能是遵循此约定编写的。)
每个实例对象都会继承类的属性并获得自己的名称空间
In [5]: class FirstClass:
name = "tom"
def show(self):
print(self.name)
...:
In [6]: a = FirstClass()
In [7]: a.name
Out[7]: 'tom'
In [8]: a.show()
tom
异常:
运行时错误:
try:
try_suite
except Exception1:
...
except
...
安装库
setup.py
运行 python setup.py install
Python3
help("modules") 查看当前系统安装了哪些模块
import socket
help(socket)
import socketserver
help(socketserver)
安装pip python-pip 是epel源下的rpm包
# pip3 list
decorator (4.0.9)
ipython (4.1.1)
ipython-genutils (0.1.0)
path.py (8.1.2)
pexpect (4.0.1)
pickleshare (0.6)
pip (1.5.6)
ptyprocess (0.5.1)
setuptools (20.2.2)
simplegeneric (0.8.1)
traitlets (4.1.0)
pip是一个安装和管理 Python 包的工具 ,是easy_install的替代品。
# pip3 install PyMySQL 与mysql连接相关的库
Downloading/unpacking PyMySQL
http://pypi.douban.com/simple/PyMySQL/ uses an insecure transport scheme (http). Consider using https if pypi.douban.com has it available
Downloading PyMySQL-0.7.2-py2.py3-none-any.whl (76kB): 76kB downloaded
Installing collected packages: PyMySQL
Successfully installed PyMySQL
Cleaning up...
In [1]: import pymysql
In [2]: pymysql.
pymysql.BINARY pymysql.Error pymysql.ProgrammingError pymysql.apilevel pymysql.get_client_info
pymysql.Binary pymysql.FIELD_TYPE pymysql.ROWID pymysql.charset pymysql.install_as_MySQLdb
pymysql.Connect pymysql.IntegrityError pymysql.STRING pymysql.connect pymysql.optionfile
pymysql.Connection pymysql.InterfaceError pymysql.TIME pymysql.connections pymysql.paramstyle
pymysql.DATE pymysql.InternalError pymysql.TIMESTAMP pymysql.constants pymysql.sys
pymysql.DATETIME pymysql.MySQLError pymysql.Time pymysql.converters pymysql.thread_safe
pymysql.DBAPISet pymysql.NULL pymysql.TimeFromTicks pymysql.cursors pymysql.threadsafety
pymysql.DataError pymysql.NUMBER pymysql.Timestamp pymysql.err pymysql.times
pymysql.DatabaseError pymysql.NotSupportedError pymysql.TimestampFromTicks pymysql.escape_dict pymysql.util
pymysql.Date pymysql.OperationalError pymysql.VERSION pymysql.escape_sequence pymysql.version_info
pymysql.DateFromTicks pymysql.PY2 pymysql.Warning pymysql.escape_string
# pip3 install paramiko 基于ssh实现远程管理的
paramiko是用python语言写的一个模块,遵循SSH2协议,支持以加密和认证的方式,进行远程服务器的连接。
使用paramiko可以很好的解决以下问题:
需要使用windows客户端,
远程连接到Linux服务器,查看上面的日志状态,批量配置远程服务器,文件上传,文件下载等
ipython3
In [1]: import paramiko
In [2]: paramiko.
Display all 100 possibilities? (y or n)
基于socket通信的简单代码
socket:
Server: listen socket
Client: connect socket
起两个回话
一个client,一个server
In [2]: import socket
In [3]: help(socket)
In [4]: dir(socket) 查看可调用方法和可调用属性
Out[4]:
['AF_APPLETALK',
'AF_ASH',
'AF_ATMPVC',
In [6]: help(socket.socket)
In [7]: s = socket.soc
socket.socket socket.socketpair
In [7]: s = socket.socket() 创建一个套接字
In [8]: s.bind(('127.0.0.1',3008)) 绑定在本机的3008端口
In [9]: s.listen(10) 监听
另一个
# ss -tnlp
LISTEN 0 10 127.0.0.1:3008 *:* users:(("ipython",64056,7))
阻塞方式接受客户端连接
sc,client = s.accept() 等待客户端连接并发送数据过来
In [10]: sc,client = s.accept()
另一个
In [1]: import socket
In [2]: c = socket.socke
socket.socket socket.socketpair
In [2]: c = socket.socket()
In [3]: c.co
c.connect c.connect_ex
In [3]: c.connect(('127.0.0.1',3008)) 连接后,server阻塞结束
S
In [11]: print
In [11]: print(sc)
<socket.socket fd=8, family=AddressFamily.AF_INET, type=SocketType.SOCK_STREAM, proto=0, laddr=('127.0.0.1', 3008), raddr=('127.0.0.1', 59846)> sc是一个套接字
In [12]: print(client)
('127.0.0.1', 59846) 客户端地址使用随机端口进行连接
再开一个新回话
# ss -tan
ESTAB 0 0 127.0.0.1:3008 127.0.0.1:59846
ESTAB 0 0 127.0.0.1:59846 127.0.0.1:3008
一个来回两个连接
S
基于套接字文件来进行数据接收,将数据保存在data中。使用1024的缓存来接收
In [13]: data = sc.recv(1024) 会处于阻塞状态中
C
发送数据,基于二进制字节编码
In [4]: c.send(b"from client") b是基于二进制编码
Out[4]: 11
数据发送完成后,server阻塞就停止了
S
In [14]: print(data)
b'from client' 可以看到客户端发来的数据了
解码后来显示
In [15]: print(data.decode()) 不会显示其原始格式
from client
可以通过open打开一个文件,把接收的数据都放入到文件中
C
关闭连接
In [5]: c.close()
# ss -tan
LISTEN 0 10 127.0.0.1:3008 *:*
CLOSE-WAIT 1 0 127.0.0.1:3008 127.0.0.1:59846
FIN-WAIT-2 0 0 127.0.0.1:59846 127.0.0.1:3008
S
关闭连接
In [16]: s.close()
# ss -tan
CLOSE-WAIT 1 0 127.0.0.1:3008 127.0.0.1:59846
超时以后,两边都直接断开
安装mysql-server程序
yum install -y mysql-server
# service mysqld start
# mysql -u root
mysql> create database testdb;
Query OK, 1 row affected (0.00 sec)
mysql> grant all on testdb.* to 'testuser'@'127.0.0.1' identified by 'testpass';
Query OK, 0 rows affected (0.01 sec)
mysql> flush privileges;
Query OK, 0 rows affected (0.01 sec)
# mysql -utestuser -h127.0.0.1 -p
Enter password:
Welcome to the MySQL monitor. Commands end with ; or \g.
Your MySQL connection id is 3
Server version: 5.1.73 Source distribution
Copyright (c) 2000, 2013, Oracle and/or its affiliates. All rights reserved.
Oracle is a registered trademark of Oracle Corporation and/or its
affiliates. Other names may be trademarks of their respective
owners.
Type 'help;' or '\h' for help. Type '\c' to clear the current input statement.
mysql>
Python连接mysql
In [17]: import pymysql
In [18]: help(pymysql)
CLASSES
builtins.object
Connection
EOFPacketWrapper
LoadLocalFile
LoadLocalPacketWrapper
MySQLResult
MysqlPacket
FieldDescriptorPacket
OKPacketWrapper
RandStruct_323
class Connection(builtins.object)
| Representation of a socket with a mysql server.
|
| The proper way to get an instance of this class is to call
| connect().
|
| Methods defined here:
|
| __del__(self)
|
| __enter__(self)
| Context manager that returns a Cursor
|
| __exit__(self, exc, value, traceback)
| On successful exit, commit. On exception, rollback
|
| __init__(self, host=None, user=None, password='', database=None, port=3306, unix_socket=None, charset='', sql_mode=None, read_default_file=None, c
onv={0: <class 'decimal.Decimal'>, 1: <class 'int'>, 2: <class 'int'>, 3: <class 'int'>, 4: <class 'float'>, 5: <class 'float'>, 7: <function convert_mysq
l_timestamp at 0x7f96a10e07b8>, 8: <class 'int'>, 9: <class 'int'>, 10: <function convert_date at 0x7f96a10e0730>, 11: <function convert_timedelta at 0x7f
96a10e0620>, 12: <function convert_datetime at 0x7f96a10e0598>, 13: <class 'int'>, 15: <function through at 0x7f96a10e08c8>, 16: <function through at 0x7f
96a10e08c8>, 246: <class 'decimal.Decimal'>, 248: <function convert_set at 0x7f96a10e0840>, 249: <function through at 0x7f96a10e08c8>, 250: <function thro
ugh at 0x7f96a10e08c8>, 251: <function through at 0x7f96a10e08c8>, 252: <function through at 0x7f96a10e08c8>, 253: <function through at 0x7f96a10e08c8>, 2
54: <function through at 0x7f96a10e08c8>}, use_unicode=None, client_flag=0, cursorclass=<class 'pymysql.cursors.Cursor'>, init_command=None, connect_timeo
ut=None, ssl=None, read_default_group=None, compress=None, named_pipe=None, no_delay=None, autocommit=False, db=None, passwd=None, local_infile=False, max
_allowed_packet=16777216, defer_connect=False, auth_plugin_map={})
In [22]: conn = pymysql.connect(host = '127.0.0.1',port = 3306,user = 'testuser',password = 'testpass',db = 'testdb')
In [23]: conn.
conn.DataError conn.character_set_name conn.escape_string conn.password conn.set_charset
conn.DatabaseError conn.charset conn.get_autocommit conn.ping conn.show_warnings
conn.Error conn.client_flag conn.get_host_info conn.port conn.socket
conn.IntegrityError conn.close conn.get_proto_info conn.protocol_version conn.sql_mode
conn.InterfaceError conn.commit conn.get_server_info conn.query conn.ssl
conn.InternalError conn.connect conn.host conn.rollback conn.thread_id
conn.NotSupportedError conn.connect_timeout conn.host_info conn.salt conn.unix_socket
conn.OperationalError conn.cursor conn.init_command conn.select_db conn.use_unicode
conn.ProgrammingError conn.cursorclass conn.insert_id conn.server_capabilities conn.user
conn.Warning conn.db conn.kill conn.server_charset conn.write_packet
conn.affected_rows conn.decoders conn.literal conn.server_language
conn.autocommit conn.encoders conn.max_allowed_packet conn.server_status
conn.autocommit_mode conn.encoding conn.next_result conn.server_thread_id
conn.begin conn.escape conn.open conn.server_version
向mysql中创建和取数据,需要先创建一个游标
In [23]: cur = conn.cursor()
In [24]: cur.
cur.DataError cur.InternalError cur.arraysize cur.execute执行命令 cur.max_stmt_length cur.scroll
cur.DatabaseError cur.NotSupportedError cur.callproc cur.executemany执行大量命令 cur.mogrify cur.setinputsizes
cur.Error cur.OperationalError cur.close cur.fetchall cur.nextset cur.setoutputsizes
cur.IntegrityError cur.ProgrammingError cur.connection cur.fetchmany cur.rowcount
cur.InterfaceError cur.Warning cur.description cur.fetchone cur.rownumber
In [27]: cur.execute("""create table if not exists tb1 (id int auto_increment not null primary key,name varchar(30) not null,email varchar(100) not null)""")
Out[27]: 0
查看表是否创建成功
[root@iptables1 ~]# mysql -utestuser -h127.0.0.1 -p
Enter password:
Welcome to the MySQL monitor. Commands end with ; or \g.
Your MySQL connection id is 5
Server version: 5.1.73 Source distribution
Copyright (c) 2000, 2013, Oracle and/or its affiliates. All rights reserved.
Oracle is a registered trademark of Oracle Corporation and/or its
affiliates. Other names may be trademarks of their respective
owners.
Type 'help;' or '\h' for help. Type '\c' to clear the current input statement.
mysql> use testdb
Reading table information for completion of table and column names
You can turn off this feature to get a quicker startup with -A
Database changed
mysql> show tables;
+------------------+
| Tables_in_testdb |
+------------------+
| tb1 |
+------------------+
1 row in set (0.01 sec)
mysql>
往表中写数据
In [29]: cur.execute("insert into tb1 (name,email) values ("tom","hello@gmail.com")")
File "<ipython-input-29-f77d021f3652>", line 1
cur.execute("insert into tb1 (name,email) values ("tom","hello@gmail.com")") 使用单引号
^
SyntaxError: invalid syntax
In [30]: cur.execute("insert into tb1 (name,email) values ('tom','hello@gmail.com')")
Out[30]: 1
mysql> select * from tb1; 由于这里是myisam引擎,没有事务,创建后,这里马上就可以查看了,如果是innodb存储引擎则,需要在事务提交后,才能查看到的
+----+------+-----------------+
| id | name | email |
+----+------+-----------------+
| 1 | tom | hello@gmail.com |
+----+------+-----------------+
1 row in set (0.00 sec)
In [31]: cur.execute("insert into tb1 (name,email) values ('jerry','jerry@gmail.com')")
Out[31]: 1
mysql> select * from tb1;
+----+-------+-----------------+
| id | name | email |
+----+-------+-----------------+
| 1 | tom | hello@gmail.com |
| 2 | jerry | jerry@gmail.com |
+----+-------+-----------------+
2 rows in set (0.00 sec)
ins_sql = "insert into tb1 (name,email) values (%s,%s)"
values = (("comyn","comyn@gmail.com"),("derek","derek@gmail.com"))
cur.executemany(ins_sql, values)
comn.commit() 提交所有的修改
In [33]: ins_sql = "insert into tb1 (name,email) values (%s,%s)"
In [34]: values = (("comyn","comyn@gmail.com"),("derek","derek@gmail.com"))
In [35]: cur.executemany(ins)
%install_default_config %install_ext %install_profiles ins_sql install.log install.log.syslog
In [35]: cur.executemany(ins_sql,values)
Out[35]: 2
mysql> select * from tb1;
+----+-------+-----------------+
| id | name | email |
+----+-------+-----------------+
| 1 | tom | hello@gmail.com |
| 2 | jerry | jerry@gmail.com |
| 3 | jerry | jerry@gmail.com |
| 4 | comyn | comyn@gmail.com |
| 5 | derek | derek@gmail.com |
+----+-------+-----------------+
5 rows in set (0.00 sec)
In [36]: conn.commit()
In [37]: cur.execute("select * from tb1") 显示有5行数据返回
Out[37]: 5
所有数据取出放在data中
In [38]: data = cur.fetchall()
In [39]: data
Out[39]:
((1, 'tom', 'hello@gmail.com'),
(2, 'jerry', 'jerry@gmail.com'),
(3, 'jerry', 'jerry@gmail.com'),
(4, 'comyn', 'comyn@gmail.com'),
(5, 'derek', 'derek@gmail.com'))
In [40]: print(data)
((1, 'tom', 'hello@gmail.com'), (2, 'jerry', 'jerry@gmail.com'), (3, 'jerry', 'jerry@gmail.com'), (4, 'comyn', 'comyn@gmail.com'), (5, 'derek', 'derek@gmail.com'))
In [41]: if data:
....: for record in data:
....: print(record)
....:
(1, 'tom', 'hello@gmail.com')
(2, 'jerry', 'jerry@gmail.com')
(3, 'jerry', 'jerry@gmail.com')
(4, 'comyn', 'comyn@gmail.com')
(5, 'derek', 'derek@gmail.com')
paramiko
import paramiko
help(paramiko.SSHClient)
In [42]: import paramiko
In [43]: ssh = paramiko.SSHClient()
In [44]: ssh.
ssh.close ssh.get_host_keys ssh.load_host_keys ssh.save_host_keys
ssh.connect ssh.get_transport ssh.load_system_host_keys ssh.set_log_channel
ssh.exec_command ssh.invoke_shell ssh.open_sftp ssh.set_missing_host_key_policy
In [45]: help(ssh.set)
ssh.set_log_channel ssh.set_missing_host_key_policy
In [45]: help(ssh.set_missing_host_key_policy)
Help on method set_missing_host_key_policy in module paramiko.client:
set_missing_host_key_policy(policy) method of paramiko.client.SSHClient instance
Set the policy to use when connecting to a server that doesn't have a
host key in either the system or local `.HostKeys` objects. The
default policy is to reject all unknown servers (using `.RejectPolicy`).
You may substitute `.AutoAddPolicy` or write your own policy class.
:param .MissingHostKeyPolicy policy:
the policy to use when receiving a host key from a
previously-unknown server
In [46]: ssh.set_missing_host_key_policy(paramiko.AutoAddPolicy())
In [47]: ssh.connect("192.168.16.36",username="root",password="123456")
In [48]: 已经连接上了
可以在远程主机上运行命令了
In [48]: ssh.exec_command("whoami")
Out[48]:
(<paramiko.ChannelFile from <paramiko.Channel 0 (open) window=2097152 -> <paramiko.Transport at 0xa0bb9be0 (cipher aes128-ctr, 128 bits) (active; 1 open channel(s))>>>,
<paramiko.ChannelFile from <paramiko.Channel 0 (open) window=2097152 -> <paramiko.Transport at 0xa0bb9be0 (cipher aes128-ctr, 128 bits) (active; 1 open channel(s))>>>,
<paramiko.ChannelFile from <paramiko.Channel 0 (open) window=2097152 -> <paramiko.Transport at 0xa0bb9be0 (cipher aes128-ctr, 128 bits) (active; 1 open channel(s))>>>)
返回的结果都保存在了一个对象上,有三个 标准输入、标准输出、标准错误
In [49]: stdin,stdout,stderr=ssh.exec_command("whoami")
In [50]: stdout.
stdout.FLAG_APPEND stdout.FLAG_WRITE stdout.closed stdout.seek
stdout.FLAG_BINARY stdout.SEEK_CUR stdout.flush stdout.tell
stdout.FLAG_BUFFERED stdout.SEEK_END stdout.newlines stdout.write
stdout.FLAG_LINE_BUFFERED stdout.SEEK_SET stdout.read stdout.writelines
stdout.FLAG_READ stdout.channel stdout.readline stdout.xreadlines
stdout.FLAG_UNIVERSAL_NEWLINE stdout.close stdout.readlines
In [50]: stdout.readline
Out[50]: <bound method ChannelFile.readline of <paramiko.ChannelFile from <paramiko.Channel 1 (closed) -> <paramiko.Transport at 0xa0bb9be0 (cipher aes128-ctr, 128 bits) (active; 0 open channel(s))>>>>
In [51]: stdout.readline()
Out[51]: 'root\n'
In [53]: stdin,stdout,stderr=ssh.exec_command("whoami")
In [54]: stdout.readli
stdout.readline stdout.readlines
In [54]: stdout.readlines()
Out[54]: ['root\n']
In [55]: stdin,stdout,stderr=ssh.exec_command("whoami")
In [56]: stdout.read()
Out[56]: b'root\n'
In [57]: stdin,stdout,stderr=ssh.exec_command("whoami")
In [58]: stdout.read().decode()
Out[58]: 'root\n'
远程服务器获取文件到本地
In [59]: ssh.
ssh.close ssh.get_host_keys ssh.load_host_keys ssh.save_host_keys
ssh.connect ssh.get_transport ssh.load_system_host_keys ssh.set_log_channel
ssh.exec_command ssh.invoke_shell ssh.open_sftp ssh.set_missing_host_key_policy
In [59]: ftp = ssh.open_sftp() 生成ftp连接对象,需要先安装一下ftp工具
In [60]: ftp.
ftp.chdir ftp.from_transport ftp.listdir ftp.mkdir ftp.readlink ftp.sock ftp.unlink
ftp.chmod ftp.get ftp.listdir_attr ftp.normalize ftp.remove ftp.stat ftp.utime
ftp.chown ftp.get_channel ftp.listdir_iter ftp.open ftp.rename ftp.symlink
ftp.close ftp.getcwd ftp.logger ftp.put ftp.request_number ftp.truncate
ftp.file ftp.getfo ftp.lstat ftp.putfo ftp.rmdir ftp.ultra_debug
获取帮助
In [60]: help(ftp.get)
get(remotepath, localpath, callback=None) method of paramiko.sftp_client.SFTPClient instance
Copy a remote file (``remotepath``) from the SFTP server to the local
host as ``localpath``. Any exception raised by operations will be
passed through. This method is primarily provided as a convenience.
:param str remotepath: the remote file to copy
:param str localpath: the destination path on the local host
:param callable callback:
optional callback function (form: ``func(int, int)``) that accepts
the bytes transferred so far and the total bytes to be transferred
.. versionadded:: 1.4
.. versionchanged:: 1.7.4
Added the ``callback`` param
In [6]: ftp.get('/etc/rsyncd.conf','/tmp/rsyncd.conf.paramiko')
# ls /tmp/ rsyncd.conf.paramiko
上传一个文件到远程的服务器上
In [7]: ftp.put('/etc/hosts','/tmp/hosts.paramiko')
Out[7]: <SFTPAttributes: [ size=158 uid=0 gid=0 mode=0o100644 atime=1460449355 mtime=1460449355 ]>
# ls /tmp/
hosts.paramiko 上传成功了
# rm /tmp/hosts.paramiko
rm: remove regular file `/tmp/hosts.paramiko'? y
In [8]: res = ftp.put('/etc/hosts','/tmp/hosts.paramiko')
In [9]: if res:
...: print("successful")
...:
successful
# ls /tmp/
hosts.paramiko
ftp连接结束后,可以关闭
In [10]: ftp.close()
In [11]: ssh.close()

相关文章推荐
- 1.4Python环境准备
- 1.5Python基础
- python urllib的用法实例
- 学习python第一周
- Python自动化运维--系统基础信息模块
- pythonchallenge初试
- 使用Python脚本强化LLDB调试器
- 自动化 测试框架部署(python3+selenium2)
- Python编程-字符串的编码转换、存储及乱码问题
- 利用python,基于SVM实现文本分类
- Python 进阶 —— x = x+1 vs x += 1
- Python学习-机器学习实战-ch06 支持向量机
- Python collections.defaultdict()与dict的使用和区别
- 【Grades Crawler】利用python编写爬虫 爬取西电教务处成绩并本地保存
- 在Python中使用机器学习(1)—安装四库
- python中实现有序字典
- 【LeetCode-343】Integer Break
- python编码问题
- Python学习笔记12
- Python分割list