2016年RHEL7 :RHCE试题答案整理
2016-04-25 11:34
711 查看
RHCE考试:
1.Selinux两台服务器上配置~]# vim
/etc/selinux/configSELINUX=disabledSELINUXTYPE=targeted~]#reboot 2.ssh登录控制~]#vim /ect/hosts.allowsshd:172.25.0.~]#vim /ect/hosts.denysshd:172.24.0. 3.命令别名~]#vim /etc/bashrcalias
qstat=' '重读环境变量、验证~]# source /etc/bashrc 或 ~]# .
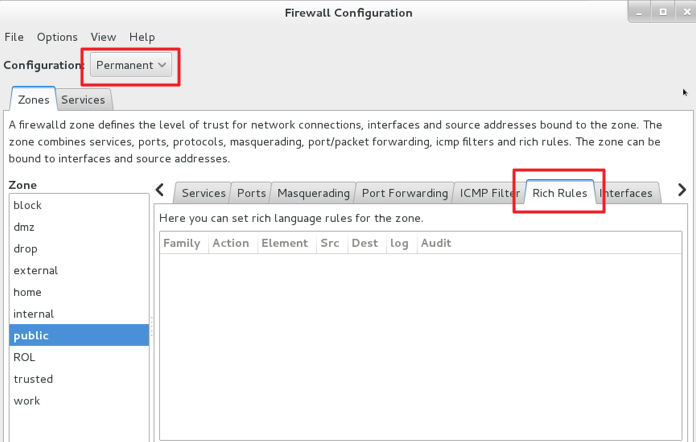
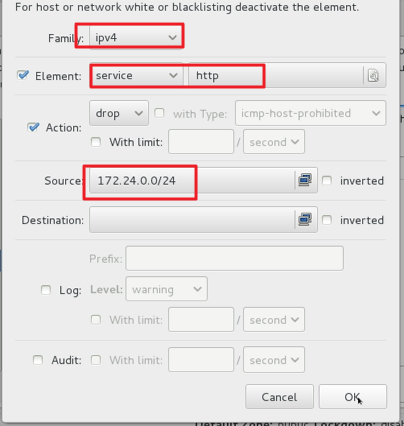
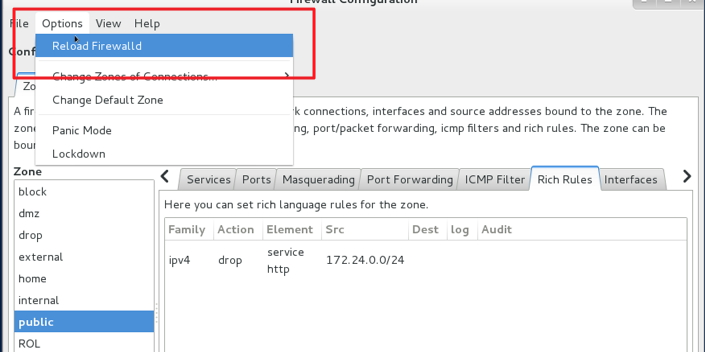
/PATH/FROM/CONF_FILE~]# alias~]#qstat 4.防火墙规则,配置端口转发图形化界面操作。。。~]# firewall-config
& 在图形化下配置选择模式:Configuration Permanent永久模式Zone:public 适用区域Port Forwarding端口转发 --> Add
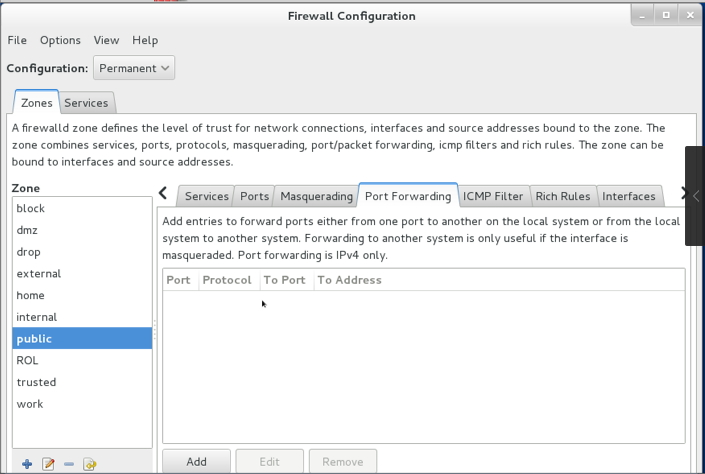
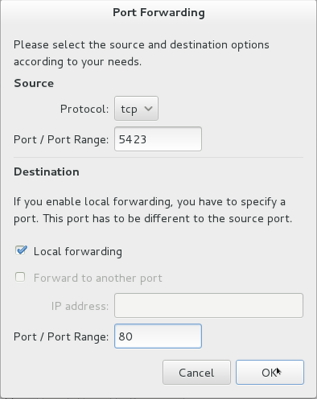
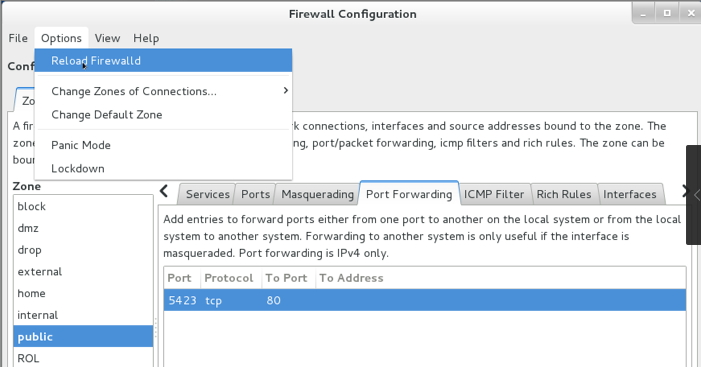
~]# firewall-cmd
--list-all public 验证 5.链路聚合图形化界面配置:~]#nm-conection-editor &


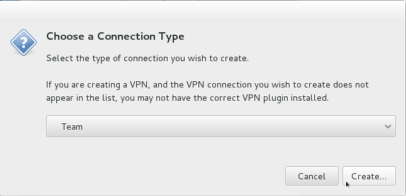
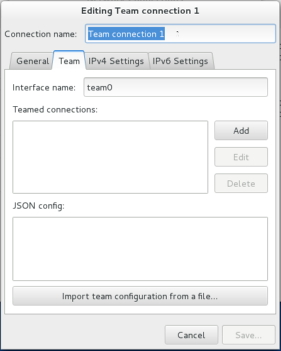
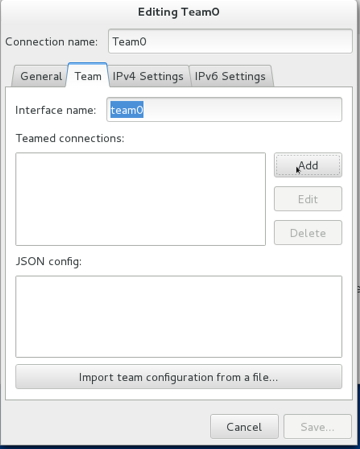
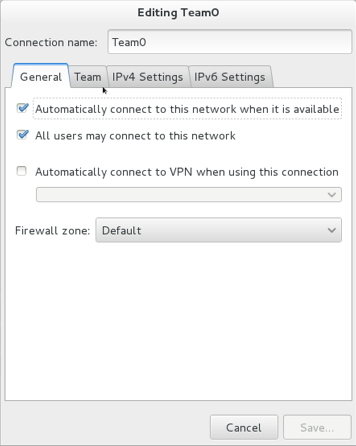
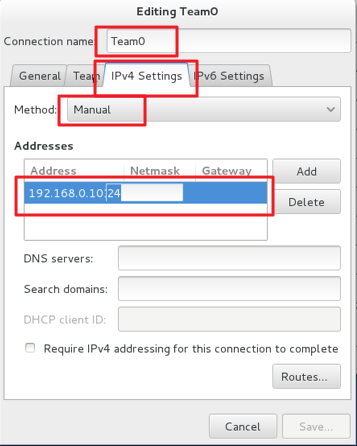
~]#lab teambridge setup
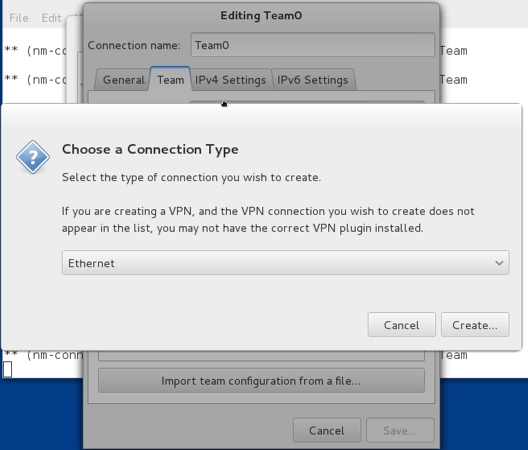
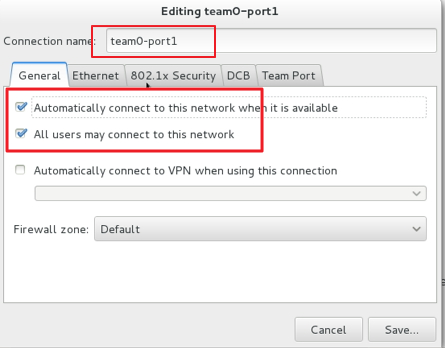
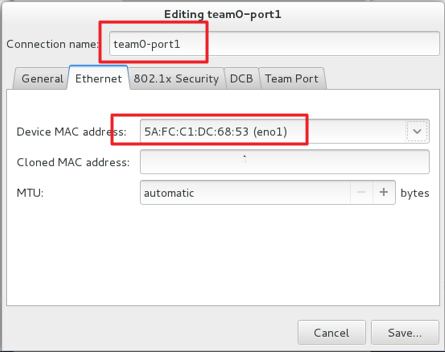

man teamd----》{"runner\":{\"name\":\"activebackup\"}}
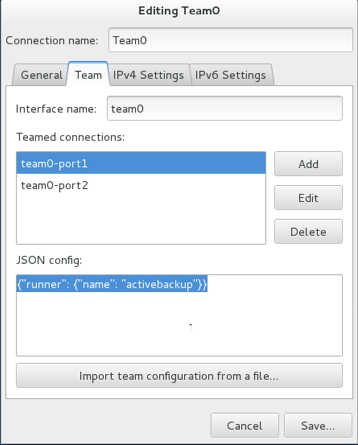
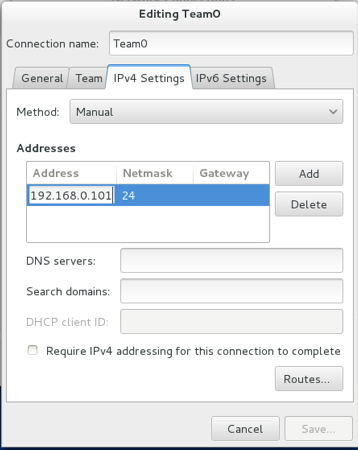
~]#systemctl restart network~]#ip addr show team0~]#teamdctl team0 state 6.配置IPv6地址图形配置~]# nm-connection-editor & 图形配置


~]# systemctl
restart network~]# ip addr show
eth0~]# ping #测试 7.本地邮件服务~]#yum install -y postfix~]#vim
/etc/postfix/main.cfinit_interfaces=loopback-onlymyorigin = example.com #从该系统上发送的邮件都显示来自relayhost = [classroom.example.com] # 转发发到mydestination= # 本地不接受外来邮件local_transport=err:local delivery disabled~]# systemctl
restart postfix~]#
systemctl enable postfix 8.Samba共享目录Server:~]#
yum install samba samba-client -y ~]# mkdir /common~]# chcon -R -t samba_share_t /common #修改安全上下文,此处的SElinux是打开的,在配置文件中也有此命令~]# vim
/etc/samba/smb.confworkgroup = STAFF # 此处是修改[common] # 此处开始是添加内容comment=commonpath
= /commonhosts
allow = 172.25.0.browseable
= yes~]# smbpasswd -a
andy~]# testparm # 查看配置有无问题~]#
systemctl restart smb nmb~]#
systemctl enable smb nmb~]#
firewall-cmd --add-service=samba --permanent~]# firewall-cmd
--reloadClient:~]#
yum install samba-client cifs-utils -y~]# smbclient -L //172.25.0.11 -U andy # 测试能否连接~]# smbclient //172.25.0.11/common -U andy
# 测试能否连接共享目录~]# 第三步测试:能够下载不能上传挂载可以做看题目要求:~]#mkdir /mnt/common~]#vim /etc/fstab//172.25.0.11/common /mnt/common cifs defaults,username=k1,password=redhat,sec=ntlmssp 0 0~]#mount -a~]#df -hT 9.多用户SMB挂载~]#
mkdir /share~]#
chmod o+w /share~]#
chcon -R -t samba_share_t /share~]# useradd k1~]# useradd c1~]# smbpasswd -a k1~]#
smbpasswd -a c1 ~]# vim
/etc/samba/smb.conf[share]comment=sharepath
= /sharehosts
allow = 172.25.0.browseable
= yeswritable
= nowrite
list = c1~]#
systemctl restart smb nmb Client端测试:~]#vim /etc/fstab//172.25.0.11/share /mnt/dev cifs defaults,multiuser,username=k1,password=redhat,sec=ntlmssp 0 0~]#mount -a~]#df -h~]# useradd c1~]# su - c1~]#cd /mnt/dev~]# cifscreds
add 172.25.0.11 -u c1 # 临时提升权限?????????????????? 10.NFS服务Server:~]# mkdir /public~]# mkdir /pretected~]# chcon -R -t
public_content_t /public~]# chcon -R -t
public_content_t /pretected/~]# vim /etc/exports/public 172.25.0.0/24(ro,sync)/pretected 172.25.0.0/24(rw,sec=krb5p,sync)~]#
wget -O /etc/krb5.keytab http://classroom.example.com/pub/keytabs/server0.keytab?~]# useradd k2?~]# chown k2 /pretected/project/~]# systemctl
restart nfs-secure-server~]# systemctl enable
nfs-server.service~]# systemctl
restart nfs~]# firewall-cmd
--add-service=nfs --permanent~]# firewall-cmd
--reload~]# firewall-cmd --add-service=rpc-bind --permanent
# 挂载相关的放行~]# firewall-cmd
--reload~]# firewall-cmd --permanent --add-service=mountd
# 挂载相关的放行~]# firewall-cmd
--reload~]# vim
/etc/sysconfig/nfs # 为支持krb5验证RPCNFSDARGS='-V 4.2' 11.挂载NFS共享Client:~]# wget -O
/etc/krb5.keytab http://classroom.example.com/pub/keytabs/desktop0.keytab~]# systemctl
restart nfs-secure~]#
systemctl enable nfs-secure ~]# mkdir
/mnt/nfssecure~]# vim /etc/fstab172.25.0.11:/public
/mnt/nfsmount nfs defaules
0 0172.25.0.11:/pretected /mnt/nfssecure nfs defaults,sec=krb5p,v4.2 0 0~]# mount -a 12.配置Web站点~]#
yum groupinstall -y web* ~]#cd /var/www/html~]#wget http:// ~]#mv ~]# systemctl start
httpd~]#
systemctl enable httpd~]#firewall-cmd --add-service=http -permanent~]#firewall-cmd --reload~]# systemctl
restart httpd~]#firewall-config &
~]# curl http://server0.example.com 13.配置安全web服务~]# yum install
mod_ssl~]# cd
/etc/httpd/conf.d~]# wget http://classroom.example.com/pub/tls/certs/www0.crt~]# wget http://classroom.example.com/pub/tls/private/www0.key~]# wget http://classroom.example.com/pub/example-ca.crt~]# vim ssl.confDocumentRoot "/var/www/html"ServerName
server0.example.com:443SSLCertificateFile
/etc/httpd/conf.d/www0.crtSSLCertificateKeyFile
/etc/httpd/conf.d/www0.keySSLCertificateChainFile
/etc/httpd/conf.d/example-ca.crt~]# systemctl restart httpd~]# firewall-cmd
--add-service=https --permanent~]# firewall-cmd
--reload 14.配置虚拟主机~]# vim vhost.conf<VirtualHost
*:80>ServerName www.exmaple.com DocumentRoot
/var/www/virtual</VirtualHost><Directory
"/var/www/virtual">AllowOverride
NoneRequire
all granted</Directory><VirtualHost
*:80>ServerName
server0.exmaple.com DocumentRoot /var/www/html</VirtualHost>~]# systemctl
restart httpd~]#mkdir /var/www/virtual~]#chmod o+w
/var/www/virtual 15.配置Web内容服务~]# mkdir
/var/www/html/private~]# echo "15
" > /var/www/html/private/index.html~]# mkdir
/var/www/virtual~]# echo
"14" > /var/www/virtual/index.html~]# vim vhost.conf<VirtualHost
*:80>ServerNamewww.exmaple.com DocumentRoot
/var/www/virtual</VirtualHost><Directory
"/var/www/virtual">AllowOverride
NoneRequire
all granted</Directory><VirtualHost
_default_:80>ServerName
server0.example.comDocumentRoot
/var/www/html<Directory
"/var/www/html">AllowOverride
NoneRequire
all granted</Directory></VirtualHost><Directory
"/var/www/html/private">AllowOverride
NoneRequire
all deniedRequire local</Directory>~]# systemctl
restart httpd~]# curl http://server0.example.com/private/index.html~]# curl http://server0.example.com/private/index.html 16.实现动态Web内容~]# yum install
mod_wsgi -y~]# vim
/etc/httpd/conf/httpd.confListen
8909~]# semanage port -a
-t http_port_t -p tcp 8909~]# systemctl restart httpd~]# echo
"16" > /var/www/html/webinfo.wsgi~]#vim vhost.conf<VirtualHost
*:8909>ServerName
16.exmaple.comDocumentRoot
/var/www/html<Directory
"/var/www/html">AllowOverride
NoneRequire
all granted</Directory>WSGIScriptAlias
/ /var/www/html/webinfo.wsgi</VirtualHost>~]# systemctl
restart httpd~]# firewall-config-edit
&图形化放行~]#firewall-cmd
--reload

17.case脚本~]#vim /etc/boot/foo/sh#!/bin/bashcase
$1 infedora)echo
"redhat";;redhat)echo
"fedora";;*)echo
"/root/foo.sh redhat|fedora"esac~]# chmod +x
/root/foo.sh 18.添加用户脚本????~]#vim /root/batchusers.sh#!/bin/bashif
[$# -eq 0 ];thenecho
"Usage:/root/batchusers"exit
1fiif
[! -f $1];thenecho
"input file not found"exit
1fifor
i in $(cat $1);douseradd
-s /bin/false $i;done~]#
chmod +x /root/batchusers.sh 19.ISCSI服务~]#
fdisk -l /dev/vda~]#yum install -y targetcli~]#targetcli/> ls/> cd backstores//> cd block/> create disk1 /dev/vda1/> cd ../> cd ../> cd iscsi/> create
iqn.2014-11.com.example:server0/> cd iqn.2014-11.com.wxample:server0/tpg1//> ls/> luns/ create /backstores/block/disk1/> acls/ create
iqn.2014-11.com.example:desktop0/> portals/ create
172.25.0.11/> exit~]#fire-cmd --add-port=3260/tcp --permanent~]#fire-cmd --reload~]#systemctl enaable target~]#systemctl start targe 20.配置ISCSI服务客户端~]# yum install
iscsi* -y~]#vim /ettc/iscsi/initiatorname.iscsiInitiatorName=iqn.2014-11.com.example:desktop0~]#iscsiadm -t st -m discovery -p 172.25.0.11~]#iscsiadm -m node -T iqn.2014-11.com.example:server0 -p
172.25.0.11 -l~]#fdisk -l~]# fdisk
/dev/sdc 分区~]# mkfs.ext4 /dev/sd...~]# mkdir /mnt/data~]# vim /etc/fstabUUID= /mnt/data ext4
defaults,_netdev 0 0~]# mount -a 21.配置数据库~]#
yum groupinstall "mariadb*" -y~]# systemctl start
mariadb~]#
systemctl enable mariadb~]#
mysql_secure_installation~]#
mysql -u root -p MariaDB > CREATE DATABASE Contacts;MariaDB > quit~]#
mysql -u root -p Contacts < /root/users.mdb 22.查询数据库~]# mysql -u root -pMariaDB > use
Contacts;MariaDB > show
tables;MariaDB > create
user r1@localhost identified by 'redhat';MariaDB > grant
select on Contacts.* to r1@localhost;MariaDB > flush
privileges;MariaDB > select
* from pass inner join name where name.aid=pass.bid;MariaDB > select
* from pass inner join name on name.aid=pass.bid where password='tangerine';MariaDB >select * from name inner join loc on name.aid=loc.cid
where firstname='John' and
loction='guangzhou';
1.Selinux两台服务器上配置~]# vim
/etc/selinux/configSELINUX=disabledSELINUXTYPE=targeted~]#reboot 2.ssh登录控制~]#vim /ect/hosts.allowsshd:172.25.0.~]#vim /ect/hosts.denysshd:172.24.0. 3.命令别名~]#vim /etc/bashrcalias
qstat=' '重读环境变量、验证~]# source /etc/bashrc 或 ~]# .
/PATH/FROM/CONF_FILE~]# alias~]#qstat 4.防火墙规则,配置端口转发图形化界面操作。。。~]# firewall-config
& 在图形化下配置选择模式:Configuration Permanent永久模式Zone:public 适用区域Port Forwarding端口转发 --> Add
~]# firewall-cmd
--list-all public 验证 5.链路聚合图形化界面配置:~]#nm-conection-editor &
~]#lab teambridge setup
man teamd----》{"runner\":{\"name\":\"activebackup\"}}
~]#systemctl restart network~]#ip addr show team0~]#teamdctl team0 state 6.配置IPv6地址图形配置~]# nm-connection-editor & 图形配置
~]# systemctl
restart network~]# ip addr show
eth0~]# ping #测试 7.本地邮件服务~]#yum install -y postfix~]#vim
/etc/postfix/main.cfinit_interfaces=loopback-onlymyorigin = example.com #从该系统上发送的邮件都显示来自relayhost = [classroom.example.com] # 转发发到mydestination= # 本地不接受外来邮件local_transport=err:local delivery disabled~]# systemctl
restart postfix~]#
systemctl enable postfix 8.Samba共享目录Server:~]#
yum install samba samba-client -y ~]# mkdir /common~]# chcon -R -t samba_share_t /common #修改安全上下文,此处的SElinux是打开的,在配置文件中也有此命令~]# vim
/etc/samba/smb.confworkgroup = STAFF # 此处是修改[common] # 此处开始是添加内容comment=commonpath
= /commonhosts
allow = 172.25.0.browseable
= yes~]# smbpasswd -a
andy~]# testparm # 查看配置有无问题~]#
systemctl restart smb nmb~]#
systemctl enable smb nmb~]#
firewall-cmd --add-service=samba --permanent~]# firewall-cmd
--reloadClient:~]#
yum install samba-client cifs-utils -y~]# smbclient -L //172.25.0.11 -U andy # 测试能否连接~]# smbclient //172.25.0.11/common -U andy
# 测试能否连接共享目录~]# 第三步测试:能够下载不能上传挂载可以做看题目要求:~]#mkdir /mnt/common~]#vim /etc/fstab//172.25.0.11/common /mnt/common cifs defaults,username=k1,password=redhat,sec=ntlmssp 0 0~]#mount -a~]#df -hT 9.多用户SMB挂载~]#
mkdir /share~]#
chmod o+w /share~]#
chcon -R -t samba_share_t /share~]# useradd k1~]# useradd c1~]# smbpasswd -a k1~]#
smbpasswd -a c1 ~]# vim
/etc/samba/smb.conf[share]comment=sharepath
= /sharehosts
allow = 172.25.0.browseable
= yeswritable
= nowrite
list = c1~]#
systemctl restart smb nmb Client端测试:~]#vim /etc/fstab//172.25.0.11/share /mnt/dev cifs defaults,multiuser,username=k1,password=redhat,sec=ntlmssp 0 0~]#mount -a~]#df -h~]# useradd c1~]# su - c1~]#cd /mnt/dev~]# cifscreds
add 172.25.0.11 -u c1 # 临时提升权限?????????????????? 10.NFS服务Server:~]# mkdir /public~]# mkdir /pretected~]# chcon -R -t
public_content_t /public~]# chcon -R -t
public_content_t /pretected/~]# vim /etc/exports/public 172.25.0.0/24(ro,sync)/pretected 172.25.0.0/24(rw,sec=krb5p,sync)~]#
wget -O /etc/krb5.keytab http://classroom.example.com/pub/keytabs/server0.keytab?~]# useradd k2?~]# chown k2 /pretected/project/~]# systemctl
restart nfs-secure-server~]# systemctl enable
nfs-server.service~]# systemctl
restart nfs~]# firewall-cmd
--add-service=nfs --permanent~]# firewall-cmd
--reload~]# firewall-cmd --add-service=rpc-bind --permanent
# 挂载相关的放行~]# firewall-cmd
--reload~]# firewall-cmd --permanent --add-service=mountd
# 挂载相关的放行~]# firewall-cmd
--reload~]# vim
/etc/sysconfig/nfs # 为支持krb5验证RPCNFSDARGS='-V 4.2' 11.挂载NFS共享Client:~]# wget -O
/etc/krb5.keytab http://classroom.example.com/pub/keytabs/desktop0.keytab~]# systemctl
restart nfs-secure~]#
systemctl enable nfs-secure ~]# mkdir
/mnt/nfssecure~]# vim /etc/fstab172.25.0.11:/public
/mnt/nfsmount nfs defaules
0 0172.25.0.11:/pretected /mnt/nfssecure nfs defaults,sec=krb5p,v4.2 0 0~]# mount -a 12.配置Web站点~]#
yum groupinstall -y web* ~]#cd /var/www/html~]#wget http:// ~]#mv ~]# systemctl start
httpd~]#
systemctl enable httpd~]#firewall-cmd --add-service=http -permanent~]#firewall-cmd --reload~]# systemctl
restart httpd~]#firewall-config &
~]# curl http://server0.example.com 13.配置安全web服务~]# yum install
mod_ssl~]# cd
/etc/httpd/conf.d~]# wget http://classroom.example.com/pub/tls/certs/www0.crt~]# wget http://classroom.example.com/pub/tls/private/www0.key~]# wget http://classroom.example.com/pub/example-ca.crt~]# vim ssl.confDocumentRoot "/var/www/html"ServerName
server0.example.com:443SSLCertificateFile
/etc/httpd/conf.d/www0.crtSSLCertificateKeyFile
/etc/httpd/conf.d/www0.keySSLCertificateChainFile
/etc/httpd/conf.d/example-ca.crt~]# systemctl restart httpd~]# firewall-cmd
--add-service=https --permanent~]# firewall-cmd
--reload 14.配置虚拟主机~]# vim vhost.conf<VirtualHost
*:80>ServerName www.exmaple.com DocumentRoot
/var/www/virtual</VirtualHost><Directory
"/var/www/virtual">AllowOverride
NoneRequire
all granted</Directory><VirtualHost
*:80>ServerName
server0.exmaple.com DocumentRoot /var/www/html</VirtualHost>~]# systemctl
restart httpd~]#mkdir /var/www/virtual~]#chmod o+w
/var/www/virtual 15.配置Web内容服务~]# mkdir
/var/www/html/private~]# echo "15
" > /var/www/html/private/index.html~]# mkdir
/var/www/virtual~]# echo
"14" > /var/www/virtual/index.html~]# vim vhost.conf<VirtualHost
*:80>ServerNamewww.exmaple.com DocumentRoot
/var/www/virtual</VirtualHost><Directory
"/var/www/virtual">AllowOverride
NoneRequire
all granted</Directory><VirtualHost
_default_:80>ServerName
server0.example.comDocumentRoot
/var/www/html<Directory
"/var/www/html">AllowOverride
NoneRequire
all granted</Directory></VirtualHost><Directory
"/var/www/html/private">AllowOverride
NoneRequire
all deniedRequire local</Directory>~]# systemctl
restart httpd~]# curl http://server0.example.com/private/index.html~]# curl http://server0.example.com/private/index.html 16.实现动态Web内容~]# yum install
mod_wsgi -y~]# vim
/etc/httpd/conf/httpd.confListen
8909~]# semanage port -a
-t http_port_t -p tcp 8909~]# systemctl restart httpd~]# echo
"16" > /var/www/html/webinfo.wsgi~]#vim vhost.conf<VirtualHost
*:8909>ServerName
16.exmaple.comDocumentRoot
/var/www/html<Directory
"/var/www/html">AllowOverride
NoneRequire
all granted</Directory>WSGIScriptAlias
/ /var/www/html/webinfo.wsgi</VirtualHost>~]# systemctl
restart httpd~]# firewall-config-edit
&图形化放行~]#firewall-cmd
--reload
17.case脚本~]#vim /etc/boot/foo/sh#!/bin/bashcase
$1 infedora)echo
"redhat";;redhat)echo
"fedora";;*)echo
"/root/foo.sh redhat|fedora"esac~]# chmod +x
/root/foo.sh 18.添加用户脚本????~]#vim /root/batchusers.sh#!/bin/bashif
[$# -eq 0 ];thenecho
"Usage:/root/batchusers"exit
1fiif
[! -f $1];thenecho
"input file not found"exit
1fifor
i in $(cat $1);douseradd
-s /bin/false $i;done~]#
chmod +x /root/batchusers.sh 19.ISCSI服务~]#
fdisk -l /dev/vda~]#yum install -y targetcli~]#targetcli/> ls/> cd backstores//> cd block/> create disk1 /dev/vda1/> cd ../> cd ../> cd iscsi/> create
iqn.2014-11.com.example:server0/> cd iqn.2014-11.com.wxample:server0/tpg1//> ls/> luns/ create /backstores/block/disk1/> acls/ create
iqn.2014-11.com.example:desktop0/> portals/ create
172.25.0.11/> exit~]#fire-cmd --add-port=3260/tcp --permanent~]#fire-cmd --reload~]#systemctl enaable target~]#systemctl start targe 20.配置ISCSI服务客户端~]# yum install
iscsi* -y~]#vim /ettc/iscsi/initiatorname.iscsiInitiatorName=iqn.2014-11.com.example:desktop0~]#iscsiadm -t st -m discovery -p 172.25.0.11~]#iscsiadm -m node -T iqn.2014-11.com.example:server0 -p
172.25.0.11 -l~]#fdisk -l~]# fdisk
/dev/sdc 分区~]# mkfs.ext4 /dev/sd...~]# mkdir /mnt/data~]# vim /etc/fstabUUID= /mnt/data ext4
defaults,_netdev 0 0~]# mount -a 21.配置数据库~]#
yum groupinstall "mariadb*" -y~]# systemctl start
mariadb~]#
systemctl enable mariadb~]#
mysql_secure_installation~]#
mysql -u root -p MariaDB > CREATE DATABASE Contacts;MariaDB > quit~]#
mysql -u root -p Contacts < /root/users.mdb 22.查询数据库~]# mysql -u root -pMariaDB > use
Contacts;MariaDB > show
tables;MariaDB > create
user r1@localhost identified by 'redhat';MariaDB > grant
select on Contacts.* to r1@localhost;MariaDB > flush
privileges;MariaDB > select
* from pass inner join name where name.aid=pass.bid;MariaDB > select
* from pass inner join name on name.aid=pass.bid where password='tangerine';MariaDB >select * from name inner join loc on name.aid=loc.cid
where firstname='John' and
loction='guangzhou';

相关文章推荐
- RHEL7 Minimal Register
- RHEL7 Install Python3 and pip3
- RHCSA 系列(五): RHEL7 中的进程管理:开机,关机
- RHCSA 系列(七): 使用 ACL(访问控制列表) 和挂载 Samba/NFS 共享
- RHCSA 系列(八): 加固 SSH,设定主机名及启用网络服务
- RHCSA 系列(二): 如何进行文件和目录管理
- RHCSA 系列(三): 如何管理 RHEL7 的用户和组
- RHCSA 系列(四): 编辑文本文件及分析文本
- RHCSA 系列(九): 安装、配置及加固一个 Web 和 FTP 服务器
- RHCSA 系列(十一): 使用 firewalld 和 iptables 来控制网络流量
- RHCSA 系列(十二): 使用 Kickstart 完成 RHEL 7 的自动化安装
- RHCSA 系列(十三): 在 RHEL 7 中使用 SELinux 进行强制访问控制
- RHCSA 系列(十四): 在 RHEL 7 中设置基于 LDAP 的认证
- RHCSA 系列(十五): 虚拟化基础和使用 KVM 进行虚拟机管理
- RHCSA 系列(一): 回顾基础命令及系统文档
- RHCE 排错强化训练!
- 按部就班三步走:RHCE黄金认证轻松在手
- 高手攻关心得:RHCE实战详细经验
- 认证考试介绍之RHCE篇
- Rhel7/Centos7 修改运行级别