android中的Section ListView
2016-04-23 22:05
405 查看
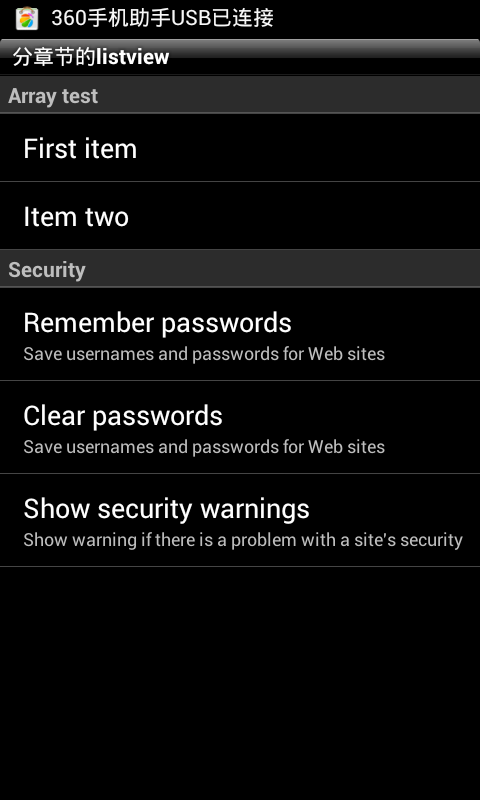
前几天,和ios开发的同事扯淡时发现iphone里有个Cell section listview,分章节的列表。Android中的联系人也有这种效果,首字母相同的联系人会被分在一个章节中。
后来搜了一下,android做起来也很easy。下面记录一下方便以后参考(大家改一下包名)
首先复写一下BaseAdapter:
[java] view
plain copy
package com.test.activity;
import java.util.LinkedHashMap;
import java.util.Map;
import android.content.Context;
import android.view.View;
import android.view.ViewGroup;
import android.widget.Adapter;
import android.widget.ArrayAdapter;
import android.widget.BaseAdapter;
public class SeparatedListAdapter extends BaseAdapter {
public final Map<String, Adapter> sections = new LinkedHashMap<String, Adapter>();
public final ArrayAdapter<String> headers;
public final static int TYPE_SECTION_HEADER = 0;
public SeparatedListAdapter(Context context) {
headers = new ArrayAdapter<String>(context, R.layout.list_header);
}
public void addSection(String section, Adapter adapter) {
this.headers.add(section);
this.sections.put(section, adapter);
}
public Object getItem(int position) {
for (Object section : this.sections.keySet()) {
Adapter adapter = sections.get(section);
int size = adapter.getCount() + 1;
// check if position inside this section
if (position == 0)
return section;
if (position < size)
return adapter.getItem(position - 1);
// otherwise jump into next section
position -= size;
}
return null;
}
public int getCount() {
// total together all sections, plus one for each section header
int total = 0;
for (Adapter adapter : this.sections.values())
total += adapter.getCount() + 1;
return total;
}
public int getViewTypeCount() {
// assume that headers count as one, then total all sections
int total = 1;
for (Adapter adapter : this.sections.values())
total += adapter.getViewTypeCount();
return total;
}
public int getItemViewType(int position) {
int type = 1;
for (Object section : this.sections.keySet()) {
Adapter adapter = sections.get(section);
int size = adapter.getCount() + 1;
// check if position inside this section
if (position == 0)
return TYPE_SECTION_HEADER;
if (position < size)
return type + adapter.getItemViewType(position - 1);
// otherwise jump into next section
position -= size;
type += adapter.getViewTypeCount();
}
return -1;
}
public boolean areAllItemsSelectable() {
return false;
}
public boolean isEnabled(int position) {
return (getItemViewType(position) != TYPE_SECTION_HEADER);
}
@Override
public View getView(int position, View convertView, ViewGroup parent) {
int sectionnum = 0;
for (Object section : this.sections.keySet()) {
Adapter adapter = sections.get(section);
int size = adapter.getCount() + 1;
// check if position inside this section
if (position == 0)
return headers.getView(sectionnum, convertView, parent);
if (position < size)
return adapter.getView(position - 1, convertView, parent);
// otherwise jump into next section
position -= size;
sectionnum++;
}
return null;
}
@Override
public long getItemId(int position) {
return position;
}
}
然后开始写主Act,用listview适配一下上面的adapter
[java] view
plain copy
package com.test.activity;
import java.util.HashMap;
import java.util.LinkedList;
import java.util.List;
import java.util.Map;
import android.app.Activity;
import android.os.Bundle;
import android.widget.ArrayAdapter;
import android.widget.ListView;
import android.widget.SimpleAdapter;
public class ListSample extends Activity {
public final static String ITEM_TITLE = "title";
public final static String ITEM_CAPTION = "caption";
public Map<String, ?> createItem(String title, String caption) {
Map<String, String> item = new HashMap<String, String>();
item.put(ITEM_TITLE, title);
item.put(ITEM_CAPTION, caption);
return item;
}
@Override
public void onCreate(Bundle icicle) {
super.onCreate(icicle);
List<Map<String, ?>> security = new LinkedList<Map<String, ?>>();
security.add(createItem("Remember passwords",
"Save usernames and passwords for Web sites"));
security.add(createItem("Clear passwords",
"Save usernames and passwords for Web sites"));
security.add(createItem("Show security warnings",
"Show warning if there is a problem with a site's security"));
// create our list and custom adapter
SeparatedListAdapter adapter = new SeparatedListAdapter(this);
adapter.addSection("Array test", new ArrayAdapter<String>(this,
R.layout.list_item, new String[] { "First item", "Item two" }));
adapter.addSection("Security", new SimpleAdapter(this, security,
R.layout.list_complex,
new String[] { ITEM_TITLE, ITEM_CAPTION }, new int[] {
R.id.list_complex_title, R.id.list_complex_caption }));
ListView list = new ListView(this);
list.setAdapter(adapter);
this.setContentView(list);
}
}
这样java代码就写完了。。
最后把xml布局文件粘贴一下就可以跑起来了
[html] view
plain copy
<!-- list_complex.xml -->
<LinearLayout
xmlns:android="http://schemas.android.com/apk/res/android"
android:layout_width="fill_parent"
android:layout_height="wrap_content"
android:orientation="vertical"
android:paddingTop="10dip"
android:paddingBottom="10dip"
android:paddingLeft="15dip"
>
<TextView
android:id="@+id/list_complex_title"
android:layout_width="fill_parent"
android:layout_height="wrap_content"
android:textAppearance="?android:attr/textAppearanceLarge"
/>
<TextView
android:id="@+id/list_complex_caption"
android:layout_width="fill_parent"
android:layout_height="wrap_content"
android:textAppearance="?android:attr/textAppearanceSmall"
/>
</LinearLayout>
[html] view
plain copy
<!-- list_header.xml -->
<TextView
xmlns:android="http://schemas.android.com/apk/res/android"
android:id="@+id/list_header_title"
android:layout_width="fill_parent"
android:layout_height="wrap_content"
android:paddingTop="2dip"
android:paddingBottom="2dip"
android:paddingLeft="5dip"
style="?android:attr/listSeparatorTextViewStyle" />
[html] view
plain copy
<!-- list_item.xml -->
<TextView
xmlns:android="http://schemas.android.com/apk/res/android"
android:id="@+id/list_item_title"
android:layout_width="fill_parent"
android:layout_height="fill_parent"
android:paddingTop="10dip"
android:paddingBottom="10dip"
android:paddingLeft="15dip"
android:textAppearance="?android:attr/textAppearanceLarge"
/>
引用:http://blog.csdn.net/r8hzgemq/article/details/7882985
http://jingyan.baidu.com/article/03b2f78c77ebb45ea337ae52.html https://github.com/beworker/pinned-section-listview http://blog.csdn.net/jdsjlzx/article/details/20697257
demo:http://blog.csdn.net/anddroid_lanyan/article/details/41895631
http://blog.sina.com.cn/s/blog_8c23dc160100y0dh.html

相关文章推荐
- android中Drawable方法详解
- Android课程---关于Service的学习(后台运行)
- 用android虚拟机,向sdcard导入文件时候报错 transfer error: Read-only file system
- 帮同学做了一个Android重力加速度传感器蓝牙控制小车的程序
- android中drawable资源文件的使用
- Android数据库SQLite
- AndroidStudio使用进阶二:搭建自己的maven私服,并使用Gradle统一依赖管理
- Android数据存储方式之 SQLite
- Android 技术总结(不断更新)
- Android中的Environment.getExternalStorageState使用
- 广播--android学习
- android桌面快捷方式跳转到指定activity
- [android]editText和软键盘的一些总结
- Android apk反编译
- android studio导入jar包
- Android导入开源库及jar等文件到基于Android Studio构建的项目中
- [android] 手机卫士号码归属地查询完成
- mob短信验证两种方式
- android studio JNI使用
- android studio JNI使用