OpenCV读取图片并显示和保存图片
2016-04-22 12:57
686 查看
Load and Display an Image
Goal
In this tutorial you will learn how to:Load an image (using imread)
Create a named OpenCV window (using namedWindow)
Display an image in an OpenCV window (using imshow)
Source Code
Download the source code from here.1 2 3 4 5 6 7 8 9 10 11 12 13 14 15 16 17 18 19 20 21 22 23 24 25 26 27 28 29 30 | #include <opencv2/core/core.hpp>
#include <opencv2/highgui/highgui.hpp>
#include <iostream>
using namespace cv;
using namespace std;
int main( int argc, char** argv )
{
if( argc != 2)
{
cout <<" Usage: display_image ImageToLoadAndDisplay" << endl;
return -1;
}
Mat image;
image = imread(argv[1], CV_LOAD_IMAGE_COLOR); // Read the file
if(! image.data ) // Check for invalid input
{
cout << "Could not open or find the image" << std::endl ;
return -1;
}
namedWindow( "Display window", CV_WINDOW_AUTOSIZE );// Create a window for display.
imshow( "Display window", image ); // Show our image inside it.
waitKey(0); // Wait for a keystroke in the window
return 0;
} |
Explanation
In OpenCV 2 we have multiple modules. Each one takes care of a different area or approach towards image processing. You could already observe this in the structure of the user guide of these tutorials itself.Before you use any of them you first need to include the header files where the content of each individual module is declared.
You’ll almost always end up using the:
core section, as here are defined the basic building blocks of the library
highgui module, as this contains the functions for input and output operations
// Video Image PSNR and SSIM
#include <iostream> // for standard I/O
#include <string>   // for strings
We also include the iostream to facilitate console line output and input. To avoid data structure and function name conflicts with other libraries, OpenCV has its own namespace: cv. To avoid
the need appending prior each of these the cv:: keyword you can import the namespace in the whole file by using the lines:
using namespace cv;
using namespace std;
This is true for the STL library too (used for console I/O). Now, let’s analyze the main function. We start up assuring that we acquire a valid image name argument from the command line.
if( argc != 2)
{
cout <<" Usage: display_image ImageToLoadAndDisplay" << endl;
return -1;
}
Then create a Mat object that will store the data of the loaded image.
Mat image;
Now we call the imread function
which loads the image name specified by the first argument (argv[1]). The second argument specifies the format in what we want the image. This may be:
CV_LOAD_IMAGE_UNCHANGED (<0) loads the image as is (including the alpha channel if present)
CV_LOAD_IMAGE_GRAYSCALE ( 0) loads the image as an intensity one
CV_LOAD_IMAGE_COLOR (>0) loads the image in the RGB format
image = imread(argv[1], CV_LOAD_IMAGE_COLOR); // Read the file
Note
OpenCV offers support for the image formats Windows bitmap (bmp), portable image formats (pbm, pgm, ppm) and Sun raster (sr, ras). With help of plugins (you need to specify to use
them if you build yourself the library, nevertheless in the packages we ship present by default) you may also load image formats like JPEG (jpeg, jpg, jpe), JPEG 2000 (jp2 - codenamed in the CMake as Jasper), TIFF files (tiff, tif) and portable network graphics
(png). Furthermore, OpenEXR is also a possibility.
After checking that the image data was loaded correctly, we want to display our image, so we create an OpenCV window using the namedWindow function.
These are automatically managed by OpenCV once you create them. For this you need to specify its name and how it should handle the change of the image it contains from a size point of view. It may be:
CV_WINDOW_AUTOSIZE is the only supported one if you do not use the Qt backend. In this case the window size will take up the size of the image it shows. No resize permitted!
CV_WINDOW_NORMAL on Qt you may use this to allow window resize. The image will resize itself according to the current window size. By using the | operator you also need to specify
if you would like the image to keep its aspect ratio (CV_WINDOW_KEEPRATIO) or not (CV_WINDOW_FREERATIO).
namedWindow( "Display window", CV_WINDOW_AUTOSIZE );// Create a window for display.
Finally, to update the content of the OpenCV window with a new image use the imshow function.
Specify the OpenCV window name to update and the image to use during this operation:
imshow( "Display window", image ); // Show our image inside it.
Because we want our window to be displayed until the user presses a key (otherwise the program would end far too quickly), we use the waitKey function
whose only parameter is just how long should it wait for a user input (measured in milliseconds). Zero means to wait forever.
waitKey(0); // Wait for a keystroke in the window
Result
Compile your code and then run the executable giving an image path as argument. If you’re on Windows the executable will of course contain an exe extension too. Of courseassure the image file is near your program file.
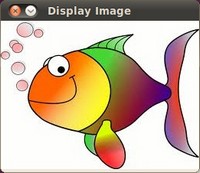
./DisplayImage HappyFish.jpg
You should get a nice window as the one shown below:
读取、修改、保存图像
Note我们假设读者已经了解图像读取函数 imread ,并能使用 imshow 将图像显示到窗口。
目标
如下,将学习如何使用:图像读取 imread
图像颜色空间的转换 cvtColor
图像保存至硬盘 (using imwrite)
代码
代码如下:1 2 3 4 5 6 7 8 9 10 11 12 13 14 15 16 17 18 19 20 21 22 23 24 25 26 27 28 29 30 | #include <cv.h>
#include <highgui.h>
using namespace cv;
int main( int argc, char** argv )
{
if(argc != 2)
{
printf("useage: %s <imagefile>\n ", argv[0]);
return -1;
}
char* imageName = argv[1];
Mat image;
image = imread( imageName, CV_LOAD_IMAGE_COLOR);
if( !image.data )
{
printf( " No image data \n " );
return -1;
}
Mat gray_image;
cvtColor( image, gray_image, CV_BGR2GRAY );
imwrite( "../../images/Gray_Image.jpg", gray_image );
namedWindow( imageName, CV_WINDOW_AUTOSIZE );
namedWindow( "Gray image", CV_WINDOW_AUTOSIZE );

imshow( imageName, image );
imshow( "Gray image", gray_image );
waitKey(0);
return 0;
} |
注解
首先:创建Mat,用于保存图像内容。
使用 imread 读取图像,图像路径为 imageName ,图像按BGR格式读取。
其次,将RGB图像转化为灰度格式。Opencv中有现成的转化函数:
cvtColor( image, gray_image, CV_BGR2GRAY );
cvtColor 的参数为:
源图像 (image) 。
目标图像 (gray_image),用于保存转换图像。
附加参数,用于指定转换的类型,例子中使用参数 CV_BGR2GRAY 。参数的具体定义请参见cvColor函数的API文档。
然后,使用函数 imwrite 将得到的灰度图像 gray_image 保存到硬盘。程序结束时,该灰度图像将会被释放。
imwrite( "../../images/Gray_Image.jpg", gray_image );
该函数,将图像写入到指定的文件夹下,程序执行时需保证该文件夹存在。示例中,将得到的灰度图像写到../../images/下,命名为Gray_Image.jpg。
最后,为了检验图像是否正确,将原始图像和灰度图像分别显示到打开的窗口中:
namedWindow( imageName, CV_WINDOW_AUTOSIZE ); namedWindow( "Gray image", CV_WINDOW_AUTOSIZE ); imshow( imageName, image ); imshow( "Gray image", gray_image );
结尾的 waitKey(0) 函数,用于等待用户的按键操作来关闭窗口。
结语
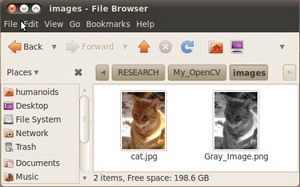
程序运行后,将得到: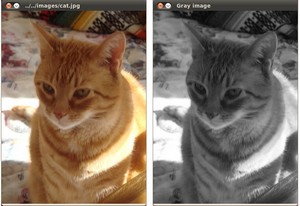
检查你的输出文件夹,将发现一个新的.jpg文件。文件名为 Gray_Image.jpg :
恭喜你,到这儿你已经完成了整个程序!
from: http://www.opencv.org.cn/opencvdoc/2.3.2/html/doc/tutorials/introduction/table_of_content_introduction/table_of_content_introduction.html#table-of-content-introduction

相关文章推荐
- OpenCV在Windows、Linux、Android、iOS上的安装
- Sqoop 数据导入问题
- 发布网站配置IIS(把网上找到的解决方法综合了一下)
- OpenCV之core 模块. 核心功能(2)基本绘图 随机数发生器&绘制文字 离散傅立叶变换 输入输出XML和YAML文件 与 OpenCV 1 同时使用
- [OpenGL红宝书]第一章 OpenGL概述
- OpenCV之core 模块. 核心功能(1)Mat - 基本图像容器 OpenCV如何扫描图像、利用查找表和计时 矩阵的掩码操作 使用OpenCV对两幅图像求和(求混合(blending))
- Docker - Section II
- linux解压覆盖命令
- MMORPG服务器架构
- shell脚本中一些特殊符号
- 一个不错的shell 脚本教程 入门级
- Centos 6.5 安装icingaweb1 中文版部署
- tomcat-禁止某些IP访问的方法
- VMware和CentOS7安装和配置
- tomcat server.xml docbase workdir
- tomcat中引用js静态文件找不到问题
- shell 小技巧之修改后缀及grep
- 微服务架构与可持续交付实践
- linux下查看java 占用cpu使用情况
- IT运维流程 — ITIL