IOS封装Framework,使用bundle管理资源(二)
2016-04-20 19:34
246 查看
上一篇通过 Bundle 创建 framework,这一篇直接通过 iOS 的 Framework来实现,更加简单。
本篇使用的 Xcode 版本为 7.2.1 。
一、首先,iOS -> Framework&Library -> Cocoa Touch Framework 创建工程。

工程的名字要与你所期望的 SDK 名字一样。这里以 ExpeSDK 作为项目名。
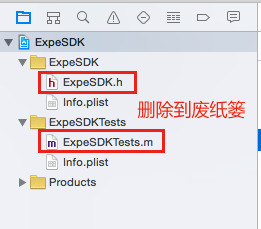
二、工程创建完成后,删除自带的 ExpeSDK.h 和 ExpeSDKTests.m 文件,因为用不到的,移到废纸篓。
三、在 Build Settings 中更改一些配置
3.1 Architectures 默认是 armv7和 arm64。可以增加 armv7s 架构,主要是为了兼容5C,如果不考虑5C的话,可以忽略这一步。
3.2 更改输出路径:在项目根目录下创建一个build目录,更改如下配置,输出文件就会在build文件下,这一步只是为了方便找到输出文件而已。
Per-configuration Build Products Path > $(SRCROOT)/build/$(CONFIGURATION)$(EFFECTIVE_PLATFORM_NAME)
3.3 推荐如下设置:
Mach-O Type > Static Library;( 静态库,如果需要提审 Appstore 的话不允许使用动态库的)
Dead Code Stripping > NO;(是否消除无效代码)
Link With Standard Libraries 默认是YES,如果没有特殊要求的话,默认就可以。
设为 NO 也是可以打包的,但是使用framework时要配置Other Linker Flags。
Enable Bitcode > NO;(支持旧库)
四、将需要共享的文件copy到工程。这里copy过来的文件是 config.h 和 config.m ;
五、Build Phases -> Headers :
将需要共享的头文件拖入 Public, 私有的保留在 Project。

六、编译
模拟器编译:

Device 编译:

七、合并二进制文件
编译成功后,在build目录下会生成模拟器和设备的framework,合并他们的二进制文件,使framework能够在设备和模拟器上通用;
device的framework:

simulator的framework:

7.1 打开终端,cd 到 build 目录:
cd build文件路径
7.2 输入合成命令:(lipo -create 设备二进制文件 模拟器二进制文件 -output 合成文件的名字)
lipo -create Debug-iphoneos/ExpeSDK.framework/ExpeSDK Debug-iphonesimulator/ExpeSDK.framework/ExpeSDK -output ExpeSDK
合成完毕后,build目录下会生成一个新的二进制文件:

7.3 替换二进制文件
然后将新的二进制文件替换掉 device framework 中的二进制文件。

移出framework。
OK,framework制作完成!
很多时候,我们需要用到图片,xib等等这些资源,就需要 bundle 来管理。
创建 Bundle 最简单的方法:新建一个文件,命名为 xxx.bundle 就OK 了。
此处,我新建一个tuxiang.bundle,然后右击显示包内容,放入2张图片 tx_1.jpg 和 tx_2.png 。
1、新建一个app工程showApp
2、将上面的 ExpeSDK.framework 和 tuxiang.bundle 加入到项目中,如此,当程序运行时,xcode会自动将 tuxiang.bundle 拷贝到 app mainBundle.
在ExpeSDK.framework的config.m中我已经写好了获取tuxiang.bundle中图片的方法,代码如下:
在config.h文件中提供对外的方法:
3、在 showApp 中调用 configUI:
先导入头文件
然后在viewDidLoad中调用函数
4、运行:
的确是预期的效果。
本篇使用的 Xcode 版本为 7.2.1 。
一、首先,iOS -> Framework&Library -> Cocoa Touch Framework 创建工程。
工程的名字要与你所期望的 SDK 名字一样。这里以 ExpeSDK 作为项目名。
二、工程创建完成后,删除自带的 ExpeSDK.h 和 ExpeSDKTests.m 文件,因为用不到的,移到废纸篓。
三、在 Build Settings 中更改一些配置
3.1 Architectures 默认是 armv7和 arm64。可以增加 armv7s 架构,主要是为了兼容5C,如果不考虑5C的话,可以忽略这一步。
3.2 更改输出路径:在项目根目录下创建一个build目录,更改如下配置,输出文件就会在build文件下,这一步只是为了方便找到输出文件而已。
Per-configuration Build Products Path > $(SRCROOT)/build/$(CONFIGURATION)$(EFFECTIVE_PLATFORM_NAME)
3.3 推荐如下设置:
Mach-O Type > Static Library;( 静态库,如果需要提审 Appstore 的话不允许使用动态库的)
Dead Code Stripping > NO;(是否消除无效代码)
Link With Standard Libraries 默认是YES,如果没有特殊要求的话,默认就可以。
设为 NO 也是可以打包的,但是使用framework时要配置Other Linker Flags。
Enable Bitcode > NO;(支持旧库)
四、将需要共享的文件copy到工程。这里copy过来的文件是 config.h 和 config.m ;
五、Build Phases -> Headers :
将需要共享的头文件拖入 Public, 私有的保留在 Project。
六、编译
模拟器编译:
Device 编译:
七、合并二进制文件
编译成功后,在build目录下会生成模拟器和设备的framework,合并他们的二进制文件,使framework能够在设备和模拟器上通用;
device的framework:
simulator的framework:
7.1 打开终端,cd 到 build 目录:
cd build文件路径
7.2 输入合成命令:(lipo -create 设备二进制文件 模拟器二进制文件 -output 合成文件的名字)
lipo -create Debug-iphoneos/ExpeSDK.framework/ExpeSDK Debug-iphonesimulator/ExpeSDK.framework/ExpeSDK -output ExpeSDK
合成完毕后,build目录下会生成一个新的二进制文件:
7.3 替换二进制文件
然后将新的二进制文件替换掉 device framework 中的二进制文件。
移出framework。
OK,framework制作完成!
很多时候,我们需要用到图片,xib等等这些资源,就需要 bundle 来管理。
创建 Bundle 最简单的方法:新建一个文件,命名为 xxx.bundle 就OK 了。
此处,我新建一个tuxiang.bundle,然后右击显示包内容,放入2张图片 tx_1.jpg 和 tx_2.png 。
1、新建一个app工程showApp
2、将上面的 ExpeSDK.framework 和 tuxiang.bundle 加入到项目中,如此,当程序运行时,xcode会自动将 tuxiang.bundle 拷贝到 app mainBundle.
在ExpeSDK.framework的config.m中我已经写好了获取tuxiang.bundle中图片的方法,代码如下:
- (UIView*)configUI
{
UIImage * image = [config getPNGImage:@"tx_2"];
UIImageView * imgView = [[UIImageView alloc] initWithImage:image];
imgView.frame = CGRectMake(0, 20, 375, 600);
return imgView;
}
+ (UIImage*)getPNGImage:(NSString*)_image_name
{
NSBundle * txBundle = [self getBundle:@"tuxiang"];
NSString * imgPath = [txBundle pathForResource:_image_name ofType:@"png"];
return [UIImage imageWithContentsOfFile:imgPath];
}
+ (UIImage*)getJPGImage:(NSString*)_image_name
{
NSBundle * bundle = [self getBundle:@"tuxiang"];
NSString * imgPath = [bundle pathForResource:_image_name ofType:@"jpg"];
return [UIImage imageWithContentsOfFile:imgPath];
}

+ (NSBundle*)getBundle:(NSString*)_bundle_name
{
NSLog(@"mainBundle resourcePath = %@",[NSBundle mainBundle].resourcePath);

/* 从 mainBundle 获取 tuxiang.bundle */
// 方法 1
//    NSString * component = [NSString stringWithFormat:@"%@.bundle",_bundle_name];
//    NSString * bundlePath = [[NSBundle mainBundle].resourcePath stringByAppendingPathComponent:component];

// 方法 2
NSString * bundlePath = [[NSBundle mainBundle] pathForResource:_bundle_name ofType:@"bundle"];

NSBundle * bundle = [NSBundle bundleWithPath:bundlePath];
return bundle;
}
在config.h文件中提供对外的方法:
- (UIView*)configUI;
3、在 showApp 中调用 configUI:
先导入头文件
#import "ExpeSDK/config.h"
然后在viewDidLoad中调用函数
- (void)viewDidLoad
{
[super viewDidLoad];

config * ObjCon = [[config alloc] init];
[self.view addSubview:[ObjCon configUI]];
}
4、运行:
的确是预期的效果。

相关文章推荐
- Enterprise Library for .NET Framework 2.0缓存使用实例
- C# Entity Framework中的IQueryable和IQueryProvider详解
- 由vbs sort引发.NET Framework之间的关系说明
- C#修改IIS站点framework版本号的方法
- C#难点逐个击破(6):C#数据类型与.net framework数据类型
- zend framework框架中url大小写问题解决方法
- YII Framework框架教程之安全方案详解
- Yii PHP Framework实用入门教程(详细介绍)
- 微软NET Framework 3.5 Beta 1 发布 提供下载
- 使用Entity Framework(4.3.1版本)遇到的问题整理
- 解决了Ajax、MySQL 和 Zend Framework 的乱码问题
- WINDOWS + WAMP + Zend Framework 配置步骤分享
- zend framework文件上传功能实例代码
- 工厂模式在Zend Framework中应用介绍
- .NET Framework SQL Server 数据提供程序连接池
- Zend Framework教程之视图组件Zend_View用法详解
- Zend Framework教程之配置文件application.ini解析
- Zend Framework教程之MVC框架的Controller用法分析
- Zend Framework教程之Zend_Db_Table表关联实例详解
- Zend Framework教程之Loader以及PluginLoader用法详解