RabbitMQ入门(四) —— topic交换器
2016-04-12 17:41
549 查看
今天我们来学习最后一个交换器类型:topic。direct是放到exchange绑定的一个queue里,fanout是放到exchange绑定的所有queue里。那有没有放到exchange绑定的一部分queue里,或者多个routing key可以路由到一个queue里呢,那就要用到topic类型的exchange。
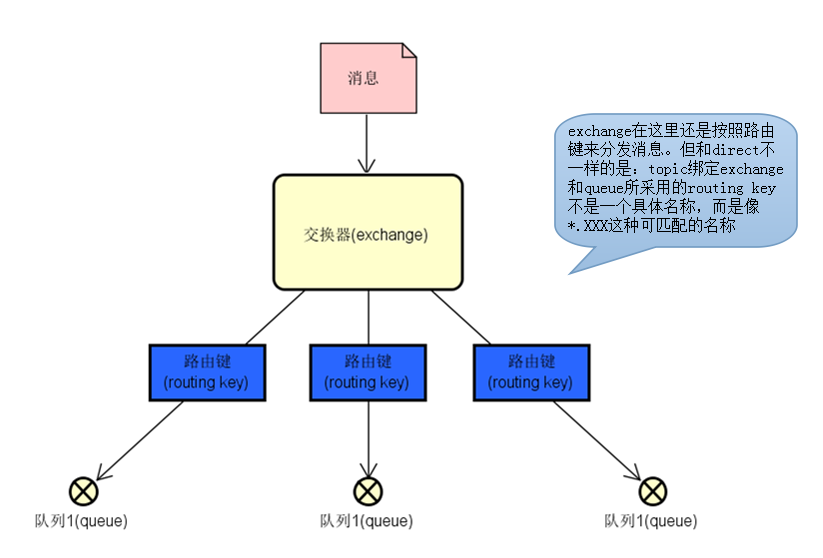
我们先来看看多个routing key如何路由到一个queue里。假设我们有三个系统,在出错的时候会写日志,并会把日志发送到RabbitMQ,路由键为:系统名.error。在RabbitMQ里我们想把所有的error信息放到一个queue里面,就可以使用如下的方式:
然后运行produce方法,向RabbitMQ发送消息:

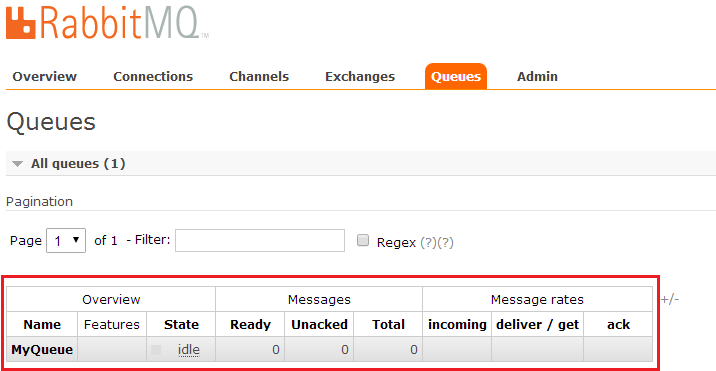
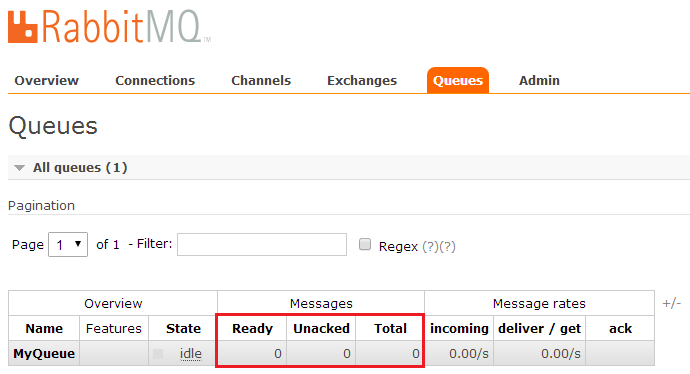
可以看到3条消息进入了同一个queue。最后运行consume来消费消息:

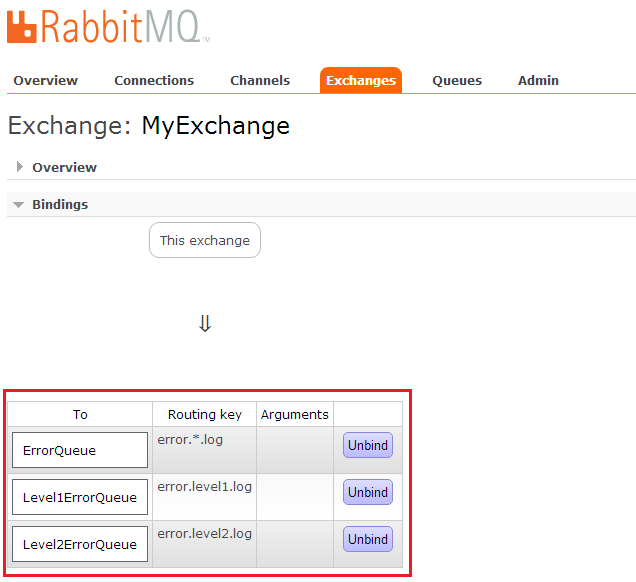
上面我们展示了如何让多个routing key路由到同一个queue。那有没有办法让一个routing key路由到多个queue呢?其实用topic类型的exchange是完全可以做到的。比如,我们的系统出错后会根据不同的错误级别生成error_levelX.log日志,我们在后台首先要把所有的error保存在一个总的queue里,然后再按level分别存放在不同的queue。我们把上面的代码修改下:

然后运行produce方法向RabbitMQ发送消息。可以看到消息只进入了ErrorQueue和Level1ErrorQueue两个队列:

最后运行consume来消费ErrorQueue队列里的消息:
到此为止,RabbitMQ常用的3类exchange全部介绍完了。对于topic有一点需要注意,就是它的匹配规则。topic的匹配规则是基于标识符的,用.分隔。比如error.level1.log中,error、level1和log都是标识符。
*只能匹配一个标识符,比如error.*.log只能匹配error.level1.log或者error.high.log,而不能匹配error.log或者error.level1.high.log。
#可以匹配0个或多个标识符,如error.#.log就可以匹配error.log或者error.level1.high.log。
本文出自 “銅鑼衛門” 博客,请务必保留此出处http://jaeger.blog.51cto.com/11064196/1763091
我们先来看看多个routing key如何路由到一个queue里。假设我们有三个系统,在出错的时候会写日志,并会把日志发送到RabbitMQ,路由键为:系统名.error。在RabbitMQ里我们想把所有的error信息放到一个queue里面,就可以使用如下的方式:
package com.jaeger.exchange.topic;

import java.io.IOException;
import java.util.concurrent.TimeoutException;

import org.junit.Test;

import com.rabbitmq.client.AMQP;
import com.rabbitmq.client.Channel;
import com.rabbitmq.client.Connection;
import com.rabbitmq.client.ConnectionFactory;
import com.rabbitmq.client.Consumer;
import com.rabbitmq.client.DefaultConsumer;
import com.rabbitmq.client.Envelope;

public class Producer {
private static final String MY_EXCHANGE_NAME = "MyExchange";
// 三个不同系统发送日志时使用的路由键
private static final String SYS1_ERROR_ROUTING_KEY = "sys1.error";
private static final String SYS2_ERROR_ROUTING_KEY = "sys2.error";
private static final String SYS3_ERROR_ROUTING_KEY = "sys3.error";
private static final String MY_QUEUE_NAME = "MyQueue";
private static final String TOPIC = "topic";
private static final String HOST = "172.19.64.21";
private static final String USER = "jaeger";
private static final String PASSWORD = "root";
private static final int PORT = 5672;

@Test
public void createExchangeAndQueue() throws IOException, TimeoutException {
ConnectionFactory connectionFactory = new ConnectionFactory();
connectionFactory.setHost(HOST);
connectionFactory.setUsername(USER);
connectionFactory.setPassword(PASSWORD);
connectionFactory.setPort(PORT);
Connection connection = connectionFactory.newConnection();
Channel channel = connection.createChannel();
// 创建一个topic类型的exchange
channel.exchangeDeclare(MY_EXCHANGE_NAME, TOPIC);
// 创建一个queue
channel.queueDeclare(MY_QUEUE_NAME, false, false, false, null);
// 创建一个routing key,把exchange和queue绑定到一起,但这里的routing key并不是一个
// 具体的名称,而是可以匹配所有以.error结尾的routing key
channel.queueBind(MY_QUEUE_NAME, MY_EXCHANGE_NAME, "*.error");
channel.close();
connection.close();
}

@Test
public void produce() throws IOException, TimeoutException {
ConnectionFactory connectionFactory = new ConnectionFactory();
connectionFactory.setHost(HOST);
connectionFactory.setUsername(USER);
connectionFactory.setPassword(PASSWORD);
connectionFactory.setPort(PORT);
Connection connection = connectionFactory.newConnection();
Channel channel = connection.createChannel();
String message = "Hello 世界!";
/*
向RabbitMQ发送消息。我们这里指定了exchange和3个不同的routing key的名称,RabbitMQ会去找有没有叫这个名称的exchange,
如果找到了又发现这个exchange是topic类型,就会尝试用指定的routing key去匹配exchange绑定的routing key,
凡是匹配到的routing key的queue都会收到消息。
*/
channel.basicPublish(MY_EXCHANGE_NAME, SYS1_ERROR_ROUTING_KEY, null, message.getBytes("utf-8"));
channel.basicPublish(MY_EXCHANGE_NAME, SYS2_ERROR_ROUTING_KEY, null, message.getBytes("utf-8"));
channel.basicPublish(MY_EXCHANGE_NAME, SYS3_ERROR_ROUTING_KEY, null, message.getBytes("utf-8"));
System.out.println("Sent '" + message + "'");
channel.close();
connection.close();
}

@Test
public void consume() throws IOException, TimeoutException, InterruptedException{
ConnectionFactory connectionFactory = new ConnectionFactory();
connectionFactory.setHost(HOST);
connectionFactory.setUsername(USER);
connectionFactory.setPassword(PASSWORD);
connectionFactory.setPort(PORT);
Connection connection = connectionFactory.newConnection();
Channel channel = connection.createChannel();
Consumer consumer = new DefaultConsumer(channel) {
@Override
public void handleDelivery(String consumerTag, Envelope envelope, AMQP.BasicProperties properties,
byte[] body) throws IOException {
String message = new String(body, "UTF-8");
System.out.println("Received '" + message + "'");
}
};
channel.basicConsume(MY_QUEUE_NAME, true, consumer);
Thread.sleep(1000);
}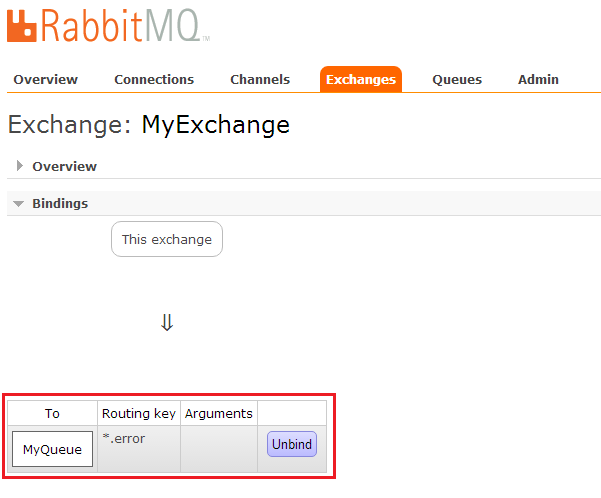
}运行createExchangeAndQueue,发现exchange上绑定了一个*.error的路由键:然后运行produce方法,向RabbitMQ发送消息:
可以看到3条消息进入了同一个queue。最后运行consume来消费消息:
上面我们展示了如何让多个routing key路由到同一个queue。那有没有办法让一个routing key路由到多个queue呢?其实用topic类型的exchange是完全可以做到的。比如,我们的系统出错后会根据不同的错误级别生成error_levelX.log日志,我们在后台首先要把所有的error保存在一个总的queue里,然后再按level分别存放在不同的queue。我们把上面的代码修改下:
package com.jaeger.exchange.topic;
import java.io.IOException;
import java.util.concurrent.TimeoutException;
import org.junit.Test;
import com.rabbitmq.client.AMQP;
import com.rabbitmq.client.Channel;
import com.rabbitmq.client.Connection;
import com.rabbitmq.client.ConnectionFactory;
import com.rabbitmq.client.Consumer;
import com.rabbitmq.client.DefaultConsumer;
import com.rabbitmq.client.Envelope;
public class Producer {
private static final String MY_EXCHANGE = "MyExchange";
private static final String SYS_ERROR_ROUTING_KEY = "error.level1.log";
private static final String SYS_ERROR_QUEUE = "ErrorQueue";
private static final String SYS_LEVEL1_ERROR_QUEUE = "Level1ErrorQueue";
private static final String SYS_LEVEL2_ERROR_QUEUE = "Level2ErrorQueue";
private static final String TOPIC = "topic";
private static final String HOST = "172.19.64.21";
private static final String USER = "jaeger";
private static final String PASSWORD = "root";
private static final int PORT = 5672;
@Test
public void createExchangeAndQueue() throws IOException, TimeoutException {
ConnectionFactory connectionFactory = new ConnectionFactory();
connectionFactory.setHost(HOST);
connectionFactory.setUsername(USER);
connectionFactory.setPassword(PASSWORD);
connectionFactory.setPort(PORT);
Connection connection = connectionFactory.newConnection();
Channel channel = connection.createChannel();
// 创建一个topic类型的exchange
channel.exchangeDeclare(MY_EXCHANGE, TOPIC);
// 创建三个存放error的queue
channel.queueDeclare(SYS_ERROR_QUEUE, false, false, false, null);
channel.queueDeclare(SYS_LEVEL1_ERROR_QUEUE, false, false, false, null);
channel.queueDeclare(SYS_LEVEL2_ERROR_QUEUE, false, false, false, null);
// 创建三个routing key,把exchange和三个queue绑定到一起
channel.queueBind(SYS_ERROR_QUEUE, MY_EXCHANGE, "error.*.log");
channel.queueBind(SYS_LEVEL1_ERROR_QUEUE, MY_EXCHANGE, "error.level1.log");
channel.queueBind(SYS_LEVEL2_ERROR_QUEUE, MY_EXCHANGE, "error.level2.log");
channel.close();
connection.close();
}
@Test
public void produce() throws IOException, TimeoutException {
ConnectionFactory connectionFactory = new ConnectionFactory();
connectionFactory.setHost(HOST);
connectionFactory.setUsername(USER);
connectionFactory.setPassword(PASSWORD);
connectionFactory.setPort(PORT);
Connection connection = connectionFactory.newConnection();
Channel channel = connection.createChannel();
String message = "Hello 世界!";
/*
向RabbitMQ发送消息。我们这里指定了exchange和一个routing key的名称,RabbitMQ会去找有没有叫这个名称的exchange,
如果找到了又发现这个exchange是topic类型,就会尝试用指定的routing key去匹配exchange绑定的routing key,
凡是匹配到的routing key的queue都会收到消息。
*/
channel.basicPublish(MY_EXCHANGE, SYS_ERROR_ROUTING_KEY, null, message.getBytes("utf-8"));
System.out.println("Sent '" + message + "'");
channel.close();
connection.close();
}
@Test
public void consume() throws IOException, TimeoutException, InterruptedException{
ConnectionFactory connectionFactory = new ConnectionFactory();
connectionFactory.setHost(HOST);
connectionFactory.setUsername(USER);
connectionFactory.setPassword(PASSWORD);
connectionFactory.setPort(PORT);
Connection connection = connectionFactory.newConnection();
Channel channel = connection.createChannel();
Consumer consumer = new DefaultConsumer(channel) {
@Override
public void handleDelivery(String consumerTag, Envelope envelope, AMQP.BasicProperties properties,
byte[] body) throws IOException {
String message = new String(body, "UTF-8");
System.out.println("Received '" + message + "'");
}
};
channel.basicConsume(SYS_ERROR_QUEUE, true, consumer);
Thread.sleep(1000);
}
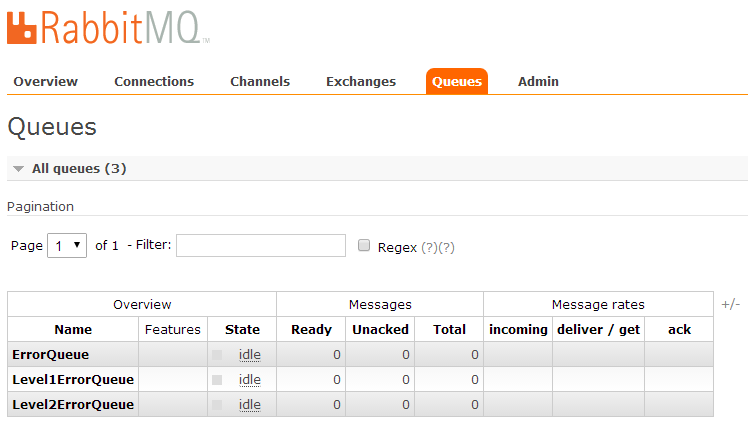
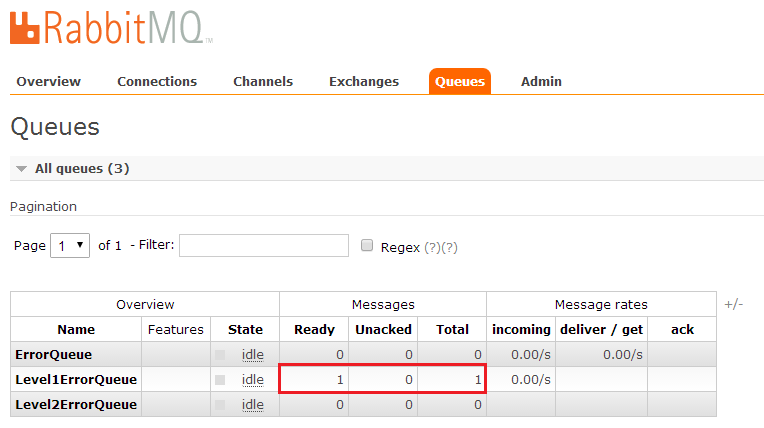
}运行createExchangeAndQueue方法,创建3个queue:然后运行produce方法向RabbitMQ发送消息。可以看到消息只进入了ErrorQueue和Level1ErrorQueue两个队列:
最后运行consume来消费ErrorQueue队列里的消息:
到此为止,RabbitMQ常用的3类exchange全部介绍完了。对于topic有一点需要注意,就是它的匹配规则。topic的匹配规则是基于标识符的,用.分隔。比如error.level1.log中,error、level1和log都是标识符。
*只能匹配一个标识符,比如error.*.log只能匹配error.level1.log或者error.high.log,而不能匹配error.log或者error.level1.high.log。
#可以匹配0个或多个标识符,如error.#.log就可以匹配error.log或者error.level1.high.log。
本文出自 “銅鑼衛門” 博客,请务必保留此出处http://jaeger.blog.51cto.com/11064196/1763091

相关文章推荐
- App工程结构搭建:几种常见Android代码架构分析
- linux_00_历史和主流分支
- 查看Linux是32位还是64位
- URL访问网站的整个过程
- Linux上SD/MMC卡驱动移植调试记录
- Servlet实现表单提交(MyEclipse10,Tomcat7.0,JDK1.7,)——Java Web练习(一)
- 1.1.3 Hadoop生态系统
- 独立模式的Hadoop环境搭建
- xshell工具或Linux系统中运行jar文件
- 近 100 个 Linux 常用命令大全
- linux下通过wget下载rpm包
- 配置Tomcat 输入ip可以直接访问项目的方法
- linux配置java环境变量
- Linux下使用命令行配置IPMI
- ffmpeg encoder optimization
- tomcat7用jndi配置数据源出现java.lang.NoSuchMethodException: org.apache.catalina.deploy.WebXml addResourceRef
- Frozen your python script with PyInstaller - Linux Instance
- Rsync初步实践
- tomcat内存溢出java.lang.OutOfMemoryError: Java heap space 的解决
- linux命令之mkdir touch