iOS开发之自定义UITableView
2016-04-08 13:01
525 查看
在上一篇中我记录的是iOS中的UITableView的使用,不过只有很简单的在单元格中显示图片和一个标签,这一篇记录的实现一个稍微复杂一点的UITableView,单元格里面的内容由我们自定义,而不是固定的一个图片一个标签,程序运行的效果如下:
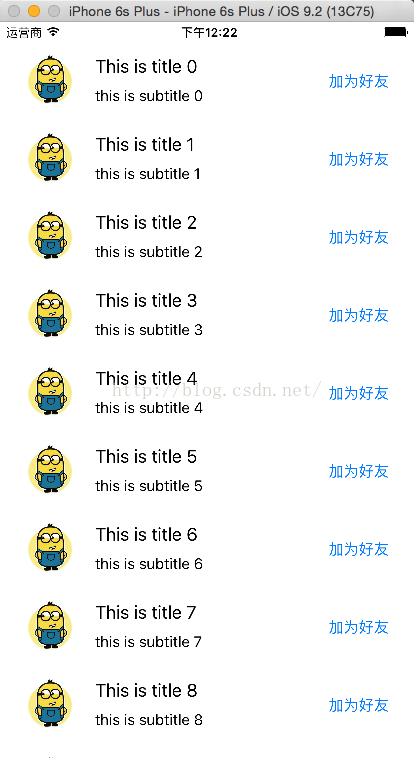
由于是用的iOS模拟器,所以UITableView中的分割线没有显示出来,如果用真机测试或者将模拟器放大的话,是可以显示分割线的。下面就一步步记录下实现这个自定义UITableView的过程:
1、打开Xcode新建一个项目,命名为:CustomTableView,选择Single View Application;
2、在Main.storyboard中拖入TableView控件,然后在TableView控件中拖入一个TableViewCell控件;
3、选中Main.storyboard中的TableViewCell,然后在Xcode右边的Size inspector中将TableViewCell的高度设置为78,如下图所示:

上图中需要注意的是,只有勾选了Custom复选框后,才能设置Row Height的高度。
4、向TableViewCell中拖入图片、标签、按钮等控件,如下图所示:
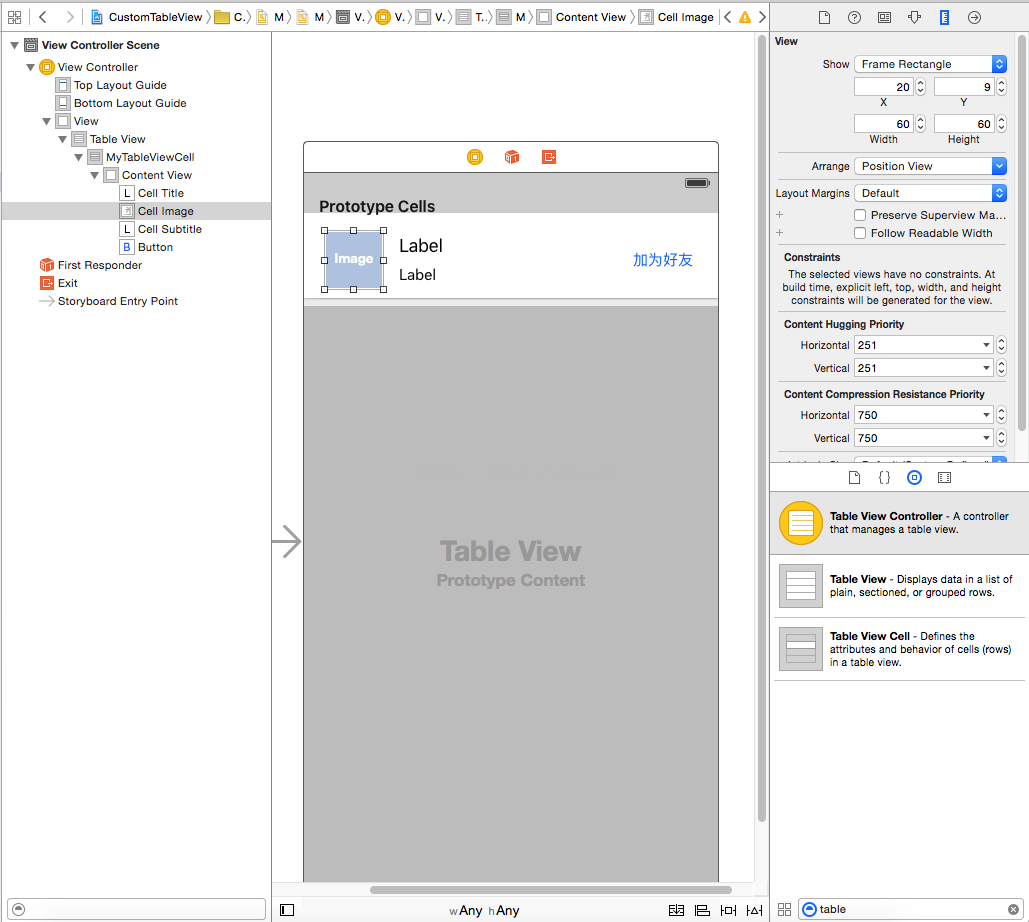
这里将TableViewCell中的Image大小设置为60*60,可以选中TableViewCell中的Image后,在Xcode右侧的Size inspector视图中设置。
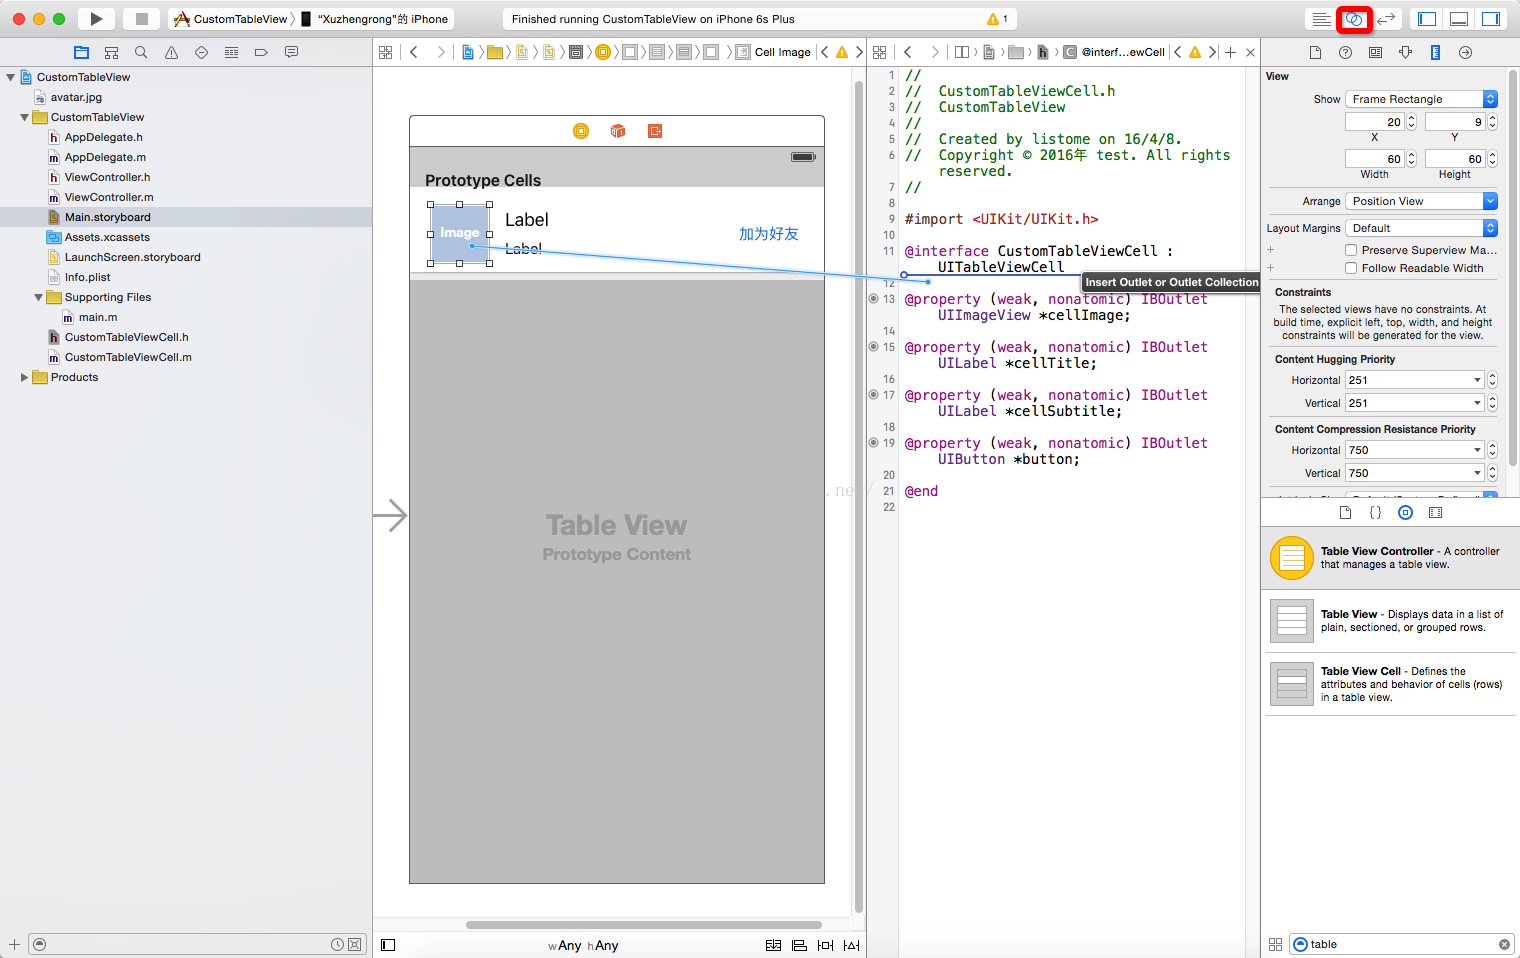
5、设计好了TableView中的单元格后,需要新建一个类代表这个单元格,在项目中新建一个类CustomTableViewCell继承自UITableViewCell,然后选中Main.storyboard中的单元格,在右边的Identity inspector视图中,将单元格的Class设置为我们创建的CustomTableViewCell,接着打开xcode的Assistant editor视图,Xcode中间部分就分成了两个视图在左边的视图打开Main.storyboard,在右边打开我们创建的CustomTableViewCell.h文件,然后使用鼠标右键,将TableViewCell中的控件拖拽到CustomTableViewCell.h文件中,这样就在CustomTableViewCell中创建了与单元格中的控件对应的成员变量,如下图所示:
6、给单元格设置一个字符串类型的标识符,选中Main.storyboard中的单元格,然后打开右侧的Attributes inspector视图,在Identifier属性中填入MyTableViewCell,如下图所示:
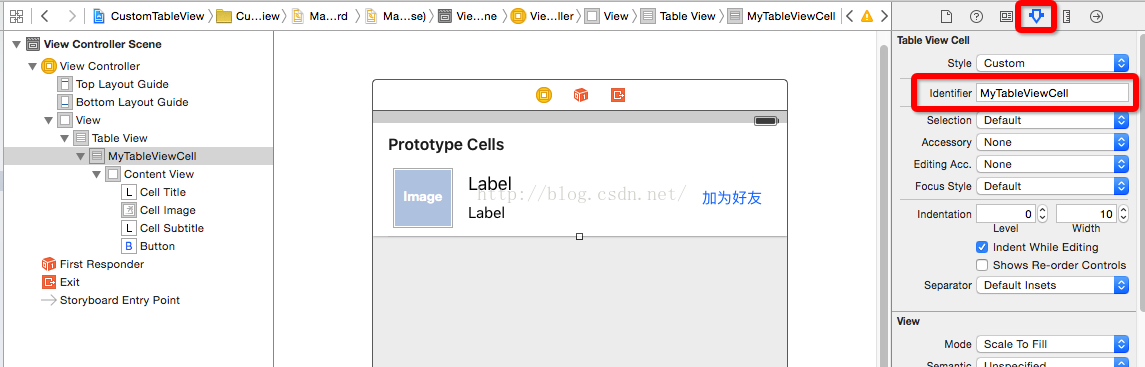
这里的标识符是我们任意指定的一个字符串,在后面的代码中还要用到,作用是唯一标识这个单元格
7、编写代码给TableView加上测试数据。
在ViewController.h文件中,我们需要实现UITableViewDelegate和UITableViewDataSource协议,如下代码所示:
#import <UIKit/UIKit.h>
@interface ViewController : UIViewController <UITableViewDataSource, UITableViewDelegate>
@property (weak, nonatomic) IBOutlet UITableView *tableView;
#pragma mark 装载UITableView中的测试数据,显示在单元格中的标题
@property (strong, nonatomic) NSMutableArray *titles;
#pragma mark 装载UITableView中的测试数据,显示在单元格中的子标题
@property (strong, nonatomic) NSMutableArray *subtitles;
@end然后在ViewController.m文件中,需要生成测试数据,并实现协议中的某些方法,ViewController.m文件的代码如下:
#import "ViewController.h"
#import "CustomTableViewCell.h"
@interface ViewController ()
@end
@implementation ViewController
static NSString *identifier = @"MyTableViewCell";
- (void)viewDidLoad {
[super viewDidLoad];
// 加载测试数据
[self loadData];
}
#pragma mark 加载测试数据
- (void)loadData {
//初始化两个数组
self.titles = [NSMutableArray array];
self.subtitles = [NSMutableArray array];
//给数组添加20条测试数据,用于显示到TableView上
for(int i = 0; i < 20; i++) {
[self.titles addObject:[NSString stringWithFormat:@"This is title %i", i]];
[self.subtitles addObject:[NSString stringWithFormat:@"this is subtitle %i", i]];
}
//给UITableView设置代理和数据源
self.tableView.delegate = self;
self.tableView.dataSource = self;
}
#pragma mark 该方法返回的是UITableView的行数
- (NSInteger)tableView:(UITableView *)tableView numberOfRowsInSection:(NSInteger)section {
return [self.titles count];
}
#pragma mark 该方法返回某一行的单元格
- (UITableViewCell *)tableView:(UITableView *)tableView cellForRowAtIndexPath:(NSIndexPath *)indexPath {
CustomTableViewCell *cell = [self.tableView dequeueReusableCellWithIdentifier:identifier forIndexPath:indexPath];
//在这里处理单元格中的图片和标签等控件
cell.cellImage.image = [UIImage imageNamed:@"avatar.jpg"];
cell.cellTitle.text = [self.titles objectAtIndex:indexPath.row];
cell.cellSubtitle.text = [self.subtitles objectAtIndex:indexPath.row];
return cell;
}
#pragma mark 该方法返回单元格的高度,需要跟我们在Size inspector视图中设置的高度保持一致
- (CGFloat)tableView:(UITableView *)tableView heightForRowAtIndexPath:(NSIndexPath *)indexPath {
return 78;
}
- (void)didReceiveMemoryWarning {
[super didReceiveMemoryWarning];
// Dispose of any resources that can be recreated.
}
@end上面的代码注释写得比较清楚了,到这里就可以运行程序了。
-----end-----
由于是用的iOS模拟器,所以UITableView中的分割线没有显示出来,如果用真机测试或者将模拟器放大的话,是可以显示分割线的。下面就一步步记录下实现这个自定义UITableView的过程:
1、打开Xcode新建一个项目,命名为:CustomTableView,选择Single View Application;
2、在Main.storyboard中拖入TableView控件,然后在TableView控件中拖入一个TableViewCell控件;
3、选中Main.storyboard中的TableViewCell,然后在Xcode右边的Size inspector中将TableViewCell的高度设置为78,如下图所示:
上图中需要注意的是,只有勾选了Custom复选框后,才能设置Row Height的高度。
4、向TableViewCell中拖入图片、标签、按钮等控件,如下图所示:
这里将TableViewCell中的Image大小设置为60*60,可以选中TableViewCell中的Image后,在Xcode右侧的Size inspector视图中设置。
5、设计好了TableView中的单元格后,需要新建一个类代表这个单元格,在项目中新建一个类CustomTableViewCell继承自UITableViewCell,然后选中Main.storyboard中的单元格,在右边的Identity inspector视图中,将单元格的Class设置为我们创建的CustomTableViewCell,接着打开xcode的Assistant editor视图,Xcode中间部分就分成了两个视图在左边的视图打开Main.storyboard,在右边打开我们创建的CustomTableViewCell.h文件,然后使用鼠标右键,将TableViewCell中的控件拖拽到CustomTableViewCell.h文件中,这样就在CustomTableViewCell中创建了与单元格中的控件对应的成员变量,如下图所示:
6、给单元格设置一个字符串类型的标识符,选中Main.storyboard中的单元格,然后打开右侧的Attributes inspector视图,在Identifier属性中填入MyTableViewCell,如下图所示:
这里的标识符是我们任意指定的一个字符串,在后面的代码中还要用到,作用是唯一标识这个单元格
7、编写代码给TableView加上测试数据。
在ViewController.h文件中,我们需要实现UITableViewDelegate和UITableViewDataSource协议,如下代码所示:
#import <UIKit/UIKit.h>
@interface ViewController : UIViewController <UITableViewDataSource, UITableViewDelegate>
@property (weak, nonatomic) IBOutlet UITableView *tableView;
#pragma mark 装载UITableView中的测试数据,显示在单元格中的标题
@property (strong, nonatomic) NSMutableArray *titles;
#pragma mark 装载UITableView中的测试数据,显示在单元格中的子标题
@property (strong, nonatomic) NSMutableArray *subtitles;
@end然后在ViewController.m文件中,需要生成测试数据,并实现协议中的某些方法,ViewController.m文件的代码如下:
#import "ViewController.h"
#import "CustomTableViewCell.h"
@interface ViewController ()
@end
@implementation ViewController
static NSString *identifier = @"MyTableViewCell";
- (void)viewDidLoad {
[super viewDidLoad];
// 加载测试数据
[self loadData];
}
#pragma mark 加载测试数据
- (void)loadData {
//初始化两个数组
self.titles = [NSMutableArray array];
self.subtitles = [NSMutableArray array];
//给数组添加20条测试数据,用于显示到TableView上
for(int i = 0; i < 20; i++) {
[self.titles addObject:[NSString stringWithFormat:@"This is title %i", i]];
[self.subtitles addObject:[NSString stringWithFormat:@"this is subtitle %i", i]];
}
//给UITableView设置代理和数据源
self.tableView.delegate = self;
self.tableView.dataSource = self;
}
#pragma mark 该方法返回的是UITableView的行数
- (NSInteger)tableView:(UITableView *)tableView numberOfRowsInSection:(NSInteger)section {
return [self.titles count];
}
#pragma mark 该方法返回某一行的单元格
- (UITableViewCell *)tableView:(UITableView *)tableView cellForRowAtIndexPath:(NSIndexPath *)indexPath {
CustomTableViewCell *cell = [self.tableView dequeueReusableCellWithIdentifier:identifier forIndexPath:indexPath];
//在这里处理单元格中的图片和标签等控件
cell.cellImage.image = [UIImage imageNamed:@"avatar.jpg"];
cell.cellTitle.text = [self.titles objectAtIndex:indexPath.row];
cell.cellSubtitle.text = [self.subtitles objectAtIndex:indexPath.row];
return cell;
}
#pragma mark 该方法返回单元格的高度,需要跟我们在Size inspector视图中设置的高度保持一致
- (CGFloat)tableView:(UITableView *)tableView heightForRowAtIndexPath:(NSIndexPath *)indexPath {
return 78;
}
- (void)didReceiveMemoryWarning {
[super didReceiveMemoryWarning];
// Dispose of any resources that can be recreated.
}
@end上面的代码注释写得比较清楚了,到这里就可以运行程序了。
-----end-----

相关文章推荐
- 峰回路转,Firefox 浏览器即将重返 iOS 平台
- 峰回路转,Firefox 浏览器即将重返 iOS 平台
- 不可修补的 iOS 漏洞可能导致 iPhone 4s 到 iPhone X 永久越狱
- iOS 12.4 系统遭黑客破解,漏洞危及数百万用户
- 每日安全资讯:NSO,一家专业入侵 iPhone 的神秘公司
- [转][源代码]Comex公布JailbreakMe 3.0源代码
- flex 控件的重要属性
- Delphi控件ListView的属性及使用方法详解
- web下载的ActiveX控件自动更新
- WinForm实现按名称递归查找控件的方法
- C#中父窗口和子窗口之间控件互操作实例
- Android编程之Button控件用法实例分析
- Android控件之CheckBox、RadioButton用法实例分析
- 在Android开发中使用自定义组合控件的例子
- MFC中动态创建控件以及事件响应实现方法
- WinForm自定义函数FindControl实现按名称查找控件
- Android控件之ProgressBar用法实例分析
- WinForm拖拽控件生成副本的解决方法
- ASP.NET动态添加用户控件的方法