IOS 开发-UI初级 (一)
2016-04-06 20:28
597 查看
今天开始学习IOS 初级UI,把学习过程记录于此。
创建一个全新的工程:
File -> new ->Project ->IOS -> Application -> single View Application
工程的目录结构如下:
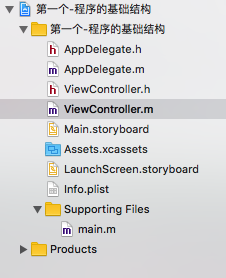
其中:
AppDelegate.h和AppDelegate.m主要处理应用的声明周期事件。
ViewController则主要负责视图的处理。
Main.storyboard是程序的界面设计文件。
Assets.xcassets用于存放资源文件。
LaunchScreen.storyboard是应用启动时短暂展示的启动画面的设计文件。
info.plist保存一些工程的信息
main.m是程序的入口
Products里放的是编译之后产生的.app文件
单击mian.m打开文件内容如下:
打开AppDelegate.m在每一个方法里都加入
输出当前正在执行的方法名称
点击左上角的三角按钮运行程序,此时会打开模拟器。当程序运行起来之后会发现终端里输出了下图中的前两行数据,按下Command+shift+H返回桌面,然后再点击应用图标返回应用,程序都会输出执行的响应生命周期方法。
运行结果如下图:

这些方法很容根据它们的名字判断出它们会在何时执行。
接下来,开始编写我们的第一个IOS程序。实现的效果如下:
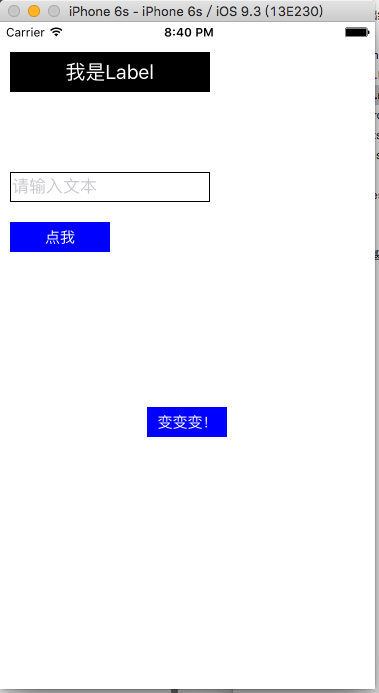
在文本框里输入文字,点击文本框下的按钮里面的内容就会显示在上方的Label中。
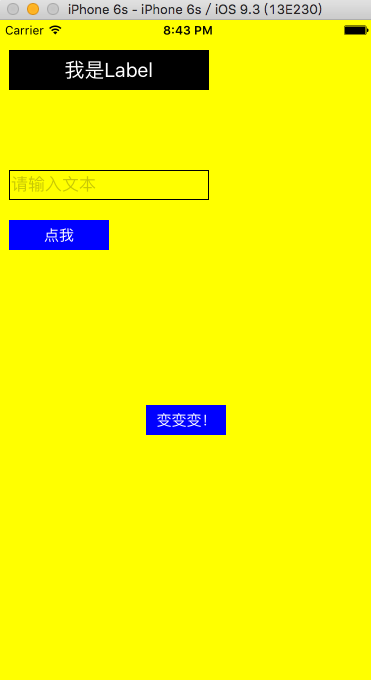
点击第二个按钮,整个界面的颜色都会改变。
由于是初学,所以不使用storyboard来进行界面设计,我们在Viewcontroller.m里手动添加每一个控件。
打开ViewController.m
完成以下代码:
以上是代码的全部。
其中应该注意的是:
CGRect不是一个类而是一个结构体,可以通过CGRectMake函数方便的获取一个CGRect
同理CGPoint也不是类
CGRectGetWidth可以获取一个CGRect的宽,传入ViewController的view.bounds可以获取屏幕的宽度:
UIButton的初始化方法有很多,可根据需求自由选自
暂时就这些了。
自己写的第一篇长博客,希望是一个好的开始吧(*^_^*)
创建一个全新的工程:
File -> new ->Project ->IOS -> Application -> single View Application
工程的目录结构如下:
其中:
AppDelegate.h和AppDelegate.m主要处理应用的声明周期事件。
ViewController则主要负责视图的处理。
Main.storyboard是程序的界面设计文件。
Assets.xcassets用于存放资源文件。
LaunchScreen.storyboard是应用启动时短暂展示的启动画面的设计文件。
info.plist保存一些工程的信息
main.m是程序的入口
Products里放的是编译之后产生的.app文件
单击mian.m打开文件内容如下:
#import <UIKit/UIKit.h>
#import "AppDelegate.h"

int main(int argc, char * argv[]) {
@autoreleasepool {
return UIApplicationMain(argc, argv, nil, NSStringFromClass([AppDelegate class]));
/**
*程序调用 UIApplicationMain() 函数创建应用程序对象。(该对象是单例)。
*为应用程序指定委托AppDelegate , 该委托负责处理程序生命周期事件。
*/
}
}
打开AppDelegate.m在每一个方法里都加入
NSLog(@"%@",NSStringFromSelector(_cmd));
输出当前正在执行的方法名称
点击左上角的三角按钮运行程序,此时会打开模拟器。当程序运行起来之后会发现终端里输出了下图中的前两行数据,按下Command+shift+H返回桌面,然后再点击应用图标返回应用,程序都会输出执行的响应生命周期方法。
运行结果如下图:
这些方法很容根据它们的名字判断出它们会在何时执行。
接下来,开始编写我们的第一个IOS程序。实现的效果如下:
在文本框里输入文字,点击文本框下的按钮里面的内容就会显示在上方的Label中。
点击第二个按钮,整个界面的颜色都会改变。
由于是初学,所以不使用storyboard来进行界面设计,我们在Viewcontroller.m里手动添加每一个控件。
打开ViewController.m
完成以下代码:
//
//  ViewController.m
//  第一个-程序的基础结构
//
//  Created by rimi on 16/4/6.
//  Copyright © 2016年 BlueSky. All rights reserved.
//

#import "ViewController.h"

@interface ViewController ()
//标签
@property(nonatomic,strong)UILabel * label;
@property(nonatomic,strong)UITextField * textField;//声明称属性对外公开控件,也可以不声明为属性
@end

@implementation ViewController

- (void)viewDidLoad {//视图加载成功时执行
//iphone 6s 开发分辨率=375 x 667 iPhone 6s真实分辨率为 375*2 x 667*2
[super viewDidLoad];
_label=[[UILabel alloc] initWithFrame:CGRectMake(10, 30, 200, 40)];
//初始化一个UILabel控件 传入的参数为CGRect,它代表一块矩形区域,参数依次为 x, y, with, height
_label.backgroundColor=[UIColor blackColor];//设置label的背景颜色
_label.text=@"我是Label";//设置label中显示的文字
_label.textColor=[UIColor whiteColor];//设置label中文字的颜色
_label.textAlignment=NSTextAlignmentCenter;//设置文字的对齐方式
_label.font=[UIFont systemFontOfSize:20];//设置字体大小
_textField=[[UITextField alloc]initWithFrame:CGRectMake(10, 150, 200, 30)];//初始化一个文本框
_textField.borderStyle=UITextBorderStyleLine;//设置文本框样式
_textField.placeholder=@"请输入文本";//显示在没有输入时的提示文字
[self.view addSubview:_label];
[self.view addSubview:_textField];//把上面初始化的空间添加到ViewController的主视图中
UIButton * button =[UIButton buttonWithType: UIButtonTypeSystem];//初始化一个按钮
button.frame=CGRectMake(10, 200, 100, 30);
button.backgroundColor=[UIColor blueColor];
button.tintColor=[UIColor whiteColor];//设置按钮文字的颜色
[button addTarget:self action:@selector(onButtonClick:) forControlEvents:UIControlEventTouchUpInside];//为按钮添加响应点击的方法,由于以前习惯于Android的命名方式所以这里使用了onButtonClick
[button setTitle:@"点我" forState:UIControlStateNormal];
button.tag=10086;//为button设置tag,它是这个button的唯一身份标识,相当于And
4000
roid中控件的id
[self.view addSubview:button];//将Button添加进主视图
UIButton * changeColor =[UIButton buttonWithType:UIButtonTypeSystem];//再初始化一个按钮
changeColor.bounds=CGRectMake(0,0, 80, 30);
changeColor.center=CGPointMake(CGRectGetWidth(self.view.bounds)/2, 400);
[changeColor setTitle:@"变变变!" forState:UIControlStateNormal];
changeColor.backgroundColor=[UIColor blueColor];
changeColor.tintColor=[UIColor whiteColor];
[changeColor addTarget:self action:@selector(changecolor:) forControlEvents:UIControlEventTouchUpInside];
[self.view addSubview:changeColor];
// Do any additional setup after loading the view, typically from a nib.
}
- (void)didReceiveMemoryWarning {//收到内存警告时执行
[super didReceiveMemoryWarning];
// Dispose of any resources that can be recreated.
}
-(void)changecolor:(UIButton *)sender{//响应点击事件的这个方法需要程序员自己写,返回值为空,参数为UIButton 这里的sender就是用户点击的那个按钮
if ([self.view.backgroundColor isEqual:[UIColor greenColor]]) {//切换主视图的背景颜色
self.view.backgroundColor=[UIColor yellowColor];
}
else self.view.backgroundColor=[UIColor greenColor];
}

-(void)onButtonClick:(UIButton * )sender{
NSLog(@"点击了按钮!%@",sender.currentTitle);
//通过tag获取Button对象;
UIButton * button=[self.view viewWithTag:10086];//可以通过父视图的ViewWithTag方法传入Tag值获取子视图的对象
if (button==sender) {
NSLog(@"hahahah");//通过这段代码可以看出从参数传入的对象就是用户点击的那个按钮的对象,传入的对象和我们通过Tag找到的对象是同一个对象
}
if (_textField.text.length>0) {//将文本框的文字赋值给Label
_label.text=_textField.text;
[_textField resignFirstResponder];
}
}
@end
以上是代码的全部。
其中应该注意的是:
CGRect不是一个类而是一个结构体,可以通过CGRectMake函数方便的获取一个CGRect
同理CGPoint也不是类
CGRectGetWidth可以获取一个CGRect的宽,传入ViewController的view.bounds可以获取屏幕的宽度:
CGRectGetWidth(self.view.bounds)
UIButton的初始化方法有很多,可根据需求自由选自
暂时就这些了。
自己写的第一篇长博客,希望是一个好的开始吧(*^_^*)

相关文章推荐
- GUI - Web前端开发框架
- 峰回路转,Firefox 浏览器即将重返 iOS 平台
- 峰回路转,Firefox 浏览器即将重返 iOS 平台
- 评价ui设计作品好坏的八个标准(界面/交互设计研究)
- 不可修补的 iOS 漏洞可能导致 iPhone 4s 到 iPhone X 永久越狱
- iOS 12.4 系统遭黑客破解,漏洞危及数百万用户
- 每日安全资讯:NSO,一家专业入侵 iPhone 的神秘公司
- [转][源代码]Comex公布JailbreakMe 3.0源代码
- 为Yahoo! UI Extensions Grid增加内置的可编辑器
- Cocos2d-x UI开发之文本类使用实例
- 谈谈对jquery ui tabs 的理解
- 在IE 浏览器中使用 jquery的fadeIn() 效果 英文字符字体加粗
- UI Events 用户界面事件
- jquery UI Datepicker时间控件的使用方法(基础版)
- Hallo.js基于jQuery UI所见即所得的Web编辑器
- 基于jQuery UI CSS Framework开发Widget的经验
- jquery ui 1.7 ui.tabs 动态添加与关闭(按钮关闭+双击关闭)
- jQuery UI设置固定日期选择特效代码分享
- Jquery ajax 同步阻塞引起的UI线程阻塞问题