Android TabHost使用
2016-04-06 15:41
513 查看
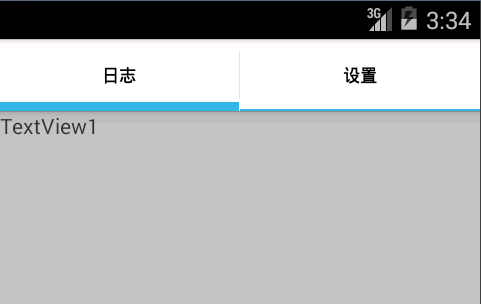
TabHost是Android中自带的选项卡控件,效果图如下:
主布局文件
核心代码:
两个子页面很简单,两个Activity以及对应布局。
主布局文件
<RelativeLayout xmlns:android="http://schemas.android.com/apk/res/android"
xmlns:tools="http://schemas.android.com/tools"
android:layout_width="match_parent"
android:layout_height="match_parent"
tools:context=".MainActivity" >

<TabHost
android:id="@+id/tabhost"
android:layout_width="match_parent"
android:layout_height="match_parent"
android:layout_alignParentLeft="true"
android:layout_alignParentTop="true" >

<LinearLayout
android:layout_width="match_parent"
android:layout_height="match_parent"
android:orientation="vertical" >

<TabWidget
android:id="@android:id/tabs"
android:layout_width="match_parent"
android:layout_height="wrap_content" >
</TabWidget>

<FrameLayout
android:id="@android:id/tabcontent"
android:layout_width="match_parent"
android:layout_height="match_parent"
android:orientation="vertical" >

<LinearLayout
android:id="@+id/tab1"
android:layout_width="match_parent"
android:layout_height="match_parent"
android:orientation="vertical" >
</LinearLayout>

<LinearLayout
android:id="@+id/tab2"
android:layout_width="match_parent"
android:layout_height="match_parent"
android:orientation="vertical">
</LinearLayout>

<LinearLayout
android:id="@+id/tab3"
android:layout_width="match_parent"
android:layout_height="match_parent"
android:orientation="vertical" >
</LinearLayout>
</FrameLayout>
</LinearLayout>
</TabHost>

</RelativeLayout>
核心代码:
package com.tabhost;

import android.os.Bundle;
import android.app.Activity;
import android.app.ActivityGroup;
import android.content.Intent;
import android.view.Menu;
import android.view.Window;
import android.widget.TabHost;

public class MainActivity extends ActivityGroup {

private TabHost mTabHost;

protected void onCreate(Bundle savedInstanceState) {
super.onCreate(savedInstanceState);
this.requestWindowFeature(Window.FEATURE_NO_TITLE);
setContentView(R.layout.activity_main);
// 设置TabHost
initTabs();
}

private void initTabs() {
mTabHost = (TabHost) findViewById(R.id.tabhost);
mTabHost.setup(this.getLocalActivityManager());
// 添加日志列表的tab,注意下面的setContent中的代码.是这个需求实现的关键
mTabHost.addTab(mTabHost.newTabSpec("tab_log")
.setIndicator("日志",getResources().getDrawable(R.drawable.login_bg))
.setContent(new Intent(this, LogActivity.class)));

// 添加应用设置的tab,注意下面的setContent中的代码.是这个需求实现的关键
mTabHost.addTab(mTabHost.newTabSpec("tab_setting")
.setIndicator("设置",getResources().getDrawable(R.drawable.ic_launcher))
.setContent(new Intent(this, SettingActivity.class)));
mTabHost.setCurrentTab(1);
}

}
两个子页面很简单,两个Activity以及对应布局。

相关文章推荐
- android DPI 计算 及单位换算
- 独立项目 - 1 - 整体规划
- Android GridView添加网格线
- android笔记2——关于图片缓存的一些注意事项
- Android开发系列通信篇之EventBus
- android按下返回键弹出提示框的几种做法!
- android中File文件写的实现
- android 6.0 logcat机制(一)java层写log,logd接受log
- 聊天软件登陆界面的实现
- Android官方开发文档Training系列课程中文版:分享简单数据之添加简单的分享行为
- Android之图片缓存
- mac下android studio安装plantuml插件
- Android 修改默认输入法
- 你应该知道的那些Android小经验
- android Webview基本配置以及android与js交互
- android 各国语言对应的缩写
- Android Fragment 你应该知道的一切
- Android开发小技巧系列之避免连续点击
- Android之Notification的多种用法
- Android沉浸式状态栏兼容4.4手机的实现