swift表格(UITableView)介绍与基础实现
2016-04-06 10:13
549 查看
1、表视图(UITableView)
UITableView 继承自 UIScrollView。一个表视图可以由多个分段(section)组成,每个分段可以有一个头和尾。很多情况下表视图只有一个分段,而且不显示头尾。表视图本身也可以有一个头(显示在第一个分段之前)和一个尾(显示在最后一个分段之后)。一个表视图的整体元素结构示意图如下: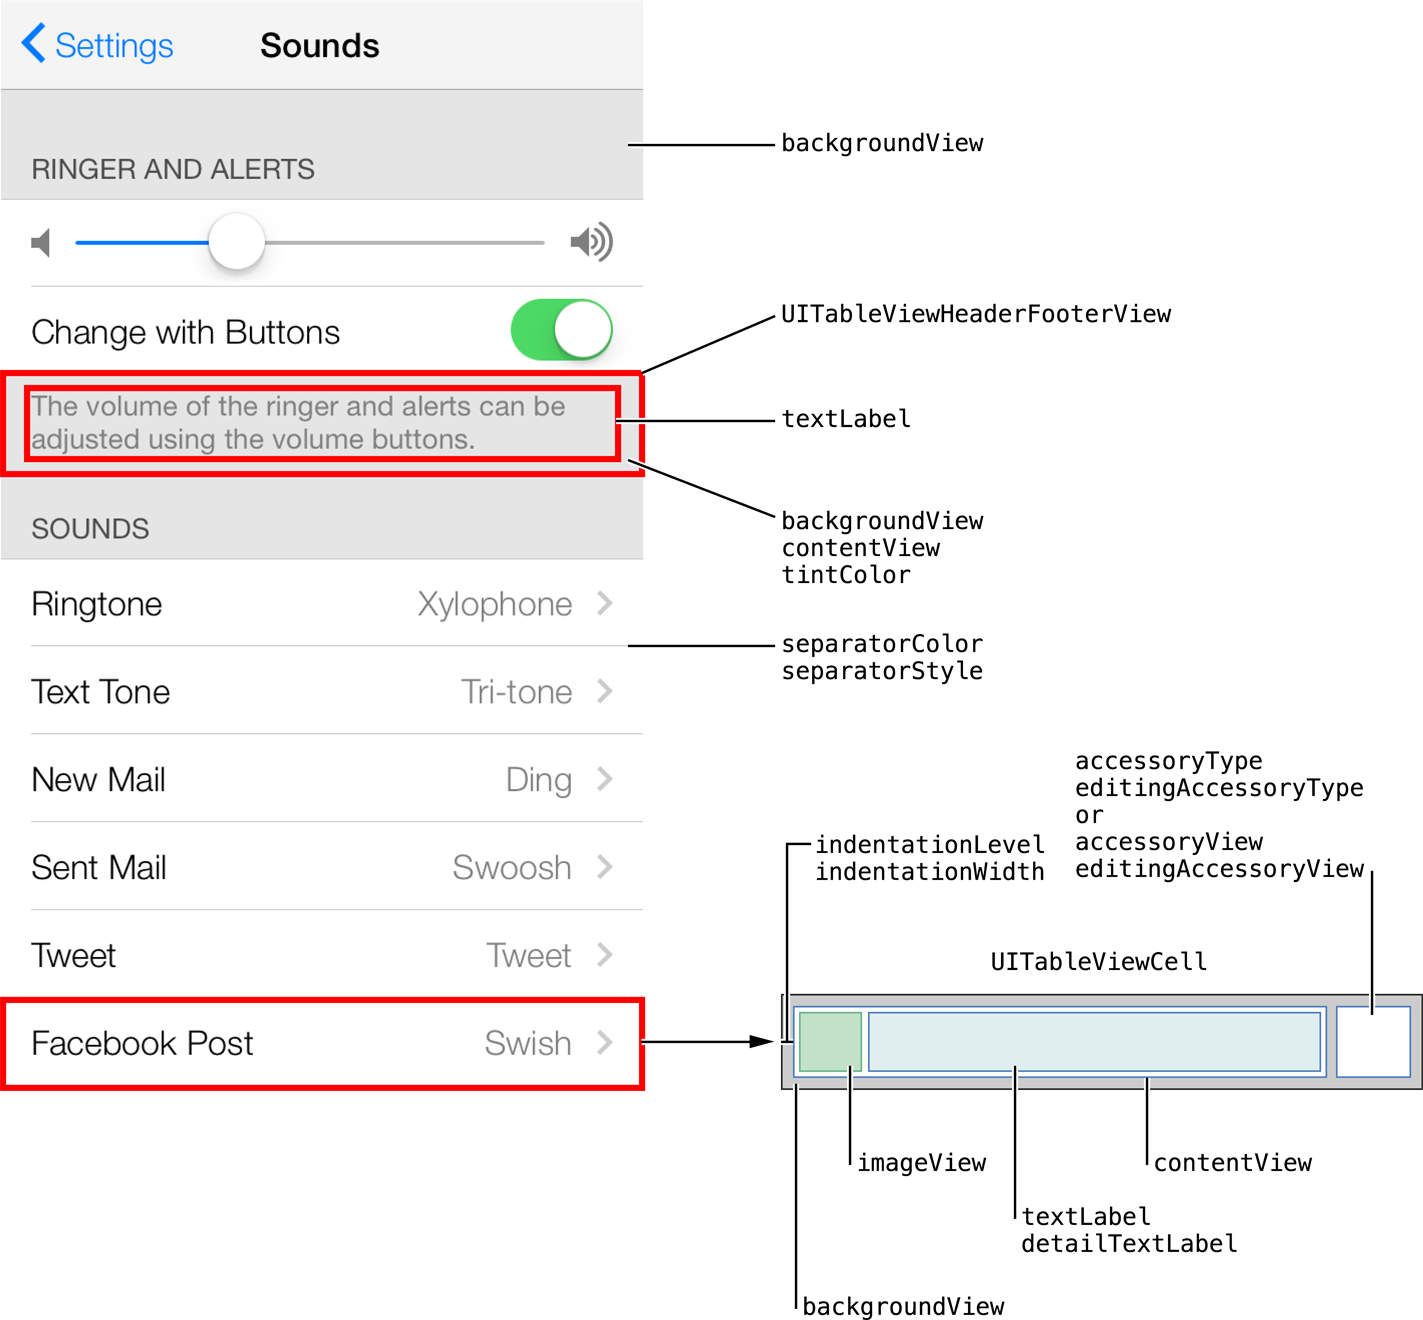
(1)表视图风格
UITableView 有以下两种样式(UITableViewStyle)
Plain(普通样式)
Grouped(分组样式)
上述两种风格本质无区别,只是显示样式不同而已。
(2)表视图分割线(Separator)
分割线有以下三种样式(UITableViewCellSeparatorStyle)
None(无分割线)
SingleLine(单线条)
SingleLineEtched(带浮雕效果的线条)
(3)表视图单元格(Cell)
Cell 有以下四种显示样式(UITableViewCellStyle)
Default(左侧显示 textLabel,不显示 detailTextLabel,最左边可选显示 imageView)
Value1(左侧显示 textLabel,右侧显示 detailTextLabel,最左边可选显示 imageView)
Value2(左侧依次显示 textLabel、detailTextLabel,最左边可选显示 imageView)
Subtitle(左侧上方显示 textLabel,左侧下方显示 detailTextLabel,最左边可选显示 imageView)
Cell 有以下四种选中样式(UITableViewCellSelectionStyle)
None
Blue
Gray
Default
(4)附属图形(Accessory)
单元格的 Accessory 有以下五种样式(UITableViewCellAccessoryType)
None(无附属图形)
DisclosureIndicator(小箭头)
DetailDisclosureButton(详细信息按钮 + 指向右侧的箭头)
Checkmark(勾号)
DetailButton(详细信息按钮)
2、UITableView 协议
iOS 遵循 MVC 设计模式,很多操作通过代理和外界沟通,UITableView 同理实现了以下两种协议:UITableViewDelegate
UITableViewDataSource
以下是官方分别对这两个协议的原文介绍:
UITableViewDelegate has no required methods. It declares methods that allow the delegate to modify visible aspects of the table view, manage selections, support an accessory view, and support editing of individual rows in a table.
UITableViewDataSource has two required methods. The "numberOfRowsInSection" method tells the table view how many rows to display in each section, and the "cellForRowAtIndexPath" method provides the cell to display for each row in the table. Optional methods
allow the data source to configure multiple sections, provide headers and/or footers, and support adding, removing, and reordering rows in the table.
3、表视图控制器(UITableViewController)
很多时候一个 UIViewController 中只有一个 UITableView,因此苹果官方为了方便大家开发直接提供了一个 UITableViewController,这个控制器实现了 UITableView 数据源和代理协议,内部定义了一个 tableView 属性供外部访问,同时自动铺满整个屏幕、自动伸缩以方便我们的开发。如果需要用到 Table View 是不充满全屏的话,我们应该使用UIViewController 自己创建和维护 UITableView。
从一定层面上来说,除了方便、自动设置委托和数据源属性外,表视图控制器没有任何其它的优势。
4、UITableView 基础示例
//
//  ViewController.swift
//  UITableViewSample-Simple
//
//  Created by jinnchang on 15/5/21.
//  Copyright (c) 2015年 Jinn Chang. All rights reserved.
//

import UIKit

class ViewController: UIViewController, UITableViewDelegate, UITableViewDataSource {

var tableView: UITableView!

override func viewDidLoad() {
super.viewDidLoad()
// Do any additional setup after loading the view, typically from a nib.

tableView = UITableView(frame: CGRectMake(0, 20, self.view.frame.size.width, self.view.frame.size.height), style: UITableViewStyle.Plain)
tableView.delegate = self
tableView.dataSource = self

self.view.addSubview(tableView)
}

override func didReceiveMemoryWarning() {
super.didReceiveMemoryWarning()
// Dispose of any resources that can be recreated.
}

// 设置每个分段对应的行数
func tableView(tableView: UITableView, numberOfRowsInSection section: Int) -> Int {
return 20
}

// 设置每行的具体内容
func tableView(tableView: UITableView, cellForRowAtIndexPath indexPath: NSIndexPath) -> UITableViewCell {
var cell = tableView.dequeueReusableCellWithIdentifier("cell") as? UITableViewCell
if(cell == nil) {
cell = UITableViewCell(style: UITableViewCellStyle.Default, reuseIdentifier: "cell")
}
cell!.textLabel?.text = "\(indexPath.row + 1)"
return cell!
}

}
GitHub 上项目地址:https://github.com/jinnchang/SwiftSamples/tree/master/UITableViewSample-Simple
相关文章推荐
- Swift - 使用CoreLocation实现定位(经纬度、海拔、速度、距离等)
- Swift快速入门之开始吧
- Swift学习笔记之基本数据类型-元组
- Swift学习笔记之基本数据类型-整形,浮点,布尔
- swift语言使用正则表达式验证字符串是否为邮箱,手机号,身份证号
- swift基本语法(总结提炼版)之012 swift 之闭包
- swift之UITableView的使用
- swift二级表视图apple文档翻译版
- 《Swift入门》关于Swift
- Swift语言中问号 ? 和 感叹号 ! 的作用
- Swift之高德地图自定义标注弹出气泡样式
- swift 类似九宫格
- swift实现ios类似微信输入框跟随键盘弹出的效果
- Swift-处理耗时操作
- Swift三种操作:is、as?和as!
- 自学Swift之打印输出
- IOS开发Swift用NSURLSessionDownloadTask实现后台下载
- Swift-归档解归档
- OC与swift的相互调用
- Swift UIStepper/UISegmentedControl/UIActivityIndicatorView