Contiki移植到STM32F103VC
2016-04-04 09:43
253 查看
Contiki系统简单介绍
Contiki 是一个小型的,开源的,极易移植的多任务电脑操作系统。它专门设计以适用于一系列的内存受限的网络系统,包括从8位电脑到微型控制器的嵌入系统。它的名字来自于托尔·海尔达尔的康提基号。Contiki只需几kilobyte的代码和几百字节的内存就能提供多任务环境和内建TCP/IP支持。
Contiki官网下载V2.5源码http://www.contiki-os.org/
contiki-2.5源码中,stm32移植的相关内容分散在两个文件夹中,第一, cpu\arm\stm32f103,这个文件夹存放的stm32移植的相关文件;第二,platform\stm32test,这个文件夹中有一个不是那么完整的例子。
在Contiki-2.5源码文件夹下用到的有:\core\sys\下面所有文件,\cpu\arm\stm32f103\clock.c文件主要修改,\platform\stm32test\contiki-conf.h文件。
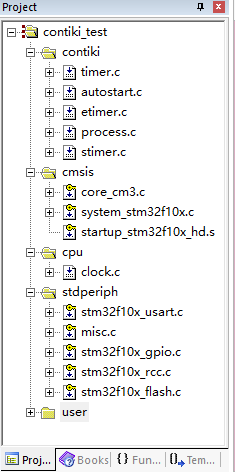
STM32工程下主要用到的文件:core_cm3.c,system_stm32f10x.c,startup_stm32f10_hd.s,stm32f10x_it.c
例子代码如下:
#include <stm32f10x_map.h>
#include <stm32f10x_dma.h>
#include <gpio.h>
#include <nvic.h>
#include <stdint.h>
#include <stdio.h>
#include <debug-uart.h>
#include <sys/process.h>
#include <sys/procinit.h>
#include <etimer.h>
#include <sys/autostart.h>
#include <clock.h>
unsigned int idle_count = 0;
int
main()
{
dbg_setup_uart();
printf("Initialising\n");

clock_init();
process_init();
process_start(&etimer_process, NULL);
autostart_start(autostart_processes);
printf("Processes running\n");
while(1) {
do {
} while(process_run() > 0);
idle_count++;
/* Idle! */
/* Stop processor clock */
/* asm("wfi"::); */
}
return 0;
}
Contiki 系统移植步骤
在cpu\arm\stm32f10\clock.c文件中添加:#include "stm32f10x.h"
在cpu\arm\stm32f10\clock.c文件中删除:
#include <stm32f10x_map.h>
#include <nvic.h>
修改void clock_init()函数为:
void
clock_init()
{
//every msec got int
if (SysTick_Config(SystemCoreClock / CLOCK_SECOND))
{
/* Capture error */
while (1);
}
}
修改void SysTick_Handler(void)函数为:
void SysTick_Handler(void)
{
current_clock++;
if(etimer_pending() && etimer_next_expiration_time() <= current_clock) {
etimer_request_poll();
/* printf("%d,%d\n", clock_time(),etimer_next_expiration_time   ()); */

}
if (--second_countdown == 0) {
current_seconds++;
second_countdown = CLOCK_SECOND;
}
}
在keil中新建一个工程,就可以了。
新建测试工程主函数:
#include <stdint.h>
#include <stdio.h>
#include <debug-uart.h>
#include <sys/process.h>
#include <sys/procinit.h>
#include <sys/etimer.h>
#include <sys/autostart.h>
#include <sys/clock.h>
#include "bsp.h"

PROCESS_NAME(led_process);

AUTOSTART_PROCESSES(&led_process);

void
main()
{
bsp_init();

dbg_setup_uart();
printf("Initialising...\r\n");

clock_init();
process_init();
process_start(&etimer_process, NULL);
autostart_start(autostart_processes);
printf("Processes running...\r\n");
while(1) {
do {
} while(process_run() > 0);
}
//return 0;
}
一个点灯的线程:
#include <stdio.h>
#include <sys/process.h>
#include <sys/etimer.h>
#include <sys/stimer.h>
#include "bsp.h"

PROCESS(led_process, "Led");
PROCESS_THREAD(led_process,ev,data){
static struct etimer et;
PROCESS_BEGIN();

etimer_set(&et, (CLOCK_SECOND*2));
while(1){
printf("-->Waiting .......\r\n");
//PROCESS_WAIT_EVENT_UNTIL(etimer_expired(&et));
PROCESS_WAIT_EVENT_UNTIL(ev==PROCESS_EVENT_TIMER);
printf("-->Timer Got.\r\n");
bsp_led_toggle(BOARD_LED_ALL);
etimer_reset(&et);
}
PROCESS_END();
}
以下图片为keil工程结构的参考

相关文章推荐
- VS中智能提示无法显示中文
- JS中的prototype
- Android中添加监听回调接口的方法
- 二进制位模式从左到右翻转后的值
- vc 中各种类型的数据相互转换
- R语言笔记 plot 画图
- R语言构建配对交易量化模型
- SpringMvc国际化
- R语言构建配对交易量化模型
- git的 .gitignore 如何配置(git如何忽略、追踪文件)
- 分享个软件开发方面好的资源网站
- 黑马程序猿_7K面试题之交通灯系统
- hdu 5655 CA Loves Stick
- Dubbo高级篇_04_FastDFS分布式文件系统的安装与使用
- 最全批处理.bat
- MathType转Latex公式
- 3d 绘制中的光照
- 简单的折半查找
- Java中静态变量,成员变量,局部变量,常量
- 以对象的方式来访问xml数据表(二)