分布式开发 (负载均衡图解)
2016-04-03 19:42
369 查看
Nginx反向代理以及负载均衡配置
平常我们做系统开发一般分为以下两种:第一种:企业中的管理系统:如 CRM (客户关系管理系统), OA (办公自动化系统), ERP (企业资源管理系统)
它们的特点就是:公司内部员工使用,所以访问量小。(老板要求开发速度快,所以一般用拖控件的形式进行开发,不要求性能)所以根本就用不到分布式开发,一台数据库服务器,一台IIS服务器就搞定了。
第二种:互联网系统 ,如:京东,淘宝,百度
它们的特点就是:访问量大,服务器性能要求非常高。(服务器多)
要求:分布式系统开发(服务器集群,即:很多台服务器集群在一起,来运行同一个业务)
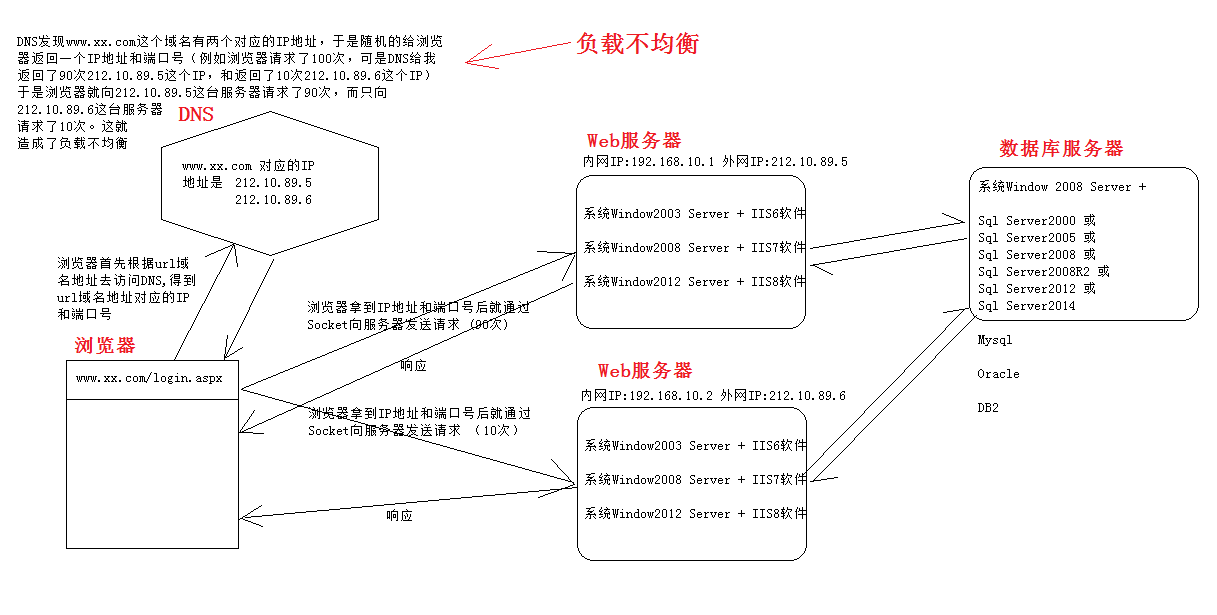
负载不均衡图解
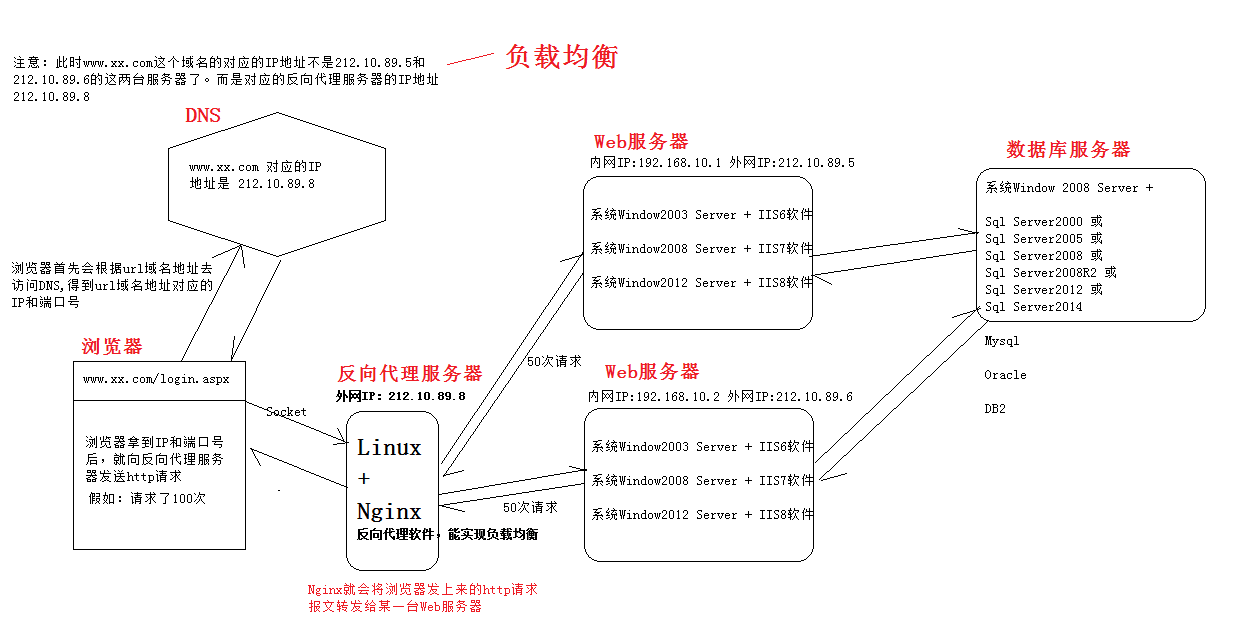
负载均衡图解
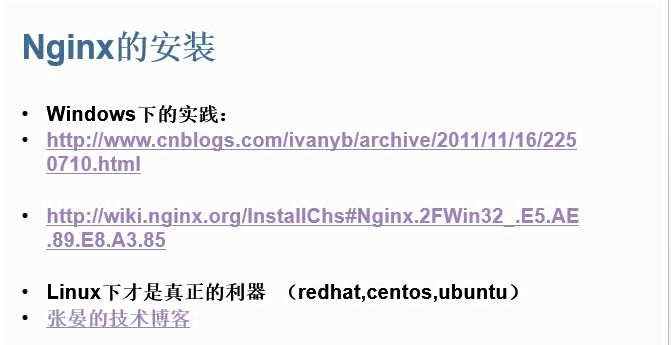
现在我们去下载Nginx这个软件(我们下载windows版)在Windows下来配置一个Nginx (注意:Nginx不能放在中文目录下),配置好后,“以管理员身份运行”nginx.exe文件
windows下的Nginx是这样的
然后我们打开conf文件夹,找到nginx.conf 文件,用记事本打开。然后进行配置
#user  nobody;
worker_processes  1;#配置当前服务器的CPU核心数(你CPU是几核的就平配几,当然也可以配1,数字不能大于你服务器CPU的核心数,服务器一般是8核的,有的是16核的,核数越高,性能就越高)

#error_log  logs/error.log;
#error_log  logs/error.log  notice;
#error_log  logs/error.log  info;

#pid        logs/nginx.pid;

events {
worker_connections  1024;
}

#http表示它要监听的请求
http {
include       mime.types;
default_type  application/octet-stream;

#log_format  main  '$remote_addr - $remote_user [$time_local] "$request" '
#                  '$status $body_bytes_sent "$http_referer" '
#                  '"$http_user_agent" "$http_x_forwarded_for"';

#access_log  logs/access.log  main;

sendfile        on;
#tcp_nopush     on;

#keepalive_timeout  0;
keepalive_timeout  65;

#gzip  on;

upstream testsite{   #这个upstream节点是我自己新建的,upstream这个名字是固定的,mytestsite这个名字可以随便自己取
#此处配置要做负载均衡的服务器的Ip和端口号。(其实就是你的服务器的IP和端口号)
server 127.0.0.1:8081;     #我们也可以给这台服务器加个权重,可以这样配 server 127.0.0.1:8081 weight=2
server 127.0.0.1:8082;     #我们也可以给这台服务器加个权重,可以这样配 server 127.0.0.1:8082 weight=1 这样的话8081这个网站请求2次后才交给8082这台服务器
}

server {
listen       8083;   #Nginx监听的端口号
server_name  localhost; #Nginx监听的IP地址,将来一定是要将这个localhost替换为你网站的外网IP或域名,localhost和127.0.0.1仅仅是本机测试使用(即:做反向代理服务器的IP地址,其实就是安装Nginx这个软件的这台电脑(服务器)的IP地址)

#charset koi8-r;

#access_log  logs/host.access.log  main;

location / {
proxy_pass http://testsite;  #注意:testsite是程序员自己定义的upstream后面的名字,同时要加上http://前缀,否则报错
root   html;
index  index.html index.htm;
}

#error_page  404              /404.html;

# redirect server error pages to the static page /50x.html
#
error_page   500 502 503 504  /50x.html;
location = /50x.html {
root   html;
}

# proxy the PHP scripts to Apache listening on 127.0.0.1:80
#
#location ~ \.php$ {
#    proxy_pass   http://127.0.0.1; #}

# pass the PHP scripts to FastCGI server listening on 127.0.0.1:9000
#
#location ~ \.php$ {
#    root           html;
#    fastcgi_pass   127.0.0.1:9000;
#    fastcgi_index  index.php;
#    fastcgi_param  SCRIPT_FILENAME  /scripts$fastcgi_script_name;
#    include        fastcgi_params;
#}

# deny access to .htaccess files, if Apache's document root
# concurs with nginx's one
#
#location ~ /\.ht {
#    deny  all;
#}
}

# another virtual host using mix of IP-, name-, and port-based configuration
#
#server {
#    listen       8000;
#    listen       somename:8080;
#    server_name  somename  alias  another.alias;

#    location / {
#        root   html;
#        index  index.html index.htm;
#    }
#}

# HTTPS server
#
#server {
#    listen       443 ssl;
#    server_name  localhost;

#    ssl_certificate      cert.pem;
#    ssl_certificate_key  cert.key;

#    ssl_session_cache    shared:SSL:1m;
#    ssl_session_timeout  5m;

#    ssl_ciphers  HIGH:!aNULL:!MD5;
#    ssl_prefer_server_ciphers  on;

#    location / {
#        root   html;
#        index  index.html index.htm;
#    }
#}

}
现在我们就来做测试:
发布两个一模一样的网站,网站1 下面有一个index.html文件。 网站2下面有一个index.html的文件
网站1的地址是 http://localhost:8081/index.html
网站2的地址是 http://localhost:8082/index.html
反向代理服务器,Nginx 监听的端口号是8083 它监听的IP地址是localhost 或者说是127.0.0.1
那么我们现在就可以用 http://localhost:8083/index.html这个IP地址来访问网站1,和网站2下面的index.html文件。(如果向这个地址请求了100次,那么肯定有50次是向网站1请求的,另外50次是向网站2请求的。这样就达到了负载均衡的目的。)

相关文章推荐
- 解决vbe6ext.olb不能被加载 内存溢出 问题
- Hadoop 生态系统中个项目的简介
- GCD使用
- 逆元的各种求解方式
- UI基础 - UITabBarController
- 第五周进度条
- Calendar Provider
- ZooKeeper
- jquery实现ajax实例
- 小题目泛做
- php笔记之表单验证
- Gridland
- MapReduce读/写RCFile文件
- 基本的排序算法
- hdu5656 dp
- _stdcall与_cdecl区别
- 2假动作,数据缓冲,CCEaseExponential,CCEaseElastic,CCEaseBounce,CCCallFunc,funcNCallBack,funcNDCallBack,funcO
- Linux第六次实验——谢飞帆
- linux 总线 设备 驱动
- linux 总线 设备 驱动