ImageLoader加载显示图片解析
2016-03-25 11:50
405 查看
之前讲的都是Universal ImageLoader的缓存部分解析,现在到了最核心的部分就是ImageLoader的加载显示图片部分的代码。
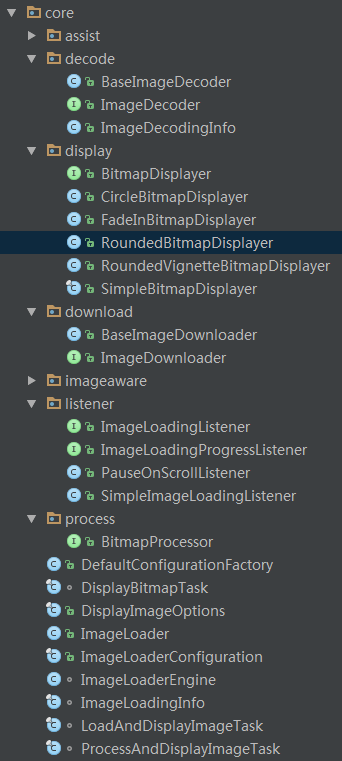
首先来看代码结构。

首先我要说的是ImageLoaderConfiguration类,这里面用到了Builder模式,我们在一般在引入了Universal ImageLoader类库之后,会以这种形式初始化ImageLoader类库的。
这里的config就是ImageLoaderConfiguration里面的Builder类,里面涉及到许多关于ImageLoader的属性,最后config会调用build()方法,跟进去看看。
这段代码我们可以看出,假如我们的Builder的一些属性值没有设置,那么系统会默认为我们设置默认属性。ImageLoader会调用init(ImageLoaderConfiguration config)方法,接下来看看这个init方法怎么使用ImageLoaderConfig.
这个init方法,没什么东西,这要就是生成了ImageLoaderEngine,跟进去看看。
这里面初始化了3个Executor,taskDistributor,taskExecutor,taskExecutorForCachedImages。
这里可以看到taskDistributor负责开启加载任务,taskExecutorForCachedImages负责执行硬盘缓存过的LoadAndDisplayImageTask,如果没有硬盘缓存过taskExecutor将负责接下来的任务。
还有ImageLoaderEngine还有一个作用就是负责暂停,终止或者继续图片加载显示任务,以及展现当前网络状态。
现在跳到ImageLoader的displayImage方法。
我们可以看到第14行是对displayImage方法中uri为空时候的处理,如果设置了uri为空时候的图片就显示出来。代码第35行反应的是如果从内存缓存里面获取Bitmap可用,这里会使用ProcessAndDisplayImageTask,而如果内存缓存里面获取的Bitmap不可用,就会使用LoadAndDisplayImageTask,相对于ProcessAndDisplayImageTask,LoadAndDisplayImageTask有加载过程。
这是LoadAndDisplayImageTask实现的Runnable接口,在第3行的waitIfPaused(),使用的就是前面介绍的ImageLoadEngine的getPauseLock().wait()方法实现暂停加载图片功能。第19行代码里面调用了tryLoadImage()方法,就是在MemoryCache里面找到的Bitmap不可用的情况下调用tryLoadImage()方法,该方法会从硬盘缓存里面获取Bitmap如果不可用则会从网上获取Bitmap的iostream,保存在硬盘缓存中,然后再从硬盘缓存中获取Bitmap。
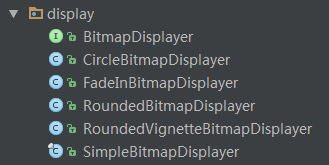
最后我想提一下BitmapDisplayer,ImageLoader类库加载图片最后要显示的时候都会调用BitmapDisplayer的display方法。这些在LoadAndDisplayImageTask和ProcessAndDisplayImageTask类中有所体现,值得一提的是,作者为我们实现了一些不同的BitmapDisplayer以满足不同的需求。

CircleBitmapDisplayer实现了加载的图片呈现出圆形效果,FadeInBitmapDisplayer实现了图片以淡入淡出效果显示,RoundedBitmapDisplayer实现了图片圆角显示效果,RoundedVignetteBitmapDisplayer实现了图片圆角Vignette小时效果,以及SimpleBitmapDisplayer实现最基本的图片不带任何特殊效果的显示效果。
总体来说,Universal ImageLoader的类库可扩展性很好,如上所述的那么些BitmapDisplayer,如果读者感兴趣也可以自己实现自定义的图片加载显示效果。
首先来看代码结构。

首先我要说的是ImageLoaderConfiguration类,这里面用到了Builder模式,我们在一般在引入了Universal ImageLoader类库之后,会以这种形式初始化ImageLoader类库的。
public static void initImageLoader(Context context) {
// This configuration tuning is custom. You can tune every option, you may tune some of them,
// or you can create default configuration by
//  ImageLoaderConfiguration.createDefault(this);
// method.
ImageLoaderConfiguration.Builder config = new ImageLoaderConfiguration.Builder(context);
config.threadPriority(Thread.NORM_PRIORITY - 2);
config.denyCacheImageMultipleSizesInMemory();
config.diskCacheFileNameGenerator(new Md5FileNameGenerator());
config.diskCacheSize(50 * 1024 * 1024); // 50 MiB
config.tasksProcessingOrder(QueueProcessingType.LIFO);
config.writeDebugLogs(); // Remove for release app

// Initialize ImageLoader with configuration.
ImageLoader.getInstance().init(config.build());
}
这里的config就是ImageLoaderConfiguration里面的Builder类,里面涉及到许多关于ImageLoader的属性,最后config会调用build()方法,跟进去看看。
/** Builds configured {@link ImageLoaderConfiguration} object */
public ImageLoaderConfiguration build() {
initEmptyFieldsWithDefaultValues();
return new ImageLoaderConfiguration(this);
}

private void initEmptyFieldsWithDefaultValues() {
if (taskExecutor == null) {
taskExecutor = DefaultConfigurationFactory
.createExecutor(threadPoolSize, threadPriority, tasksProcessingType);
} else {
customExecutor = true;
}
if (taskExecutorForCachedImages == null) {
taskExecutorForCachedImages = DefaultConfigurationFactory
.createExecutor(threadPoolSize, threadPriority, tasksProcessingType);
} else {
customExecutorForCachedImages = true;
}
if (diskCache == null) {
if (diskCacheFileNameGenerator == null) {
diskCacheFileNameGenerator = DefaultConfigurationFactory.createFileNameGenerator();
}
diskCache = DefaultConfigurationFactory
.createDiskCache(context, diskCacheFileNameGenerator, diskCacheSize, diskCacheFileCount);
}
if (memoryCache == null) {
memoryCache = DefaultConfigurationFactory.createMemoryCache(context, memoryCacheSize);
}
if (denyCacheImageMultipleSizesInMemory) {
memoryCache = new FuzzyKeyMemoryCache(memoryCache, MemoryCacheUtils.createFuzzyKeyComparator());
}
if (downloader == null) {
downloader = DefaultConfigurationFactory.createImageDownloader(context);
}
if (decoder == null) {
decoder = DefaultConfigurationFactory.createImageDecoder(writeLogs);
}
if (defaultDisplayImageOptions == null) {
defaultDisplayImageOptions = DisplayImageOptions.createSimple();
}
}
这段代码我们可以看出,假如我们的Builder的一些属性值没有设置,那么系统会默认为我们设置默认属性。ImageLoader会调用init(ImageLoaderConfiguration config)方法,接下来看看这个init方法怎么使用ImageLoaderConfig.
/**
* Initializes ImageLoader instance with configuration.<br />
* If configurations was set before ( {@link #isInited()} == true) then this method does nothing.<br />
* To force initialization with new configuration you should {@linkplain #destroy() destroy ImageLoader} at first.
*
* @param configuration {@linkplain ImageLoaderConfiguration ImageLoader configuration}
* @throws IllegalArgumentException if <b>configuration</b> parameter is null
*/
public synchronized void init(ImageLoaderConfiguration configuration) {
if (configuration == null) {
throw new IllegalArgumentException(ERROR_INIT_CONFIG_WITH_NULL);
}
if (this.configuration == null) {
L.d(LOG_INIT_CONFIG);
engine = new ImageLoaderEngine(configuration);
this.configuration = configuration;
} else {
L.w(WARNING_RE_INIT_CONFIG);
}
}
这个init方法,没什么东西,这要就是生成了ImageLoaderEngine,跟进去看看。
ImageLoaderEngine(ImageLoaderConfiguration configuration) {
this.configuration = configuration;

taskExecutor = configuration.taskExecutor;
taskExecutorForCachedImages = configuration.taskExecutorForCachedImages;

taskDistributor = DefaultConfigurationFactory.createTaskDistributor();
}
这里面初始化了3个Executor,taskDistributor,taskExecutor,taskExecutorForCachedImages。
/** Submits task to execution pool */
void submit(final LoadAndDisplayImageTask task) {
taskDistributor.execute(new Runnable() {
@Override
public void run() {
File image = configuration.diskCache.get(task.getLoadingUri());
boolean isImageCachedOnDisk = image != null && image.exists();
initExecutorsIfNeed();
if (isImageCachedOnDisk) {
taskExecutorForCachedImages.execute(task);
} else {
taskExecutor.execute(task);
}
}
});
}

/** Submits task to execution pool */
void submit(ProcessAndDisplayImageTask task) {
initExecutorsIfNeed();
taskExecutorForCachedImages.execute(task);
}
这里可以看到taskDistributor负责开启加载任务,taskExecutorForCachedImages负责执行硬盘缓存过的LoadAndDisplayImageTask,如果没有硬盘缓存过taskExecutor将负责接下来的任务。
还有ImageLoaderEngine还有一个作用就是负责暂停,终止或者继续图片加载显示任务,以及展现当前网络状态。
现在跳到ImageLoader的displayImage方法。
public void displayImage(String uri, ImageAware imageAware, DisplayImageOptions options,
ImageSize targetSize, ImageLoadingListener listener, ImageLoadingProgressListener progressListener) {
checkConfiguration();
if (imageAware == null) {
throw new IllegalArgumentException(ERROR_WRONG_ARGUMENTS);
}
if (listener == null) {
listener = defaultListener;
}
if (options == null) {
options = configuration.defaultDisplayImageOptions;
}

if (TextUtils.isEmpty(uri)) {
engine.cancelDisplayTaskFor(imageAware);
listener.onLoadingStarted(uri, imageAware.getWrappedView());
if (options.shouldShowImageForEmptyUri()) {
imageAware.setImageDrawable(options.getImageForEmptyUri(configuration.resources));
} else {
imageAware.setImageDrawable(null);
}
listener.onLoadingComplete(uri, imageAware.getWrappedView(), null);
return;
}

if (targetSize == null) {
targetSize = ImageSizeUtils.defineTargetSizeForView(imageAware, configuration.getMaxImageSize());
}
String memoryCacheKey = MemoryCacheUtils.generateKey(uri, targetSize);
engine.prepareDisplayTaskFor(imageAware, memoryCacheKey);

listener.onLoadingStarted(uri, imageAware.getWrappedView());

Bitmap bmp = configuration.memoryCache.get(memoryCacheKey);
if (bmp != null && !bmp.isRecycled()) {
L.d(LOG_LOAD_IMAGE_FROM_MEMORY_CACHE, memoryCacheKey);

if (options.shouldPostProcess()) {
ImageLoadingInfo imageLoadingInfo = new ImageLoadingInfo(uri, imageAware, targetSize, memoryCacheKey,
options, listener, progressListener, engine.getLockForUri(uri));
ProcessAndDisplayImageTask displayTask = new ProcessAndDisplayImageTask(engine, bmp, imageLoadingInfo,
defineHandler(options));
if (options.isSyncLoading()) {
displayTask.run();
} else {
engine.submit(displayTask);
}
} else {
options.getDisplayer().display(bmp, imageAware, LoadedFrom.MEMORY_CACHE);
listener.onLoadingComplete(uri, imageAware.getWrappedView(), bmp);
}
} else {
if (options.shouldShowImageOnLoading()) {
imageAware.setImageDrawable(options.getImageOnLoading(configuration.resources));
} else if (options.isResetViewBeforeLoading()) {
imageAware.setImageDrawable(null);
}

ImageLoadingInfo imageLoadingInfo = new ImageLoadingInfo(uri, imageAware, targetSize, memoryCacheKey,
options, listener, progressListener, engine.getLockForUri(uri));
LoadAndDisplayImageTask displayTask = new LoadAndDisplayImageTask(engine, imageLoadingInfo,
defineHandler(options));
if (options.isSyncLoading()) {
displayTask.run();
} else {
engine.submit(displayTask);
}
}
}
我们可以看到第14行是对displayImage方法中uri为空时候的处理,如果设置了uri为空时候的图片就显示出来。代码第35行反应的是如果从内存缓存里面获取Bitmap可用,这里会使用ProcessAndDisplayImageTask,而如果内存缓存里面获取的Bitmap不可用,就会使用LoadAndDisplayImageTask,相对于ProcessAndDisplayImageTask,LoadAndDisplayImageTask有加载过程。
@Override
public void run() {
if (waitIfPaused()) return;
if (delayIfNeed()) return;

ReentrantLock loadFromUriLock = imageLoadingInfo.loadFromUriLock;
L.d(LOG_START_DISPLAY_IMAGE_TASK, memoryCacheKey);
if (loadFromUriLock.isLocked()) {
L.d(LOG_WAITING_FOR_IMAGE_LOADED, memoryCacheKey);
}

loadFromUriLock.lock();
Bitmap bmp;
try {
checkTaskNotActual();

bmp = configuration.memoryCache.get(memoryCacheKey);
if (bmp == null || bmp.isRecycled()) {
bmp = tryLoadBitmap();
if (bmp == null) return; // listener callback already was fired

checkTaskNotActual();
checkTaskInterrupted();

if (options.shouldPreProcess()) {
L.d(LOG_PREPROCESS_IMAGE, memoryCacheKey);
bmp = options.getPreProcessor().process(bmp);
if (bmp == null) {
L.e(ERROR_PRE_PROCESSOR_NULL, memoryCacheKey);
}
}

if (bmp != null && options.isCacheInMemory()) {
L.d(LOG_CACHE_IMAGE_IN_MEMORY, memoryCacheKey);
configuration.memoryCache.put(memoryCacheKey, bmp);
}
} else {
loadedFrom = LoadedFrom.MEMORY_CACHE;
L.d(LOG_GET_IMAGE_FROM_MEMORY_CACHE_AFTER_WAITING, memoryCacheKey);
}

if (bmp != null && options.shouldPostProcess()) {
L.d(LOG_POSTPROCESS_IMAGE, memoryCacheKey);
bmp = options.getPostProcessor().process(bmp);
if (bmp == null) {
L.e(ERROR_POST_PROCESSOR_NULL, memoryCacheKey);
}
}
checkTaskNotActual();
checkTaskInterrupted();
} catch (TaskCancelledException e) {
fireCancelEvent();
return;
} finally {
loadFromUriLock.unlock();
}

DisplayBitmapTask displayBitmapTask = new DisplayBitmapTask(bmp, imageLoadingInfo, engine, loadedFrom);
runTask(displayBitmapTask, syncLoading, handler, engine);
}
这是LoadAndDisplayImageTask实现的Runnable接口,在第3行的waitIfPaused(),使用的就是前面介绍的ImageLoadEngine的getPauseLock().wait()方法实现暂停加载图片功能。第19行代码里面调用了tryLoadImage()方法,就是在MemoryCache里面找到的Bitmap不可用的情况下调用tryLoadImage()方法,该方法会从硬盘缓存里面获取Bitmap如果不可用则会从网上获取Bitmap的iostream,保存在硬盘缓存中,然后再从硬盘缓存中获取Bitmap。
最后我想提一下BitmapDisplayer,ImageLoader类库加载图片最后要显示的时候都会调用BitmapDisplayer的display方法。这些在LoadAndDisplayImageTask和ProcessAndDisplayImageTask类中有所体现,值得一提的是,作者为我们实现了一些不同的BitmapDisplayer以满足不同的需求。

CircleBitmapDisplayer实现了加载的图片呈现出圆形效果,FadeInBitmapDisplayer实现了图片以淡入淡出效果显示,RoundedBitmapDisplayer实现了图片圆角显示效果,RoundedVignetteBitmapDisplayer实现了图片圆角Vignette小时效果,以及SimpleBitmapDisplayer实现最基本的图片不带任何特殊效果的显示效果。
总体来说,Universal ImageLoader的类库可扩展性很好,如上所述的那么些BitmapDisplayer,如果读者感兴趣也可以自己实现自定义的图片加载显示效果。
相关文章推荐
- html5生成柱状图(条形图)效果的实例代码
- Sphinx+Mysql+中文分词安装-实现中文全文搜索
- 血性的民族,才能得到别人的尊重。
- android之状态栏提醒(Notification、NotificationManager)
- 分组加密的四种模式
- apache commons fileupload 1.3.1(一)Mime部分
- 瑞柏匡丞:悦享音乐,仅仅在互联
- C++第3次上机实验
- 栈中的“先进后出,后进先出”是什么意思?
- Linux开发初步
- 2016年腾讯实习生校园招聘-电面
- HashMap与HashTable解读(二)
- Java DES 3DES AES Base64加密
- Linux下简单安装MongoDB
- C++学习笔记之vector类详解
- Python 正则表达式的剖析
- jQuery支持mobile的全屏水平横向翻页效果
- iOS NSString中的搜索方法rangeOfString
- 数据导入问题:[Err] [Imp] 1406 - Data too long for column 'linkman' at row 20 [Err] [Imp] INSERT INTO `excel_eprinfo`
- web压测,webbench安装测试
