Junit使用教程(二)
2016-03-22 08:55
561 查看
二、核心——断言
断言是编写测试用例的核心实现方式,即期望值是多少,测试的结果是多少,以此来判断测试是否通过。
1. 断言核心方法
2. 示例
[java] view
plain copy
package test;
import static org.hamcrest.CoreMatchers.*;
import static org.junit.Assert.*;
import java.util.Arrays;
import org.hamcrest.core.CombinableMatcher;
import org.junit.Test;
public class AssertTests {
@Test
public void testAssertArrayEquals() {
byte[] expected = "trial".getBytes();
byte[] actual = "trial".getBytes();
org.junit.Assert.assertArrayEquals("failure - byte arrays not same", expected, actual);
}
@Test
public void testAssertEquals() {
org.junit.Assert.assertEquals("failure - strings not same", 5l, 5l);
}
@Test
public void testAssertFalse() {
org.junit.Assert.assertFalse("failure - should be false", false);
}
@Test
public void testAssertNotNull() {
org.junit.Assert.assertNotNull("should not be null", new Object());
}
@Test
public void testAssertNotSame() {
org.junit.Assert.assertNotSame("should not be same Object", new Object(), new Object());
}
@Test
public void testAssertNull() {
org.junit.Assert.assertNull("should be null", null);
}
@Test
public void testAssertSame() {
Integer aNumber = Integer.valueOf(768);
org.junit.Assert.assertSame("should be same", aNumber, aNumber);
}
// JUnit Matchers assertThat
@Test
public void testAssertThatBothContainsString() {
org.junit.Assert.assertThat("albumen", both(containsString("a")).and(containsString("b")));
}
@Test
public void testAssertThathasItemsContainsString() {
org.junit.Assert.assertThat(Arrays.asList("one", "two", "three"), hasItems("one", "three"));
}
@Test
public void testAssertThatEveryItemContainsString() {
org.junit.Assert.assertThat(Arrays.asList(new String[] { "fun", "ban", "net" }), everyItem(containsString("n")));
}
// Core Hamcrest Matchers with assertThat
@Test
public void testAssertThatHamcrestCoreMatchers() {
assertThat("good", allOf(equalTo("good"), startsWith("good")));
assertThat("good", not(allOf(equalTo("bad"), equalTo("good"))));
assertThat("good", anyOf(equalTo("bad"), equalTo("good")));
assertThat(7, not(CombinableMatcher.<Integer> either(equalTo(3)).or(equalTo(4))));
assertThat(new Object(), not(sameInstance(new Object())));
}
}
三、核心——注解
1. 说明
2. 执行顺序
一个测试类单元测试的执行顺序为:
@BeforeClass –> @Before –> @Test –> @After –> @AfterClass
每一个测试方法的调用顺序为:
@Before –> @Test –> @After
3. 示例
[java] view
plain copy
package test;
import static org.junit.Assert.*;
import org.junit.*;
public class JDemoTest {
@BeforeClass
public static void setUpBeforeClass() throws Exception {
System.out.println("in BeforeClass================");
}
@AfterClass
public static void tearDownAfterClass() throws Exception {
System.out.println("in AfterClass=================");
}
@Before
public void before() {
System.out.println("in Before");
}
@After
public void after() {
System.out.println("in After");
}
@Test(timeout = 10000)
public void testadd() {
JDemo a = new JDemo();
assertEquals(6, a.add(3, 3));
System.out.println("in Test ----Add");
}
@Test
public void testdivision() {
JDemo a = new JDemo();
assertEquals(3, a.division(6, 2));
System.out.println("in Test ----Division");
}
@Ignore
@Test
public void test_ignore() {
JDemo a = new JDemo();
assertEquals(6, a.add(1, 5));
System.out.println("in test_ignore");
}
@Test
public void teest_fail() {
fail();
}
}
class JDemo extends Thread {
int result;
public int add(int a, int b) {
try {
sleep(1000);
result = a + b;
} catch (InterruptedException e) {
}
return result;
}
public int division(int a, int b) {
return result = a / b;
}
}
执行结果:
[plain] view
plain copy
in BeforeClass================
in Before
in Test ----Add
in After
in Before
in Test ----Division
in After
in AfterClass=================
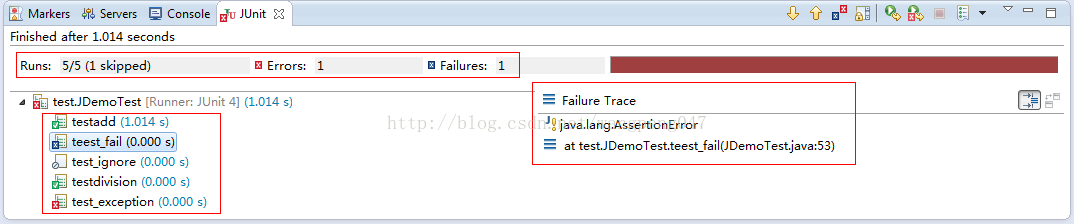
图中左上红框中部分表示Junit运行结果,5个成功(1个忽略),1个错误,1个失败。(注意错误和失败不是一回事,错误说明代码有错误,而失败表示该测试方法测试失败)
左下红框中则表示出了各个测试方法的运行状态,可以看到成功、错误、失败、失败各自的图标是不一样的,还可以看到运行时间。
右边部分则是异常堆栈,可查看异常信息。
断言是编写测试用例的核心实现方式,即期望值是多少,测试的结果是多少,以此来判断测试是否通过。
1. 断言核心方法
| assertArrayEquals(expecteds, actuals) | 查看两个数组是否相等。 |
| assertEquals(expected, actual) | 查看两个对象是否相等。类似于字符串比较使用的equals()方法 |
| assertNotEquals(first, second) | 查看两个对象是否不相等。 |
| assertNull(object) | 查看对象是否为空。 |
| assertNotNull(object) | 查看对象是否不为空。 |
| assertSame(expected, actual) | 查看两个对象的引用是否相等。类似于使用“==”比较两个对象 |
| assertNotSame(unexpected, actual) | 查看两个对象的引用是否不相等。类似于使用“!=”比较两个对象 |
| assertTrue(condition) | 查看运行结果是否为true。 |
| assertFalse(condition) | 查看运行结果是否为false。 |
| assertThat(actual, matcher) | 查看实际值是否满足指定的条件 |
| fail() | 让测试失败 |
[java] view
plain copy
package test;
import static org.hamcrest.CoreMatchers.*;
import static org.junit.Assert.*;
import java.util.Arrays;
import org.hamcrest.core.CombinableMatcher;
import org.junit.Test;
public class AssertTests {
@Test
public void testAssertArrayEquals() {
byte[] expected = "trial".getBytes();
byte[] actual = "trial".getBytes();
org.junit.Assert.assertArrayEquals("failure - byte arrays not same", expected, actual);
}
@Test
public void testAssertEquals() {
org.junit.Assert.assertEquals("failure - strings not same", 5l, 5l);
}
@Test
public void testAssertFalse() {
org.junit.Assert.assertFalse("failure - should be false", false);
}
@Test
public void testAssertNotNull() {
org.junit.Assert.assertNotNull("should not be null", new Object());
}
@Test
public void testAssertNotSame() {
org.junit.Assert.assertNotSame("should not be same Object", new Object(), new Object());
}
@Test
public void testAssertNull() {
org.junit.Assert.assertNull("should be null", null);
}
@Test
public void testAssertSame() {
Integer aNumber = Integer.valueOf(768);
org.junit.Assert.assertSame("should be same", aNumber, aNumber);
}
// JUnit Matchers assertThat
@Test
public void testAssertThatBothContainsString() {
org.junit.Assert.assertThat("albumen", both(containsString("a")).and(containsString("b")));
}
@Test
public void testAssertThathasItemsContainsString() {
org.junit.Assert.assertThat(Arrays.asList("one", "two", "three"), hasItems("one", "three"));
}
@Test
public void testAssertThatEveryItemContainsString() {
org.junit.Assert.assertThat(Arrays.asList(new String[] { "fun", "ban", "net" }), everyItem(containsString("n")));
}
// Core Hamcrest Matchers with assertThat
@Test
public void testAssertThatHamcrestCoreMatchers() {
assertThat("good", allOf(equalTo("good"), startsWith("good")));
assertThat("good", not(allOf(equalTo("bad"), equalTo("good"))));
assertThat("good", anyOf(equalTo("bad"), equalTo("good")));
assertThat(7, not(CombinableMatcher.<Integer> either(equalTo(3)).or(equalTo(4))));
assertThat(new Object(), not(sameInstance(new Object())));
}
}
三、核心——注解
1. 说明
| @Before | 初始化方法 |
| @After | 释放资源 |
| @Test | 测试方法,在这里可以测试期望异常和超时时间 |
| @Ignore | 忽略的测试方法 |
| @BeforeClass | 针对所有测试,只执行一次,且必须为static void |
| @AfterClass | 针对所有测试,只执行一次,且必须为static void |
| @RunWith | 指定测试类使用某个运行器 |
| @Parameters | 指定测试类的测试数据集合 |
| @Rule | 允许灵活添加或重新定义测试类中的每个测试方法的行为 |
| @FixMethodOrder | 指定测试方法的执行顺序 |
一个测试类单元测试的执行顺序为:
@BeforeClass –> @Before –> @Test –> @After –> @AfterClass
每一个测试方法的调用顺序为:
@Before –> @Test –> @After
3. 示例
[java] view
plain copy
package test;
import static org.junit.Assert.*;
import org.junit.*;
public class JDemoTest {
@BeforeClass
public static void setUpBeforeClass() throws Exception {
System.out.println("in BeforeClass================");
}
@AfterClass
public static void tearDownAfterClass() throws Exception {
System.out.println("in AfterClass=================");
}
@Before
public void before() {
System.out.println("in Before");
}
@After
public void after() {
System.out.println("in After");
}
@Test(timeout = 10000)
public void testadd() {
JDemo a = new JDemo();
assertEquals(6, a.add(3, 3));
System.out.println("in Test ----Add");
}
@Test
public void testdivision() {
JDemo a = new JDemo();
assertEquals(3, a.division(6, 2));
System.out.println("in Test ----Division");
}
@Ignore
@Test
public void test_ignore() {
JDemo a = new JDemo();
assertEquals(6, a.add(1, 5));
System.out.println("in test_ignore");
}
@Test
public void teest_fail() {
fail();
}
}
class JDemo extends Thread {
int result;
public int add(int a, int b) {
try {
sleep(1000);
result = a + b;
} catch (InterruptedException e) {
}
return result;
}
public int division(int a, int b) {
return result = a / b;
}
}
执行结果:
[plain] view
plain copy
in BeforeClass================
in Before
in Test ----Add
in After
in Before
in Test ----Division
in After
in AfterClass=================
图中左上红框中部分表示Junit运行结果,5个成功(1个忽略),1个错误,1个失败。(注意错误和失败不是一回事,错误说明代码有错误,而失败表示该测试方法测试失败)
左下红框中则表示出了各个测试方法的运行状态,可以看到成功、错误、失败、失败各自的图标是不一样的,还可以看到运行时间。
右边部分则是异常堆栈,可查看异常信息。

相关文章推荐
- UIView之setNeedsDisplay与drawRect 和 setNeedsLayout与layoutSubViews
- 康托展开总结
- linux下的压缩和解压缩的命令总结
- 康托展开总结
- HTML制作邮箱
- 微服务(Micro Service Architecture)浅析
- Junit使用教程(一)
- U盘掉了
- SAP主数据字段前导零 策略
- POJ 1286 解题报告
- Android实现控件随手指滑动缩放
- 进阶级-正则表达式
- 【HTML5】H5的新标签简介
- 20160322 股票入门
- 倍增法lca
- CLUSTER集群与存储技术
- Java中动态地改变数组长度及数组转Map的代码实例分享
- aodv之二
- CSS-float
- .NET面试题解析(07)-多线程编程与线程同步