linux运维实战练习-2016年3月4日-3月19日课程作业
2016-03-19 22:22
856 查看
I.作业(练习)内容:
1、搭建LAMP环境,并实践基于DNS做基于域名的虚拟主机。
搭建LAMP环境步骤:
1. 下载相应的软件包至/usr/local/src目前下
安装libxm12

重启Apache服务器,确认80端口已经处理监听状态

将Apache服务器设置开机启动
查看Mysql的版本
编译PHP

phpMyAdmin安装
解压安装文件

成功访问PhpMyAdmin下在的index.php

2、基于1题目中的环境,重新搭建一个同样的环境,要求:
a)实现web服务文件更新的自动同步到另一台机器上
b)数据库实现主从复制
c)通过shell脚本实现网站源代码备份和mysql备份,备份策略包括全量备份、增量备份、差异备份
3、使用压测工具(ab/webbench等)实现搭建的页面压测,要求通过调整apache的工作模式来对比最后性能。
4、基于3步骤过程中的压测,通过脚本实现iptables自动判断来源ip,并作拒绝制定ip访问,要求访问次数1秒超过10次的拒绝掉。
5、基于2中的环境,通过lvs实现负载均衡,要求使用DR模式,并能把其中的原理部分通过自己的理解汇总出来。
本文出自 “WE BECOME WHATWEPRACTICE” 博客,请务必保留此出处http://nearlv.blog.51cto.com/2432295/1752970
1、搭建LAMP环境,并实践基于DNS做基于域名的虚拟主机。
搭建LAMP环境步骤:
1. 下载相应的软件包至/usr/local/src目前下
[root@localhost ~]# ls /usr/local/src/ | grep 'tar*'
apr-1.4.6.tar.gz
apr-1.5.2.tar.gz
apr-util-1.5.1.tar.gz
autoconf-2.69.tar.gz
freetype-2.4.10.tar.gz
gd-2.0.35.tar.gz
httpd-2.4.3.tar.gz
jpegsrc.v8b.tar.gz
libmcrypt-2.5.8.tar.gz
libpng-1.5.14.tar.gz
libxml2-2.9.0.tar.gz
php-5.4.11.tar.gz
phpMyAdmin-3.5.6-all-languages.tar.gz
xunzai.com_mysql-5.0.18.tar.gz
ZendGuard-5_5_0.tar.gz
zlib-1.2.7.tar.gz
2. 软件的安装分配置(configure)、编译(make)、和安装(make install)三个步骤,以下将分别演示安装步骤:
安装libxm12
[root@localhost src]# tar zxvf libxml2-2.9.0.tar.gz  解压文件
[root@localhost src]# cd libxml2-2.9.0/  切换目录
[root@localhost libxml2-2.9.0]# ./configure --prefix=/usr/local /libxml2 配置,指定安装到/usr/local /libxml2 目录下
[root@localhost libxml2-2.9.0]# make 进行编译
[root@localhost libxml2-2.9.0]# make install   开始安装libxm12库文件
安装成功在“/usr/local/libxm12”目录下有以下四个文件
[root@localhost ~]# ls /usr/local/libxm12    bin  include  lib  share
安装gcc
[root@localhost]# yum install gcc gcc-c++ gcc-g77安装libmcrypt
[root@localhost src]# tar zxvf libmcrypt-2.5.8.tar.gz  解压
[root@localhost src]# cd libmcrypt-2.5.8/  切换目录
[root@localhost libmcrypt-2.5.8]# ./configure with-mcrypt-dir=/usr/local/libmcrypt   安装文件
[root@localhost libmcrypt-2.5.8]# yum install gcc gcc-c++ gcc-g77  安装gcc
[root@localhost libmcrypt-2.5.8]# cd libltdl/
[root@localhost libltdl]# ./configure --enable-ltdl-install
[root@localhost libltdl]# make
[root@localhost libltdl]# make install
make[1]: Entering directory `/usr/local/src/libmcrypt-2.5.8/libltdl'
/bin/sh ./../mkinstalldirs /usr/local/lib
/bin/sh ./libtool  --mode=install /usr/bin/install -c libltdl.la /usr/local/lib/libltdl.la
/usr/bin/install -c .libs/libltdl.lai /usr/local/lib/libltdl.la
/usr/bin/install -c .libs/libltdl.a /usr/local/lib/libltdl.a
ranlib /usr/local/lib/libltdl.a
chmod 644 /usr/local/lib/libltdl.a
PATH="$PATH:/sbin" ldconfig -n /usr/local/lib
----------------------------------------------------------------------
Libraries have been installed in:
/usr/local/lib
安装zlib
[root@localhost src]# tar zxvf zlib-1.2.7.tar.gz
[root@localhost src]# cd zlib-1.2.7/
[root@localhost zlib-1.2.7]# ./configure -with- zlib-dir=/usr/local/libmcrypt
[root@localhost zlib-1.2.7]# make
[root@localhost zlib-1.2.7]# make install
[root@localhost zlib-1.2.7]# ls /usr/local/zlib/
include  lib  share
安装libpng
[root@localhost src]# tar libpng-1.5.14.tar.gz ^C
[root@localhost src]# cd libpng-1.5.14/
[root@localhost libpng-1.5.14]# ./configure --prefix=/usr/local/libpng^C
[root@localhost libpng-1.5.14]# ls /usr/local/libpng/
bin  include  lib  share
安装jpeg8
[root@localhost ~]# mkdir /usr/local/jpeg8  //建立jpeg8软件安装目录
[root@localhost ~]# mkdir /usr/local/jpeg8/bin  //建立存放命令的目录
[root@localhost ~]# mkdir /usr/local/jpeg8/lib  //创建jpeg8库文件所在目录
[root@localhost ~]# mkdir /usr/local/jpeg8/include  //建立存放头文件目录
[root@localhost ~]# mkdir /usr/local/jpeg8/man/man1 //建立存放手册的目录
[root@localhost ~]# tar zxvf /usr/local/src/jpeg //解压
jpeg-8b/            jpegsrc.v8b.tar.gz
[root@localhost ~]# tar zxvf /usr/local/src/jpeg
jpeg-8b/            jpegsrc.v8b.tar.gz
[root@localhost ~]# tar zxvf /usr/local/src/jpegsrc.v8b.tar.gz
[root@localhost ~]# cd /usr/local/src/jpeg-8b/
[root@localhost jpeg-8b]# ./configgure --prefix=/usr/local/jpeg8/ --enable-share --enable-static
安装freetype
[root@localhost src]# tar zxvf freetype-2.4.10.tar.gz //解压包到freetype-2.4.10目录
[root@localhost src]# cd freetype-2.4.10/  //进入目录freetype-2.4.10中
[root@localhost freetype-2.4.10]# ./configure --prefix=/usr/local/freetype //编译
[root@localhost freetype-2.4.10]# make  //对软件源代码文件进行编译
[root@localhost freetype-2.4.10]# make install  //开始安装freetype库文件
[root@localhost freetype-2.4.10]# ls /usr/local/freetype/ //软件安装成功,在该目录下有以下4个文件
bin  include  lib  share
安装atuoconf
[root@localhost src]# tar zxvf autoconf-2.69.tar.gz
[root@localhost src]# cd autoconf-2.69/
[root@localhost autoconf-2.69]# ./configure \  //配置命令
>--prefix=/usr/local/gd \   //指定安装软件的位置
>--with-jpeg=/usr/local/jpeg8/ \   //指定去哪找jpeg库文件
>--with-png=/usr/local/libpng/  \  //指定去哪找png库文件
>--with-freetype=/usr/local/freetype/
[root@localhost autoconf-2.69]# make
[root@localhost autoconf-2.69]# make install
[root@localhost autoconf-2.69]# ls /usr/local/gd
bin  include  lib
安装apr
[root@localhost src]# tar apr-1.5.2.tar.gz
[root@localhost src]# cd apr-1.5.2/
[root@localhost apr-1.5.2]# ./configure --prefix=/usr/local/apr-httpd/ && make && make install
安装apr-util
[root@localhost apr-1.5.2]# cd /usr/local/src/
[root@localhost src]# tar apr-util-1.5.1.tar.gz
[root@localhost src]# cd apr-util-1.5.1/
[root@localhost apr-util-1.5.1]# ./configure --prefix=/usr/local/apr-util-httpd/ --with-apr=/usr/local/apr-httpd/ && make && make install
安装pcre
[root@localhost apr-util-1.5.1]# cd /usr/local/src/
[root@localhost src]# unzip -o pcre-8.32.zip
[root@localhost src]# cd pcre-8.32/
[root@localhost pcre-8.32]# .#./configure --prefix=/usr/local/pcre && make && make
安装Httpd
[root@localhost src]# tar xzvf httpd-2.4.3.tar.gz
[root@localhost src]# cd httpd-2.4.3/
[root@localhost httpd-2.4.3]# ./configure --prefix=/usr/local/apache243 --enable-mods-shared=all --enable-deflate --enable-speling --enable-cache --enable-file-cache --enable-disk-cache --enable-mem-cache --enable-so --enable-expires=shared --enable-static-support
--sysconfdir=/etc/httpd --with-z=/usr/local/zlib/ --with-apr=/usr/local/apr-httpd/ --with-apr-util=/usr/local/apr-util-httpd/ --with-pcre=/usr/local/pcre/ --disable-userdir
[root@localhost ~]# make
[root@localhost ~]#
[root@localhost ~]# make install
[root@localhost ~]# ls /usr/local/apache243/  安装成功检测该文件夹下是否有以下文件
bin  build  cgi-bin  error  htdocs  icons  include  lib  logs  man  manual  modules
修改httpd.conf配置文件,添加如下一行
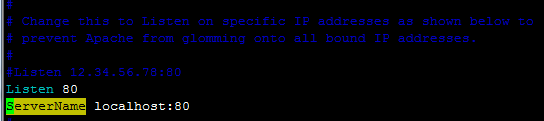
重启Apache服务器,确认80端口已经处理监听状态
[root@localhost ~]# /usr/local/apache243/bin/apachectl start
httpd (pid 130058) already running
[root@localhost ~]# netstat -tnl | grep 80
tcp6       0      0 :::80                   :::*                    LISTEN
确认Apache服务器可以使用

将Apache服务器设置开机启动
[root@localhost ~]# echo "/usr/local/apache243/bin/apachectl start" >> /etc/rc.d/rc.local[root@localhost ~]# cat /etc/rc.d/rc.local
#!/bin/bash
# THIS FILE IS ADDED FOR COMPATIBILITY PURPOSES
#
# It is highly advisable to create own systemd services or udev rules
# to run scripts during boot instead of using this file.
#
# In contrast to previous versions due to parallel execution during boot
# this script will NOT be run after all other services.
#
# Please note that you must run 'chmod +x /etc/rc.d/rc.local' to ensure
# that this script will be executed during boot.
touch /var/lock/subsys/local
/usr/local/apache243/bin/apachectl start
安装Mysql数据库
[root@localhost mysql-5.0.18]# tar xvzf mysql-5.0.18
[root@localhost mysql-5.0.18]# cd mysql-5.0.18/
[root@localhost mysql-5.0.18]# ./configure --prefix=/usr/local/mysql --enable-thread-safe-client --with-extra-charsets=all
config.status: ib_config.h is unchanged
config.status: executing depfiles commands
MySQL has a Web site at http://www.mysql.com/ which carries details on the latest release, upcoming features, and other information to make your work or play with MySQL more productive. There you can also find information about mailing lists for MySQL discussion.
Remember to check the platform specific part of the reference manual for    hints about installing MySQL on your platform. Also have a look at the     files in the Docs directory.
Thank you for choosing MySQL!
添加用户名和用户组
[root@localhost mysql-5.0.18]# groupadd mysql
[root@localhost mysql-5.0.18]# useradd -g mysql mysql
创建mysql数据库服务器的配置文件,可以使用源码包support-files目录中的my-medium.cnf文件作为模板,将其复制到/etc/目录下,命名为my.cnf文件
[root@localhost mysql-5.0.18]# cp support-files/my-medium.cnf /etc/my.cnf进入到安装目录/usr/local/mysql下,执行bin目录下的mysql_install_db脚本,用来初始化MySQL数据库的授权表,其中存储了服务器访问允许
[root@localhost mysql-5.0.18]# cd /usr/local/mysql
[root@localhost mysql]# bin/mysql_install_db --user=mysql
将程序二进制的所有权改为root用户,数据目录的所有权改为运行mysqld程序的mysql用户
[root@localhost mysql]# chown -R root .  //将文件的所有属性改为root用户
[root@localhost mysql]# whown -R mysql var  //将数据目录的所有属性改为mysql用户
[root@localhost mysql]# chgrp -R mysql .   //将组属性改为mysql组
确认mysql目录下生成以下10个文件
[root@localhost mysql]# pwd
/usr/local/mysql
[root@localhost mysql]# ls
bin  include  info  lib  libexec  man  mysql-test  share  sql-bench  var
启动Mysql
[root@localhost mysql]# /usr/local/mysql/bin/mysqld_safe --user=mysql &
[1] 36598
确认Mysql对应 的端口号3306正常打开
[root@localhost mysql]# netstat -tnl | grep 3306
tcp        0      0 0.0.0.0:3306            0.0.0.0:*               LISTEN
检测Mysql服务器是否正常工作
查看Mysql的版本
[root@localhost mysql]# bin/mysqladmin version
bin/mysqladmin  Ver 8.41 Distrib 5.0.18, for unknown-linux-gnu on x86_64 Copyright (C) 2000 MySQL AB & MySQL Finland AB & TCX DataKonsult AB This software comes with ABSOLUTELY NO WARRANTY. This is free software,and you are welcome to modify and redistribute it underthe GPL license
Server version        5.0.18-log    Protocol version    10     Connection        Localhost via UNIX socket     UNIX socket        /tmp/mysql.sock     Uptime:            1 day 2 hours 58 min 37 sec
Threads: 1  Questions: 12  Slow queries: 0  Opens: 0  Flush tables: 2  Open tables: 1  Queries per second avg: 0.000
设置密码:
[root@localhost mysql]# bin/mysql -u root -h localhost -p
Enter password:
Welcome to the MySQL monitor.  Commands end with ; or \g.     Your MySQL connection id is 11 to server version: 5.0.18-log
Type 'help;' or '\h' for help. Type '\c' to clear the buffer.
mysql> set password for 'root'@'localhost'=password('abc012');
Query OK, 0 rows affected (0.01 sec)
mysql> exit    Bye
mysql服务器和apache服务器一样也有必要设置为开机自动运行,设置方法进入到mysql源代码目录/usr/local/src /mysql-5.0.18,将子目录support-files下的mysql.server文件复制到/etc/rc.d/init.d目录中,并重 命名为mysqld,命令行如下[root@localhost mysql]# cd /usr/local/src/mysql-5.0.18 [root@localhost mysql-5.0.18]# cp support-files/mysql.server /etc/rc.d/init.d/mysqld [root@localhost mysql-5.0.18]# chown root.root /etc/rc.d/init.d/mysqld //修改权限 [root@localhost mysql-5.0.18]# chmod 755 /etc/rc.d/init.d/mysqld [root@localhost mysql-5.0.18]# chkconfig --add mysqld //把mysqld添加到chkconfig中 [root@localhost mysql-5.0.18]# chkconfig --level 3 mysqld on //加入运行级别三开机启动 [root@localhost mysql-5.0.18]# chkconfig --level 5 mysqld on //加入运行级别五开机启动 [root@localhost mysql-5.0.18]# chkconfig --list mysqld //检查设置 Note: This output shows SysV services only and does not include native systemd services. SysV configuration data might be overridden by native systemd configuration. If you want to list systemd services use 'systemctl list-unit-files'. To see services enabled on particular target use 'systemctl list-dependencies [target]'. mysqld 0:off 1:off 2:on 3:on 4:on 5:on 6:off安装PHP
编译PHP
[root@localhost php-5.4.11]# ./configure --prefix=/usr/local/php --with-config-file-path=/usr/local/php/etc --with-apxs2=/usr/local/apache243/bin/apxs --with-mysql=/usr/local/mysql/ --with-libxml-dir=/usr/local/libxml2/ --with-png-dir=/usr/local/libpng/ --with-jpeg-dir=/usr/local/jpeg8/ --with-freetype-dir=/usr/local/freetype/ --with-gd=/usr/local/gd/ --with-zlib-dir=/usr/local/zlib/ --with-mcrypt=/usr/local/libmcrypt/ --with-mysqli=/usr/local/mysql/bin/mysql_config --enable-soap --enable-mbstring=all --enable-sockets编译PHP
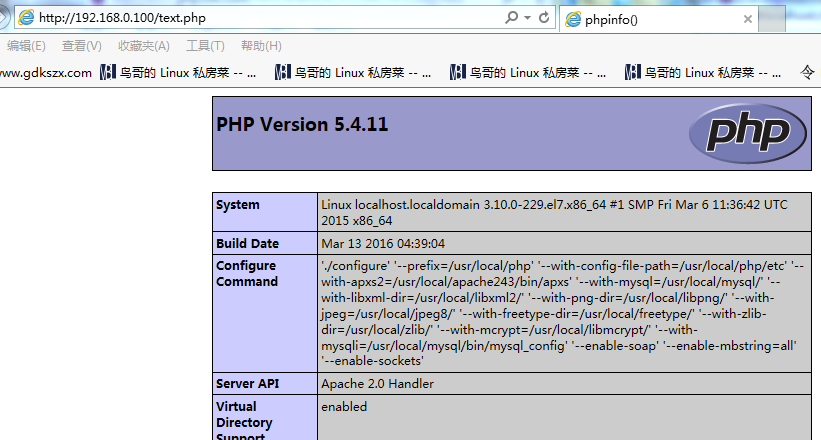
[root@localhost php-5.4.11]# make
lxml2 -lz -lm -ldl -lmysqlclient_r -lz -lcrypt -lnsl -lm -lxml2 -lz -lm -ldl -lxml2 -lz -lm -ldl -lcrypt -lxml2 -lz -lm -ldl -lxml2 -lz -lm -ldl -lxml2 -lz -lm -ldl -lcrypt  -o sapi/cgi/php-cgi
Generating phar.php
Generating phar.phar
PEAR package
PHP_Archive not installed: generated phar will require PHP's phar extension be enabled.  clicommand.inc
directorygraphiterator.inc
directorytreeiterator.inc
invertedregexiterator.inc
pharcommand.inc
phar.inc
Build complete.
Don't forget to run 'make test'.
[root@localhost php-5.4.11]# make install
[PEAR] XML_Util       - installed: 1.2.1
[PEAR] PEAR           - installed: 1.9.4
Wrote PEAR system config file at: /usr/local/php/etc/pear.conf
You may want to add: /usr/local/php/lib/php to your php.ini include_path
/usr/local/src/php-5.4.11/build/shtool install -c ext/phar/phar.phar /usr/local/php/bin  ln -s -f /usr/local/php/bin/phar.phar /usr/local/php/bin/phar
Installing PDO headers:
/usr/local/php/include/php/ext/pdo/
创建PHP测试页
[root@localhost php-5.4.11]# cat /usr/local/apache243/htdocs/text.php
<?php
phpinfo();
?>
重启Apache服务器
[root@localhost php-5.4.11]# /usr/local/apache243/bin/apachectl stop
[root@localhost php-5.4.11]# /usr/local/apache243/bin/apachectl start
成功访问刚刚创建的测试页
phpMyAdmin安装
解压安装文件
[root@localhost src]# tar xzvf phpMyAdmin-3.5.6-all-languages.tar.gz将解压的目录下的所有文件复制/usr/local/apache243/htdocs/phpmyadmin下
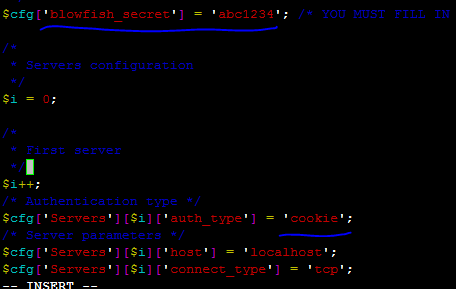
[root@localhost src]# cp -a phpMyAdmin-3.5.6-all-languages
/usr/local/apache243/htdocs/phpmyadmin
PhpMyAdmin(config.inc.php)配置文件,默认不存在config.inc.php文件,我们需要手工创建一个,也可以复制config.sample.inc.php,这时,我们以cookie身份验证模式
[root@localhost src]# cd /usr/local/apache243/htdocs/phpmyadmin/
[root@localhost phpmyadmin]# cp config.sample.inc.php config.inc.php
修改如下
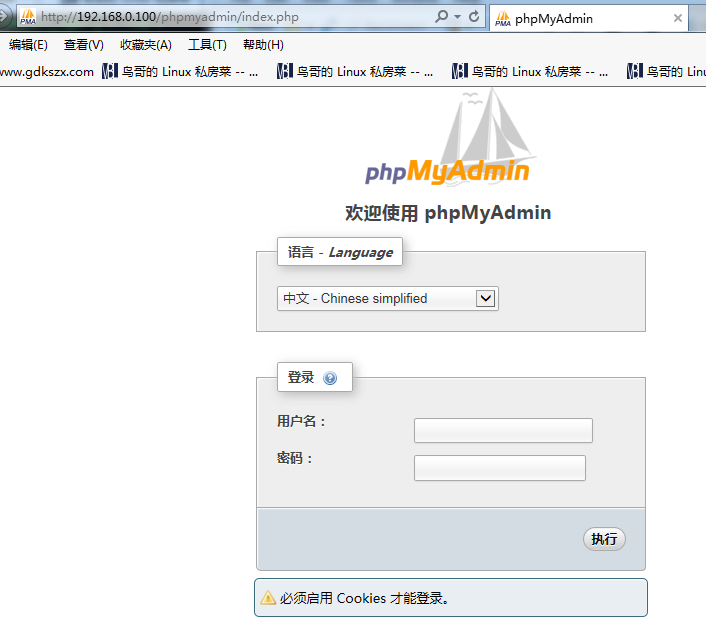
成功访问PhpMyAdmin下在的index.php
2、基于1题目中的环境,重新搭建一个同样的环境,要求:
a)实现web服务文件更新的自动同步到另一台机器上
b)数据库实现主从复制
c)通过shell脚本实现网站源代码备份和mysql备份,备份策略包括全量备份、增量备份、差异备份
3、使用压测工具(ab/webbench等)实现搭建的页面压测,要求通过调整apache的工作模式来对比最后性能。
4、基于3步骤过程中的压测,通过脚本实现iptables自动判断来源ip,并作拒绝制定ip访问,要求访问次数1秒超过10次的拒绝掉。
5、基于2中的环境,通过lvs实现负载均衡,要求使用DR模式,并能把其中的原理部分通过自己的理解汇总出来。
本文出自 “WE BECOME WHATWEPRACTICE” 博客,请务必保留此出处http://nearlv.blog.51cto.com/2432295/1752970

相关文章推荐
- linux c语言 计算函数执行时间
- Linux内核协议栈(附1)inet_create函数注释
- linux防火墙
- Linux 终端的一些动画命令
- linux输入子系统概念介绍
- Command Line in Mac/Linux
- ubantu(Linux) 系統如何安裝AdobeFlash
- LINUX内核分析第四周——扒开系统调用的三层皮
- Linux-进程间通信(一): 管道
- 与一线Linux嵌入式开发工程师的对话
- Linux 运行级别
- CentOS通过删除旧内核解决/boot空间不足的问题
- Linux操作系统下的三种Java环境配置方法
- 《Linux内核分析》 第四周
- linux之sed命令
- 2013337朱荟潼 Linux第五章读书笔记——系统调用
- Linux下cpuinfo详解
- linux grep 和 find 命令
- 从事LINUX驱动或者是安卓驱动工作的话,初学者应具备哪些专业技能呢?
- Linux启动流程