Suricata配置文件说明2
2016-03-10 18:32
579 查看
本文接上一篇配置文件说明1,是了解suricata配置文件的第二篇。
下面这个图是一种典型的运行模式表明了模块间的协作关系,1、2、3、4分别代表四种模块:

Suricata的多个线程通过下面的选项可以选择是否绑定特定的CPU核心,如果是no则不绑定,每次运行的时候每个线程对应的CPU核心可能都不是同一个,是yes则每次运行的时候指定的线程只能运行在特定的核心上。通过绑定线程和CPU核心,能够提高CPU cache的命中率,减少内存访问的损耗,提高程序的运行速度:
下面这幅图可以很清楚地解释。上面的是绑定的情况,数据包获取、解密和输出模块均在core 0这个核心上,且每个核心都有一个detect线程,但是相对来说其在core 0上的优先级比较低,只有当core 0的其他线程不工作时才会运行,这样suricata也会把较少的检测任务分配给它,而是分配给其他核心上的检测线程;但是如果是下面哪种未绑定的情况,则是由系统根据CPU每个核心的负载程度来分配每个线程运行所在的核心:

用户可以根据自己的具体情况配置线程和CPU核心的对应关系,下面是一种配置方法,management-, receive-, decode-, stream-, detect-, verdict-, reject-和outputs-set这些字段都是固定的,每个字段拥有cpu、mode和prio三个选项。cpu自然就是选择线程执行的cpu核心编号,数字从0到3或是all,[0,1]表示core 0和core 1,[1-3]表示core 1,core 2, core 3三个核心。mode可以“balance”或“exclusive”,balance表示可以在所有cpu字段定义的核心中选择最合理的核心运行,比如下面的decode-cpu-set这次可以在core
0上种运行,等下个时间片可以在core 1上运行;而exclusive则表示固定cpu核心,第一次时间片在core 0上运行,直到线程结束都不能更换核心。prio则是线程在核心中的权限高低,有low,medium和high以及default。除此之外在detect-cpu-set中还可以有threads字段直接指定检测线程的数量而不是根据CPU核心数来计算:
上面提到的检测线程的数量可以直接指定,也可以根据CPU核心数计算,而计算的系数就是由detect-thread-ratio来指定,默认系数是1.5,比如你的CPU是4核,那就会有6个检测线程:

持续的跟踪网络中的流需要占用大量的内存,为了控制占用的内存不至于太大,这里有几个选项需要配置。memcap表示最大跟踪流量所使用的内存,默认为32MB;由于suricata是通过五元组计算出一个hash值判断数据包属于哪个流,hash_size指的就是这个hash表的大小;Prealloc表示预先分配的内存,这样在识别流的时候会有更好的性能;emergency-recovery表示的是当前占用的内存大于memcap时进入内存紧急模式(emergency-mode),需要删除的流的百分比(相对于prealloc来说),这里表示需要删除30%的prealloc设置的空间的流,而删除的原则是根据后面会配置的flow-timeouts也就是超时时间来确定,如果没有流超时则会设置更严格的超时时间,如果还是没用suricata会删除最久未使用过的流;prune_flows表示处于紧急模式的时候每新增一条流将会删除掉旧的流的数量:
TCP新建连接就是三次握手,建立连接则是完成三次握手之后,而关闭连接则是reset数据包或是关闭tcp连接的四次握手。UDP新建连接是只有一方发送数据包,建立连接则是两方都发送数据包。下面是TCP、UDP、ICMP和default(其他协议)的超时配置,没有emergency前缀的是正常模式下的超时,带有emergency前缀的是在内存紧急模式下的超时时间:
首先是数据流跟踪模块的配置,和flow的一样,这里的memcap也是当前模块能占用内存的最大值;checksum_validation设置是否检查TCP数据包的CRC校验和,这个值用于保证数据包的完整性,如果设为yes则会丢弃那些校验失败的数据包;max_sessions对最大的TCP连接数进行了限制,防止其占用过多的内存;prealloc_sessions则是为了提高性能预先分配的连接数;midstream配置是否允许suricata从一个TCP连接的中间开始跟踪,出现这种情况几乎每次都会发生,因为当启动suricata时有部分TCP连接已经开始并处于建立连接的状态了,若设为true则表示可以从流中间跟踪,默认为false;async_oneside设置是否打开异步数据包处理,因为有时一个流可能不是从一个路由器而是多个不同的路由器进行传输,这样会导致数据包并不同步,true表示处理这种异步情况,默认为false:
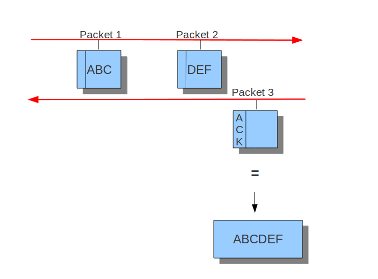
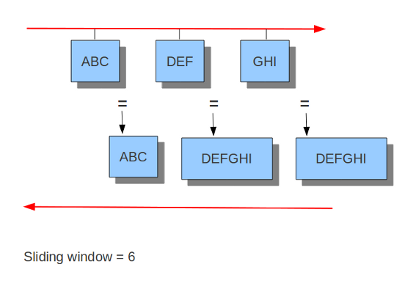
而最后的inline就看不大懂了,难道是选择yes就可以在IPS模式下工作,而no就不工作?官方文档中只提到了IDS和IPS模式下的流跟踪模块的不同,可以看到在IDS模式下只有服务端发送了ACK包suricata才会将之前监视的客户端数据包重组并进行下一步处理,而在IPS模式下由于需要实时监控并丢弃符合规则的包所以采用的是滑动窗口的方式,每当客户端发送一个数据包就会进行下一步处理:
IDS模式下
IPS模式下
Stream引擎的第二部分便是数据包重组,memcap就不做介绍了;因为数据包重组的代价比较大,需要的资源较多,为了避免无限制的重组超大数据包,depth对其进行了限制,默认为1MB;toserver_chunk_size和toclient_chunk_size只有超过设置的大小的原始数据包才会调用重组(字面上是这么理解):
由于http协议的数据包比较复杂和常用,且它的解析器使用第三方库,因此下面对其单独说明。
在每一种模式下可以配置IP地址、web服务器种类以及对request、response数据包大小的限制,默认的IDS模式表示所有的IP都使用这套配置。一套典型的配置如下,前面几项配置都容易理解double-decode-path和double-decode-query需要进行特殊说明。有些攻击web服务器的手法是通过在URI中加入特定的攻击字段来完成,URI由协议、主机名、端口号(大部分http协议是80端口,因此可省略)、路径和查询参数五部分组成(详情参考统一资源定位符-维基百科),能够控制的便是路径和查询参数,double-decode-path和double-decode-query就是可以检查这两部分是否经过了双重URL编码(可参考Double
Encoding-OWASP):
除了以上的配置外,还有一些针对URI的斜杠、反斜杠及编码之类的配置,等后面用到的时候再详细了解:
http://en.wikipedia.org/wiki/Abstract_Syntax_Notation_One
https://www.owasp.org/index.php/Double_Encoding
threading
Suricata是一个多线程的程序,当它在拥有多核CPU的计算机上运行时会产生多线程以同时处理多个网络流量。在前一篇文章中介绍过suricata其实是有thread,thread-module和queue组成,而thread-module按照功能分为数据包获取、解码数据包和应用层流信息、检测、输出四种模块。<code class="hljs vbnet has-numbering">数据包获取模块是从网络流量或文件中获取数据包。 解码前面获取的数据包,如果是基于TCP协议的流则需要分三步:首先是跟踪每一条流的所有链接信息,然后使用流重组(stream-<span class="hljs-keyword">assembly</span>)对已经完成的流进行重组,最后则是根据对应的应用层协议对其进一步分析,比如HTTP协议有专门的分析模块。 检测模块则是对上一步解码或重组的流量进行检测。检测模块可以是多线程因此它可以同时检测多个数据包或流。 输出模块则会针对配置文件中的配置,对所有的警告、事件以及需要输出的额外信息进行处理并格式化输出。</code><ul class="pre-numbering" style="display: block;"><li>1</li><li>2</li><li>3</li><li>4</li></ul>
下面这个图是一种典型的运行模式表明了模块间的协作关系,1、2、3、4分别代表四种模块:
Suricata的多个线程通过下面的选项可以选择是否绑定特定的CPU核心,如果是no则不绑定,每次运行的时候每个线程对应的CPU核心可能都不是同一个,是yes则每次运行的时候指定的线程只能运行在特定的核心上。通过绑定线程和CPU核心,能够提高CPU cache的命中率,减少内存访问的损耗,提高程序的运行速度:
<code class="hljs lasso has-numbering"><span class="hljs-built_in">set</span><span class="hljs-attribute">-cpu</span><span class="hljs-attribute">-affinity</span>: no</code><ul class="pre-numbering" style="display: block;"><li>1</li></ul>
下面这幅图可以很清楚地解释。上面的是绑定的情况,数据包获取、解密和输出模块均在core 0这个核心上,且每个核心都有一个detect线程,但是相对来说其在core 0上的优先级比较低,只有当core 0的其他线程不工作时才会运行,这样suricata也会把较少的检测任务分配给它,而是分配给其他核心上的检测线程;但是如果是下面哪种未绑定的情况,则是由系统根据CPU每个核心的负载程度来分配每个线程运行所在的核心:
用户可以根据自己的具体情况配置线程和CPU核心的对应关系,下面是一种配置方法,management-, receive-, decode-, stream-, detect-, verdict-, reject-和outputs-set这些字段都是固定的,每个字段拥有cpu、mode和prio三个选项。cpu自然就是选择线程执行的cpu核心编号,数字从0到3或是all,[0,1]表示core 0和core 1,[1-3]表示core 1,core 2, core 3三个核心。mode可以“balance”或“exclusive”,balance表示可以在所有cpu字段定义的核心中选择最合理的核心运行,比如下面的decode-cpu-set这次可以在core
0上种运行,等下个时间片可以在core 1上运行;而exclusive则表示固定cpu核心,第一次时间片在core 0上运行,直到线程结束都不能更换核心。prio则是线程在核心中的权限高低,有low,medium和high以及default。除此之外在detect-cpu-set中还可以有threads字段直接指定检测线程的数量而不是根据CPU核心数来计算:
<code class="hljs cs has-numbering">  cpu-affinity:
- management-cpu-<span class="hljs-keyword">set</span>:
cpu: [ <span class="hljs-number">0</span> ]  <span class="hljs-preprocessor"># include only these cpus in affinity settings</span>
- receive-cpu-<span class="hljs-keyword">set</span>:
cpu: [ <span class="hljs-number">0</span> ]  <span class="hljs-preprocessor"># include only these cpus in affinity settings</span>
- decode-cpu-<span class="hljs-keyword">set</span>:
cpu: [ <span class="hljs-number">0</span>, <span class="hljs-number">1</span> ]
mode: <span class="hljs-string">"balanced"</span>
- stream-cpu-<span class="hljs-keyword">set</span>:
cpu: [ <span class="hljs-string">"0-1"</span> ]
- detect-cpu-<span class="hljs-keyword">set</span>:
cpu: [ <span class="hljs-string">"all"</span> ]
mode: <span class="hljs-string">"exclusive"</span> <span class="hljs-preprocessor"># run detect threads in these cpus</span>
<span class="hljs-preprocessor"># Use explicitely 3 threads and don't compute number by using</span>
<span class="hljs-preprocessor"># detect-thread-ratio variable:</span>
<span class="hljs-preprocessor"># threads: 3</span>
prio:
low: [ <span class="hljs-number">0</span> ]
medium: [ <span class="hljs-string">"1-2"</span> ]
high: [ <span class="hljs-number">3</span> ]
<span class="hljs-keyword">default</span>: <span class="hljs-string">"medium"</span>
- verdict-cpu-<span class="hljs-keyword">set</span>:
cpu: [ <span class="hljs-number">0</span> ]
prio:
<span class="hljs-keyword">default</span>: <span class="hljs-string">"high"</span>
- reject-cpu-<span class="hljs-keyword">set</span>:
cpu: [ <span class="hljs-number">0</span> ]
prio:
<span class="hljs-keyword">default</span>: <span class="hljs-string">"low"</span>
- output-cpu-<span class="hljs-keyword">set</span>:
cpu: [ <span class="hljs-string">"all"</span> ]
prio:
<span class="hljs-keyword">default</span>: <span class="hljs-string">"medium"</span>
</code><ul class="pre-numbering" style="display: block;"><li>1</li><li>2</li><li>3</li><li>4</li><li>5</li><li>6</li><li>7</li><li>8</li><li>9</li><li>10</li><li>11</li><li>12</li><li>13</li><li>14</li><li>15</li><li>16</li><li>17</li><li>18</li><li>19</li><li>20</li><li>21</li><li>22</li><li>23</li><li>24</li><li>25</li><li>26</li><li>27</li><li>28</li><li>29</li><li>30</li><li>31</li><li>32</li><li>33</li><li>34</li></ul>
上面提到的检测线程的数量可以直接指定,也可以根据CPU核心数计算,而计算的系数就是由detect-thread-ratio来指定,默认系数是1.5,比如你的CPU是4核,那就会有6个检测线程:
<code class="hljs http has-numbering"><span class="hljs-attribute">detect-thread-ratio</span>: <span class="hljs-string">1.5</span></code><ul class="pre-numbering" style="display: block;"><li>1</li></ul>
IP Defrag
在之前介绍suricata规则检测IP头的时候介绍过,IP协议可以对较大的数据进行分片传输,然后在目的端进行重组,suricata中就有一个叫做defragment-engine的模块对分片的IP数据包进行监视和重组然后传给后续的处理模块。配置比较简单,max-frags指出最大的分片数量,prealloc表明是否在程序启动时预分配部分空间,timeout则是超时的时间。因为在数据包监测及重组的过程中,未处理的数据包都会在内存中,如果数量太大或是长时间未进行处理就会降低性能:<code class="hljs http has-numbering"><span class="hljs-attribute">defrag</span>: <span class="hljs-string"></span> <span class="hljs-attribute">max-frags</span>: <span class="hljs-string">65535 </span> <span class="hljs-attribute">prealloc</span>: <span class="hljs-string">yes </span> <span class="hljs-attribute">timeout</span>: <span class="hljs-string">60</span></code><ul class="pre-numbering" style="display: block;"><li>1</li><li>2</li><li>3</li><li>4</li></ul>
Flow和Stream
其实针对flow和stream的概念我也没有搞得特别清楚,在suricata中flow配置的是网络流方面的选项,而stream则专门针对TCP协议的重组进行配置。flow
flow在概念上比较大,它和一次网络连接比较相似。Suricata通过五元组(协议,源IP,源端口,目的IP,目的端口)来识别流量中的数据包是否属于同一个流:持续的跟踪网络中的流需要占用大量的内存,为了控制占用的内存不至于太大,这里有几个选项需要配置。memcap表示最大跟踪流量所使用的内存,默认为32MB;由于suricata是通过五元组计算出一个hash值判断数据包属于哪个流,hash_size指的就是这个hash表的大小;Prealloc表示预先分配的内存,这样在识别流的时候会有更好的性能;emergency-recovery表示的是当前占用的内存大于memcap时进入内存紧急模式(emergency-mode),需要删除的流的百分比(相对于prealloc来说),这里表示需要删除30%的prealloc设置的空间的流,而删除的原则是根据后面会配置的flow-timeouts也就是超时时间来确定,如果没有流超时则会设置更严格的超时时间,如果还是没用suricata会删除最久未使用过的流;prune_flows表示处于紧急模式的时候每新增一条流将会删除掉旧的流的数量:
<code class="hljs lasso has-numbering">flow:
memcap: <span class="hljs-number">33554432</span>          <span class="hljs-variable">#The</span> maximum amount of <span class="hljs-built_in">bytes</span> the flow<span class="hljs-attribute">-engine</span> will make use of<span class="hljs-built_in">.</span>
hash_size: <span class="hljs-number">65536</span>          <span class="hljs-variable">#Flows</span> will be organized <span class="hljs-keyword">in</span> a hash<span class="hljs-attribute">-table</span><span class="hljs-built_in">.</span> <span class="hljs-keyword">With</span> this option you can <span class="hljs-built_in">set</span> the
<span class="hljs-variable">#size</span> of the hash<span class="hljs-attribute">-table</span><span class="hljs-built_in">.</span>
Prealloc: <span class="hljs-number">10000</span>           <span class="hljs-variable">#The</span> amount of flows Suricata has <span class="hljs-keyword">to</span> keep ready <span class="hljs-keyword">in</span> memory<span class="hljs-built_in">.</span>
emergency<span class="hljs-attribute">-recovery</span>: <span class="hljs-number">30</span>    <span class="hljs-variable">#Percentage</span> of <span class="hljs-number">1000</span> prealloc<span class="hljs-string">'d flows.
prune_flows: 5            #Amount of flows being terminated during the emergency mode.  </span></code><ul class="pre-numbering" style="display: block;"><li>1</li><li>2</li><li>3</li><li>4</li><li>5</li><li>6</li><li>7</li></ul>
flow-timeouts
上一节中提到的流的超时时间在此处设置。由于协议的不同,因此需要对不同的协议设置不同的阶段,对应的超时时间也会不同。TCP协议包括新建连接,建立连接和关闭连接,UDP只有新建连接和建立连接两个阶段。TCP新建连接就是三次握手,建立连接则是完成三次握手之后,而关闭连接则是reset数据包或是关闭tcp连接的四次握手。UDP新建连接是只有一方发送数据包,建立连接则是两方都发送数据包。下面是TCP、UDP、ICMP和default(其他协议)的超时配置,没有emergency前缀的是正常模式下的超时,带有emergency前缀的是在内存紧急模式下的超时时间:
<code class="hljs http has-numbering"><span class="hljs-attribute">flow-timeouts</span>: <span class="hljs-string"></span>

<span class="vhdl">  <span class="hljs-keyword">default</span>:
<span class="hljs-keyword">new</span>: <span class="hljs-number">30</span>                     #<span class="hljs-typename">Time</span>-<span class="hljs-keyword">out</span> <span class="hljs-keyword">in</span> seconds <span class="hljs-keyword">after</span> the last activity <span class="hljs-keyword">in</span> this flow <span class="hljs-keyword">in</span> a <span class="hljs-keyword">New</span> state.
established: <span class="hljs-number">300</span>            #<span class="hljs-typename">Time</span>-<span class="hljs-keyword">out</span> <span class="hljs-keyword">in</span> seconds <span class="hljs-keyword">after</span> the last activity <span class="hljs-keyword">in</span> this flow <span class="hljs-keyword">in</span> a Established
#state.
emergency_new: <span class="hljs-number">10</span>           #<span class="hljs-typename">Time</span>-<span class="hljs-keyword">out</span> <span class="hljs-keyword">in</span> seconds <span class="hljs-keyword">after</span> the last activity <span class="hljs-keyword">in</span> this flow <span class="hljs-keyword">in</span> a <span class="hljs-keyword">New</span> state
#during the emergency mode.
emergency_established: <span class="hljs-number">100</span>  #<span class="hljs-typename">Time</span>-<span class="hljs-keyword">out</span> <span class="hljs-keyword">in</span> seconds <span class="hljs-keyword">after</span> the last activity <span class="hljs-keyword">in</span> this flow <span class="hljs-keyword">in</span> a Established
#state <span class="hljs-keyword">in</span> the emergency mode.
tcp:
<span class="hljs-keyword">new</span>: <span class="hljs-number">60</span>
established: <span class="hljs-number">3600</span>
closed: <span class="hljs-number">120</span>
emergency_new: <span class="hljs-number">10</span>
emergency_established: <span class="hljs-number">300</span>
emergency_closed: <span class="hljs-number">20</span>
udp:
<span class="hljs-keyword">new</span>: <span class="hljs-number">30</span>
established: <span class="hljs-number">300</span>
emergency_new: <span class="hljs-number">10</span>
emergency_established: <span class="hljs-number">100</span>
icmp:
<span class="hljs-keyword">new</span>: <span class="hljs-number">30</span>
established: <span class="hljs-number">300</span>
emergency_new: <span class="hljs-number">10</span>
emergency_established: <span class="hljs-number">100</span></span></code><ul class="pre-numbering" style="display: block;"><li>1</li><li>2</li><li>3</li><li>4</li><li>5</li><li>6</li><li>7</li><li>8</li><li>9</li><li>10</li><li>11</li><li>12</li><li>13</li><li>14</li><li>15</li><li>16</li><li>17</li><li>18</li><li>19</li><li>20</li><li>21</li><li>22</li><li>23</li><li>24</li><li>25</li><li>26</li><li>27</li></ul>
stream
Stream引擎用于跟踪TCP连接,它有两个模块,分别是TCP数据流的跟踪和数据包重组引擎,前者用于监视TCP连接的状态并确定一个完整的数据流,后者则用于将数据流进行重组以便让后续的处理模块能够识别。首先是数据流跟踪模块的配置,和flow的一样,这里的memcap也是当前模块能占用内存的最大值;checksum_validation设置是否检查TCP数据包的CRC校验和,这个值用于保证数据包的完整性,如果设为yes则会丢弃那些校验失败的数据包;max_sessions对最大的TCP连接数进行了限制,防止其占用过多的内存;prealloc_sessions则是为了提高性能预先分配的连接数;midstream配置是否允许suricata从一个TCP连接的中间开始跟踪,出现这种情况几乎每次都会发生,因为当启动suricata时有部分TCP连接已经开始并处于建立连接的状态了,若设为true则表示可以从流中间跟踪,默认为false;async_oneside设置是否打开异步数据包处理,因为有时一个流可能不是从一个路由器而是多个不同的路由器进行传输,这样会导致数据包并不同步,true表示处理这种异步情况,默认为false:
<code class="hljs http has-numbering"><span class="hljs-attribute">stream</span>: <span class="hljs-string"></span>
<span class="hljs-attribute">memcap</span>: <span class="hljs-string">33554432              #Amount of flow-information (in bytes) to keep in memory.</span>
<span class="hljs-attribute">checksum_validation</span>: <span class="hljs-string">yes      #Validate packet checksum, reject packets with invalid checksums.</span>
<span class="hljs-attribute">max_sessions</span>: <span class="hljs-string">262144         # 256k concurrent sessions </span>
<span class="hljs-attribute">prealloc_sessions</span>: <span class="hljs-string">32768     # 32k sessions prealloc'd </span>
<span class="hljs-attribute">midstream</span>: <span class="hljs-string">false             # do not allow midstream session pickups </span>
<span class="hljs-attribute">async_oneside</span>: <span class="hljs-string">false         # do not enable async stream handling </span>
<span class="hljs-attribute">inline</span>: <span class="hljs-string">no                   # stream inline mode</span></code><ul class="pre-numbering" style="display: block;"><li>1</li><li>2</li><li>3</li><li>4</li><li>5</li><li>6</li><li>7</li><li>8</li></ul>
而最后的inline就看不大懂了,难道是选择yes就可以在IPS模式下工作,而no就不工作?官方文档中只提到了IDS和IPS模式下的流跟踪模块的不同,可以看到在IDS模式下只有服务端发送了ACK包suricata才会将之前监视的客户端数据包重组并进行下一步处理,而在IPS模式下由于需要实时监控并丢弃符合规则的包所以采用的是滑动窗口的方式,每当客户端发送一个数据包就会进行下一步处理:
IDS模式下
IPS模式下
Stream引擎的第二部分便是数据包重组,memcap就不做介绍了;因为数据包重组的代价比较大,需要的资源较多,为了避免无限制的重组超大数据包,depth对其进行了限制,默认为1MB;toserver_chunk_size和toclient_chunk_size只有超过设置的大小的原始数据包才会调用重组(字面上是这么理解):
<code class="hljs http has-numbering">  <span class="hljs-attribute">reassembly</span>: <span class="hljs-string">            </span>
<span class="hljs-attribute">memcap</span>: <span class="hljs-string">67108864             #Amount of packets (in bytes) to keep in memory.</span>
<span class="hljs-attribute">depth</span>: <span class="hljs-string">1048576               #The depth of the reassembling.</span>
<span class="hljs-attribute">toserver_chunk_size</span>: <span class="hljs-string">2560    # inspect raw stream in chunks of at least this size </span>
<span class="hljs-attribute">toclient_chunk_size</span>: <span class="hljs-string">2560    # inspect raw stream in chunks of at least </span></code><ul class="pre-numbering" style="display: block;"><li>1</li><li>2</li><li>3</li><li>4</li><li>5</li></ul>
应用层解析器
asn1_max_frames
Asn1是一种标准的描述数据和结构体的标准符号,大量用于通信和计算机网络中解码和传输数据,详细可以参考Abstract Syntax Notation One-维基百科。这里就是配置使用asn1进行解码的数据包的最大数量:<code class="hljs http has-numbering"> <span class="hljs-attribute">asn1_max_frames</span>: <span class="hljs-string">256</span></code><ul class="pre-numbering" style="display: block;"><li>1</li></ul>
app-layer
如果希望Suricata解析应用层协议的数据包则需要对其进行配置。包括tls、ftp、smtp、ssh、http等。下面是部分默认的配置,enable可以选择yes、no或detection-only,yes表示既解析和检测数据包,detection-only则是只检测不做额外的解析,no则不检测也不解析:<code class="hljs coffeescript has-numbering">app-<span class="hljs-attribute">layer</span>: <span class="hljs-attribute">protocols</span>: <span class="hljs-attribute">tls</span>: <span class="hljs-attribute">enabled</span>: <span class="hljs-literal">yes</span> detection-<span class="hljs-attribute">ports</span>: <span class="hljs-attribute">dp</span>: <span class="hljs-number">443</span> <span class="hljs-comment">#no-reassemble: yes</span> <span class="hljs-attribute">dcerpc</span>: <span class="hljs-attribute">enabled</span>: <span class="hljs-literal">yes</span> <span class="hljs-attribute">ftp</span>: <span class="hljs-attribute">enabled</span>: <span class="hljs-literal">yes</span> <span class="hljs-attribute">ssh</span>: <span class="hljs-attribute">enabled</span>: <span class="hljs-literal">yes</span> <span class="hljs-attribute">smtp</span>: <span class="hljs-attribute">enabled</span>: <span class="hljs-literal">yes</span> <span class="hljs-attribute">imap</span>: <span class="hljs-attribute">enabled</span>: detection-only <span class="hljs-attribute">msn</span>: <span class="hljs-attribute">enabled</span>: detection-only</code><ul class="pre-numbering" style="display: block;"><li>1</li><li>2</li><li>3</li><li>4</li><li>5</li><li>6</li><li>7</li><li>8</li><li>9</li><li>10</li><li>11</li><li>12</li><li>13</li><li>14</li><li>15</li><li>16</li><li>17</li><li>18</li><li>19</li><li>20</li></ul>
由于http协议的数据包比较复杂和常用,且它的解析器使用第三方库,因此下面对其单独说明。
libhtp
Suricata使用libhtp库对HTTP会话数据包进行解析。由于http的web服务器种类非常多导致了suricata必须处理每一种不同服务器所产生的http流量,用户在这里可以配置IP地址和web服务器种类的对应关系。可以选择的web服务器包括,默认的是IDS模式的服务器:<code class="hljs haskell has-numbering"><span class="hljs-type">Minimal</span> <span class="hljs-type">Generic</span> <span class="hljs-type">IDS</span> (<span class="hljs-default"><span class="hljs-keyword">default</span>) </span> <span class="hljs-type">IIS_4_0</span> <span class="hljs-type">IIS_5_0</span> <span class="hljs-type">IIS_5_1</span> <span class="hljs-type">IIS_6_0</span> <span class="hljs-type">IIS_7_0</span> <span class="hljs-type">IIS_7_5</span> <span class="hljs-type">Apache</span> <span class="hljs-type">Apache_2_2</span></code><ul class="pre-numbering" style="display: block;"><li>1</li><li>2</li><li>3</li><li>4</li><li>5</li><li>6</li><li>7</li><li>8</li><li>9</li><li>10</li><li>11</li></ul>
在每一种模式下可以配置IP地址、web服务器种类以及对request、response数据包大小的限制,默认的IDS模式表示所有的IP都使用这套配置。一套典型的配置如下,前面几项配置都容易理解double-decode-path和double-decode-query需要进行特殊说明。有些攻击web服务器的手法是通过在URI中加入特定的攻击字段来完成,URI由协议、主机名、端口号(大部分http协议是80端口,因此可省略)、路径和查询参数五部分组成(详情参考统一资源定位符-维基百科),能够控制的便是路径和查询参数,double-decode-path和double-decode-query就是可以检查这两部分是否经过了双重URL编码(可参考Double
Encoding-OWASP):
<code class="hljs http has-numbering"><span class="hljs-attribute">libhtp</span>: <span class="hljs-string"></span>
<span class="hljs-attribute">default-config</span>: <span class="hljs-string"></span>
<span class="hljs-attribute">personality</span>: <span class="hljs-string">IDS</span>
<span class="hljs-attribute">request-body-limit</span>: <span class="hljs-string">3072 </span>
<span class="hljs-attribute">response-body-limit</span>: <span class="hljs-string">3072 </span>
<span class="hljs-attribute">double-decode-path</span>: <span class="hljs-string">no</span>
<span class="hljs-attribute">double-decode-query</span>: <span class="hljs-string">no</span>

<span class="d">  server-config:
- apache:
address: [<span class="hljs-number">192.168</span>.1.0/<span class="hljs-number">24</span>, <span class="hljs-number">127.0</span>.0.0/<span class="hljs-number">8</span>, <span class="hljs-string">"::1"</span>]
personality: Apache_2_2
request-<span class="hljs-keyword">body</span>-limit: <span class="hljs-number">0</span>
response-<span class="hljs-keyword">body</span>-limit: <span class="hljs-number">0</span>
<span class="hljs-built_in">double</span>-decode-path: no
<span class="hljs-built_in">double</span>-decode-query: no

- iis7:
address:
- <span class="hljs-number">192.168</span>.0.0/<span class="hljs-number">24</span>
- <span class="hljs-number">192.168</span>.10.0/<span class="hljs-number">24</span>
personality: IIS_7_0
request-<span class="hljs-keyword">body</span>-limit: <span class="hljs-number">4096</span>
response-<span class="hljs-keyword">body</span>-limit: <span class="hljs-number">8192</span>
<span class="hljs-built_in">double</span>-decode-path: no
<span class="hljs-built_in">double</span>-decode-query: no</span></code><ul class="pre-numbering" style="display: block;"><li>1</li><li>2</li><li>3</li><li>4</li><li>5</li><li>6</li><li>7</li><li>8</li><li>9</li><li>10</li><li>11</li><li>12</li><li>13</li><li>14</li><li>15</li><li>16</li><li>17</li><li>18</li><li>19</li><li>20</li><li>21</li><li>22</li><li>23</li><li>24</li><li>25</li><li>26</li></ul>
除了以上的配置外,还有一些针对URI的斜杠、反斜杠及编码之类的配置,等后面用到的时候再详细了解:
<code class="hljs vbscript has-numbering">     # Configures whether backslash characters are treated as path segment
# separators. They are <span class="hljs-keyword">not</span> <span class="hljs-keyword">on</span> Unix systems, but are <span class="hljs-keyword">on</span> Windows systems.
# <span class="hljs-keyword">If</span> this setting <span class="hljs-keyword">is</span> enabled, a path such as <span class="hljs-string">"/one\two/three"</span> will be
# converted <span class="hljs-keyword">to</span> <span class="hljs-string">"/one/two/three"</span>.  Accepted values - yes, no.
path-backslash-separators: yes

# Configures whether consecutive path segment separators will be
# compressed. When enabled, a path such as <span class="hljs-string">"/one//two"</span> will be normalized
# <span class="hljs-keyword">to</span> <span class="hljs-string">"/one/two"</span>. The backslash_separators <span class="hljs-keyword">and</span> decode_separators
# parameters are used before compression takes place. <span class="hljs-keyword">For</span> example, <span class="hljs-keyword">if</span>
# backslash_separators <span class="hljs-keyword">and</span> decode_separators are both enabled, the path
# <span class="hljs-string">"/one\\/two\/%5cthree/%2f//four"</span> will be converted <span class="hljs-keyword">to</span>
# <span class="hljs-string">"/one/two/three/four"</span>.  Accepted values - yes, no.
path-compress-separators: yes

# This parameter <span class="hljs-keyword">is</span> used <span class="hljs-keyword">to</span> predict how a <span class="hljs-built_in">server</span> will react when control
# characters are present <span class="hljs-keyword">in</span> a <span class="hljs-built_in">request</span> path, but does <span class="hljs-keyword">not</span> affect path
# normalization.  Accepted values - none <span class="hljs-keyword">or</span> status_400 */
path-control-char-handling: none

# Controls the UTF-<span class="hljs-number">8</span> treatment of <span class="hljs-built_in">request</span> paths. One <span class="hljs-keyword">option</span> <span class="hljs-keyword">is</span> <span class="hljs-keyword">to</span> only
# validate path as UTF-<span class="hljs-number">8.</span> <span class="hljs-keyword">In</span> this <span class="hljs-keyword">case</span>, the UTF-<span class="hljs-number">8</span> flags will be raised
# as appropriate, <span class="hljs-keyword">and</span> the path will remain <span class="hljs-keyword">in</span> UTF-<span class="hljs-number">8</span> (<span class="hljs-keyword">if</span> it was UTF-<span class="hljs-number">8</span> <span class="hljs-keyword">in</span>
# the first place). The other <span class="hljs-keyword">option</span> <span class="hljs-keyword">is</span> <span class="hljs-keyword">to</span> convert a UTF-<span class="hljs-number">8</span> path into a
# single byte stream using best-fit mapping.  Accepted values - yes, no.
path-convert-utf8: yes

# Configures whether encoded path segment separators will be decoded.
# Apache does <span class="hljs-keyword">not</span> <span class="hljs-keyword">do</span> this, but IIS does. <span class="hljs-keyword">If</span> enabled, a path such as
# <span class="hljs-string">"/one%2ftwo"</span> will be normalized <span class="hljs-keyword">to</span> <span class="hljs-string">"/one/two"</span>. <span class="hljs-keyword">If</span> the
# backslash_separators <span class="hljs-keyword">option</span> <span class="hljs-keyword">is</span> also enabled, encoded backslash
# characters will be converted too (<span class="hljs-keyword">and</span> subseqently normalized <span class="hljs-keyword">to</span>
# forward slashes).  Accepted values - yes, no.
path-decode-separators: yes

# Configures whether %u-encoded sequences <span class="hljs-keyword">in</span> path will be decoded. Such
# sequences will be treated as invalid URL encoding <span class="hljs-keyword">if</span> decoding <span class="hljs-keyword">is</span> <span class="hljs-keyword">not</span>
# desireable.  Accepted values - yes, no.
path-decode-u-encoding: yes

# Configures how <span class="hljs-built_in">server</span> reacts <span class="hljs-keyword">to</span> invalid encoding <span class="hljs-keyword">in</span> path.  Accepted
# values - preserve_percent, remove_percent, decode_invalid, status_400
path-invalid-encoding-handling: preserve_percent

# Configures how <span class="hljs-built_in">server</span> reacts <span class="hljs-keyword">to</span> invalid UTF-<span class="hljs-number">8</span> characters <span class="hljs-keyword">in</span> path.
# This setting will <span class="hljs-keyword">not</span> affect path normalization; it only controls what
# <span class="hljs-built_in">response</span> status we expect <span class="hljs-keyword">for</span> a <span class="hljs-built_in">request</span> that contains invalid UTF-<span class="hljs-number">8</span>
# characters.  Accepted values - none, status_400.
path-invalid-utf8-handling: none

# Configures how <span class="hljs-built_in">server</span> reacts <span class="hljs-keyword">to</span> encoded NUL bytes. Some servers will
# terminate path at NUL, <span class="hljs-keyword">while</span> some will respond <span class="hljs-keyword">with</span> <span class="hljs-number">400</span> <span class="hljs-keyword">or</span> <span class="hljs-number">404.</span> When
# the termination <span class="hljs-keyword">option</span> <span class="hljs-keyword">is</span> <span class="hljs-keyword">not</span> used, the NUL byte will remain <span class="hljs-keyword">in</span> the
# path.  Accepted values - none, terminate, status_400, status_404.
path-nul-encoded-handling: none

# Configures how <span class="hljs-built_in">server</span> reacts <span class="hljs-keyword">to</span> raw NUL bytes. Some servers will
# terminate path at NUL, <span class="hljs-keyword">while</span> some will respond <span class="hljs-keyword">with</span> <span class="hljs-number">400</span> <span class="hljs-keyword">or</span> <span class="hljs-number">404.</span> When
# the termination <span class="hljs-keyword">option</span> <span class="hljs-keyword">is</span> <span class="hljs-keyword">not</span> used, the NUL byte will remain <span class="hljs-keyword">in</span> the
# path.  Accepted values - none, terminate, status_400, status_404.
path-nul-raw-handling: none

# Sets the replacement characater that will be used <span class="hljs-keyword">to</span> <span class="hljs-keyword">in</span> the lossy
# best-fit mapping from Unicode characters into single-byte streams.
# The question mark <span class="hljs-keyword">is</span> the <span class="hljs-keyword">default</span> replacement character.
<span class="hljs-keyword">set</span>-path-replacement-char: ?

# Controls what the library does when it encounters an Unicode character
# where only a single-byte would <span class="hljs-keyword">do</span> (e.g., the %u-encoded characters).
# Conversion always takes place; this parameter <span class="hljs-keyword">is</span> used <span class="hljs-keyword">to</span> correctly
# predict the status code used <span class="hljs-keyword">in</span> <span class="hljs-built_in">response</span>. <span class="hljs-keyword">In</span> the future there will
# probably be an <span class="hljs-keyword">option</span> <span class="hljs-keyword">to</span> convert such characters <span class="hljs-keyword">to</span> UCS-<span class="hljs-number">2</span> <span class="hljs-keyword">or</span> UTF-<span class="hljs-number">8.</span>
# Accepted values - bestfit, status_400 <span class="hljs-keyword">and</span> status_404.
<span class="hljs-keyword">set</span>-path-unicode-mapping: bestfit</code><ul class="pre-numbering" style="display: block;"><li>1</li><li>2</li><li>3</li><li>4</li><li>5</li><li>6</li><li>7</li><li>8</li><li>9</li><li>10</li><li>11</li><li>12</li><li>13</li><li>14</li><li>15</li><li>16</li><li>17</li><li>18</li><li>19</li><li>20</li><li>21</li><li>22</li><li>23</li><li>24</li><li>25</li><li>26</li><li>27</li><li>28</li><li>29</li><li>30</li><li>31</li><li>32</li><li>33</li><li>34</li><li>35</li><li>36</li><li>37</li><li>38</li><li>39</li><li>40</li><li>41</li><li>42</li><li>43</li><li>44</li><li>45</li><li>46</li><li>47</li><li>48</li><li>49</li><li>50</li><li>51</li><li>52</li><li>53</li><li>54</li><li>55</li><li>56</li><li>57</li><li>58</li><li>59</li><li>60</li><li>61</li><li>62</li><li>63</li><li>64</li><li>65</li><li>66</li><li>67</li><li>68</li><li>69</li><li>70</li><li>71</li><li>72</li><li>73</li><li>74</li></ul>
参考链接
https://redmine.openinfosecfoundation.org/projects/suricata/wiki/Suricatayamlhttp://en.wikipedia.org/wiki/Abstract_Syntax_Notation_One
https://www.owasp.org/index.php/Double_Encoding

相关文章推荐
- 导入 p12 时的对话框出来,是选择 login 还是 system?有什么区别吗?
- Java进制的转换
- HDU 1002 A + B Problem II
- 根号算法题库
- DenyHosts 阻止SSH暴力攻击
- Suricata配置文件说明1
- 6.C语言之数组
- 漫谈iOS程序的证书和签名机制
- JavaScript DOM 编程艺术(第2版) 读后感
- 固件空中升级(OTA)与固件二次引导的原理和设计
- 循环语句(1)
- windows 下配置python-opencv
- 在视频的左上角动态显示帧数、参看帧率
- 一款看各种参考手册的神器,IT工程师必备
- 索引技术详解(转)
- c#事务处理(Transaction)
- select a method for export 选项
- Mongoose中关联查询populate的使用
- 一招看穿一切旁氏骗局
- iOS开发支付