android的AsyncTask的应用
2016-03-10 14:19
399 查看
1 ) AsyncTask实现的原理
AsyncTask,是android提供的轻量级的异步类,可以直接继承AsyncTask,在类中实现异步操作使用的优点:简单,快捷,过程可控
使用的缺点:在使用多个异步操作和并需要进行Ui变更时,就变得复杂起来.
2 )Handler异步实现的原理
在Handler 异步实现时,主要是主线程启动Thread(子线程)并生成Message,传递给Handler然后Handler获取,并进行UI变更。使用的优点:结构清晰,功能定义明确;对于多个后台任务时,简单,清晰
使用的缺点:在单个后台异步处理时,显得代码过多,结构过于复杂(相对性)
使用AsyncTask类最少要重写以下这两个方法:doInBackground和onPostExecute
一个简单的小例子:(显示进度条)
main.xml<LinearLayout xmlns:android="http://schemas.android.com/apk/res/android"
xmlns:tools="http://schemas.android.com/tools"
android:id="@+id/LinearLayout1"
android:layout_width="match_parent"
android:layout_height="match_parent"
android:orientation="vertical"
tools:context="com.example.asynctask.MainActivity" >
<ProgressBar
android:id="@+id/bar"
style="?android:attr/progressBarStyleHorizontal"
android:layout_width="match_parent"
android:layout_height="wrap_content" />
<TextView
android:id="@+id/text"
android:layout_width="match_parent"
android:layout_height="wrap_content"
android:text="@string/hello_world" />
</LinearLayout>MainActivity.java
package com.example.asynctask;

import android.app.Activity;
import android.os.AsyncTask;
import android.os.Bundle;
import android.widget.ProgressBar;
import android.widget.TextView;

public class MainActivity extends Activity {
private ProgressBar progressBar;
private TextView textView;

@Override
protected void onCreate(Bundle savedInstanceState) {
super.onCreate(savedInstanceState);
setContentView(R.layout.main);

progressBar = (ProgressBar)findViewById(R.id.bar);
textView = (TextView)findViewById(R.id.text);
ChileUpdate chileUpdate = new ChileUpdate();
chileUpdate.execute(100);
}

//每次处理数据的类型是Integer,更新之后的数值是Integer,最后的结果是字符串String
private class ChileUpdate extends AsyncTask<Integer, Integer, String>{
/*
* 这个方法会在后台任务开始执行之前调用,用于进行一些界面上的初始化操作,
* 比如显示一个进度条对话框等。/
*/
@Override
protected void onPreExecute() {
}

/*
* 这个方法中的所有代码都会在子线程中运行,我们应该在这里去处理所有的耗时任
* 务。任务一旦完成就可以通过return 语句来将任务的执行结果返回,如果AsyncTask 的
* 第三个泛型参数指定的是Void,就可以不返回任务执行结果。
* 注意,在这个方法中是不可以进行UI 操作的,
* 如果需要更新UI元素,可以调用publishProgress(Progress...)
* publishProgress(Integer... values);/
*/
@Override
protected String doInBackground(Integer... params) {
for (int i = 0; i < 100; i++) {
progressBar.setProgress(i);
publishProgress(i);
try {
Thread.sleep(params[0]);
} catch (InterruptedException e) {
e.printStackTrace();
}
}
return "执行完毕";
}

/*
* 当在后台任务中调用了publishProgress(Progress...)方法后,这个方法就会很快被调用,
* 方法中携带的参数就是在后台任务中传递过来的。在这个方法中可以对UI 进行操作,
* 利用参数中的数值就可以对界面元素进行相应地更新。/
*/
@Override
protected void onProgressUpdate(Integer... values) {
textView.setText("当前进度:"+String.valueOf(values[0]));
}

/*
* 当后台任务执行完毕并通过return 语句进行返回时,这个方法就很快会被调用。
* 返回的数据会作为参数传递到此方法中,可以利用返回的数据来进行一些UI 操作,
* 比如说提醒任务执行的结果,以及关闭掉进度条对话框等。/
*/
@Override
protected void onPostExecute(String result) {
textView.setText(result);
}
}
}
实战:(文件管理器)
main.xml<LinearLayout xmlns:android="http://schemas.android.com/apk/res/android"
xmlns:tools="http://schemas.android.com/tools"
android:id="@+id/LinearLayout1"
android:layout_width="match_parent"
android:layout_height="match_parent"
android:orientation="vertical"
tools:context="com.example.asyncfile.MainActivity" >
<ListView
android:id="@+id/listView1"
android:layout_width="match_parent"
android:layout_height="match_parent" >
</ListView>
</LinearLayout>item.xml(listview的每个条目的布局)
<?xml version="1.0" encoding="utf-8"?>
<LinearLayout xmlns:android="http://schemas.android.com/apk/res/android"
android:id="@+id/LinearLayout1"
android:layout_width="match_parent"
android:layout_height="match_parent"
android:orientation="horizontal" >
<ImageView
android:contentDescription="@null"
android:id="@+id/imageView1"
android:layout_width="wrap_content"
android:layout_height="30sp"
android:src="@drawable/ic_launcher" />
<TextView
android:id="@+id/textView1"
android:layout_width="match_parent"
android:gravity="left|center_vertical"
android:layout_height="30sp" />
</LinearLayout>MainActivity.xml
package com.example.asyncfile;
import java.io.File;
import java.util.ArrayList;
import java.util.HashMap;
import java.util.List;
import java.util.Map;
import android.app.Activity;
import android.os.AsyncTask;
import android.os.Bundle;
import android.view.View;
import android.widget.AdapterView;
import android.widget.AdapterView.OnItemClickListener;
import android.widget.ListView;
import android.widget.SimpleAdapter;
public class MainActivity extends Activity {
private ListView listView;
private List<Map<String, Object>> allItem;
private SimpleAdapter adapter;
@Override
protected void onCreate(Bundle savedInstanceState) {
super.onCreate(savedInstanceState);
setContentView(R.layout.main);
allItem = new ArrayList<Map<String,Object>>();
listView = (ListView)findViewById(R.id.listView1);
File file = new File(File.separator);//从根目录开始
new ListFileThread().execute(file);
listView.setOnItemClickListener(new OnItemClickListener(){
@Override
public void onItemClick(AdapterView<?> parent, View view,
int position, long id) {
File currentFile = (File) allItem.get(position).get("name");
if(currentFile == null)//root目录的getParentFile是null
return;
if(currentFile.isDirectory()){
if(currentFile.listFiles() == null)//文件为空也不显示
return;
allItem = new ArrayList<Map<String,Object>>();
new ListFileThread().execute(currentFile);
}
}
});
}
class ListFileThread extends AsyncTask<File, File, String>{
@Override
protected String doInBackground(File... params) {
//该item可以返回上一层
Map<String, Object> fileItem = new HashMap<String, Object>();
fileItem.put("img", android.R.drawable.btn_plus);
fileItem.put("name", params[0].getParentFile());
allItem.add(fileItem);
if(params[0].isDirectory()){
File[] tempFile = params[0].listFiles();
if(tempFile != null){
for (int x = 0; x < tempFile.length; x++) {
publishProgress(tempFile[x]);
}
}
}
return "文件已列出";
}
@Override
protected void onPreExecute() {
}
//此函数中的代码可以放到doInBackground中
@Override
protected void onProgressUpdate(File... values) {
Map<String, Object> fileItem = new HashMap<String, Object>();
if(values[0].isDirectory()){
fileItem.put("img", android.R.drawable.btn_plus);
fileItem.put("name", values[0]);
}else{
fileItem.put("img", android.R.drawable.btn_minus);
fileItem.put("name", values[0]);
}
allItem.add(fileItem);
}
@Override
protected void onPostExecute(String result) {
adapter = new SimpleAdapter(MainActivity.this, allItem, R.layout.item,
new String[]{"img", "name"},
new int[]{R.id.imageView1, R.id.textView1});
listView.setAdapter(adapter);
}
}
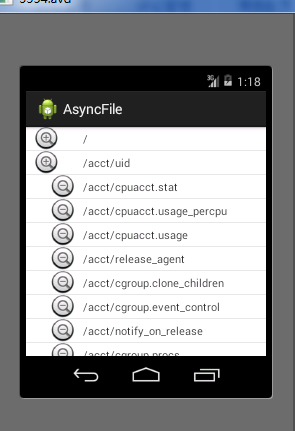
}效果:

相关文章推荐
- 使用C++实现JNI接口需要注意的事项
- Android IPC进程间通讯机制
- Android Manifest 用法
- [转载]Activity中ConfigChanges属性的用法
- Android之获取手机上的图片和视频缩略图thumbnails
- Android之使用Http协议实现文件上传功能
- Android学习笔记(二九):嵌入浏览器
- android string.xml文件中的整型和string型代替
- i-jetty环境搭配与编译
- android之定时器AlarmManager
- android wifi 无线调试
- Android Native 绘图方法
- Android java 与 javascript互访(相互调用)的方法例子
- android 代码实现控件之间的间距
- android FragmentPagerAdapter的“标准”配置
- Android"解决"onTouch和onClick的冲突问题
- android:installLocation简析
- android searchView的关闭事件
- SourceProvider.getJniDirectories