圆角之战-如何提高性能
2016-03-08 22:00
471 查看
实现方法
UIView.layer.cornerRadius = 5 //最直接的方法
这个属性只会影响视图的背景颜色和 border所以这种方法不适用于UILabel,如果要实现的话需要需要加上
UIView.layer.masksToBounds = true
否则对于 UILabel 这样内部还有子视图的控件就无能为力了
对于masksToBounds官方的解释:
When the value of this property is true, Core Animation creates an
implicit clipping mask that matches the bounds of the layer and
includes any corner radius effects. If a value for the mask property
is also specified, the two masks are multiplied to get the final mask
value.
掩膜部分为两个掩膜的乘积,这将导致离屏渲染。
为了在屏幕上实现特定的效果,合成器或者render server需要使用一块特定的离屏区域以实现最终的效果,而render server是一个单独的进程,它有一个服务器端的Core Animation版本接收来自应用端提交的view hierarchy,可以将其类比为画家在画布上作画之前,需要在调色板上将两种颜色调和之后才涂绘在画布上。
为什么这个过程很慢呢
撇开渲染的像素更多不说,还需要将其渲染到离屏的上下文中,并最终将它们传输到GPU上去呈现。而且还需要在主上下文和离屏上下文之间进行切换,并且其会阻塞图形的流水线,从而影响性能。
先不管这个复杂的过程是如何实现的,我们现在只需要知道这个过程会导致动画的延迟。可能圆角数量少的时候不会很明显,但是圆角数量多的时候差异就显示出来了。
除了简单的使用
UIView.layer.cornerRadius = 5
UIView.layer.masksToBounds = true
还有一种思路,就是使将我们将要展示的view进行剪裁,边缘剪成弧形这样最终的效果看起来也是圆角。
方法提供者链接:http://www.jianshu.com/p/f970872fdc22
实现如下
extension UIView {
func kt_addCorner(radius radius: CGFloat) {
self.kt_addCorner(radius: radi
b0fd
us, borderWidth: 1, backgroundColor: UIColor.clearColor(), borderColor: UIColor.blackColor())
}

func kt_addCorner(radius radius: CGFloat,
borderWidth: CGFloat,
backgroundColor: UIColor,
borderColor: UIColor) {
let imageView = UIImageView(image: kt_drawRectWithRoundedCorner(radius: radius,
borderWidth: borderWidth,
backgroundColor: backgroundColor,
borderColor: borderColor))
self.insertSubview(imageView, atIndex: 0)
}

func kt_drawRectWithRoundedCorner(radius radius: CGFloat,
borderWidth: CGFloat,
backgroundColor: UIColor,
borderColor: UIColor) -> UIImage {
let sizeToFit = CGSize(width: pixel(Double(self.bounds.size.width)), height: Double(self.bounds.size.height))
let halfBorderWidth = CGFloat(borderWidth / 2.0)

UIGraphicsBeginImageContextWithOptions(sizeToFit, false, UIScreen.mainScreen().scale)
let context = UIGraphicsGetCurrentContext()

CGContextSetLineWidth(context, borderWidth)
CGContextSetStrokeColorWithColor(context, borderColor.CGColor)
CGContextSetFillColorWithColor(context, backgroundColor.CGColor)

let width = sizeToFit.width, height = sizeToFit.height
CGContextMoveToPoint(context, width - halfBorderWidth, radius + halfBorderWidth)  // 开始坐标右边开始
CGContextAddArcToPoint(context, width - halfBorderWidth, height - halfBorderWidth, width - radius - halfBorderWidth, height - halfBorderWidth, radius)  // 右下角角度
CGContextAddArcToPoint(context, halfBorderWidth, height - halfBorderWidth, halfBorderWidth, height - radius - halfBorderWidth, radius) // 左下角角度
CGContextAddArcToPoint(context, halfBorderWidth, halfBorderWidth, width - halfBorderWidth, halfBorderWidth, radius) // 左上角
CGContextAddArcToPoint(context, width - halfBorderWidth, halfBorderWidth, width - halfBorderWidth, radius + halfBorderWidth, radius) // 右上角

CGContextDrawPath(UIGraphicsGetCurrentContext(), .FillStroke)
let output = UIGraphicsGetImageFromCurrentImageContext()
UIGraphicsEndImageContext()
return output
}
}

extension UIImageView {
/**
/ !!!只有当 imageView 不为nil 时,调用此方法才有效果

:param: radius 圆角半径
*/
override func kt_addCorner(radius radius: CGFloat) {
// 被注释的是图片添加圆角的 OC 写法
//        self.image = self.image?.imageAddCornerWithRadius(radius, andSize: self.bounds.size)
self.image = self.image?.kt_drawRectWithRoundedCorner(radius: radius, self.bounds.size)
}
}

extension UIImage {
func kt_drawRectWithRoundedCorner(radius radius: CGFloat, _ sizetoFit: CGSize) -> UIImage {
let rect = CGRect(origin: CGPoint(x: 0, y: 0), size: sizetoFit)

UIGraphicsBeginImageContextWithOptions(rect.size, false, UIScreen.mainScreen().scale)
CGContextAddPath(UIGraphicsGetCurrentContext(),
UIBezierPath(roundedRect: rect, byRoundingCorners: UIRectCorner.AllCorners,
cornerRadii: CGSize(width: radius, height: radius)).CGPath)
CGContextClip(UIGraphicsGetCurrentContext())

self.drawInRect(rect)
CGContextDrawPath(UIGraphicsGetCurrentContext(), .FillStroke)
let output = UIGraphicsGetImageFromCurrentImageContext()
UIGraphicsEndImageContext()

return output
}
}

private func roundbyunit(num: Double, inout _ unit: Double) -> Double {
let remain = modf(num, &unit)
if (remain > unit / 2.0) {
return ceilbyunit(num, &unit)
} else {
return floorbyunit(num, &unit)
}
}
private func ceilbyunit(num: Double, inout _ unit: Double) -> Double {
return num - modf(num, &unit) + unit
}

private func floorbyunit(num: Double, inout _ unit: Double) -> Double {
return num - modf(num, &unit)
}

private func pixel(num: Double) -> Double {
var unit: Double
switch Int(UIScreen.mainScreen().scale) {
case 1: unit = 1.0 / 1.0
case 2: unit = 1.0 / 2.0
case 3: unit = 1.0 / 3.0
default: unit = 0.0
}
return roundbyunit(num, &unit)
}
最后调用
var img_view = UIImageView.init(frame: CGRect(x: 0 + 10 * i, y: 20, width: 10, height: 20))
img_view.image = UIImage(named: "img_replys")
//注意这里的图片不能为空,否则无效果
img_view.layer.cornerRadius = CGFloat(arc4random_uniform(UInt32(20)) + UInt32(5))img_view.kt_addCorner(radius: CGFloat(arc4random_uniform(UInt32(20)) + UInt32(5)))

//UIView 类似
性能测试
既然两种方法都可以实现,性能一样吗?我们来做个测试:创建一个tableview,由少到多的增加带圆角图片的数量,使用instruments来测试FPS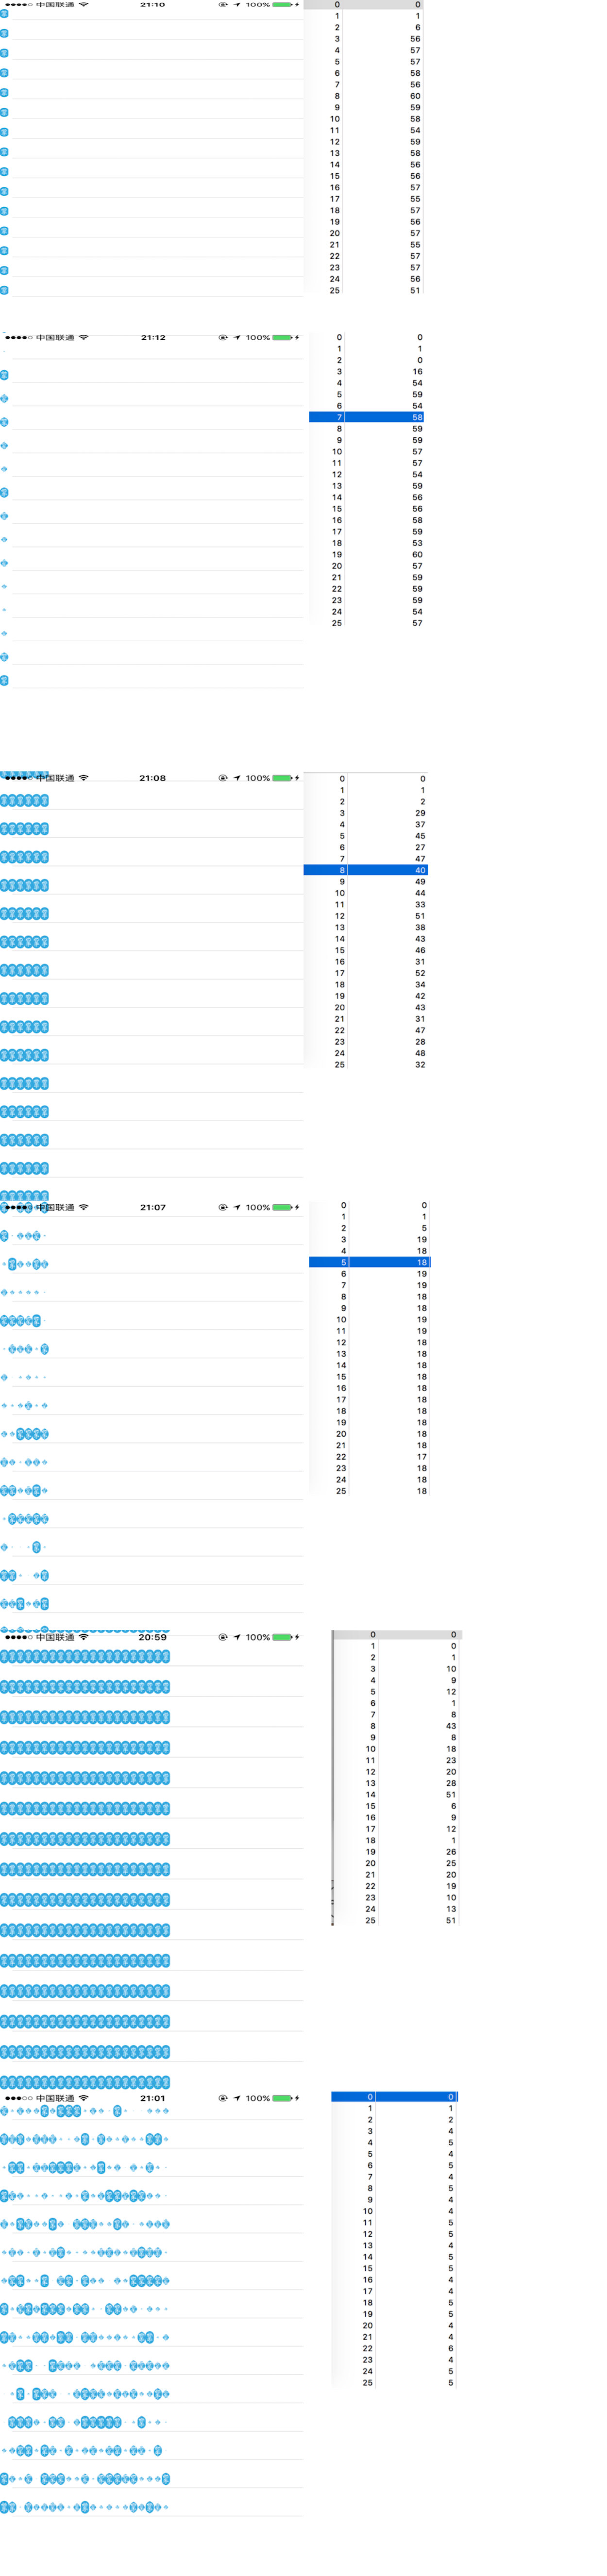
显而易见,当一个页面中圆角数量很少是,或者性能不需要优化的时候,我们可以很直接的使用layer来设置达到效果。但随着需求增多,比如一个table中要显示很多带有圆角的用户头像,我们就需要寻求解决性能问题方法了。
系统的资源是有限的,如果达到一个峰值,什么方法估计也是无能为力了。

相关文章推荐
- 彻底搞定C语言指针详解-完整版-时候初学者-必备
- Linux文件系统及常用命令
- Linux文件系统及常用命令
- 102. Binary Tree Level Order Traversal
- [刷题] Merge k Sorted Arrays
- Linux文件系统及常用命令
- html5游戏开发1 骰子游戏
- switch 语句
- 文件操作
- 适配器模式(一)
- 求奇数的乘积
- hadoop 学习笔记
- Gray Code
- 206. Reverse Linked List
- 九度OJ 1471-1480(10/10)
- 文件按修改时间和创建时间遍历
- 十天精通CSS3(11)
- Codeforces 650A Watchmen(数学,算法优化)
- hadoop生态系统学习之路(一)Cloudera Manager一键安装
- pdo数据库操作类