Android中View自定义XML属性详解以及R.attr与R.styleable的区别
2016-03-02 00:59
696 查看
为View添加自定义XML属性
Android中的各种Widget都提供了很多XML属性,我们可以利用这些XML属性在layout文件中为Widget的属性赋值。如下所示:
<TextView
android:layout_width="wrap_content"
android:layout_height="wrap_content"
android:text="Hello World!" />
我们可以通过TextView所提供的XML属性
android:text为TextView的文本赋值。
我们在自定义View的时候也会经常需要自定义View的XML属性。
假设我们有一个自定义的View,其类名是com.ispring.attr.MyView,其中com.ispring.attr是应用程序的包名。
要想自定义XML属性,总的来说包括三步:
在xml资源文件中定义各种
attr,指定
attr的数据类型。
在自定义View的构造函数中解析这些从XML中定义的属性值,将其存放到View对应的成员变量中。
在layout文件中为自定义View的XML属性赋值。
首先,我们在res/values目录下新建了一个名为attrs_my_views.xml文件,文件名是什么不重要,只要是xml文件就行。我们在该文件中定义MyView所支持的XML属性。该文件的根结点是
<resources>,我们在
<resources>节点下可以添加多个
<attr>节点,在
<attr>节点中通过
name指定XML属性名称,通过
format指定XML属性值的类型,如下图所示:
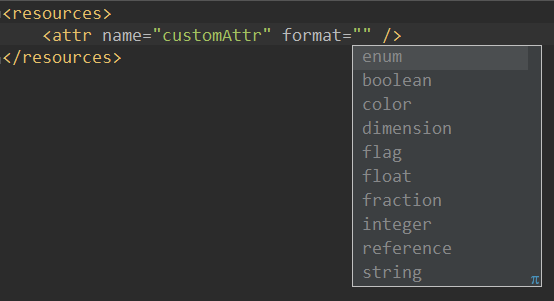
由上图我们可知,format支持的类型有enum、boolean、color、dimension、flag、float、fraction、integer、reference、string。
当我们指定了XML属性的名称和属性值的类型之后,我们就可以在layout文件中通过XML属性为其赋值了。如下图所示:

我们通过
<com.ispring.attr.MyView>在layout中引入了MyView,为了能够使用自定义属性,我们通常要指定一个自定义的命名空间以区别于Android的命名空间
xmlns:android,我们自定义命名空间的名字可以是任意的,通常我一般用
xmlns:app。我的App的命名空间是
com.ispring.attr,如果用Eclipse开发,那么可以这样定义命名空间
xmlns:app=http://schemas.android.com/apk/res/com.ispring.attr,但是在Android Studio中这样定义命名空间会有问题。Android Studio使用Gradle进行build,而Gradle不允许自定义的命名空间以包名结尾,在Android Studio中可以这样定义命名空间
xmlns:app="http://schemas.android.com/apk/res-auto",这样定义的命名空间自动指向当前App的命名空间。
在正确定义app的命名空间之后,我们就可以用
app:customAttr为MyView的customAttr属性赋值了。如果我们将customAttr的format定义为boolean的,那么此处就只能填写true或者false,填写其他类型的值会报错。
下面再对attr的format的类型进行一下说明。
boolean
boolean表示attr是布尔类型的值,取值只能是true或false。
string
string表示attr是字符串类型。
integer
integer表示attr是整数类型,取值只能是整数,不能是浮点数。
float
float表示attr是浮点数类型,取值只能是浮点数或整数。
fraction
fraction表示attr是百分数类型,取值只能以%结尾,例如30%、120.5%等。
color
color表示attr是颜色类型,例如#ff0000,也可以使用一个指向Color的资源,比如@android:color/background_dark,但是不能用0xffff0000这样的值。
dimension
dimension表示attr是尺寸类型,例如取值16px、16dp,也可以使用一个指向
<dimen>类型的资源,比如
@android:dimen/app_icon_size。
reference
reference表示attr的值只能指向某一资源的ID,例如取值
@id/textView。
enum
enum表示attr是枚举类型,在定义enum类型的attr时,可以将attr的format设置为enum,也可以不用设置attr的format属性,但是必须在attr节点下面添加一个或多个enum节点。如下所示:
<attr name="customAttr">
<enum name="man" value="0" />
<enum name="woman" value="1" />
</attr>
这样attr的属性值只能取man或woman了。
flag
flag表示attr是bit位标记,flag与enum有相似之处,定义了flag的attr,在设置值时,可以通过
|设置多个值,而且每个值都对应一个bit位,这样通过按位或操作符
|可以将多个值合成一个值,我们一般在用flag表示某个字段支持多个特性,需要注意的是,要想使用flag类型,不能在attr上设置format为flag,不要设置attr的format的属性,直接在attr节点下面添加flag节点即可。如下所示:
<attr name="customAttr">
<flag name="none" value="0" />
<flag name="bold" value="0x1" />
<flag name="italic" value="0x2" />
<flag name="underline" value="0x4" />
</attr>
在
<attr>节点下通过定义多个
<flag>表示其支持的值,value的值一般是0或者是2的N次方(N为大于等于0的整数),对于上面的例子我们在实际设置值是可以设置单独的值,如none、bold、italic、underline,也可以通过
|设置多个值,例如
app:customAttr="italic|underline"。
MyView直接继承自View,我想让MyView可以显示文本,即我传递文本给MyView,MyView能画出来,就相当于非常简单的TextView。
因此,我的attrs_my_view.xml如下所示:
<resources>
<attr name="customText" format="string" />
<attr name="customColor" format="color" />
</resources>
我们定义了两个XML属性,customText是一个string类型,表示MyView要显示的文本,customColor是color类型,表示文本的颜色。
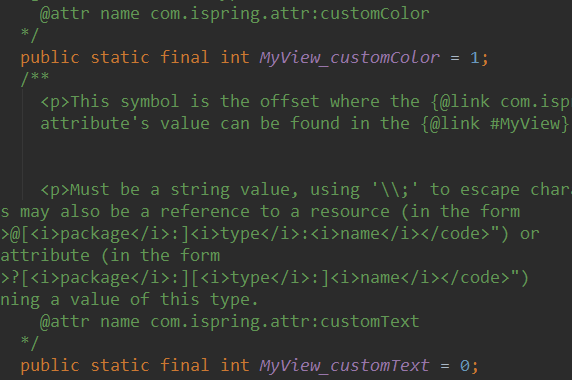
对项目进行编译之后会生成R.java文件,R.java文件对应着R类。如果是Android Studio项目,那么R文件的目录是app\build\generated\source\r\debug\com\ispring\attr\R.java,在该文件中有内部类
public static final class attr,在R.attr中会发现有
customText和
customColor,如下图所示:
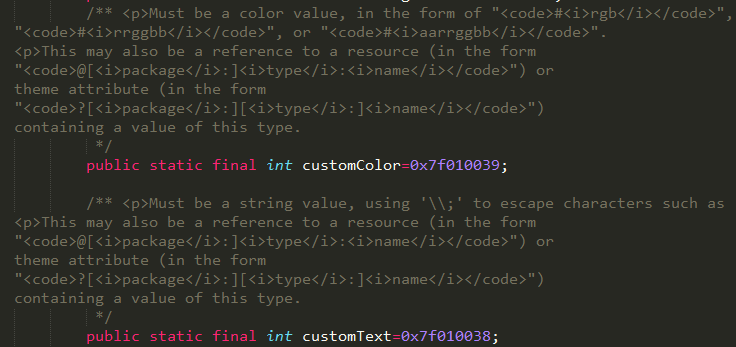
R.attr.customText和
R.attr.customColor分别是属性
customText和
customColor的资源ID。
在使用MyView时,我们可以在layout文件中为MyView设置customText和customColor两个XML属性。layout文件如下所示:
<?xml version="1.0" encoding="utf-8"?>
<RelativeLayout xmlns:android="http://schemas.android.com/apk/res/android"
xmlns:tools="http://schemas.android.com/tools"
xmlns:app="http://schemas.android.com/apk/res-auto"
android:layout_width="match_parent"
android:layout_height="match_parent"
tools:context="com.ispring.attr.MainActivity">

<com.ispring.attr.MyView
android:layout_width="match_parent"
android:layout_height="match_parent"
app:customText="Hello World!"
app:customColor="#FF0000FF"
/>

</RelativeLayout>
运行效果如下所示:
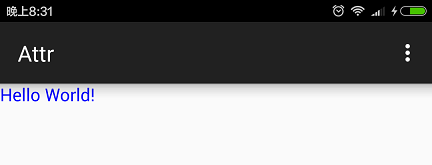
可以看出在界面上显示了蓝色的“Hello World!”文本,说明MyView的自定义属性起作用了。
我们看一下MyView的具体实现,MyView的代码如下所示:
package com.ispring.attr;

import android.content.Context;
import android.graphics.Canvas;
import android.graphics.Paint;
import android.text.TextPaint;
import android.util.AttributeSet;
import android.view.View;

public class MyView extends View {
//存储要显示的文本
private String mCustomText;
//存储文本的显示颜色
private int mCustomColor = 0xFF000000;
//画笔
private TextPaint mTextPaint;
//字体大小
private float fontSize = getResources().getDimension(R.dimen.fontSize);

public MyView(Context context) {
super(context);
init(null, 0);
}

public MyView(Context context, AttributeSet attrs) {
super(context, attrs);
init(attrs, 0);
}

public MyView(Context context, AttributeSet attrs, int defStyle) {
super(context, attrs, defStyle);
init(attrs, defStyle);
}

private void init(AttributeSet attrs, int defStyle) {
//首先判断attrs是否为null
if(attrs != null){
//获取AttributeSet中所有的XML属性的数量
int count = attrs.getAttributeCount();
//遍历AttributeSet中的XML属性
for(int i = 0; i < count; i++){
//获取attr的资源ID
int attrResId = attrs.getAttributeNameResource(i);
switch (attrResId){
case R.attr.customText:
//customText属性
mCustomText = attrs.getAttributeValue(i);
break;
case R.attr.customColor:
//customColor属性
//如果读取不到对应的颜色值,那么就用黑色作为默认颜色
mCustomColor = attrs.getAttributeIntValue(i, 0xFF000000);
break;
}
}
}

//初始化画笔
mTextPaint = new TextPaint();
mTextPaint.setFlags(Paint.ANTI_ALIAS_FLAG);
mTextPaint.setTextSize(fontSize);
}

@Override
protected void onDraw(Canvas canvas) {
super.onDraw(canvas);

if(mCustomText != null && !mCustomText.equals("")){
mTextPaint.setColor(mCustomColor);
//将文本绘制显示出来
canvas.drawText(mCustomText, 0, fontSize, mTextPaint);
}
}
}
我们在MyView中定义了两个成员变量mCustomText和mCustomColor。MyView的几个构造函数都会调用init方法,我们重点看一下init方法。
传递给init方法的是一个AttributeSet对象,可以把它看成一个索引数组,这个数组里面存储着属性的索引,通过索引可以得到XML属性名和属性值。
通过调用AttributeSet的getAttributeCount()方法可以获得XML属性的数量,然后我们就可以在for循环中通过索引遍历AttributeSet的属性名和属性值。AttributeSet中有很多getXXX方法,一般必须的参数都是索引号,说几个常用的方法:
通过AttributeSet的
public abstract String getAttributeName (int index)方法可以得到对应索引的XML属性名。
通过AttributeSet的
public abstract int getAttributeNameResource (int index)方法可以得到对应索引的XML属性在R.attr中的资源ID,例如R.attr.customText、R.attr.customColor。
如果index对应的XML属性的format是string,那么通过AttributeSet的
public abstract String getAttributeName (int index)方法,可以得到对应索引的XML属性的值,该方法返回的是String。除此之外,AttributeSet还有getAttributeIntValue、getAttributeFloatValue、getAttributeListValue等方法,返回不同类型的属性值。
我们通过attrs.getAttributeNameResource(i)得到获取attr的资源ID,然后对attrResId进行switch判断:
如果是R.attr.customText,表示当前属性是customText,我们通过attrs.getAttributeValue(i)读取customText属性值,并将其赋值给成员变量mCustomText。
如果是R.attr.customColor,表示当前属性是customColor,由于Android中用一个4字节的int型整数表示颜色,所以我们通过attrs.getAttributeIntValue(i, 0xFF000000)读取了customColor的颜色值,并将其赋值给成员变量mCustomColor。
我们重写了MyView的onDraw方法,通过执行mTextPaint.setColor(mCustomColor)把画笔设置成mCustomColor的颜色,通过执行canvas.drawText(mCustomText, 0, fontSize, mTextPaint)将mCustomText绘制到界面上。这样,MyView就使用了customText和customColor这两个XML属性。
使用<declare-styleable>
和obtainStyledAttributes方法
我们上面定义的customText和customColor这两个<attr>属性都是直接在
<resources>节点下定义的,这样定义
<attr>属性存在一个问题:不能想通过style或theme设置这两个属性的值。
要想能够通过style或theme设置XML属性的值,需要在
<resources>节点下添加
<declare-styleable>节点,并在
<declare-styleable>节点下定义
<attr>,如下所示:
<resources>
<declare-styleable name="MyView">
<attr name="customText" format="string" />
<attr name="customColor" format="color" />
</declare-styleable>
</resources>
需要给
<declare-styleable>设置name属性,一般name设置为自定义View的名字,我们此处设置为MyView。
在
<declare-styleable>下面定义的
<attr>属性与直接在
<resources>定义的
<attr>属性其实本质上没有太大区别,无论哪种方式定义
<attr>,都会在R.attr类中定义R.attr.customText和R.attr.customColor。不同的是,
<declare-styleable name="MyView">节点会在R.styleable这个内部类中有如下定义:
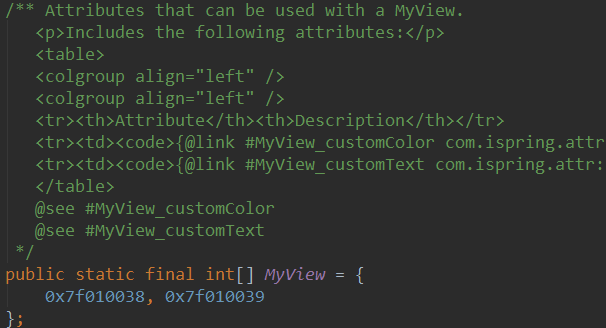
R.styleable.MyView是一个int数组,其值为0x7f010038和 0x7f010039。0x7f010038就是属性R.attr.customText,0x7f010039就是属性R.attr.customColor。也就是R.styleable.MyView等价于数组[R.attr.customText, R.attr.customColor]。R.styleable.MyView的作用会在下面介绍。
我们同样可以在R.styleable中发现R.styleable.MyView_customColor和R.styleable.MyView_customText这两个ID。
<declare-styleable name="MyView">中的name加上里面的
<attr>属性的name就组成了R.styleable中的MyView_customColor和MyView_customText,中间以下划线连接。如下图所示:
其中R.styleable.MyView_customColor对应R.attr.customColor,R.styleable.MyView_customText对应R.attr.customText。MyView_customColor和MyView_customText的作用在下面介绍。
在
<declare-styleable>中定义的
<attr>在MyView中需要通过调用theme的obtainStyledAttributes方法来读取解析属性值。obtainStyledAttributes有三个重载方法,签名分别如下所示:
public TypedArray obtainStyledAttributes (int[] attrs)
public TypedArray obtainStyledAttributes (int resid, int[] attrs)
public TypedArray obtainStyledAttributes (AttributeSet set, int[] attrs, int defStyleAttr, int defStyleRes)
我们先看第三个最复杂的方法,在MyView中使用方法如下所示:
private void init(AttributeSet attributeSet, int defStyle) {
//首先判断attributeSet是否为null
if(attributeSet != null){
//获取当前MyView所在的Activity的theme
Resources.Theme theme = getContext().getTheme();
//通过theme的obtainStyledAttributes方法获取TypedArray对象
TypedArray typedArray = theme.obtainStyledAttributes(attributeSet, R.styleable.MyView, 0, 0);
//获取typedArray的长度
int count = typedArray.getIndexCount();
//通过for循环遍历typedArray
for(int i = 0; i < count; i++){
//通过typedArray的getIndex方法获取指向R.styleable中对应的属性ID
int styledAttr = typedArray.getIndex(i);
switch (styledAttr){
case R.styleable.MyView_customText:
//如果是R.styleable.MyView_customText,表示属性是customText
//通过typedArray的getString方法获取字符串值
mCustomText = typedArray.getString(i);
break;
case R.styleable.MyView_customColor:
//如果是R.styleable.MyView_customColor,表示属性是customColor
//通过typedArray的getColor方法获取整数类型的颜色值
mCustomColor = typedArray.getColor(i, 0xFF000000);
break;
}
}
//在使用完typedArray之后,要调用recycle方法回收资源
typedArray.recycle();
}

...
}
我们在res/valeus/styles.xml文件中定义了如下style:
<style name="RedStyle">
<item name="customText">customText in RedStyle</item>
<!-- 红色 -->
<item name="customColor">#FFFF0000</item>
</style>
然后我们在layout文件中将MyView的style属性设置为上面的style,如下所示:
<com.ispring.attr.MyView
android:layout_width="match_parent"
android:layout_height="match_parent"
app:customText="customText in AttributeSet"
style="@style/RedStyle"
/>
运行效果如下所示:
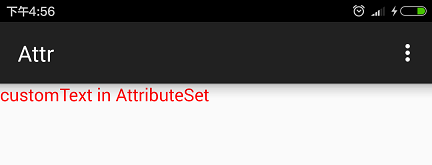
我们虽然没有直接设置MyView的customText和customColor两个属性,但是通过设置style属性之后,在效果上RedStyle中所定义的属性值应用到了MyView上了。
下面我们就来解释一下init方法:
首先我们通过
getContext().getTheme()获取到了当前MyView所在的Activity的theme。
然后调用方法
theme.obtainStyledAttributes(attributeSet, R.styleable.MyView, 0, 0),该方法返回一个TypedArray对象。TypedArray是一个数组,通过该数组可以获取应用了style和theme的XML属性值。上面这个方法有四个参数,后面两个参数都是0,大家暂且忽略不计,后面会介绍。第一个参数还是AttributeSet对象,第二个参数是一个int类型的数组,该数组表示想要获取的属性值的属性的R.attr中的ID,此处我们传入的是R.styleable.MyView,在上面我们已经提到其值等价于[R.attr.customText, R.attr.customColor],表示我们此处想获取customText和customColor这两个属性的值。
如果在layout文件中直接为MyView设置了某些XML属性,那么这些XML属性及其属性值就会出现在AttributeSet中,那么Android就会直接使用AttributeSet中该XML属性值作为
theme.obtainStyledAttributes()的返回值,比如在上面的例子中,我们通过
app:customText="customText in AttributeSet"设置了MyView的XML属性,最终运行的效果显示的也是文本”customText in AttributeSet”。
如果在layout文件中没有为MyView设置某个XML属性,但是给MyView设置了style属性,例如
style="@style/RedStyle",并且在style中指定了相应的XML属性,那么Android就会用style属性所对应的style资源中的XML属性值作为
theme.obtainStyledAttributes()的返回值。比如在上面的例子中,我们在layout文件中没有设置
app:customColor的值,但是在其style属性所对应的
RedStyle资源中将
customColor设置成了红色
#FFFF0000,最终文本也是以红色显示在界面上的。
通过以上描述,我们可以知道,View的style属性对应的style资源中定义的XML属性值其实是View直接在layou文件中定义XML属性值的替补值,是用于补漏的,AttributeSet(即在layout中直接定义XML属性)的优先级高于style属性中资源所定义的属性值。
obtainStyledAttributes方法之defStyleAttr
我们再看一下方法obtainStyledAttributes (AttributeSet set, int[] attrs, int defStyleAttr, int defStyleRes)中的第三个参数defStyleAttr,这个参数表示的是一个
<style>中某个属性的ID,当Android在AttributeSet和style属性所定义的style资源中都没有找到XML属性值时,就会尝试查找当前theme(theme其实就是一个
<style>资源)中属性为defStyleAttr的值,如果其值是一个style资源,那么Android就会去该资源中再去查找XML属性值。可能听起来比较费劲,我们举个例子。
我们更改了values/styles.xml文件,如下所示:
<resources>

<!-- Base application theme. -->
<style name="AppTheme" parent="Theme.AppCompat.Light.DarkActionBar">
<item name="myViewStyle">@style/GreenStyle</item>
</style>

<style name="GreenStyle">
<item name="customText">customText in GreenStyle</item>
<item name="customColor">#FF00FF00</item>
</style>

<style name="HelloWorldStyle">
<item name="customText">Hello World!</item>
</style>

<style name="RedStyle">
<item name="customText">customText in RedStyle</item>
<item name="customColor">#FFFF0000</item>
</style>

</resources>
我们添加了HelloWorldStyle和GreenStyle,其中HelloWorldStyle只定义了customText的属性值,而GreenStyle同时定义了customText和customColor的值,其中customColor定义为绿色。
在AppTheme中,我们设置了myViewStyle这个属性的值,如下所示:
<item name="myViewStyle">@style/GreenStyle</item>
myViewStyle这个属性是在values/attrs_my_view.xml中定义的,如下所示:
<resources>
<attr name="myViewStyle" format="reference" />
<declare-styleable name="MyView">
<attr name="customText" format="string" />
<attr name="customColor" format="color" />
</declare-styleable>
</resources>
myViewStyle被定义为一个reference格式,即其值指向一个资源类型,我们在AppTheme中将其赋值为
@style/GreenStyle,即在AppTheme中,myViewStyle的就是GreenStyle,其指向了一个style资源。
我们更改MyView代码,如下所示:
//通过theme的obtainStyledAttributes方法获取TypedArray对象
TypedArray typedArray = theme.obtainStyledAttributes(attributeSet, R.styleable.MyView, R.attr.myViewStyle, 0);
注意,上面obtainStyledAttributes方法最后一个参数还是为0,可以忽略,但是第三个参数的值不再是0,而是R.attr.myViewStyle。
然后我们更新layout文件,如下所示:
<com.ispring.attr.MyView
android:layout_width="match_parent"
android:layout_height="match_parent"
style="@style/HelloWorldStyle"
/>
我们为MyView设置了style属性,其值为HelloWorldStyle。
程序运行效果如下所示:
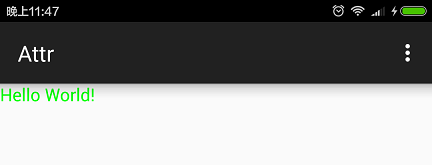
我们发现结果是绿色的“Hello World!”,我们解释一下原因。
由于这次我们没有通过layout文件直接设置MyView的XML属性的值,所以AttributeSet本身是没有XML属性值的,我们直接忽略掉AttributeSet。
我们通过
style="@style/HelloWorldStyle"为MyView设置了style为HelloWorldStyle,HelloWorldStyle中定义customText的属性值为”Hello World!”,所以最终customText的值就是”Hello World!”,在界面上显示的也是该值。
HelloWorldStyle中并没有定义customColor属性值。我们将theme.obtainStyledAttributes()方法的第三个参数设置为R.attr.myViewStyle,此处的theme就是我们上面提到的AppTheme,Android会去AppTheme中查找属性为myViewStyle的值,我们之前提到了,它的值就是
@style/GreenStyle,即GreenStyle,由于该值是个style资源,Android就会去该资源中查找customColor的值,GreenStyle定义了customColor的颜色为绿色,所以MyView最终所使用的customColor的值就是绿色。
综上,我们发现,此处的第三个参数的作用是:当在AttributeSet和style属性中都没有找到属性值时,就去Theme的某个属性(即第三个参数)中查看其值是否是style资源,如果是style资源再去这个style资源中查找XML属性值作为替补值。
obtainStyledAttributes方法之defStyleRes
最后我们看一下方法obtainStyledAttributes (AttributeSet set, int[] attrs, int defStyleAttr, int defStyleRes)中的第四个参数defStyleRes。与defStyleAttr类似,defStyleRes是前面几项的替补值,defStyleRes的优先级最低。与defStyleAttr不同的是,defStyleRes本身直接表示一个style资源,而theme要通过属性defStyleAttr间接找到style资源。
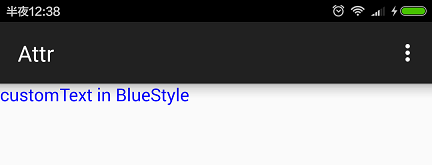
我们添加了BlueStyle这个style,如下所示:
<style name="BlueStyle">
<item name="customText">customText in BlueStyle</item>
<item name="customColor">#FF0000FF</item>
</style>
并将layout文件改为如下所示:
<com.ispring.attr.MyView
android:layout_width="match_parent"
android:layout_height="match_parent"
/>
我们更改MyView代码如下所示:
TypedArray typedArray = theme.obtainStyledAttributes(attributeSet, R.styleable.MyView, 0, R.style.BlueStyle);
第三个参数设置为0,第四个参数不再是0,而是R.style.BlueStyle。运行界面如下所示:
只有第三个参数defStyleAttr为0或者该属性在theme中找不到时,才会使用第四个参数defStyleRes。如果第三个参数defStyleAttr不为0,但是theme的defStyleAttr所对应的属性值中的style没有定义任何XML属性值,那么第四个参数也不会defStyleRes被使用。
总结
可以不通过<declare-styleable>节点定义XML属性,不过还是建议将XML属性定义在
<declare-styleable>节点下,因为这样Android会在R.styleable下面帮我们生成很多有用的常量供我们直接使用。
obtainStyledAttributes方法中,优先级从高到低依次是:直接在layout中设置View的XML属性值(AttributeSet) > 设置View的style属性 > defStyleAttr > defStyleRes
希望本文对大家理解与使用自定义XML属性有所帮助!
相关阅读:
我的Android博文整理汇总

相关文章推荐
- Android 应用程序无缝设计
- Android画布canvas rotate,translate的理解
- Android基础:button imageview
- Android 仿美团网,探索ListView的A-Z字母排序功能实现选择城市
- Android自定义布局弹窗
- Styling the Action Bar --1.1.3
- 自定义View之刻度盘
- Android ANR对话框
- android 支付宝集成 使用常见错误
- android 热修复 HotFix 混淆apk生成patch包方案
- Android Studio从jCenter发布和下载Library
- Android: 详解触摸事件如何传递 - 玲音
- Android中退出多个Activity的两个经典方法
- Android 工程报错解决 Unable to resolve target 'android-17'
- Android应用程序插件化研究之DexClassLoader
- Android&java的成长之路之八(Android短信验证 亲测)
- Android里TextView中显示不下的文字转而显示省略号
- 关于<uses-library android:name="android.test.runner"/>
- 4.5.3 Go Android 下拉刷新的整理:SwipeRefreshLayout,android-Ultra-Pull-To-Refresh(ptr),PullToRefreshListView
- android docs 打开提速