首字母索引侧栏--漂亮且实用!!
2016-02-25 16:04
483 查看
如果开发过类似微信好友或联系人的同学们可能都做过这个,首字母索引侧栏使用的是非常普遍的, 这东西确实很方便,效率非常高, 今天做一个非常漂亮且简约的索引栏!
还是先看看效果吧:
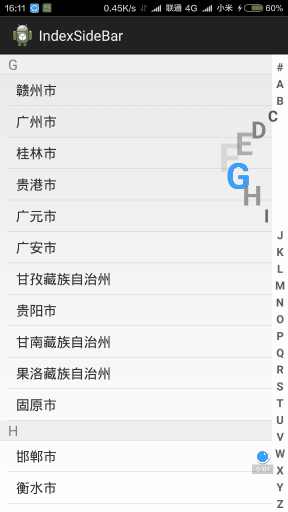
怎么样?有没有动心?
好了,废话不多说,先分析分析:
其实索引栏界面上很简单,就是一排字母, 你手指按哪儿那块做出相应反应,只是这里的选中区域要突出去,至于这个,可以利用父类的某一个属性:android:clipChildren=”false” 这个应该是ViewGroup的属性,这个属性的意思是要不要裁剪子元素的边框,默认是true,所以默认情况下,如果子元素超过了它自己的边距,就看不到了,
这里完全可以利用这个属性让索引栏突出去而不被父元素给裁剪掉了.
至于索引栏自身的逻辑其实并不难:
只是要考虑将ListView 和索引栏联系起来
我的想法是:
1.索引栏对外暴露一个监听(观察者模式-不知道算不算是),让外部其他关心索引栏滑动的事件得到通知,
2.对应的adapter持有Listview对象,和索引栏对象,并且对索引栏设置监听,在监听事件里面对listview做出相应滑动操作等
好了,逻辑差不多理清了,动手开始做索引栏
新建类:SideBar继承自View:
然后在onDraw方法里均匀绘制A~Z的字母(注意如果手指滑动时,有字母被选中的要做特殊处理)
然后拦截Touch方法,在onTouchEvent里面记录下当前选中了哪一个,并且调用invalidate()方法来让View重绘,还要调用一些观察者的方法告诉别人选中了哪个字母
上代码:
然后编写我们的Adapter,实现刚才SideBar中定义的接口:
省略了不必要的代码:
好了,现在我们可以使用刚才写好的索引栏了:
我们以全国城市为例
新建MainActivity:
布局文件:
Java代码:
好了到此这个字母索引栏也就算完工了
附上源码:
https://github.com/yuchong123/IndexSideBar
还是先看看效果吧:
怎么样?有没有动心?
好了,废话不多说,先分析分析:
其实索引栏界面上很简单,就是一排字母, 你手指按哪儿那块做出相应反应,只是这里的选中区域要突出去,至于这个,可以利用父类的某一个属性:android:clipChildren=”false” 这个应该是ViewGroup的属性,这个属性的意思是要不要裁剪子元素的边框,默认是true,所以默认情况下,如果子元素超过了它自己的边距,就看不到了,
这里完全可以利用这个属性让索引栏突出去而不被父元素给裁剪掉了.
至于索引栏自身的逻辑其实并不难:
只是要考虑将ListView 和索引栏联系起来
我的想法是:
1.索引栏对外暴露一个监听(观察者模式-不知道算不算是),让外部其他关心索引栏滑动的事件得到通知,
2.对应的adapter持有Listview对象,和索引栏对象,并且对索引栏设置监听,在监听事件里面对listview做出相应滑动操作等
好了,逻辑差不多理清了,动手开始做索引栏
新建类:SideBar继承自View:
然后在onDraw方法里均匀绘制A~Z的字母(注意如果手指滑动时,有字母被选中的要做特殊处理)
然后拦截Touch方法,在onTouchEvent里面记录下当前选中了哪一个,并且调用invalidate()方法来让View重绘,还要调用一些观察者的方法告诉别人选中了哪个字母
上代码:
package com.example.indexsidebar.views;

import android.annotation.SuppressLint;
import android.content.Context;
import android.graphics.Canvas;
import android.graphics.Color;
import android.graphics.Paint;
import android.graphics.Typeface;
import android.util.AttributeSet;
import android.view.MotionEvent;
import android.view.View;
import android.widget.TextView;

import com.example.indexsidebar.utils.DensityUtils;
/**
* 联系人 拼音搜索滚动条
* @author Administrator
*
*/
public class SideBar extends View {
private static String textColor = "#636363";
private static String selectTextColor = "#3399ff";
// 触摸事件
private OnTouchingLetterChangedListener onTouchingLetterChangedListener;
// 26个字母
public static String[] b = { "#", "A", "B", "C", "D", "E", "F", "G", "H", "I", "J", "K", "L", "M", "N", "O", "P",
"Q", "R", "S", "T", "U", "V", "W", "X", "Y", "Z" };
private int choose = -1;// 选中
private Paint paint = new Paint();
private int textSize = 20;
private int bigTextSize = 42;

public SideBar(Context context, AttributeSet attrs, int defStyle) {
super(context, attrs, defStyle);
init(context);
}

public SideBar(Context context, AttributeSet attrs) {
this(context, attrs,0);
}

public SideBar(Context context) {
super(context);
init(context);
}

public void init(Context context) {
textSize = DensityUtils.dp2px(context, 14);
bigTextSize = DensityUtils.dp2px(context, 32);
}

/**
* 重写这个方法
*/
@SuppressLint("DrawAllocation")
protected void onDraw(Canvas canvas) {
super.onDraw(canvas);
// 获取焦点改变背景颜色.
setBackgroundColor(Color.WHITE);
int height = getHeight();// 获取对应高度
int width = getWidth(); // 获取对应宽度
int singleHeight = height / b.length;// 获取每一个字母的高度
// L.e("刷新!!!!!!");
for (int i = 0; i < b.length; i++) {
paint.setColor(Color.parseColor(textColor));
// paint.setColor(Color.WHITE);
paint.setTypeface(Typeface.DEFAULT_BOLD);
paint.setAntiAlias(true);
// x坐标等于中间-字符串宽度的一半.
int t = textSize;
paint.setTextSize(t);
float xPos = width / 2 - paint.measureText(b[i]) / 2;
float yPos = singleHeight * i + singleHeight;
// 选中的状态
if (recordY >= 0) {
float xp = xPos - textSize * 6 + Math.abs(recordY - yPos);
if (xp < 0) {
xPos = xPos + xp;
t = (t - (int) (xp / 2 + 0.5));
paint.setColor(Color.argb((int) (textSize * 6 + xp - 0.5), 63, 63, 63));
}
if (i == choose) {
paint.setColor(Color.parseColor(selectTextColor));
paint.setFakeBoldText(true);
}
}
paint.setTextSize(t);
canvas.drawText(b[i], xPos, yPos, paint);
paint.reset();// 重置画笔
}
}

float recordY = -1;
private float oldX;
private float oldY;

private int touchState;//0:未处理, 1:获取  2:未获取

@Override
public boolean onTouchEvent(MotionEvent event) {
final int action = event.getAction();
float y = event.getY();// 点击y坐标
final int oldChoose = choose;
final OnTouchingLetterChangedListener listener = onTouchingLetterChangedListener;
final int c = (int) (y / getHeight() * b.length);// 点击y坐标所占总高度的比例*b数组的长度就等于点击b中的个数.

switch (action) {
case MotionEvent.ACTION_UP:
// setBackgroundColor(Color.WHITE);
recordY = -1;
choose = -1;//
invalidate();
break;
case MotionEvent.ACTION_DOWN:
touchState=0;
oldX = event.getX();
oldY = event.getY();
upDateView(event, oldChoose, listener, c);
break;
default:
//判断是否为横着滑动
if (touchState==0) {
float newx = event.getX();
float newy = event.getY();
if ((oldX-newx)*(oldX-newx)+(oldY-newy)*(oldY-newy)>bigTextSize) {
if ((oldX-newx)*(oldX-newx)>(oldY-newy)*(oldY-newy)) {
//重置状态
recordY = -1;
choose = -1;
invalidate();
touchState=2;
return true;
}else{
touchState=1;
}
}
}else if (touchState==2) {
return true;
}

upDateView(event, oldChoose, listener, c);
break;
}
invalidate();// 自动清屏,屏幕刷新
return true;
}

private void upDateView(MotionEvent event, final int oldChoose, final OnTouchingLetterChangedListener listener,
final int c) {
recordY = event.getY();
if (oldChoose != c) {
if (c >= 0 && c < b.length) {
if (listener != null) {
listener.onTouchingLetterChanged(b[c]);
}
choose = c;
// invalidate();//自动清屏,屏幕刷新
}
}
}

/**
* 向外公开的方法
*
* @param onTouchingLetterChangedListener
*/
public void setOnTouchingLetterChangedListener(OnTouchingLetterChangedListener onTouchingLetterChangedListener) {
this.onTouchingLetterChangedListener = onTouchingLetterChangedListener;
}

/**
* 选中字母的监听-接口
* @author coder
*
*/
public interface OnTouchingLetterChangedListener {
public void onTouchingLetterChanged(String s);
}

}
然后编写我们的Adapter,实现刚才SideBar中定义的接口:
省略了不必要的代码:
public class SelectLocationAdapter extends BaseAdapter implements OnTouchingLetterChangedListener {
ListView listView;
SideBar sideBar;

public void setListView(ListView listView) {
this.listView = listView;
}

public void setSideBar(SideBar sideBar) {
this.sideBar = sideBar;
sideBar.setOnTouchingLetterChangedListener(this);
}

@Override
public void onTouchingLetterChanged(String s) {
if (listView != null && map.get(s) != null) {
//根据字母对Listview做出相应滚动
listView.setSelection(map.get(s));
}
}
}
好了,现在我们可以使用刚才写好的索引栏了:
我们以全国城市为例
新建MainActivity:
布局文件:
<RelativeLayout xmlns:android="http://schemas.android.com/apk/res/android"
xmlns:tools="http://schemas.android.com/tools"
android:layout_width="match_parent"
android:layout_height="match_parent"
android:clipChildren="false"
tools:context=".MainActivity" >

<ListView
android:id="@+id/location_listview"
android:layout_width="match_parent"
android:layout_height="match_parent"
android:divider="@null"
android:listSelector="@null" >
</ListView>

<com.example.indexsidebar.views.SideBar
android:id="@+id/location_sideBar"
android:layout_width="20dp"
android:layout_height="match_parent"
android:layout_alignParentRight="true" />

</RelativeLayout>
Java代码:
@Override
protected void onCreate(Bundle savedInstanceState) {
super.onCreate(savedInstanceState);
setContentView(R.layout.activity_main);

initView();
}

private void initView() {
SideBar location_sideBar = (SideBar) findViewById(R.id.location_sideBar);
ListView location_listview = (ListView) findViewById(R.id.location_listview);
//数据源,全国省市
locationAll = LocationDAO.findAll(this);

if(locationAll!=null){
//这儿才是重点:
SelectLocationAdapter locationAdapter = new SelectLocationAdapter(locationAll, this);
locationAdapter.setSideBar(location_sideBar);
locationAdapter.setListView(location_listview);
location_listview.setAdapter(locationAdapter);
}
}
好了到此这个字母索引栏也就算完工了
附上源码:
https://github.com/yuchong123/IndexSideBar

相关文章推荐
- 使用C++实现JNI接口需要注意的事项
- Android IPC进程间通讯机制
- Android Manifest 用法
- [转载]Activity中ConfigChanges属性的用法
- Android之获取手机上的图片和视频缩略图thumbnails
- Android之使用Http协议实现文件上传功能
- Android学习笔记(二九):嵌入浏览器
- android string.xml文件中的整型和string型代替
- i-jetty环境搭配与编译
- android之定时器AlarmManager
- android wifi 无线调试
- Android Native 绘图方法
- Android java 与 javascript互访(相互调用)的方法例子
- android 代码实现控件之间的间距
- android FragmentPagerAdapter的“标准”配置
- Android"解决"onTouch和onClick的冲突问题
- android:installLocation简析
- android searchView的关闭事件
- SourceProvider.getJniDirectories