4.UIViewController
2016-02-23 19:34
465 查看
UIViewController
UIViewController简单的说就是视图控制器, 用于view的管理, 数据的处理.1. UIViewController的跳转(无导航栏)
利用前面学习的知识, 我们实现下面的需求:ViewController中有一个UIButton, 点击UIButton跳转到ViewController2
ViewController2中也有一个UIButton, 点击UIButton返回到ViewController
ViewController的代码:
import UIKit

class ViewController: UIViewController {

override func viewDidLoad() {
super.viewDidLoad()

let button = UIButton(type: .Custom)
button.frame = CGRect(x: 0, y: 10, width: 100, height: 40)
// 设置不同状态文字
button.setTitle("Normal", forState: .Normal)
button.setTitle("Highlighted", forState: .Highlighted)
button.setTitle("Disabled", forState: .Disabled)
// 设置不同状态文字颜色
button.setTitleColor(UIColor.redColor(), forState: .Normal)
button.setTitleColor(UIColor.blueColor(), forState: .Highlighted)
button.setTitleColor(UIColor.grayColor(), forState: .Disabled)

button.setBackgroundImage(UIImage(named: "normal"), forState: .Normal)
button.setBackgroundImage(UIImage(named: "highlighted"), forState: .Highlighted)
button.setBackgroundImage(UIImage(named: "disabled"), forState: .Disabled)

button.addTarget(self, action: "buttonAction:", forControlEvents: .TouchUpInside)

self.view.addSubview(button)
}

func buttonAction(sender: UIButton) {
// 跳转到ViewController2
let vc = ViewController2()
self.presentViewController(vc, animated: true, completion: nil)
}

override func didReceiveMemoryWarning() {
super.didReceiveMemoryWarning()

}

}
ViewController2代码:
import UIKit
class ViewController2: UIViewController {
override func viewDidLoad() {
super.viewDidLoad()
self.view.backgroundColor = UIColor(red: 0xff/255.0, green: 0x00/255.0, blue: 0xff/255.0, alpha: 1.0)
let button = UIButton(type: .Custom)
button.frame = CGRect(x: 0, y: 200, width: 100, height: 40)
// 设置不同状态文字
button.setTitle("返回", forState: .Normal)
button.setTitle("返回", forState: .Highlighted)
button.setTitle("返回", forState: .Disabled)
// 设置不同状态文字颜色
button.setTitleColor(UIColor.redColor(), forState: .Normal)
button.setTitleColor(UIColor.blueColor(), forState: .Highlighted)
button.setTitleColor(UIColor.grayColor(), forState: .Disabled)
button.setBackgroundImage(UIImage(named: "normal"), forState: .Normal)
button.setBackgroundImage(UIImage(named: "highlighted"), forState: .Highlighted)
button.setBackgroundImage(UIImage(named: "disabled"), forState: .Disabled)
button.addTarget(self, action: "backAction:", forControlEvents: .TouchUpInside)
self.view.addSubview(button)
}
func backAction(sender: UIButton) {
// 返回
self.dismissViewControllerAnimated(true, completion: nil)
}
override func didReceiveMemoryWarning() {
super.didReceiveMemoryWarning()
}
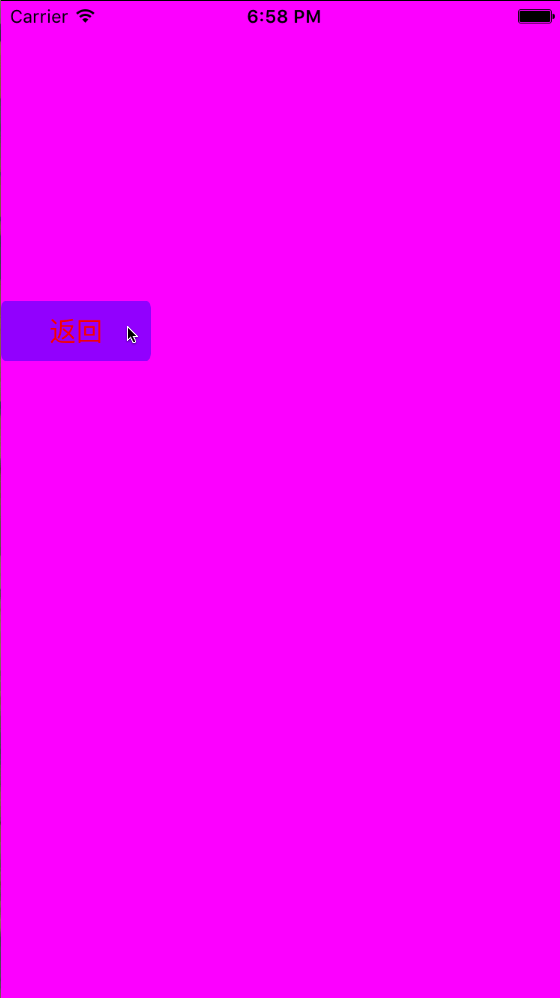
}我们看看实现的效果:
我们看看界面跳转的方法
public func presentViewController(viewControllerToPresent: UIViewController, animated flag: Bool, completion: (() -> Void)?)
第一个参数是要跳转的UIViewController
第二个参数是是否有动画
第三个参数是完成回调
界面返回方法
public func dismissViewControllerAnimated(flag: Bool, completion: (() -> Void)?)
第一个参数是否有动画
第二个参数是完成回掉
2. 界面跳转动画
self.modalTransitionStyle = .FlipHorizontal // 水平切换
self.modalTransitionStyle = .CoverVertical // 垂直切换
self.modalTransitionStyle = .CrossDissolve
self.modalTransitionStyle = .PartialCurl // 翻页
可以都试一下看看效果
3.UIViewController状态转换
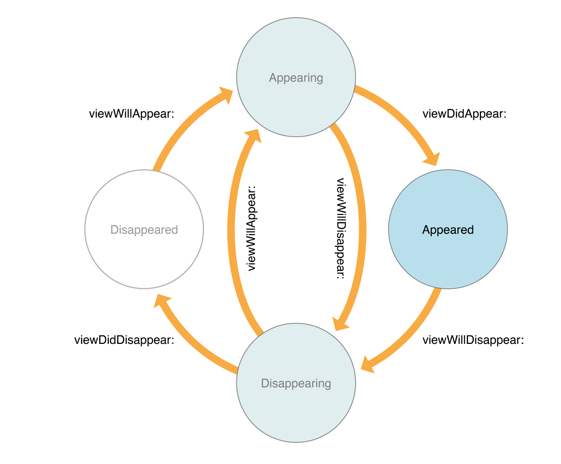
public func viewWillAppear(animated: Bool) => UIViewController将出现调用
public func viewDidAppear(animated: Bool) =>UIViewController已出现调用
public func viewWillDisappear(animated: Bool) => UIViewController将消失调用
public func viewDidDisappear(animated: Bool) => UIViewController已消失调用
我们可以注意到,还有一个方法:
public func viewDidLoad() => 在第一次加载view时调用,只调用一次, 而上面的4个方法每次都会调用
我们重写上面的方法看看执行顺序, 修改ViewController2:
class ViewController2: UIViewController {

override func viewDidLoad() {
super.viewDidLoad()

print("viewDidLoad")

self.view.backgroundColor = UIColor(red: 0xff/255.0, green: 0x00/255.0, blue: 0xff/255.0, alpha: 1.0)

let button = UIButton(type: .Custom)
button.frame = CGRect(x: 0, y: 200, width: 100, height: 40)
// 设置不同状态文字
button.setTitle("返回", forState: .Normal)
button.setTitle("返回", forState: .Highlighted)
button.setTitle("返回", forState: .Disabled)
// 设置不同状态文字颜色
button.setTitleColor(UIColor.redColor(), forState: .Normal)
button.setTitleColor(UIColor.blueColor(), forState: .Highlighted)
button.setTitleColor(UIColor.grayColor(), forState: .Disabled)

button.setBackgroundImage(UIImage(named: "normal"), forState: .Normal)
button.setBackgroundImage(UIImage(named: "highlighted"), forState: .Highlighted)
button.setBackgroundImage(UIImage(named: "disabled"), forState: .Disabled)

button.addTarget(self, action: "backAction:", forControlEvents: .TouchUpInside)

self.view.addSubview(button)

self.modalTransitionStyle = .CrossDissolve
}

override func viewWillAppear(animated: Bool) {
super.viewWillAppear(animated)
print("viewWillAppear")
}

override func viewDidAppear(animated: Bool) {
super.viewDidAppear(animated)
print("viewDidAppear")
}

override func viewWillDisappear(animated: Bool) {
super.viewWillDisappear(animated)
print("viewDidAppear")
}

override func viewDidDisappear(animated: Bool) {
super.viewDidDisappear(animated)
print("viewDidDisappear")
}

func backAction(sender: UIButton) {
// 返回
self.dismissViewControllerAnimated(true, completion: nil)
}

override func didReceiveMemoryWarning() {
super.didReceiveMemoryWarning()
}

}
运行程序,我们发现:
进入ViewController2的时候执行的方法依次是:
viewDidLoad => viewWillAppear => viewDidAppear
离开ViewController2的时候执行的方法依次是:
viewWillDisappear => viewDidDisappear
4. 界面间跳转传值
现在我们实现一个需求, ViewController跳转到ViewController2时,传一个年龄过去:我们在ViewController2中添加一个age变量:
var age: Int?
然后在ViewController的跳转方法中赋值:
func buttonAction(sender: UIButton) {
// 跳转到ViewController2
let vc = ViewController2()
vc.age = 100
self.presentViewController(vc, animated: true, completion: nil)
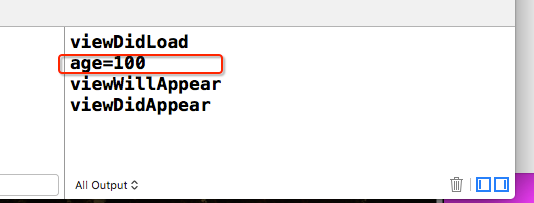
}最后在ViewController的viewDidLoad()中添加:
print("age=\(self.age!)")运行程序我们发现,控制台中打印出:
5. 加载storyboard中的UIViewController
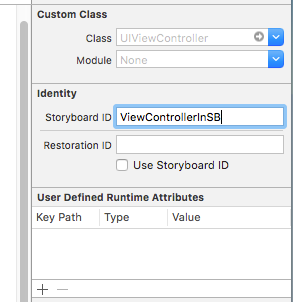
如果使用storyboard做界面, 虽然可以直接在两个UIViewController中拖线跳转, 但是有时候一个UIViewController根据条件跳转到不同的UIViewController, 这时候就需要用代码加载storyboard中的UIViewController,再根据条件来跳转.在Main.storyboard中拖一个UIViewController,Storyboard ID设置为ViewControllerInSB
let mainStoryboard = UIStoryboard(name: "Main", bundle: NSBundle.mainBundle())
let vc = mainStoryboard.instantiateViewControllerWithIdentifier("ViewControllerInSB")
self.presentViewController(vc, animated: true, completion: nil)
6. 完整代码
ViewController.swift:import UIKit
class ViewController: UIViewController {
override func viewDidLoad() {
super.viewDidLoad()
let button = UIButton(type: .Custom)
button.frame = CGRect(x: 0, y: 10, width: 100, height: 40)
// 设置不同状态文字
button.setTitle("Normal", forState: .Normal)
button.setTitle("Highlighted", forState: .Highlighted)
button.setTitle("Disabled", forState: .Disabled)
// 设置不同状态文字颜色
button.setTitleColor(UIColor.redColor(), forState: .Normal)
button.setTitleColor(UIColor.blueColor(), forState: .Highlighted)
button.setTitleColor(UIColor.grayColor(), forState: .Disabled)
button.setBackgroundImage(UIImage(named: "normal"), forState: .Normal)
button.setBackgroundImage(UIImage(named: "highlighted"), forState: .Highlighted)
button.setBackgroundImage(UIImage(named: "disabled"), forState: .Disabled)
button.addTarget(self, action: "buttonAction:", forControlEvents: .TouchUpInside)
self.modalTransitionStyle = .CrossDissolve
self.view.addSubview(button)
}
func buttonAction(sender: UIButton) { // 跳转到ViewController2 let vc = ViewController2() vc.age = 100 self.presentViewController(vc, animated: true, completion: nil) }
override func didReceiveMemoryWarning() {
super.didReceiveMemoryWarning()
}
}
ViewController2.swift:
class ViewController2: UIViewController {

var age: Int?

override func viewDidLoad() {
super.viewDidLoad()

print("viewDidLoad")
print("age=\(self.age!)")

self.view.backgroundColor = UIColor(red: 0xff/255.0, green: 0x00/255.0, blue: 0xff/255.0, alpha: 1.0)

let button = UIButton(type: .Custom)
button.frame = CGRect(x: 0, y: 200, width: 100, height: 40)
// 设置不同状态文字
button.setTitle("返回", forState: .Normal)
button.setTitle("返回", forState: .Highlighted)
button.setTitle("返回", forState: .Disabled)
// 设置不同状态文字颜色
button.setTitleColor(UIColor.redColor(), forState: .Normal)
button.setTitleColor(UIColor.blueColor(), forState: .Highlighted)
button.setTitleColor(UIColor.grayColor(), forState: .Disabled)

button.setBackgroundImage(UIImage(named: "normal"), forState: .Normal)
button.setBackgroundImage(UIImage(named: "highlighted"), forState: .Highlighted)
button.setBackgroundImage(UIImage(named: "disabled"), forState: .Disabled)

button.addTarget(self, action: "backAction:", forControlEvents: .TouchUpInside)

self.view.addSubview(button)

self.modalTransitionStyle = .CrossDissolve
}

override func viewWillAppear(animated: Bool) {
super.viewWillAppear(animated)
print("viewWillAppear")
}

override func viewDidAppear(animated: Bool) {
super.viewDidAppear(animated)
print("viewDidAppear")
}

override func viewWillDisappear(animated: Bool) {
super.viewWillDisappear(animated)
print("viewWillDisappear")
}

override func viewDidDisappear(animated: Bool) {
super.viewDidDisappear(animated)
print("viewDidDisappear")
}

func backAction(sender: UIButton) {
// 返回
self.dismissViewControllerAnimated(true, completion: nil)
}

override func didReceiveMemoryWarning() {
super.didReceiveMemoryWarning()
}

}

相关文章推荐
- 峰回路转,Firefox 浏览器即将重返 iOS 平台
- 峰回路转,Firefox 浏览器即将重返 iOS 平台
- 不可修补的 iOS 漏洞可能导致 iPhone 4s 到 iPhone X 永久越狱
- iOS 12.4 系统遭黑客破解,漏洞危及数百万用户
- Apple Swift学习教程
- 每日安全资讯:NSO,一家专业入侵 iPhone 的神秘公司
- [转][源代码]Comex公布JailbreakMe 3.0源代码
- 介绍 Fedora 上的 Swift
- 讲解iOS开发中基本的定位功能实现
- js判断客户端是iOS还是Android等移动终端的方法
- iOS应用中UISearchDisplayController搜索效果的用法
- IOS开发环境windows化攻略
- 浅析iOS应用开发中线程间的通信与线程安全问题
- Swift中实现点击、双击、捏、旋转、拖动、划动、长按手势的类和方法介绍
- Swift编程中的泛型解析
- Swift中定义二维数组的方法及遍历方法示例
- 检测iOS设备是否越狱的方法
- .net平台推送ios消息的实现方法