USB Packet capture for Windows Tour
2016-02-17 21:43
656 查看
转自:http://desowin.org/usbpcap/tour.html 可以用wireshark来看Usb协议的包了,很不错
比较简单,不翻译了
This short tour assumes you have installed the latest version of USBPcap and Wireshark 1.10.0rc1 (or newer) and rebooted your system. Each of the steps contains short description of what should happen and in some cases gives tips for troubleshooting.
If you feel the information provided there is not complete (it doesn't cover your case), please describe your problem on the USBPcap
mailing list.
The first step is to connect the device you want to sniff the traffic and identify the Root Hub this device is connected to. In order to do so, launch the USBPcapCMD.exe that is stored in the installation directory. You should be presented with something similiar
to the picture below.

If for any reason you can't see the list of connected devices make sure you have the USBPcap driver installed and you have restarted your computer after the installation.
So now you know which of the Root Hubs available in your system you want to monitor. Please disconnect the device from your computer - this will allow USBPcap to capture the USB descriptors needed for analysis in Wireshark. Now you can run the USBPcapCMD.exe
again and enter your desired output file name. (A careful reader will notice that they can skip the restart part: all that required to get the descriptors in the capture file is to reconnect your device after capture has started.).
We will be capturing the Root Hub that showed the two Hubs connected to it and an composite USB device (it is actually DigiTech RP250).

Now it is time to use the device in order to get packets captured. In this example I have simply started the X-Edit software that controls the DigiTech RP250.
After you're done collecting data, press Ctrl+C and start Wireshark. Once started, open the pcap file you have created in Step 2. You should see the packets allongside with their description. The sample capture is available at the Google code:sample_2013_04_10.pcap

If you didn't like that in steps 2 and 3 you had to finish capturing before having a chance to look at the data, you can also do a live capture. In order to do so, you must have running the cmd.exe with elevated privileges (as Administrator). Then enter the
following command:
This should result in live capture from standard input in Wireshark as shown below.

Once you know how to use USBPcap you might want it to work better. There are numerous ways to help, for example:
Improving project website
Improving the documentation
Improving the filter driver
Improving the sample application
Improving installation process
Creating project artwork (icon, website banner, etc.)
Integrating the project more closely with Wireshark (dumpcap)
Donating money
If you can help please check the menu on the right for links for github page, donation fund and contact information.
比较简单,不翻译了
This short tour assumes you have installed the latest version of USBPcap and Wireshark 1.10.0rc1 (or newer) and rebooted your system. Each of the steps contains short description of what should happen and in some cases gives tips for troubleshooting.
If you feel the information provided there is not complete (it doesn't cover your case), please describe your problem on the USBPcap
mailing list.
Step 1 - identify the Root Hub you want to monitor
The first step is to connect the device you want to sniff the traffic and identify the Root Hub this device is connected to. In order to do so, launch the USBPcapCMD.exe that is stored in the installation directory. You should be presented with something similiarto the picture below.
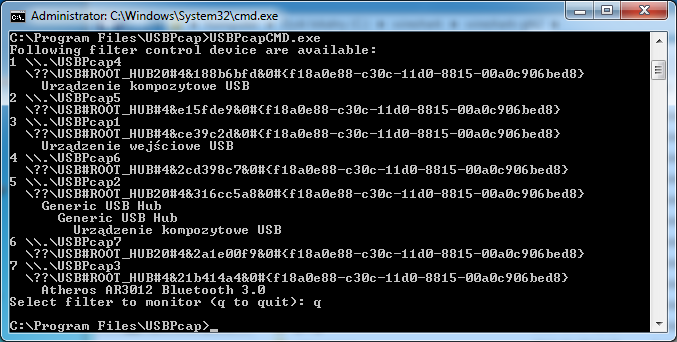
Troubleshooting step 1
If for any reason you can't see the list of connected devices make sure you have the USBPcap driver installed and you have restarted your computer after the installation.
Step 2 - start the capture
So now you know which of the Root Hubs available in your system you want to monitor. Please disconnect the device from your computer - this will allow USBPcap to capture the USB descriptors needed for analysis in Wireshark. Now you can run the USBPcapCMD.exeagain and enter your desired output file name. (A careful reader will notice that they can skip the restart part: all that required to get the descriptors in the capture file is to reconnect your device after capture has started.).
We will be capturing the Root Hub that showed the two Hubs connected to it and an composite USB device (it is actually DigiTech RP250).
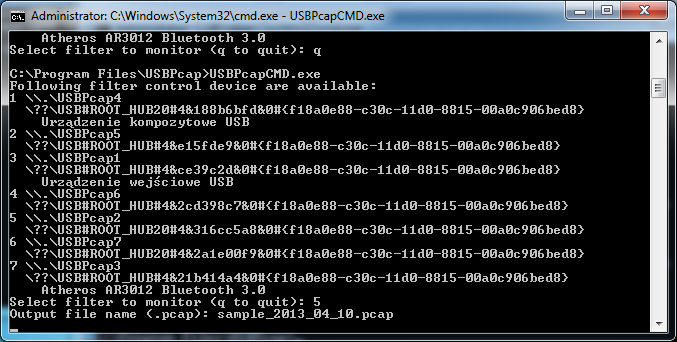
Now it is time to use the device in order to get packets captured. In this example I have simply started the X-Edit software that controls the DigiTech RP250.
Step 3 - analyse the data
After you're done collecting data, press Ctrl+C and start Wireshark. Once started, open the pcap file you have created in Step 2. You should see the packets allongside with their description. The sample capture is available at the Google code:sample_2013_04_10.pcap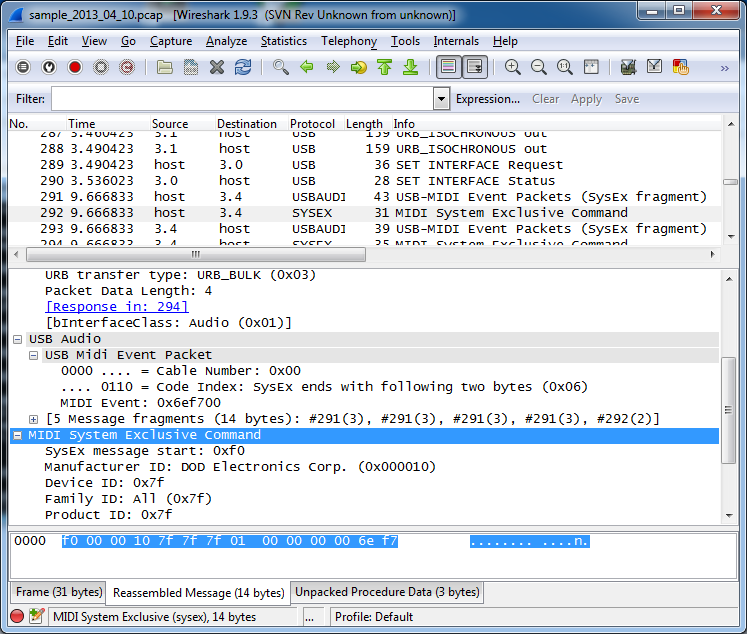
Step 4 - live capture
If you didn't like that in steps 2 and 3 you had to finish capturing before having a chance to look at the data, you can also do a live capture. In order to do so, you must have running the cmd.exe with elevated privileges (as Administrator). Then enter thefollowing command:
USBPcapCMD.exe -d \\.\USBPcap2 -o - | "C:\Program Files\Wireshark\Wireshark.exe" -k -i -
This should result in live capture from standard input in Wireshark as shown below.

Step 5 - Contribute to the project :-)
Once you know how to use USBPcap you might want it to work better. There are numerous ways to help, for example:Improving project website
Improving the documentation
Improving the filter driver
Improving the sample application
Improving installation process
Creating project artwork (icon, website banner, etc.)
Integrating the project more closely with Wireshark (dumpcap)
Donating money
If you can help please check the menu on the right for links for github page, donation fund and contact information.

相关文章推荐
- ffmpeg文档43-开发者
- javascript console 函数详解 js开发调试的利器
- 第2章{ 2-5 模块使用 }
- IP数据报的首部
- wamp Version 2.1 Version Française
- SpringMVC视图解析没按照ModelAndView的viewname跳转
- 网络请求怎么样和UI线程交互? Activity2怎么通知Activity1 更新数据
- ffmpeg文档42-参考/看
- UITableView控件Protocell的Identifier设置 注意事项
- BZOJ4356 : Ceoi2014 Wall
- css overflow:hidden为什么会失效
- android后台任务(二):IntentService
- Voice Lab 3-IPhone Features & CME Features
- __weak 和 __block 关键字的区别
- 关于EditText焦点问题
- 此证书的签发者无效
- 移动平台开发相关工具总结
- vim替换字符串
- ffmpeg文档41-多媒体源
- [Python] Mua.cm 中大自动选课系统课书CourseBook建立总结