ButterKnife的使用
2016-02-09 22:54
246 查看
步骤:
1、导入butterknife-7.0.1.jar包
2、在声明的组建变量前注入对应要绑定的id,采用@bind(R.id.id名)的形式
3、在对应的activity的oncreate方法中加入:ButterKnife.bind(当前的activity.this);
4、需要注意的,如果采用bind方式注入对应的组件的话,那么该组件对象在声明的时候就不能是static修饰或者private修饰。
5、然后跟jar包里面的方法关联起来,详细配置如下:
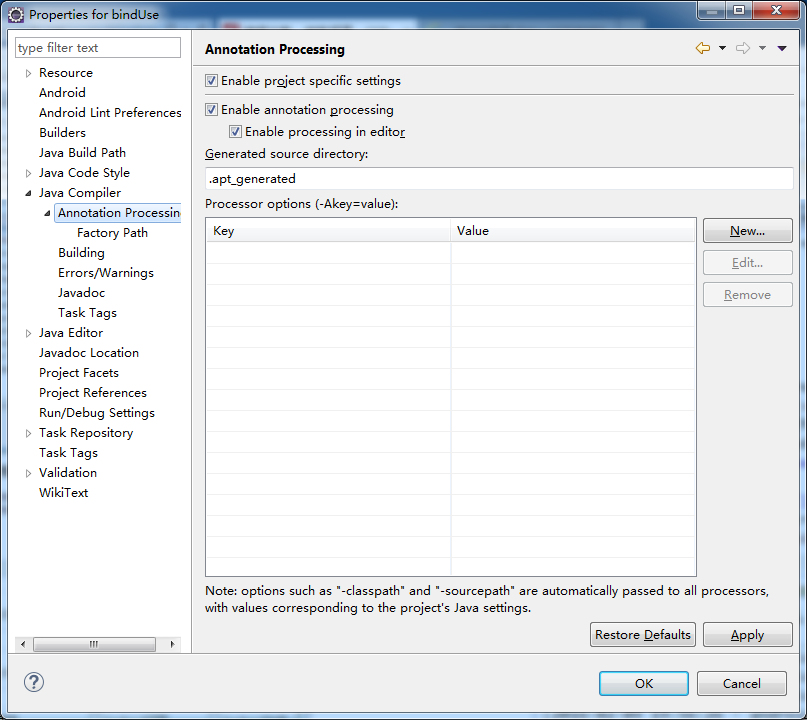
选择你的项目右键-->properties-->java compiler-->Annotation Processing-->勾选Enable annotation processing
展开Annotation Processing-->Factory Path-->勾选Enable project specific settings-->Add External JARs...-->选中你的butterknife.jar

butterknife也可以用来注入配置文件中的值,但是需要注意的是,目前StringArray和intArray没有对应的方法进行注入,只能通过老办法获取。
一些常见使用:
// TextView tv=(TextView) findViewById(R.id.main_tv);
@Bind(R.id.main_tv)
TextView tv;
举个例子:
1、导入butterknife-7.0.1.jar包
2、整体activity_main.xml
<RelativeLayout xmlns:android="http://schemas.android.com/apk/res/android"
xmlns:tools="http://schemas.android.com/tools"
android:layout_width="match_parent"
android:layout_height="match_parent"
android:paddingBottom="@dimen/activity_vertical_margin"
android:paddingLeft="@dimen/activity_horizontal_margin"
android:paddingRight="@dimen/activity_horizontal_margin"
android:paddingTop="@dimen/activity_vertical_margin"
tools:context=".MainActivity" >
<ListView
android:id="@+id/main_list"
android:layout_width="match_parent"
android:layout_height="wrap_content"
/>
</RelativeLayout>
3、item布局list_item.xml
<?xml version="1.0" encoding="utf-8"?>
<LinearLayout xmlns:android="http://schemas.android.com/apk/res/android"
android:layout_width="match_parent"
android:layout_height="match_parent"
android:orientation="vertical" >
<LinearLayout
android:layout_width="match_parent"
android:layout_height="wrap_content"
android:orientation="horizontal">
<ImageView
android:id="@+id/item_iv"
android:layout_width="wrap_content"
android:layout_height="wrap_content"
android:src="@drawable/tx1"/>
<TextView
android:id="@+id/item_tv"
android:layout_width="match_parent"
android:layout_height="match_parent"
android:text="1"/>
</LinearLayout>
</LinearLayout>
4、在drawable添加图片
tx1.jpg

tx2.jpg

tx3.jpg

tx4.jpg

tx5.jpg

5、java代码
MyAdapter.java
MainActivity.java
package com.example.binduse;
import android.app.Activity;
import android.os.Bundle;
import android.widget.ListView;
import butterknife.Bind;
import butterknife.ButterKnife;
public class MainActivity extends Activity {
private String[] name={"工藤新一","毛利兰","毛利小五郎","怪盗基德","灰原哀"};
private int[] id={R.drawable.tx1,R.drawable.tx2,R.drawable.tx3,R.drawable.tx4,R.drawable.tx5};
@Bind(R.id.main_list)
ListView list;
@Override
protected void onCreate(Bundle savedInstanceState) {
super.onCreate(savedInstanceState);
setContentView(R.layout.activity_main);
ButterKnife.bind(MainActivity.this);
MyAdapter simple=new MyAdapter(name, id, MainActivity.this);
list.setAdapter(simple);
}
}
步骤:
1、导入butterknife-7.0.1.jar包
2、在声明的组建变量前注入对应要绑定的id,采用@bind(R.id.id名)的形式
3、在对应的activity的oncreate方法中加入:ButterKnife.bind(当前的activity.this);
4、需要注意的,如果采用bind方式注入对应的组件的话,那么该组件对象在声明的时候就不能是static修饰或者private修饰。
5、然后跟jar包里面的方法关联起来,详细配置如下:
选择你的项目右键-->properties-->java compiler-->Annotation Processing-->勾选Enable annotation processing
展开Annotation Processing-->Factory Path-->勾选Enable project specific settings-->Add External JARs...-->选中你的butterknife.jar
butterknife也可以用来注入配置文件中的值,但是需要注意的是,目前StringArray和intArray没有对应的方法进行注入,只能通过老办法获取。
一些常见使用:
// TextView tv=(TextView) findViewById(R.id.main_tv);
@Bind(R.id.main_tv)
TextView tv;
// String name=getResources().getString(R.string.myname);
@BindString(R.string.myname)
String myname;
// int white=getResources().getColor(R.color.white);
@BindColor(R.color.white)
int white;
// Drawable drawable=getResources().getDrawable(R.drawable.ic_launcher);
@BindDrawable(R.drawable.ic_launcher)
Drawable drawable;
// class MyView{
//  TextView tv;
//  ImageView iv;
//  public MyView(View v){
//   tv=(TextView) v.findViewById(R.id.item_tv);
//   iv=(ImageView) v.findViewById(R.id.item_iv);
//  }
// }
class MyView{
@Bind(R.id.item_tv)
TextView tv;
@Bind(R.id.item_iv)
ImageView iv;
public MyView(View v){
ButterKnife.bind(this, v);
}
}
// Button bt1=(Button) findViewById(R.id.main_bt1);
// bt1.setOnClickListener(new OnClickListener() {
//
// @Override
// public void onClick(View v) {
// Toast.makeText(MainActivity.this, "点击了按钮1", 1000).show();
// }
// });
@OnClick(R.id.main_bt1)
public void bt1_listener(){
Toast.makeText(MainActivity.this, "点击了按钮1", 1000).show();
}举个例子:
1、导入butterknife-7.0.1.jar包
2、整体activity_main.xml
<RelativeLayout xmlns:android="http://schemas.android.com/apk/res/android"
xmlns:tools="http://schemas.android.com/tools"
android:layout_width="match_parent"
android:layout_height="match_parent"
android:paddingBottom="@dimen/activity_vertical_margin"
android:paddingLeft="@dimen/activity_horizontal_margin"
android:paddingRight="@dimen/activity_horizontal_margin"
android:paddingTop="@dimen/activity_vertical_margin"
tools:context=".MainActivity" >
<ListView
android:id="@+id/main_list"
android:layout_width="match_parent"
android:layout_height="wrap_content"
/>
</RelativeLayout>
3、item布局list_item.xml
<?xml version="1.0" encoding="utf-8"?>
<LinearLayout xmlns:android="http://schemas.android.com/apk/res/android"
android:layout_width="match_parent"
android:layout_height="match_parent"
android:orientation="vertical" >
<LinearLayout
android:layout_width="match_parent"
android:layout_height="wrap_content"
android:orientation="horizontal">
<ImageView
android:id="@+id/item_iv"
android:layout_width="wrap_content"
android:layout_height="wrap_content"
android:src="@drawable/tx1"/>
<TextView
android:id="@+id/item_tv"
android:layout_width="match_parent"
android:layout_height="match_parent"
android:text="1"/>
</LinearLayout>
</LinearLayout>
4、在drawable添加图片
tx1.jpg
tx2.jpg
tx3.jpg
tx4.jpg
tx5.jpg
5、java代码
MyAdapter.java
package com.example.binduse;

import android.content.Context;
import android.view.LayoutInflater;
import android.view.View;
import android.view.ViewGroup;
import android.widget.BaseAdapter;
import android.widget.ImageView;
import android.widget.TextView;
import butterknife.Bind;
import butterknife.ButterKnife;

public class MyAdapter extends BaseAdapter{
private String[] name;
private int[] pic;
private Context context;

public MyAdapter(String[] name, int[] pic, Context context) {
super();
this.name = name;
this.pic = pic;
this.context = context;
}

@Override
public int getCount() {
// TODO Auto-generated method stub
return name.length;
}

@Override
public Object getItem(int position) {
// TODO Auto-generated method stub
return name[position];
}

@Override
public long getItemId(int position) {
// TODO Auto-generated method stub
return position;
}

@Override
public View getView(int position, View convertView, ViewGroup parent) {
MyView myView;
if (convertView==null) {
//加载对象
LayoutInflater layoutInflater=LayoutInflater.from(context);
//实例化加载对象item的view对象
convertView=layoutInflater.inflate(R.layout.list_item, parent, false);
//实例化内部静态类
myView=new MyView(convertView);
//设值
convertView.setTag(myView);
}else {
myView=(MyView) convertView.getTag();
}
//传值
myView.iv.setImageResource(pic[position]);
myView.tv.setText(name[position]);
return convertView;
}
class MyView{
@Bind(R.id.item_tv)
TextView tv;
@Bind(R.id.item_iv)
ImageView iv;
public MyView(View v){
ButterKnife.bind(this, v);
}
}
}
MainActivity.java
package com.example.binduse;
import android.app.Activity;
import android.os.Bundle;
import android.widget.ListView;
import butterknife.Bind;
import butterknife.ButterKnife;
public class MainActivity extends Activity {
private String[] name={"工藤新一","毛利兰","毛利小五郎","怪盗基德","灰原哀"};
private int[] id={R.drawable.tx1,R.drawable.tx2,R.drawable.tx3,R.drawable.tx4,R.drawable.tx5};
@Bind(R.id.main_list)
ListView list;
@Override
protected void onCreate(Bundle savedInstanceState) {
super.onCreate(savedInstanceState);
setContentView(R.layout.activity_main);
ButterKnife.bind(MainActivity.this);
MyAdapter simple=new MyAdapter(name, id, MainActivity.this);
list.setAdapter(simple);
}
}

相关文章推荐
- 使用nvm来管理nodejs版本
- HTML+CSS笔记 CSS中级 颜色&长度值
- HTML+CSS笔记 CSS中级 缩写入门
- HTML+CSS笔记 CSS进阶再续
- JSP的指令元素:page; include; taglib
- 深入理解JavaScript闭包【译】
- Jquery封装之拖拽解决遇到的一些小bug
- HTML+CSS笔记 CSS进阶续集
- knockoutjs六 with 绑定
- JSP脚本和注释
- javascript笔记3-面向对象的程序设计-创建对象
- HTML前端开发之路——盒子背景属性
- 菜鸟学前端----图标字体使用详解
- [Cycle.js] Fine-grained control over the DOM Source
- js 强制转换
- 使用jQuery、js实现必应搜索制作
- [Cycle.js] Making our toy DOM Driver more flexible
- 阅读《深入理解bootstrap》一书,留点痕迹
- hdu 5479 Scaena Felix【栈应用】【括号匹配】
- js 隐式转换