User’s Guide for VirtualGL 2.1.1 and TurboVNC 0.5
2016-02-02 16:45
741 查看
http://www.virtualgl.org/vgldoc/2_1_1/
Intended audience: System Administrators, Graphics Programmers, Researchers, and others with knowledge of the Linux or Solaris operating systems, OpenGL and GLX, and X windows.
1 Legal Information
2 Overview
3 System Requirements
3.1 Linux/x86
3.2 Linux/Itanium
3.3 Solaris/x86
3.4 Solaris/SPARC
3.5 Mac/x86
3.6 Windows
3.7 Additional Requirements for Stereographic Rendering
3.8 Additional Requirements for Transparent Overlays
4 Obtaining and Installing VirtualGL
4.1 Installing VirtualGL on Linux
4.2 Installing VirtualGL on Solaris
4.3 Installing VirtualGL on Mac (Client Only)
4.4 Installing VirtualGL on Windows (Client Only)
4.5 Installing VirtualGL from Source
4.6 Obtaining and Installing the Sun Ray Plugin
4.7 Uninstalling VirtualGL
5 Obtaining and Installing TurboVNC
5.1 Installing TurboVNC on Linux
5.2 Installing TurboVNC on Solaris
5.3 Installing TurboVNC on Mac (Client Only)
5.4 Installing TurboVNC on Windows (Client Only)
5.5 Installing TurboVNC from Source
5.6 Uninstalling TurboVNC
6 Configuring a Linux or Solaris Machine as a VirtualGL Server
6.1 GLP: Using VirtualGL Without a 3D X Server
6.2 Granting Access to the 3D X Server
6.3 SSh Server Configuration
6.4 Un-Configuring the Server
7 Configuring a Windows Machine as a Client for the VGL Image Transport
7.1 Optimizing Exceed
8 Using VirtualGL with the VGL Image Transport
8.1 VGL Image Transport with X11 Forwarding
8.2 VGL Image Transport with a Direct X11 Connection
8.3 VGL Image Transport with SSL Encryption
8.4 VGL Image Transport with X11 Forwarding and SSh Tunneling
8.5 VGL Image Transport over Gigabit Networks
8.6 VGL Image Transport with XDMCP
8.7 The VirtualGL Client Application: Nuts and Bolts
8.7.1 The VirtualGL Client and Firewalls
9 Using VirtualGL with TurboVNC
9.1 Using TurboVNC and VirtualGL on the Same Server
9.2 Using TurboVNC When VirtualGL Is Running on a Different Machine
9.3 Disconnecting and Killing the TurboVNC Session
9.4 Using TurboVNC in a Web Browser
9.5 Optimizing TurboVNC’s Performance for Different Network Types
9.5.1 Lossless Refresh
9.6 Securing a TurboVNC Connection
9.7 Further Reading
10 Using VirtualGL with Other X Proxies
11 Using VirtualGL in a Sun Ray Environment
12 vglrun and Shell Scripts
13 Using VirtualGL with Applications That Manually Load OpenGL
14 Using VirtualGL with Chromium and ModViz VGP
14.1 Configuration 1: Sort-First Rendering (Image-Space Decomposition)
14.2 Configuration 2: Sort-First Rendering (Image-Space Decomposition) with Readback
14.3 Configuration 3: Sort-Last Rendering (Object-Space Decomposition)
14.4 A Note About Performance
14.5 ModViz VGP v1.x and VirtualGL
15 Other Application Recipes
16 Advanced OpenGL Features
16.1 Stereographic Rendering
16.1.1 Quad-Buffered Stereo
16.1.2 Anaglyphic Stereo
16.1.3 Selecting a Stereo Mode
16.2 Transparent Overlays
16.3 Indexed (PseudoColor) Rendering
16.4 Troubleshooting
17 Performance Measurement
17.1 VirtualGL’s Built-In Profiling System
17.2 Frame Spoiling
17.3 VirtualGL Diagnostic Tools
18 The VirtualGL Configuration Dialog
19 Advanced Configuration
19.1 Server Settings
19.2 Client Settings

This document and all associated illustrations are licensed under the Creative Commons Attribution
2.5 License. Any works which contain material derived from this document must cite The VirtualGL Project as the source of the material and list the current URL for the VirtualGL web site.
This product includes software developed by the OpenSSL Project for
use in the OpenSSL Toolkit. Further information is contained in
can be found in the same directory as this documentation.
The VirtualGL server components include software developed by the FLTK Project and
distributed under the terms of the FLTK License.
The VirtualGL Windows packages include PuTTY,
which is released under this license.
VirtualGL includes portions of X.org, which is released under this
license.
VirtualGL is licensed under the wxWindows Library License, v3.1, a derivative of the GNU
Lesser General Public License (LGPL).
VirtualGL is an open source package which gives any Unix or Linux remote display software the ability to run OpenGL applications with full 3D hardware acceleration. Some remote display software, such as VNC, lacks the ability to run
OpenGL applications at all. Other remote display software forces OpenGL applications to use a slow software-only OpenGL renderer, to the detriment of performance as well as compatibility. The traditional method of displaying OpenGL applications to a remote
X server (indirect rendering) supports 3D hardware acceleration, but this approach causes all of the OpenGL commands and 3D data to be sent over the network to be rendered on the client machine. This is not a tenable proposition unless the data is relatively
small and static, unless the network is very fast, and unless the OpenGL application is specifically tuned for a remote X-Windows environment.
With VirtualGL, the OpenGL commands and 3D data are instead redirected to a 3D graphics accelerator on the application server, and only the rendered 3D images are sent to the client machine. VirtualGL thus “virtualizes” 3D graphics
hardware, allowing it to be co-located in the “cold room” with compute and storage resources. VirtualGL also allows 3D graphics hardware to be shared among multiple users, and it provides “workstation-like” levels of performance on even the most modest of
networks. This makes it possible for large, noisy, hot 3D workstations to be replaced with laptops or even thinner clients. More importantly, however, VirtualGL eliminates the workstation and the network as barriers to data size. Users can now visualize gigabytes
and gigabytes of data in real time without needing to copy any of the data over the network or sit in front of the machine that is rendering the data.
Normally, a Unix OpenGL application would send all of its drawing commands and data, both 2D and 3D, to an X-Windows server, which may be located across the network from the application server. VirtualGL, however, employs a technique
called “split rendering” to force the 3D commands from the application to go to a 3D graphics card in the application server. VGL accomplishes this by pre-loading a dynamic shared object (DSO) into the application at run time. This DSO intercepts a handful
of GLX, OpenGL, and X11 commands necessary to perform split rendering. Whenever a window is created by the application, VirtualGL creates a corresponding 3D pixel buffer (“Pbuffer”) on a 3D graphics card in the application server. Whenever the application
requests that an OpenGL rendering context be created for the window, VirtualGL intercepts the request and creates the context on the corresponding Pbuffer instead. Whenever the application swaps or flushes the drawing buffer to indicate that it has finished
rendering a frame, VirtualGL reads back the Pbuffer and sends the rendered 3D image to the client.
The beauty of this approach is its non-intrusiveness. VirtualGL monitors a few X11 commands and events to determine when windows have been resized, etc., but it does not interfere in any way with the delivery of 2D X11 commands to
the X server. For the most part, VGL does not interfere with the delivery of OpenGL commands to the graphics card, either (there are some exceptions, such as its handling of color index rendering.) VGL merely forces the OpenGL commands to be delivered to a
server-side graphics card rather than a client-side graphics card. Once the OpenGL rendering context has been established in a server-side Pbuffer, everything (including esoteric OpenGL extensions, fragment/vertex programs, etc.) should “just work.” In most
cases, if an application runs locally on a 3D server/workstation, that same application will run remotely from that same machine using VirtualGL. However, if it were really as simple as that, we could all turn out the lights and go home. Most of the time spent
developing VirtualGL has been spent working around “stupid application tricks.”
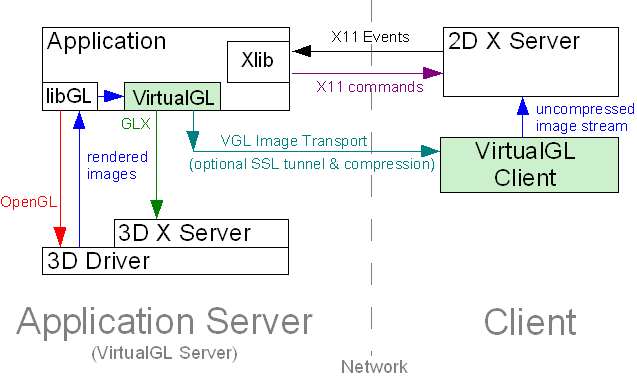
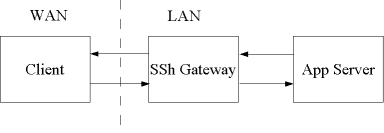
VirtualGL can currently use one of three “image transports” to send rendered 3D images to the client machine:
1. VGL Image Transport (Formerly “Direct Mode”)The VGL Image Transport is most often used whenever the 2D X server (the X server used to draw the application’s GUI and transmit keyboard and mouse events back to the application server) is located across the network from the application
server, for instance if the 2D X server is running on the user’s desktop machine. VirtualGL uses its own protocol on a dedicated TCP socket to send the rendered 3D images to the client machine, and the VirtualGL Client application decodes the images and composites
them into the appropriate X window. The VGL Transport can either deliver uncompressed images (RGB encoded), or it can compress images in real time using a high-speed JPEG codec. It also supports the delivery of stereo image pairs, which can be reconstructed
into a stereo image by the VirtualGL Client.
Figure 2.1: The VGL Image Transport with a Remote 2D X Server
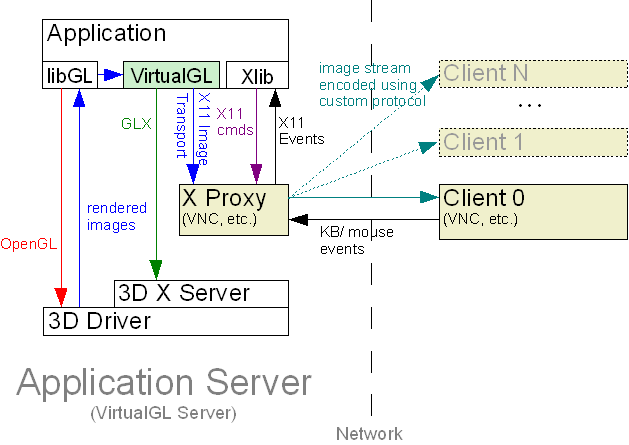
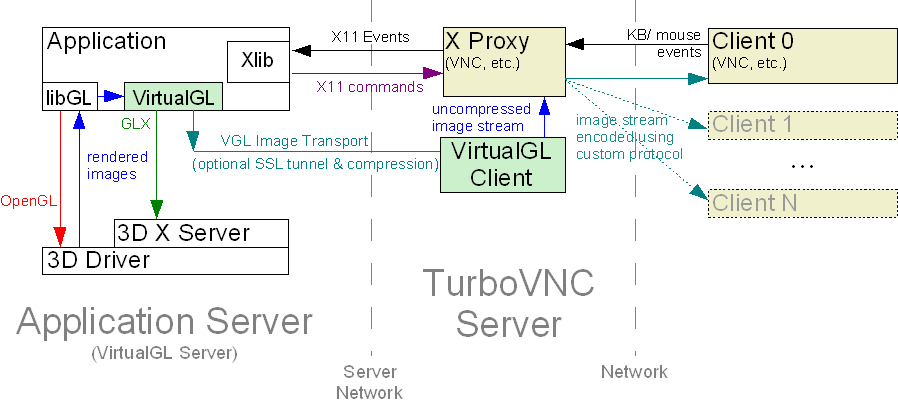
2. X11 Image Transport (Formerly “Raw Mode”)The X11 Image Transport simply draws the rendered 3D images into the appropriate X window using XPutImage() and similar X-Windows commands. This is most useful in conjunction with an “X Proxy”, which can be one of any number of Unix
remote display applications, such as VNC. These X proxies are essentially “virtual” X servers. They appear to the application as a normal X server, but they perform X11 rendering to a virtual framebuffer in main memory rather than to a real framebuffer on
a graphics card. This allows the X proxy to send only images to the client machine rather than chatty X-Windows rendering commands. When using the X11 Transport, VirtualGL does not perform any image compression or encoding itself. It instead relies upon an
X proxy to encode and deliver the images to the client(s). Since the use of an X proxy eliminates the need to send X-Windows commands over the network, this is the best means of using VirtualGL over high-latency or low-bandwidth networks. The VirtualGL Project
provides an accelerated version of VNC, called “TurboVNC”, which is meant to be used with VirtualGL’s X11 Transport. The combination of the two provides a highly-performant remote 3D solution, even on slow networks. TurboVNC also provides rudimentary collaboration
capabilities, allowing multiple users to simultaneously interact with the same 3D application.
Figure 2.2: The X11 Image Transport with an X Proxy
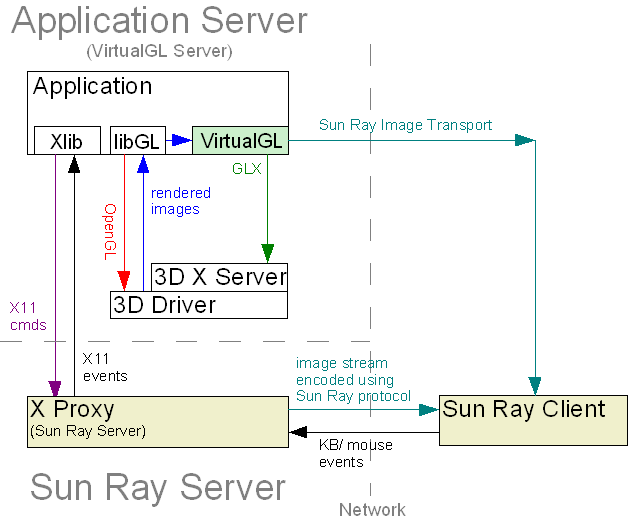
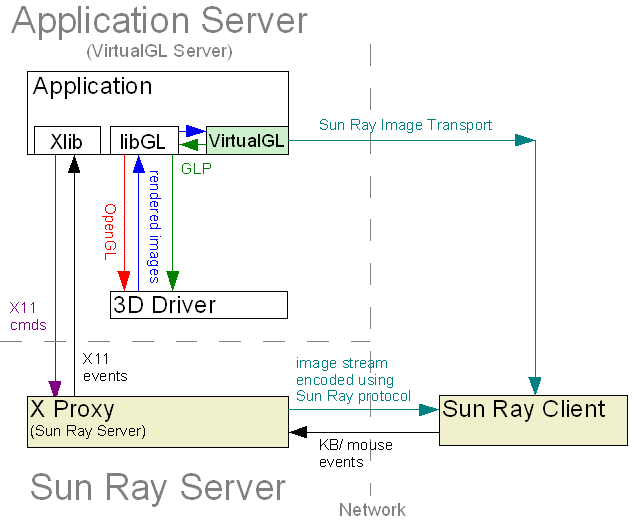
3. Sun Ray Image TransportThe Sun Ray thin client environment from Sun Microsystems consists of an X proxy (the Sun Ray Server Software) and a series of ultra-thin hardware clients that connect to this proxy over a network. It is similar in concept to VNC, in
that a virtual X server is created for every user and that only images, not rendering commands, are sent to the client. Unlike VNC, however, the client is not a piece of software running on a workstation or laptop. The client is a fanless, diskless little
box with only a monitor port, USB ports, a network jack, and a smart card slot (used for authentication.)
This environment presents unique challenges to VirtualGL The first challenge is that the Sun Ray 1 and Sun Ray 2 series clients contain relatively slow CPUs, so they are not fast enough to decompress JPEG in real time. The second challenge is that Sun Ray servers
are generally provisioned to handle a lot of simultaneous users, so using VirtualGL’s X11 Transport would put undue stress on both the Sun Ray servers and the network on which they reside. Thus, Sun Microsystems designed a plugin for VirtualGL which allows
VGL to compress images using a protocol that can be sent directly to the Sun Ray hardware client without having to pass through the Sun Ray server first. Since the plugin uses the proprietary Sun Ray image compression technology, it is currently closed source,
but the binary packages can be downloaded for free as part of the Sun Shared Visualization product.
This product also includes VirtualGL, TurboVNC, and other goodies.
Figure 2.3: The Sun Ray Image Transport
VirtualGL should build and run on Itanium Linux, but it has not been thoroughly tested. Contact us if
you encounter any difficulties. A pre-built TurboJPEG binary package is not available for Linux/Itanium, so it will be necessary to build TurboJPEG from source using the Intel Integrated Performance Primitives for Itanium processors.
* mediaLib 2.5 is included in Solaris 10 update 4 and newer. If you are running an older version of Solaris, it is recommended that you download and install the mediaLib 2.5 upgrade from the
link above. mediaLib 2.5 improves the performance of VirtualGL significantly on Solaris/x86 systems, when compared to mediaLib 2.4.
The client requirements do not apply to anaglyphic stereo. See Chapter 16 for
more details.
VirtualGL must be installed on any machine that will act as a VirtualGL server or as a client for the VGL
Image Transport. It is not necessary to install VirtualGL on the client machine if using VNC or another type of X proxy.
area of the VirtualGL SourceForge web-site.
The “i386” RPM and DEB packages are for 32-bit-only systems. The “x86_64” RPM and “amd64” DEB packages are for 64-bit systems. The 64-bit packages contain both 32-bit and 64-bit libraries.
Log in as root, cd to the directory where you downloaded the binary package, and issue one of the following commands:
RPM-based systems
Debian-based systems
area of the VirtualGL SourceForge web-site.
The “i386” RPM and DEB packages are for 32-bit-only systems. The “x86_64” RPM and “amd64” DEB packages are for 64-bit systems. The 64-bit packages contain both 32-bit and 64-bit VirtualGL
components.
Log in as root, cd to the directory where you downloaded the binary package, and issue the following commands:
RPM-based systems
Debian-based systems
Download the VirtualGL Solaris package (
x86) from the Download area of the VirtualGL
SourceForge web-site.
Both packages provide both 32-bit and 64-bit VirtualGL components.
Log in as root, cd to the directory where you downloaded the package, and issue the following commands:
(answer “Y” when prompted.)
Select the
VirtualGL for Solaris installs into
Download the VirtualGL Mac disk image (
area of the VirtualGL SourceForge web-site.
Open the disk image, then open
the same locations as the Linux packages.
Download the VirtualGL Windows installer package (
area of the VirtualGL SourceForge web-site.
Run the VirtualGL installer. The installation of VirtualGL should be self-explanatory. The only configuration option is the directory into which you want the files to be installed.
NOTE: The VirtualGL Windows installer does not remove any previous versions of VirtualGL that may be installed on your machine. If you wish, you can remove these older versions manually by
using the “Add or Remove Programs” applet in the Control Panel (or the “Programs and Features” applet if you are running Vista.)
If you are using a platform for which there is not a pre-built VirtualGL binary package available, then log in as root, download the VirtualGL source tarball (
from the Download area of the VirtualGL
SourceForge web-site, uncompress it,
The VirtualGL Sun Ray plugin is a proprietary add-on developed by Sun Microsystems to integrate VirtualGL with the Sun Ray thin client environment. If you plan to use this functionality, then it is recommended that you download and
install the Sun Shared Visualization software. This software
product is available as a free download (Sun charges for support), and it includes VirtualGL, TurboVNC, the proprietary Sun Ray plugin, and enhancements to N1 GridEngine to allow it to manage VirtualGL jobs across a cluster of 3D servers.
RPM-based systems
Debian-based systems
Answer “yes” when prompted.
Launch OSXPM
Click the “Delete Package” button
Find
Click “Delete Selected”
Enter your password if prompted
Complain to Apple about the lack of a built-in package uninstaller for OS X
TurboVNC must be installed on any machine that will act as a TurboVNC server or client. It is not necessary to install TurboVNC to use the VGL
Image Transport. Also, TurboVNC need not necessarily be installed on the same server as VirtualGL.
area of the VirtualGL SourceForge web-site.
The “i386” RPM and DEB packages are for 32-bit-only systems. The “x86_64” RPM and “amd64” DEB packages are for 64-bit systems. The 64-bit packages contain both 32-bit and 64-bit libraries.
Log in as root, cd to the directory where you downloaded the binary package, and issue one of the following commands:
RPM-based systems
Debian-based systems
area of the VirtualGL SourceForge web-site.
Log in as root, cd to the directory where you downloaded the binary package, and issue one of the following commands:
RPM-based systems
Debian-based systems
Download the TurboVNC Solaris package (
x86) from the Download area of the VirtualGL
SourceForge web-site.
Log in as root, cd to the directory where you downloaded the package, and issue the following commands:
(answer “Y” when prompted.)
Select the
TurboVNC for Solaris installs into
Download the TurboVNC Mac disk image (
area of the VirtualGL SourceForge web-site.
Open the disk image, then open
same locations as the Linux packages.
Download the TurboVNC Windows installer package (
area of the VirtualGL SourceForge web-site.
Run the TurboVNC installer. The installation of TurboVNC should be self-explanatory. The only configuration option is the directory into which you want the files to be installed.
If you are using a platform for which there is not a pre-built TurboVNC binary package available, then log in as root, download the TurboVNC source tarball (
from the Download area of the VirtualGL
SourceForge web-site, uncompress it,
RPM-based systems
Debian-based systems
Answer “yes” when prompted.
Launch OSXPM
Click the “Delete Package” button
Find
Click “Delete Selected”
Enter your password if prompted
Complain to Apple about the lack of a built-in package uninstaller for OS X
Sun’s OpenGL library for Solaris/SPARC systems has a special extension called “GLP” which allows VirtualGL to directly access a 3D graphics card even if there is no X server running on the card. GLP greatly improves the overall security
of the VirtualGL server, since it eliminates the need to grant VirtualGL users access to the 3D X server running on that machine. In addition, GLP makes it easy to assign VirtualGL jobs to any graphics card in a multi-card system.
When using GLP, the architecture of VirtualGL changes as follows:
Figure 6.1: The VGL Image Transport with a Remote 2D X Server and GLP
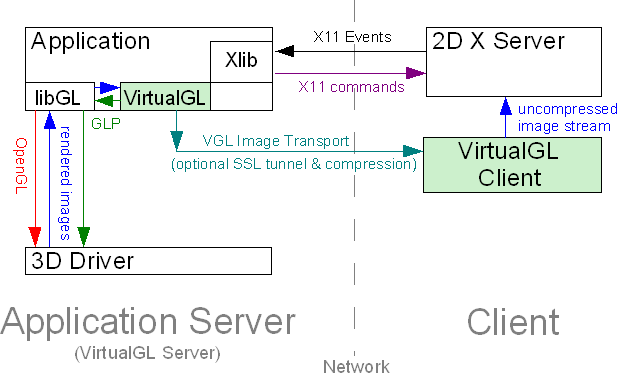
Figure 6.2: The X11 Image Transport with an X Proxy and GLP

Figure 6.3: The Sun Ray Image Transport with GLP
If the application server is running Sun OpenGL 1.5
for Solaris/SPARC, then it is recommended that you configure it to use GLP:
Log in as root.
Run
Select option 3 (
YesOnly users in the
unauthorized user could snoop the 3D framebuffer device(s) and thus see (or alter) the output of a 3D application that is being used with VirtualGL.
NoAny authenticated user can run OpenGL applications on the VirtualGL server. If it is necessary for users outside of the
selected.
If you chose to restrict framebuffer device access to the
add additional users to the group at this time. Note that any user you add to
Edit the
wish to use with VirtualGL.
This command should output a list of visuals and should complete with no errors.
to
setting
more details.
If you plan to use VirtualGL only with GLP,
then you can skip this section.
VirtualGL requires access to the application server’s 3D graphics card so that it can create off-screen pixel buffers (Pbuffers) and redirect the 3D rendering from applications into these Pbuffers. Unfortunately, accessing a 3D graphics
card on Linux and Solaris/x86 systems or on Solaris/SPARC systems without GLP requires going through an X server.
On such systems, the only way to share the application server’s 3D graphics card among multiple users is to grant those users access to the 3D X server (the X server attached to the application server’s 3D graphics card. Refer to the figures in Chapter 2.)
It is important to understand the security risks associated with this. Once a user has access to the 3D X server, there is nothing that would prevent the user from logging keystrokes or reading back images from that X server. Using
one can obtain “untrusted” X authentication keys which prevent such exploits, but unfortunately, those untrusted keys also disallow access to the 3D hardware. Thus, it is necessary to grant full trusted access to the 3D X server for any users that will need
to run VirtualGL. Unless you fully trust the users to whom you are granting this access, then you should avoid logging in locally to the 3D X server (particularly as root) unless absolutely necessary.
This section will explain how to configure a VirtualGL server such that selected users can run VirtualGL, even if the server is sitting at the login prompt.
Shut down the display manager:
Ubuntu Linux servers
Other Linux servers
Solaris 10 servers running GDM
Solaris 11/OpenSolaris servers running GDM
Solaris servers running dtlogin
Log in as root from the text console (or remotely using SSh.)
Run
Select option 1 (
YesOnly users in the
the
NoVirtualGL can be used by any user that successfully logs into the VirtualGL server. The 3D X server can also be accessed (and potentially exploited) by any user who is logged into the VirtualGL server. If you choose this option, it is
recommended that you also disable the XTEST extension (see below.)
YesOnly users in the
unauthorized user could snoop the 3D framebuffer device(s) and thus see (or alter) the output of a 3D application that is being used with VirtualGL.
NoAny authenticated user can run OpenGL applications on the VirtualGL server. If it is necessary for users outside of the
selected.
YesDisabling XTEST will not prevent a user from logging keystrokes or reading images from the 3D X server, but if a user has access to the 3D X server, disabling XTEST will prevent them from inserting keystrokes or mouse events and thus
hijacking local X sessions on that X server.
On certain Linux distributions, it may be necessary to run
line entries have been created, disabling XTEST using
No
If you chose to restrict X server or framebuffer device access to the
can also add additional users to the group at this time. Note that any user you add to
Restart the display manager:
Ubuntu Linux servers
Other Linux servers
Solaris 10 servers running GDM
Solaris 11/OpenSolaris servers running GDM
Solaris servers running dtlogin
If you restricted 3D X server access to
NOTE:
If you did not restrict 3D X server access
Both commands should output a list of visuals and should complete with no errors. If you chose to disable the XTEST extension, then check the output of
list of extensions.
The application server’s SSh daemon should have the
your distribution of SSh. Linux, Solaris 10+, and OpenSolaris systems generally keep this in
You can use the
shared access to the 3D X server and thus prevent VirtualGL from accessing the 3D hardware in that manner. Option 2 will also re-enable the XTEST extension on the 3D X server. Both Option 2 and Option 4 (
will restore the framebuffer device permissions to their default (by default, only root or the user that is currently logged into the application server locally can access the framebuffer devices.)
NOTE: Unconfiguring the server does not remove the
After selecting Option 2, you must restart the display manager before the changes will take effect.
Install Hummingbird Exceed if it isn’t already installed.
Add the Exceed path (example:
Open the “X Server Protocol” applet in XConfig.
If you are using the “Classic View” mode of XConfig, open the “Protocol” applet instead.
In the “X Server Protocol” applet, select the “Protocol” tab and make sure that “Use 32 bits per pixel for true color” is not checked.
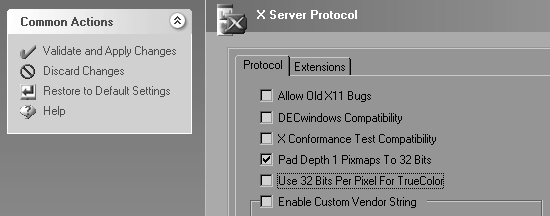
Click “Validate and Apply Changes.” If XConfig asks whether you want to perform a server reset, click “Yes.”
Open the “Other Server Settings” applet in XConfig.
If you are using the “Classic View” mode of XConfig, open the “Performance” applet instead.
Select the “Performance” tab and make sure that “Default Backing Store” is set to “None.”
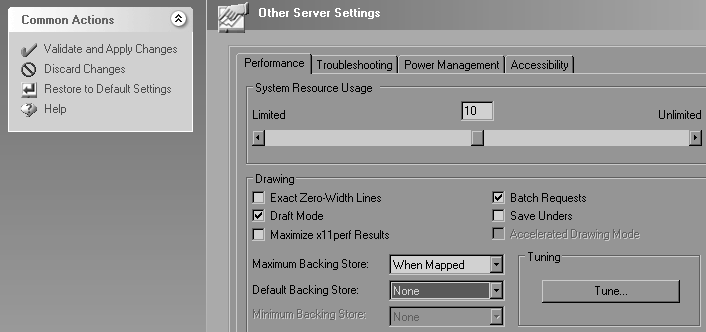
Click “Validate and Apply Changes.” If XConfig asks whether you want to perform a server reset, click “Yes.”
The bad news is that this extension is not consistently implemented across all versions of Exceed. In particular, Exceed 8, Exceed 9, and Exceed 2008 require patches to make it work properly. If you are using one of these versions
of Exceed, you will need to obtain the following patches from the Hummingbird support site:
No patches should be necessary for Exceed 10, 2006, or 2007.
Next, you need to enable the MIT-SHM extension in Exceed:
Load Exceed XConfig (right-click on the Exceed taskbar icon, then select Tools–>Configuration.)
Open the “X Server Protocol” applet in XConfig.
If you are using the “Classic View” mode of XConfig, open the “Protocol” applet instead.
Select the “Extensions” tab and make sure that “MIT-SHM” is checked.
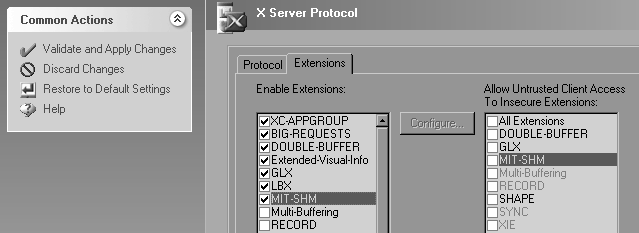
Click “Validate and Apply Changes.” If XConfig asks whether you want to perform a server reset, click “Yes.”
Supports stereographic and overlay rendering
Built-in encryption
Consumes fewer server resources, since the 2D (X11) rendering occurs on the client machine
is not recommended for use on high-latency networks
No collaboration features
Requires purchasing Exceed for use with Windows clients
The client is not stateless. As with any remote X11 app, if the network connection drops, then the application will exit
This mode is recommended for use on secure local-area networks. The X11 traffic is encrypted, but the VirtualGL image stream is left unencrypted to maximize performance.
Open a new terminal window (Mac clients: in the X11 application, start a new xterm [Command-N] if one isn’t already started.)
In the same terminal/xterm window, open a Secure Shell (SSh) session into the VirtualGL server:
Replace
In the SSh session, start a 3D application using VirtualGL:
Consult Chapter 19 for more information on
Open a new Command Prompt.
In the same Command Prompt window, set the
If you only ever plan to use one Exceed session at a time, then you can set the
Variables.)
Open a Secure Shell (SSh) session into the VirtualGL server:
Replace
In the SSh session, start a 3D application using VirtualGL:
Consult Chapter 19 for more information on
As with the previous mode, this mode performs optimally on local-area networks.
However, it is less secure, since both the X11 traffic and the VGL image stream are unencrypted. This mode is primarily useful in grid environments where you may not know ahead of time which server will execute a VirtualGL job. It is assumed that the “submit
host” (the machine into which you connect with SSh) and the “execute hosts” (the machines that will run VirtualGL jobs) share the same home directories and reside in the same domain.
Some newer Linux and Solaris distributions ship with default settings that do not allow TCP connections into the X server. Such systems cannot be used as clients with this procedure unless
they are reconfigured to allow X11 TCP connections.
that you should pass a
This mode encrypts the VGL image stream and, when used in conjunction with X11 forwarding,
provides a completely secure solution. However, enabling SSL encryption can reduce VirtualGL’s performance by as much as 20% on high-speed networks such as Ethernet.
that you should pass an argument of
(see Chapter 19 for more details.)
This mode is useful when either the VirtualGL server or the client machine are behind restrictive firewalls and only SSh connections are allowed through. Both the VGL image stream and the X11 traffic are tunneled through the SSh connection,
and thus this mode provides a completely secure solution. However, using SSh tunneling can reduce VirtualGL’s performance by anywhere from 20-40% on high-speed networks such as Ethernet.
that you should pass a
password-less logins, then this mode will require you to enter your password twice.
then use
When using the VGL image transport over Gigabit Ethernet or faster networks, it may be desirable to disable image compression. This can be accomplished by passing an argument of
the
usage by a factor of 10 or more. Thus, disabling image compression is not recommended unless you are using switched Gigabit Ethernet (or faster) infrastructure and have plenty of bandwidth to spare.
Using the VGL Image Transport with XDMCP should mostly “just work”. Once you have established the connection to the remote X server using XDMCP, you can then follow any of the above procedures to create an SSh connection to the application
server and start a 3D application using VirtualGL. The application server and the machine running the remote X server need not necessarily be the same machine.
The VirtualGL Client application receives encoded and/or compressed images on a dedicated TCP socket, decodes and/or decompresses the images, and draws the images into the appropriate X window. In previous versions of VirtualGL, it
was necessary to manually start the VirtualGL Client prior to connecting to the application server, but the new
One consequence of this ease of use is that the actual workings of
in the background, accepting VGL Image Transport connections for the X server on which it was started, until that X server is reset or until the
kill all
(
where
the name of the current X display (read from the
When
X display, they read the X window properties, determine that another
even if it is explicitly killed. However, under rare circumstances (if sent a SIGKILL signal on Unix, for instance), a
of
this X display. Alternately, you can simply reset your X server to clear the orphaned X window properties.
obtain one of those ports, because another application or another
operating system.
In a nutshell: if you only ever plan to run one X server at a time on your client machine, which means that you’ll only ever need one instance of
4243 in your client machine’s firewall. If you plan to run multiple X servers on your client machine, which means that you will need to run multiple
a multi-user TurboVNC or Sun Ray server that has a firewall, then you may wish to open ports 4200-4299 in the server’s firewall. Opening ports 4200-4299 will accommodate up to 50 separate
accommodated on a firewalled machine, unless the firewall is able to create rules based on application executables instead of listening ports.
Note that it is not necessary to open any inbound ports in the firewall to use the VGL Image Transport with SSh Tunneling.
Referring to Chapter 2, the X11 Image Transport bypasses VirtualGL’s internal image compressor and instead draws
the rendered 3D images to an X server using standard X11 drawing commands. Since this results in the images being sent uncompressed to the X server, the X11 Image Transport is designed to be used with an “X Proxy.” An X proxy acts as a virtual X server, receiving
X11 commands from the application (and from VirtualGL), rendering the X11 commands into images, compressing the resulting images, and sending the compressed images over the network to a client or clients.
Since VirtualGL is sending rendered 3D images to the X proxy at a very fast rate, the proxy must be able to compress the images very quickly in order to keep up. Unfortunately, however, most X proxies can’t. They simply aren’t designed
for the types of full-screen video workloads that VirtualGL generates. Therefore, the VirtualGL Project provides an optimized X proxy called “TurboVNC”, which is based on the Virtual
Network Computing (VNC) standard (more specifically, on the TightVNC variant
thereof.)
On the surface, TurboVNC behaves very similarly to its parent project, but TurboVNC has been tuned to provide interactive performance for the types of full-screen video workloads that VirtualGL produces. On these types of image workloads,
TurboVNC performs as much as an order of magnitude faster than TightVNC, uses more than an order of magnitude less CPU time to compress each frame, and it produces generally better compression ratios. As with TightVNC, TurboVNC uses JPEG compression for image
tiles with a high number of unique colors and paletted encoding for image tiles with a low number of unique colors. Part of TurboVNC’s speedup comes from the use of TurboJPEG, the same high-speed vector-optimized JPEG codec used by the VGL Image Transport.
However, TurboVNC also bypasses the CPU-hungry smoothness detection routines that TightVNC uses to determine whether a tile is a good candidate for JPEG compression. Furthermore, TurboVNC eliminates buffer copies, it maximizes network efficiency by using the
largest tile sizes supported by the TightVNC protocol, and it never uses a Zlib compression level higher than 1. In the aggregate, TurboVNC compresses 2D application workloads less efficiently than TightVNC, but it generally does a better job than TightVNC
of compressing 3D application workloads. Also, TurboVNC is much faster across the board than TightVNC.
TurboVNC also has the ability to hide network latency by decompressing and drawing a frame on the client while the next frame is being fetched from the server. This can improve performance dramatically on high-latency connections.
TurboVNC additionally provides client-side double buffering, full support for Solaris, and other refinements.
much faster (perhaps even orders of magnitude faster) with TurboVNC than with the VGL Image Transport on such connections.
For 3D applications whose rendered images do not contain very many unique colors (for instance, CAD applications in wireframe mode), the hybrid protocol used by TurboVNC will generally use less network bandwidth than the pure motion
JPEG protocol used by the VGL Image Transport.
TurboVNC provides two lossless compression modes, one of which is designed to reduce server CPU usage on gigabit networks and the other of which is designed to provide reasonable performance on wide-area networks (at the expense
of higher server CPU usage.) The VGL Image Transport’s only lossless option is uncompressed RGB.
TurboVNC includes a lossless refresh feature which will, on demand, send a mathematically lossless image of the current VNC desktop to the client. A user connecting over a low-bandwidth connection can use low-quality JPEG to achieve
the best performance when manipulating the 3D model, then they can request a lossless refresh when they are ready to study the model in detail.
TurboVNC provides rudimentary collaboration capabilities. Multiple clients can simultaneously view the same TurboVNC session and pass around control of the keyboard and mouse.
The TurboVNC viewer is stateless. If the network hiccups or the viewer is otherwise disconnected, the session continues to run on the server and can be rejoined from any machine on the network.
No X server is required on the client machine. This reduces the deployment cost and complexity for Windows clients.
Any web browser or PDA can be used as a TurboVNC client (with reduced performance.)
TurboVNC will generally require about 20% more server CPU cycles to maintain the same frame rate as the VGL Image Transport, both because it has to compress more pixels in each frame (an entire desktop rather than a single window)
and because it has to perform 2D (X11) rendering as well as 3D rendering.
TurboVNC does not support quad-buffered stereo or transparent overlays.
The most common (and optimal) way to use TurboVNC is to set it up on the same server that is running VirtualGL. This allows VirtualGL to send its rendered 3D images to TurboVNC through shared memory rather than sending them over a
network.
Open a new Command Prompt/terminal window on your client machine. (Mac clients: in the X11 application, start a new xterm [Command-N] if one isn’t already started.)
In the new Command Prompt/terminal/xterm window, open a Secure Shell (SSh) session into the VirtualGL/TurboVNC server:
Linux/Mac/Solaris clients
Windows clients
Replace
In the SSh session, start a TurboVNC session:
Make a note of the X display number that the TurboVNC session is occupying, for instance:
If this is the first time that a TurboVNC session has ever been run under this user account, TurboVNC will prompt for a VNC session password.
The SSh session can now be exited, if desired.
On the client machine, start the TurboVNC Viewer.
Linux/Mac/Solaris clientsOpen a new terminal/xterm and type
Windows clientsSelect TurboVNC Viewer in the TurboVNC Start Menu group.
A small dialog box will appear.
Enter the X display name (hostname/IP address and display number) of the TurboVNC session in the “VNC Server” field, then click “Connect” (Windows) or press Enter (Linux/Mac/Solaris.)
Another dialog box appears, prompting for the VNC session password.
Enter the VNC session password and click “OK” (Windows) or press Enter (Linux/Mac/Solaris.)
A TurboVNC desktop window should appear on your client machine. This window contains a virtual X server with which you can interact to launch X-Windows applications on the TurboVNC server.
Open a new terminal inside the TurboVNC desktop.
In the terminal, start a 3D application using VirtualGL:
VirtualGL will detect that the X display connection is local and will automatically enable the X11 Image Transport.
Consult Chapter 19 for more information on
If TurboVNC and VirtualGL are running on different servers, then it is desirable to use the VGL Image Transport to send images from the VirtualGL server to the TurboVNC server. It is also desirable to disable image compression in the
VGL Image Transport. Otherwise, the images would have to be compressed by the VirtualGL server, decompressed by the VirtualGL Client, then recompressed by the TurboVNC server, which is a waste of CPU resources. However, sending images uncompressed over a network
requires a fast network (generally, Gigabit Ethernet or faster), so there needs to be a fast link between the VirtualGL server and the TurboVNC server for this procedure to perform well.
using the VGL Image Transport to remotely display 3D applications from a VirtualGL server to a remote 2D X server, with the following notable differences:
The “client” in this case is really the TurboVNC server.
The “X server” is really the TurboVNC session.
Once connected to the VirtualGL server with SSh, it is recommended that you disable image compression in the VGL Image Transport by either setting the
passing an argument of
Closing the TurboVNC viewer disconnects from the TurboVNC session, but the TurboVNC session will remain running on the TurboVNC server (as will any applications that you may have started in the session), and you can reconnect to the
session at any time.
To kill a TurboVNC session:
Using SSh (
… or …
Using the TurboVNC Viewer, connect to the TurboVNC session that you wish to kill, and open a new terminal in that TurboVNC session.
Type the following command:
Replace
To list the X display numbers and process ID’s of all TurboVNC sessions that are currently running under your user account on a particular machine, type the following command:
When a TurboVNC session is created, it automatically launches a miniature web server that serves up a Java TurboVNC viewer applet. This Java TurboVNC viewer can be used to connect to the TurboVNC session from a machine that does not
have a native TurboVNC viewer installed (or a machine for which no native TurboVNC viewer is available.) The Java viewer is significantly slower than the native viewer on high-speed networks, but on low-speed networks the Java viewer and native viewers have
comparable performance. The Java viewer does not currently support double buffering.
To use the Java TurboVNC viewer, point your web browser to:
where
Example: If the TurboVNC session is occupying X display
The level of image compression in TurboVNC can be adjusted to balance the (sometimes conflicting) goals of high image quality and high performance. There are four options which control the manner in which TurboVNC compresses images:
Allow JPEG compressionIf this option is enabled, then TurboVNC will use JPEG compression for all image tiles with more than 24 unique colors and paletted encoding for all other image tiles. If this option is disabled, then TurboVNC will select between paletted
or raw encoding depending on the size of the image tile and its color count.
JPEG image qualityLower quality levels produce grainier JPEG images with more noticeable compression artifacts, but lower quality levels also use less network bandwidth and CPU time. Refer to Section 19.1 for
more details.
JPEG chrominance subsamplingAfter converting the image from RGB to YUV, chrominance subsampling discards some of the U and V (chrominance) components to save space. 1x subsampling retains the chrominance components for all pixels, 2x subsampling retains the chrominance
components for every other pixel, 4x subsampling retains the chrominance components for every fourth pixel, and grayscale throws out all of the chrominance components. Refer to Section 19.1 for
more details.
Zlib compression levelIf Zlib compression is enabled, then paletted and raw-encoded image tiles will be compressed with Zlib prior to transmission. This decreases network bandwidth usage at the expense of increased server CPU usage. If JPEG compression is
enabled, then Zlib compression is always used with non-JPEG image tiles.
In the Windows TurboVNC Viewer, these parameters can be adjusted by accessing the Options dialog box (click on the “Options” button in the “TurboVNC Connection” dialog box or, after connecting to the server, click on the Connection
Options button in the toolbar.) In the Unix TurboVNC viewer, press F8 after connecting to bring up the options menu. In the Java viewer, click on the Options button at the top of the browser window.
The TurboVNC Viewer provides five image encoding protocols, corresponding to the most useful combinations of the image compression options described above:
In the Windows TurboVNC Viewer, the image encoding protocol can be set using the Options dialog box (click on the “Options” button in the “TurboVNC Connection” dialog box or, after connecting to the server, click on the Connection
Options button in the toolbar.) In the Java viewer, the same thing is accomplished by clicking on the “Options” button at the top of the browser window. With the Linux/Mac/Solaris TurboVNC Viewer, the “Perceptually Lossless” protocol is the default, and you
can use the following command line switches to select another protocol:
You can also press the F8 key after connecting to pop up a menu from which you can select a different protocol.
the server will send a mathematically lossless copy of the current TurboVNC desktop to the requesting viewer. So, for instance, a user can rotate/pan/zoom an object in their 3D application using a very low-quality JPEG setting, then when that user is ready
to interpret or analyze the object, they can request a lossless refresh of TurboVNC’s virtual screen.
To perform a lossless refresh in the Windows or Unix TurboVNC viewers, press CTRL-ALT-SHIFT-L (in the Windows TurboVNC Viewer, you can also click on the Lossless Refresh toolbar icon.) In the Java TurboVNC Viewer, click on the “Lossless
Refresh” button at the top of the browser window.
Normally, the connection between the TurboVNC server and the TurboVNC viewer is completely unencrypted, but securing that connection can be easily accomplished by using the port forwarding feature of Secure Shell (SSh.) After you have
started a TurboVNC session on the TurboVNC server, open a new SSh connection into the TurboVNC server using the following command line:
Linux/Mac/Solaris clients
Windows clients
Replace
the TurboVNC session to which you want to connect.
For instance, if you wish to connect to display
Linux/Mac/Solaris clients
Windows clients
After the SSh connection has been established, you can then launch the TurboVNC viewer and point it to
TurboVNC.
For more detailed instructions on the usage of TurboVNC:
Linux/Mac/SolarisRefer to the TurboVNC man pages:
WindowsUse the embedded help feature (the question mark button in the upper right of the TurboVNC Viewer window.)
The TightVNC documentation:
http://www.tightvnc.com/docs.html
might also be helpful, since TurboVNC is based on TightVNC and shares many of its features.
The previous chapter described how to use VirtualGL with TurboVNC, but much of this
information is also applicable to other X proxies, such as RealVNC, NX, etc. Generally, none of these other solutions will provide anywhere near the performance of TurboVNC, but some of them have capabilities that TurboVNC lacks (NX, for instance, can do seamless
windows.)
VirtualGL reads the value of the
then VirtualGL will assume that the X server connection is local and will enable the X11 Image Transport as the default. This should effectively make the X11 Image Transport the default for most X proxies, but if for some reason that doesn’t occur, then you
can force the use of the X11 Image Transport by setting the
As described in Chapter 2, the Sun Ray environment consists of both an X proxy and an ultra-thin hardware client.
If the proprietary VirtualGL Sun Ray plugin is not used, then the Sun Ray server can be treated just like any other X proxy and used with either the X11 Image Transport or the VGL Image Transport, as described in Chapter 9 and
Chapter 10.
If, however, the Sun Ray plugin is installed on the VirtualGL server, then a slightly different procedure is required to connect to that server and use the Sun Ray Image Transport. This procedure assumes that VirtualGL is running on
a different machine than the Sun Ray server.
In the same terminal window, open a Secure Shell (SSh) session into the VirtualGL server:
Replace
In the SSh session, start a 3D application using VirtualGL:
Consult Chapter 19 for more information on
Note that this procedure is substantially similar to the X11 Forwarding procedure
used with the VGL Image Transport, except that it invokes
Sun Ray Image Transport.
If the VirtualGL Sun Ray plugin is installed on a VirtualGL server, then VirtualGL will try to use the Sun Ray Image Transport when displaying 3D applications from that server to a Sun Ray client. However, the Sun Ray Image Transport
requires that the Sun Ray client be on a network that is accessible from the VirtualGL server. Some Sun Ray deployments place the clients on a private network that is visible only to the Sun Ray server, and the Sun Ray Image Transport cannot be used in such
cases (unless VirtualGL is running on the Sun Ray server itself, but that defeats the purpose of the Sun Ray Image Transport.) If VirtualGL detects that it is running in a Sun Ray environment but is unable to use the Sun Ray Image Transport, then it will fall
back to using the X11 Image Transport.
the VirtualGL faker library will be preloaded into every executable that the script launches. Normally this is innocuous, but if the script calls any executables that have the setuid and/or setgid permission bits set, then the dynamic linker will refuse to
preload the VirtualGL faker library into those executables. The following warning will be printed out for each setuid/setgid executable that the script tries to launch:
Linux
Solaris
On Solaris and on newer versions of Linux (GLIBC 2.3 and later), the executable will continue to run, but without VirtualGL preloaded into it. That may be a problem, if the setuid/setgid executable was a 3D application that was intended
to be used with VirtualGL. To further complicate matters, some older versions of Linux will refuse to launch setuid/setgid executables at all if one attempts to preload VirtualGL into them.
There are a couple of ways to work around this issue. Probably the safest way is to simply edit the application script and make it store the value of the
executable is launched. For instance, consider the following application script:
Initial contents of
You could modify the script as follows:
SolarisModified
LinuxModified
You can also force VirtualGL to be preloaded into setuid/setgid executables, but please be aware of the security ramifications of this before you do it. By applying one of the following workarounds, you are essentially telling the
operating system that you trust the security and stability of the VirtualGL code as much as you trust the security and stability of the operating system. And while we’re flattered, we’re not sure that we’re necessarily deserving of that accolade, so if you
are in a security critical environment, apply the appropriate level of paranoia here.
To force VirtualGL to be preloaded into setuid/setgid executables on Linux, make
On 64-bit Linux systems, also run:
On Solaris, you can force VirtualGL to be preloaded into setuid/setgid executables by adding the VirtualGL library directories to the Solaris “secure path.” Solaris keeps a tight lid on what goes into
and by default, it will only allow libraries in those paths to be preloaded into an executable that is setuid and/or setgid. Generally, 3rd party packages are forbidden from installing anything into
the
will preload VirtualGL only into 32-bit executables called by a script, whereas
will preload VirtualGL only into 64-bit executables. So if, for instance, the setuid executable that the script is invoking is 32-bit and the application executable is 64-bit, then you could use
application script.
The lion’s share of OpenGL applications are dynamically linked against
applications, VirtualGL is loaded ahead of
However, some applications (particularly games) are not dynamically linked against
load OpenGL and GLX symbols from
So let’s assume that you just downloaded the latest version of the Linux game Foo Wars from the Internet, and (for whatever reason) you want to run the game in a VNC session. The game provides a command line switch
can be used to specify an OpenGL library to load other than
You still need to use
for loading a substitute OpenGL library allows VirtualGL to intercept the GLX and OpenGL calls.
In some cases, the application does not provide an override mechanism such as the above. In these cases, you should pass an argument of
Passing
instead of
Chapter 15 contains specific recipes for getting a variety of games and other applications to work with
VirtualGL.
Chromium is a powerful framework for performing various types of parallel OpenGL rendering. It is usually used on clusters of commodity Linux PC’s to divide up the task of rendering scenes with large geometries or large pixel counts
(such as when driving a display wall.) Chromium is most often used in one of three configurations:
Sort-First Rendering (Image-Space Decomposition)
Sort-First Rendering (Image-Space Decomposition) with Readback
Sort-Last Rendering (Object-Space Decomposition)
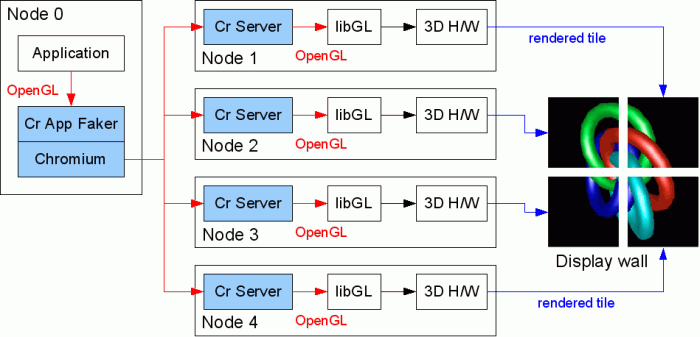
Sort-First Rendering (Image-Space Decomposition) is used to overcome the fill rate limitations of individual graphics cards. When configured to use sort-first rendering, Chromium divides up the scene based on which polygons will be
visible in a particular section of the final image. It then instructs each node of the cluster to render only the polygons that are necessary to generate the image section (“tile”) for that node. This is primarily used to drive high-resolution displays that
would be impractical to drive from a single graphics card due to limitations in the card’s framebuffer memory, processing power, or both. Configuration 1 could be used, for instance, to drive a CAVE, video wall, or even an extremely high-resolution monitor.
In this configuration, each Chromium node generally uses all of its screen real estate to render a section of the multi-screen image.
VirtualGL is generally not very useful with Configuration 1. You could theoretically install a separate copy of VirtualGL on each display node and use it to redirect the output of each
Client instance running on a multi-screen 2D X server elsewhere on the network. However, synchronizing the frames on the remote end would require modifications to VirtualGL. Such is left as an exercise for the reader.
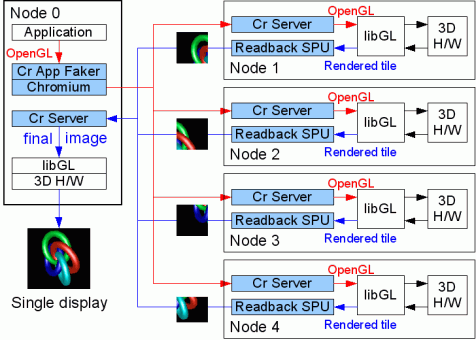
Configuration 2 uses the same sort-first principle as Configuration 1, except that each tile is only a fraction of a single screen, and the tiles are recombined into a single window on Node 0. This configuration is perhaps the least
often used of the three, but it is useful in cases where the scene contains a large amount of textures (such as in volume rendering) and thus rendering the whole scene on a single node would be prohibitively slow due to fill rate limitations.
In this configuration, the application is allowed to choose a visual, create an X window, and manage the window as it would normally do. However, all other OpenGL and GLX activity is intercepted by the Chromium App Faker (CrAppFaker)
so that the 3D rendering can be split up among the rendering nodes. Once each node has rendered its section of the final image, the image tiles get passed back to a Chromium Server (CrServer) process running on Node 0. This CrServer process attaches to the
previously-created application window and draws the pixels into the window using
The general strategy for making this work with VirtualGL is to first make it work without VirtualGL and then insert VirtualGL only into the processes that run on Node 0. VirtualGL must be inserted into the CrAppFaker process to prevent
CrAppFaker from sending
to the 2D X server (which would similarly fail if the 2D X server didn’t support GLX and which would create a performance issue if the 2D X server was remote.) Instead, VirtualGL forces CrServer to draw into a Pbuffer, and VGL then takes charge of transmitting
the pixels from the Pbuffer to the 2D X server in the most efficient way possible.
Since Chromium uses
which allows one to specify an alternate path to be searched for
This symbolic link is located in its own isolated directory, so that directory can be passed to Chromium in the
to the following table:
Running the CrServer in VirtualGL is simply a matter of setting this environment variable and then invoking
In the case of CrAppFaker, it is also necessary to set
is really just a copy of Chromium’s
to load VirtualGL again, and an endless loop will occur.
Therefore, we must use the
pass OpenGL commands into Chromium:
CrAppFaker will copy the application into a temporary directory and then copy
of
in
NOTE:
So, putting this all together, here is an example of how you might start a sort-first rendering job using Chromium and VirtualGL:
Start the mothership on Node 0 with an appropriate configuration for performing sort-first rendering with readback
Start
On Node 0, set the
above)
On Node 0,
On Node 0, set
On Node 0, launch
Again, it’s always a good idea to make sure this works without VirtualGL before adding VirtualGL into the mix.
in place of step 2 above:
On each of the rendering nodes,
set the
set the
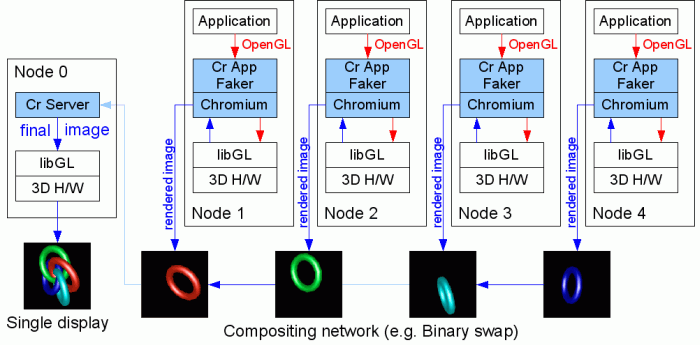
Sort-Last Rendering is used when the scene contains a huge number of polygons and the rendering bottleneck is processing all of that geometry on a single graphics card. In this case, each node runs a separate copy of the application,
and for best results, the application needs to be aware that it is running in a parallel environment so that it can give Chromium hints as to how to distribute the various objects to be rendered. Each node generates an image of a particular portion of the
object space, and these images must be composited in such a way that the front-to-back ordering of pixels is maintained. This is generally done by collecting Z buffer data from each node to determine whether a particular pixel on a particular node is visible
in the final image. The rendered images from each node are often composited using a “binary swap”, whereby the nodes combine their images in a cascading tree so that the overall compositing time is proportional to log2(N) rather than N.
To make this configuration work with VirtualGL:
Start the mothership on Node 0 with an appropriate configuration for performing sort-last rendering
Start
On Node 0, set the
On Node 0,
should be decomposed. CRUT applications require an additional piece of software,
Start the mothership on Node 0 with an appropriate configuration for performing sort-last rendering
Start
On Node 0, set the
On Node 0,
On Node 0,
Chromium’s use of X11 is generally not very optimal. It assumes a very fast connection between the 2D X server and the Chromium Server. In certain modes, Chromium polls the 2D X server on every frame to determine whether windows have
been resized, etc. Thus, we have observed that, even on a fast network, Chromium tends to perform much better with VirtualGL running in a TurboVNC session as opposed to using the VGL Image Transport.
ModViz Virtual Graphics PlatformTM is a polished commercial clustered rendering framework for Linux which supports all three of the rendering modes described above and provides a much more straightforward interface to configure
and run these types of parallel rendering jobs.
All VGP jobs, regardless of configuration, are spawned through
the application instance(s), sending rendered images back to Node 0, and compositing the images as appropriate. In a similar manner to VirtualGL’s
and this library intercepts the OpenGL calls from the application.
So our strategy here is similar to our strategy for loading the Chromium App Faker. We want to insert VirtualGL between VGP and the real system OpenGL library, so that VGP will call VirtualGL and VirtualGL will call
Achieving this with VGP is relatively simple:
Replace
NOTE: This is known not to work with VGP 2.0.
Stereographic rendering is a feature of OpenGL that creates separate rendering buffers for the left and right eyes and allows the application to render a different image into each buffer. How the stereo images are subsequently displayed
depends on the particulars of the 3D hardware and the user’s environment. VirtualGL can support stereographic applications in one of two ways: (1) by sending the stereo image pairs to the client to be displayed in stereo by the client’s 3D graphics card, or
(2) by combining each stereo image pair into a single anaglyph that can be viewed with traditional red/cyan 3D glasses.
stereo capabilities generally provide some sort of synchronization signal that can be used to control various types of active stereo 3D glasses. Some also support “passive stereo”, which requires displaying the left and right eye buffers to different monitor
outputs. VirtualGL supports true quad-buffered stereo by rendering the stereo images on the server and sending the image pairs across the network to be displayed by a 3D graphics card on the client.
In most cases, the VirtualGL Client and TurboVNC Viewer use only 2D drawing commands, thus eliminating the need for a 3D graphics card on the client machine. But drawing stereo images requires a 3D graphics card, so such a card must
be present in any client machine that will use VirtualGL’s quad-buffered stereo feature. Since the 3D graphics card is only being used to draw images, it need not necessarily be a high-end card. Generally, the least expensive 3D graphics card that has stereo
capabilities will work fine in a VirtualGL client machine.
The VirtualGL server must also have a 3D graphics card that supports stereo, since this is the only way that VirtualGL can obtain a stereo Pbuffer. When an application tries to render something in stereo, VirtualGL will (by default)
use quad-buffered stereo rendering if:
The client supports OpenGL (Exceed 3D is required for Windows clients)
The client has stereo rendering capabilities
The server has stereo rendering capabilities
If one or more of these is not true, then VirtualGL will fall back to using anaglyphic stereo (see below.) It is usually necessary to explicitly enable stereo in the graphics driver configuration for both the client and server machines.
The Troubleshooting section below lists a way to verify that both client and server have stereo visuals
available.
In quad-buffered mode, VirtualGL reads back both eye buffers on the server and sends the contents as a pair of compressed images (one for each eye) to the VirtualGL Client. The VirtualGL Client then decompresses both images and draws
them as a single stereo frame to the client machine’s X display using
the same frame rate as mono.
Quad-buffered stereo requires the VGL Image Transport. If any other image transport is used, then VGL will fall back to anaglyphic stereo mode.
a 3D anaglyph, the red color data from the left eye buffer is combined with the green and blue color data from the right eye buffer, thus allowing a single monographic image to contain stereo data. From the point of view of VirtualGL, an anaglyphic image is
the same as a monographic image, so anaglyphic stereo images can be sent using any image transport to any type of client, regardless of the client’s capabilities.
VirtualGL uses anaglyphic stereo if it detects that an application has rendered something in stereo but quad-buffered stereo is not available, either because the client doesn’t support it or because a transport other than the VGL Image
Transport is being used. Anaglyphic stereo provides a cheap and easy way to view stereographic applications in X proxies and on clients that do not support quad-buffered stereo. Additionally, anaglyphic stereo performs much faster than quad-buffered stereo,
since it does not require sending twice the data to the client.
As with quad-buffered stereo, anaglyphic stereo requires that the VirtualGL server have stereo rendering capabilities. However, anaglyphic stereo does not require any 3D rendering capabilities (stereo or otherwise) on the client machine.
more details.
Transparent overlays have similar requirements and restrictions as quad-buffered stereo. In this case, VirtualGL completely bypasses its own GLX faker and uses indirect OpenGL rendering to render the transparent overlay on the client
machine’s 3D graphics card. The underlay is still rendered on the server, as always. Using indirect rendering to render the overlay is unfortunately necessary, because there is no reliable way to draw to an overlay using 2D (X11) functions, there are severe
performance issues (on some cards) with using
The use of overlays is becoming more and more infrequent, and when they are used, it is generally only for drawing small, simple, static shapes and text. We have found that it is often faster to ship the overlay geometry over to the
client rather than to render it as an image and send the image. So even if it were possible to implement overlays without using indirect rendering, it is likely that indirect rendering of overlays would still be the fastest approach for most applications.
As with quad-buffered stereo, overlays must be explicitly enabled in the graphics driver configuration. In the case of overlays, however, they need only be supported and enabled on the client machine. Some graphics drivers are known
to disallow using both quad-buffered stereo and overlays at the same time.
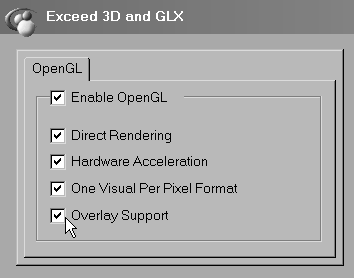
Indexed color (8-bit) overlays have been tested and are known to work with VirtualGL. True color (24-bit) overlays work, in theory, but have not been tested. Use
to verify whether your client’s X display supports overlays and whether they are enabled. In Exceed 3D, make sure that the “Overlay Support” option is checked in the “Exceed 3D and GLX” applet:
Overlays do not work with X proxies (including TurboVNC.) VirtualGL must be displaying to a “real” X server.
In a PseudoColor visual, each pixel is represented by an index which refers to a location in a color table. The color table stores the actual color values (256 of them in the case of 8-bit PseudoColor) which correspond to each index.
An application merely tells the X server which color index to use when drawing, and the X server takes care of mapping that index to an actual color from the color table. OpenGL allows for rendering to Pseudocolor visuals, and it does so by being intentionally
ignorant of the relationship between indices and actual colors. As far as OpenGL is concerned, each color index value is just a meaningless number, and it is only when the final image is drawn by the X server that these numbers take on meaning. As a result,
many pieces of OpenGL’s core functionality either have undefined behavior or do not work at all with PseudoColor rendering. PseudoColor rendering used to be a common technique for visualizing scientific data, because such data often only contained 8 bits per
sample to begin with. Applications could manipulate the color table to allow the user to dynamically control the relationship between sample values and colors. As more and more graphics cards drop support for PseudoColor rendering, however, the applications
which use it are becoming a vanishing breed.
VirtualGL supports PseudoColor rendering if a PseudoColor visual is available on the 2D X server or X proxy. A PseudoColor visual need not be present on the application server. On the application server, VirtualGL uses the red channel
of a standard RGB Pbuffer to store the color index. Upon receiving an end of frame trigger, VirtualGL reads back the red channel of the Pbuffer and uses
PseudoColor rendering in VirtualGL always uses the X11 Image Transport. However, since there is only 1 byte per pixel in a PseudoColor “image”, the images can still be sent to the client reasonably quickly even though they are uncompressed.
VirtualGL’s PseudoColor rendering mode works with TurboVNC, provided that the TurboVNC server is configured to use an 8-bit color depth. Note, however, that VNC cannot provide both PseudoColor and TrueColor visuals at the same time.
VirtualGL includes a modified version of
Run one of the following command sequences on the VirtualGL server to determine whether the server has a suitable visual for stereographic rendering:
Solaris VirtualGL servers (using GLP)
Linux and Solaris VirtualGL servers (not using GLP)
One or more of the visuals should say “stereo=1” and should list “Pbuffer” as one of the “Drawable Types.”
Run the following command sequence on the VirtualGL server to determine whether the X display on the client has a suitable visual for stereographic rendering, transparent overlays, or Pseudocolor.
In order to use stereo, one or more of the visuals should say “stereo=1”. In order to use transparent overlays, one or more of the visuals should say “level=1”, should list a “Transparent Index” (non-transparent visuals will say “Opaque”
instead), and should have a class of “PseudoColor.” In order to use PseudoColor (indexed) rendering, one of the visuals should have a class of “PseudoColor.”
The easiest way to uncover bottlenecks in VirtualGL’s image pipelines is to set the
the server has the same effect.) This will cause VirtualGL to measure and report the throughput of the various stages in the pipeline. For example, here are some measurements from a dual Pentium 4 server communicating with a Pentium III client on a 100 Megabit
LAN:
Server
Client
The total throughput of the pipeline is 8.0 Megapixels/sec, or 6.4 frames/sec, indicating that our frame is 8.0 / 6.4 = 1.25 Megapixels in size (a little less than 1280 x 1024 pixels.) The readback and compress stages, which occur
in parallel on the server, are obviously not slowing things down, and we’re only using 1/10 of our available network bandwidth. Looking at the client, however, we discover that its slow decompression speed (10.35 Megapixels/second) is the primary bottleneck.
Decompression and blitting on the client cannot be done in parallel, so the aggregate performance is the harmonic mean of the decompression and blitting rates: [1/ (1/10.35 + 1/35.75)] = 8.0 Mpixels/sec. In this case, we could improve the performance
of the whole system by simply using a client with a faster CPU.
By default, VirtualGL will only send a frame to the client if the client is ready to receive it. If a rendered frame arrives at the server’s queue and there are frames waiting in the queue to be processed, then those unprocessed frames
are dropped (“spoiled”) and the new frame is promoted to the head of the queue. This prevents a backlog of frames on the server, which would cause a perceptible delay in the responsiveness of interactive applications. However, when running non-interactive
applications, particularly benchmarks, frame spoiling should always be disabled. With frame spoiling disabled, the server will render frames only as quickly as VirtualGL can send those frames to the client, which will conserve server resources as well as allow
OpenGL benchmarks to accurately measure the frame rate of the VirtualGL system. With frame spoiling enabled, OpenGL benchmarks will report meaningless data, since the rate at which the server can render frames is decoupled from the rate at which VirtualGL
can send those frames to the client.
In a VNC environment, there is another layer of frame spoiling, since the server only sends updates to the client when the client requests them. Thus, even if frame spoiling is disabled in VirtualGL, OpenGL benchmarks will still report
inaccurate data if they are run in a VNC session. TCBench, described below, provides a limited solution to this problem.
To disable frame spoiling, set the
more details.
VirtualGL includes several tools which can be useful in diagnosing performance problems with the system.
Linux/Mac/Solaris VirtualGL installations or in
To use NetTest, first start up the NetTest server on one end of the connection:
(Use
Next, start the client on the other end of the connection:
(Replace
The NetTest client will produce output similar to the following:
We can see that the throughput peaks at about 94 megabits/sec, which is pretty good for a 100 Megabit connection. We can also see that, for small transfer sizes, the round-trip time is dominated by latency. The “latency” is the same
thing as the one-way (1/2 round-trip) transit time for a zero-byte packet, which is about 93 microseconds in this case.
processor individually. On Windows, this same functionality is provided in the Windows Performance Monitor, which is part of the operating system. On Solaris, the same data can be obtained through
CPUstat measures the CPU usage over a given sample period (a few seconds) and continuously reports how much the CPU was utilized since the last sample period. Output for a particular sample looks something like this:
The first column indicates what percentage of time the CPU was active since the last sample period (this is then broken down into what percentage of time the CPU spent running user, nice, and system/kernel code.) “ALL” indicates the
average utilization across all CPUs since the last sample period. “Min”, “Max”, and “Avg” indicate a running minimum, maximum, and average of all samples since CPUstat was started.
Generally, if an application’s CPU usage is fairly steady, you can run CPUstat for a bit and wait for the Max. and Avg. for the “ALL” category to stabilize, then that will tell you what the application’s peak and average % CPU utilization
is.
as seen from the client’s point of view. It does this by attaching to one of the client windows and continuously reading back a small area at the center of the window. While this may seem to be a somewhat non-rigorous test, experiments have shown that if care
is taken to ensure that the application is updating the center of the window on every frame (such as in a spin animation), TCBench can produce quite accurate results. It has been sanity checked with VirtualGL’s internal profiling mechanism and with a variety
of system-specific techniques, such as monitoring redraw events on the client’s windowing system.
TCBench can be found in
in the window you want to benchmark. That window should already have an automated animation of some sort running before you launch TCBench. Note that GLXSpheres (see below) is an ideal benchmark to use with TCBench, since GLXSpheres draws a new sphere to the
center of its window on every frame.
TCBench can also be used to measure the frame rate of applications that are running on the local display, although for extremely fast applications (those that exceed 40 fps on the local display), you may need to increase the sampling
rate of TCBench to get accurate results. The default sampling rate of 50 samples/sec should be fine for measuring the throughput of VirtualGL and other thin client systems.
lists the relevant command line switches, which can be used to adjust the benchmark time, the sampling rate, and the x and y offset of the sampling area within the window.
good test of VirtualGL’s end-to-end performance, because that benchmark generated images with about the same proportion of solid color and similar frequency components to the images generated by volume visualization applications.
Thus, the goal of GLXSpheres was to create an open source Unix version of SphereMark (the original SphereMark was for Windows only) completely from scratch. GLXSpheres does not use any code from the original benchmark, but it does
attempt to mimic the image output of the original as closely as possible. GLXSpheres lacks some of the advanced rendering features of the original, such as the ability to use vertex arrays, but since it was primarily designed as a benchmark for VirtualGL,
display lists are more than fast enough for that purpose.
GLXSpheres has some additional modes which its predecessor lacked, modes which are designed specifically to test the performance of various VirtualGL features:
Stereographic rendering (
Color index rendering (
Overlay rendering (
Immediate mode rendering (
when immediate mode OpenGL is rendered indirectly (over a remote X connection), this causes every OpenGL command to be sent as a separate network request to the X server … on every frame. Many applications cannot use display lists, because the geometry they
are rendering is dynamic, so this models how such applications might perform when displayed remotely without VirtualGL.
Interactive mode (
that you can achieve when running interactive applications in VirtualGL. Comparing this interactive frame rate (
X latency on the performance of interactive applications in a VirtualGL environment.
GLXSpheres is installed in
Several of VirtualGL’s configuration parameters can be changed on the fly once a 3D application has been started. This is accomplished by using the VirtualGL Configuration dialog, which can be popped up by holding down the
and pressing the
You can use this dialog to adjust various image compression and display parameters in VirtualGL. Changes are reflected immediately in the application.
Image Compression (Transport)This is a drop-down gadget with the following options:
None (X11 Transport) : equivalent to setting
JPEG (VGL Transport) : equivalent to setting
RGB (VGL Transport) : equivalent to setting
DPCM (Sun Ray Transport) : equivalent to setting
RGB (Sun Ray Transport) : equivalent to setting
YUV (Sun Ray Transport) : equivalent to setting
See Section 19.1 for more information about the
Chrominance SubsamplingThis drop-down gadget is active only when using JPEG, Sun Ray DPCM, or Sun Ray YUV compression. It has the following options:
Grayscale : equivalent to setting
1X : equivalent to setting
2X : equivalent to setting
4X : equivalent to setting
8X : equivalent to setting
16X : equivalent to setting
See Section 19.1 for more information about the
JPEG Image QualityThis slider gadget is active only when using JPEG compression. It is the equivalent of setting
more information about the
Connection ProfileThis drop-down gadget is active only if the VGL Image Transport was active when VirtualGL started. It has the following options:
Low Qual (Low-Bandwidth Network) : Sets the image compression type to JPEG (VGL Transport), sets the Chrominance Subsampling to 4X, and sets the JPEG Image Quality to 30.
Medium Qual : Sets the image compression type to JPEG (VGL Transport), sets the Chrominance Subsampling to 2X, and sets the JPEG Image Quality to 80.
High Qual (High-Bandwidth Network) : Sets the image compression type to JPEG (VGL Transport), sets the Chrominance Subsampling to 1X, and sets the JPEG Image Quality to 95.
Gamma Correction FactorThis floating point input gadget is the equivalent of setting
system with the specified gamma correction factor. See Section 19.1 for more information about the
option.
Frame SpoilingThis toggle button is the equivalent of setting
more information about the
Interframe ComparisonThis toggle button is the equivalent of setting
about the
Stereographic Rendering MethodThis drop-down gadget has the following options:
Send Left Eye Only : equivalent to setting
Send Right Eye Only : equivalent to setting
Quad-Buffered (if available) : equivalent to setting
Anaglyphic (Red/Cyan) : equivalent to setting
See Section 19.1 for more information about the
Limit Frames/secondThis floating point input gadget is the equivalent of setting
about the
You can set the
any combination of
will cause the dialog box to pop up whenever
To disable the VirtualGL dialog altogether, set
VirtualGL monitors the application’s X event loop to determine whenever a particular key sequence has been pressed. If an application is not monitoring key press events in its X event loop,
then the VirtualGL Configuration dialog might not pop up at all. There is unfortunately no workaround for this, but it should be a rare occurrence.
You can control the operation of the VirtualGL faker in four different ways. Each method of configuration takes precedence over the previous method:
Setting a configuration environment variable globally (for instance, in
Setting a configuration environment variable on a per-user basis (for instance, in
Setting a configuration environment variable only for the current shell session (for instance,
Passing a configuration option as an argument to
DescriptionWhen using the VGL Image Transport,
be set to the hostname or IP address of the Sun Ray server. Normally,
Descriptionproxy = Send images uncompressed using the X11 Image Transport. This is useful when displaying to a local 2D X server or X proxy (see Section 9.1.)
jpeg = Compress images using JPEG and send using the VGL Image Transport. This is useful when displaying to a remote 2D X server (see Chapter 8.)
rgb = Encode images as uncompressed RGB and send using the VGL Image Transport. This is useful when displaying to a remote 2D X server or X proxy across a very fast network (see Section 9.2.)
sr = Compress images using the Sun Ray default compression method (DPCM) and send using the Sun Ray Image Transport. This requires that the proprietary Sun Ray plugin be installed on the VirtualGL server. (see Chapter 11.)
srrgb = Encode images as uncompressed RGB and send using the Sun Ray Image Transport. This requires that the proprietary Sun Ray plugin be installed on the VirtualGL server (see Chapter 11.)
sryuv = Encode images as uncompressed YUV and send using the Sun Ray Image Transport. This requires that the proprietary Sun Ray plugin be installed on the VirtualGL server (see Chapter 11.)
If this option is not specified, then the default is set as follows:
If the 2D X server is a Sun Ray server and the Sun Ray plugin is installed on the VirtualGL server, then VGL will default to using sr compression. VGL will fall back to using proxy compression if, for any given frame, it is unable to send
the frame using the Sun Ray Image Transport. This could occur if, for example, the Sun Ray client is on a network that is not visible to the VirtualGL server.
If the 2D X server is not a Sun Ray server but the
Otherwise, it defaults to jpeg compression.
DescriptionIf the VirtualGL server has multiple 3D graphics cards and you want the OpenGL rendering to be redirected to a display other than :0, then you can set
many application instances on a beefy multi-pipe application server.
GLP mode (Solaris/SPARC only):
Setting this option to
See Section 6.1 for more details.
DescriptionThis option prevents VirtualGL from sending frames at a rate faster than the specified limit. It can be used, for instance, as a crude way to control network bandwidth or CPU usage in multi-user environments where those resources are
constrained.
If frame spoiling is disabled, then this effectively limits the server’s 3D rendering frame rate as well.
Description“Gamma” refers to the relationship between the intensity of light which your computer’s monitor is instructed to display and the intensity which it actually displays. The curve is an exponential curve of the form Y = XG,
where X is between 0 and 1. G is called the “gamma” of the monitor. PC monitors and TV’s usually have a gamma of around 2.2.
Some of the math involved in 3D rendering assumes a linear gamma (G = 1.0), so technically speaking, 3D applications will not display with mathematical correctness unless the pixels are “gamma corrected” to counterbalance the non-linear response curve of the
monitor. However, some systems do not have any form of built-in gamma correction, so the applications developed for such systems have usually been designed to display properly without gamma correction. Gamma correction involves passing pixels through a function
of the form X = W1/G, where G is the “gamma correction factor” and should be equal to the gamma of the monitor. So the final output is Y = XG = (W1/G)G = W, which describes a linear relationship
between the intensity of the pixels drawn by the application and the intensity of the pixels displayed by the monitor.
This option tells VirtualGL to enable gamma correction using the best available method. If VirtualGL is remotely displaying to a Solaris/SPARC X server which has gamma-corrected X visuals, then VGL will attempt to assign one of these visuals to the application.
This causes the 3D output of the application to be gamma corrected by the factor specified in
it has do not match the application’s needs, then VirtualGL performs gamma correction internally and uses a default gamma correction factor of 2.22. This option emulates the default behavior of OpenGL applications running locally on SPARC machines.
This option tells VGL not to use gamma-corrected visuals, even if they are available on the 2D X server, and disables VGL’s internal gamma correction system as well. This emulates the default behavior of OpenGL applications running locally on Linux or Solaris/x86
machines.
If
a gamma correction factor of G (where G < 0) is equivalent to specifying a gamma correction factor of -1/G.
DescriptionNormally, VirtualGL loads the first OpenGL dynamic library that it finds in the dynamic linker path (usually
setting to explicitly specify another OpenGL dynamic library to load.
You shouldn’t need to muck with this unless something doesn’t work. However, setting this environment variable is necessary when using VirtualGL with Chromium.
DescriptionVirtualGL will normally monitor an application’s X event queue and pop up the VirtualGL Configuration dialog whenever
already using, then you can redefine the key sequence used to pop up the VirtualGL Configuration dialog by setting
You can also set
DescriptionThe VGL and Sun Ray Image Transports will normally compare each frame with the previous frame and send only the portions of the image which have changed. Setting
This setting was introduced in order to work around a specific application interaction issue, but since a proper fix for that issue was introduced in VirtualGL 2.1.1, this option isn’t really useful anymore.
When using the VGL Image Transport, interframe comparison is affected by the
DescriptionSetting this environment variable to the pathname of a log file on the VirtualGL server will cause VirtualGL to redirect all of its messages (including profiling and trace output) to the specified log file rather than to stderr.
DescriptionThe VGL Image Transport can divide the task of compressing each frame among multiple server CPUs. This might speed up the overall throughput in rare circumstances where the server CPUs are significantly slower than the client CPUs.
VirtualGL will not allow more than 4 processors total to be used for compression, nor will it allow you to set this parameter to a value greater than the number of processors in the system.
Multi-threaded compression is affected by the
DescriptionThe connection port for the VGL Image Transport is normally determined by reading an X property that
DescriptionIf profiling output is enabled, then VirtualGL will continuously benchmark itself and periodically print out the throughput of various stages in its image pipelines.
See Chapter 17 for more details.
DescriptionIn digital images, “frequency” refers to how quickly the color changes between light and dark as you move either horizontally or vertically in the image. Images with very sharp, bright features on a dark background, for instance, consist
of both low-frequency and high-frequency components, whereas images with smooth transitions between neighboring pixels contain only low-frequency components. JPEG compression works by breaking down the image into its constituent frequencies and then throwing
out the highest of these frequencies. The JPEG image “quality” determines which frequencies are thrown out. A JPEG quality of 1 throws out all but the lowest frequencies and thus produces a very impressionistic, but generally not very useful, compressed image.
A JPEG quality of 100 retains all frequencies in the original image (but, due to roundoff errors, the compressed image is still not completely lossless.)
Because the human eye usually can’t detect the highest frequencies in the image, and often because the image lacks those high-frequency elements to begin with, a sufficiently high JPEG quality setting can produce a “perceptually lossless” image. A “perceptually
lossless” image contains a small amount of mathematical error when compared to the original image, but this error is so small that, under normal circumstances, the human visual system cannot distinguish it. The threshold quality level at which JPEG compression
becomes perceptually lossless is different for each image, but experiments with various visual difference benchmarks (such as HDR-VDP)
suggest that a JPEG quality of 95 is sufficient to guarantee perceptual losslessness for the types of applications (volume visualization apps, in particular) in which image quality is critical. As with any benchmarks, Your Mileage May Vary. If image quality
is of paramount concern, consider setting the JPEG quality to 100 or using RGB encoding.
DescriptionOn rare occasions, it might be desirable to have VirtualGL redirect OpenGL rendering from an application into a Pbuffer but not automatically read back and send the rendered pixels. Some applications have their own mechanisms for reading
back the rendered pixels, so setting
This feature was developed initially to support running ParaView in parallel using MPI. ParaView/MPI
normally uses MPI processes 1 through N as rendering servers, each drawing a portion of the geometry into a separate window on a separate X display. ParaView reads back these server windows and composites the pixels into the main application window, which
is controlled by MPI process 0. By creating a script which passes a different value of
graphics cards while preventing VirtualGL from displaying any pixels except those generated by process 0.
This setting can also be used to force Chromium to render into Pbuffers instead of windows. See Section 14.2.
DescriptionIn remote display environments, the mouse movement is generally sampled at least 40 and sometimes 60 times per second. Therefore, unless VirtualGL is able to deliver at least this number of frames per second to the client, the movement
of a 3D scene will appear to drag behind the mouse motion. VirtualGL’s default behavior is to compensate for this by dropping frames. This ensures that every mouse motion event will result in a new frame being rendered on the server, even though not all of
these frames will actually be delivered to the client.
Frame spoiling should produce the best results with interactive applications, but it should be turned off when running benchmarks or other non-interactive applications. Turning off frame spoiling will force every frame rendered on the server to be sent through
VirtualGL, and thus the frame rate reported by OpenGL benchmarks will accurately reflect the frame rate of VirtualGL’s image pipeline (though, in X proxy environments, this may still not accurately reflect the frame rate seen by the user. See Section 17.2.)
Disabling frame spoiling also prevents non-interactive applications from wasting graphics resources by rendering frames that will never be seen.
DescriptionEnabling this option causes the VGL Image Transport to be tunneled through a secure socket layer (SSL) (see Section 8.3.)
Descriptionleft = When an application renders a stereo frame, send only the left eye buffer
right = When an application renders a stereo frame, send only the right eye buffer
quad = Attempt to use quad-buffered stereo, which will result in a pair of images being sent to the VirtualGL Client for every frame. If quad-buffered stereo is not available, either because the client machine or the image transport does not support
it, then fall back to using anaglyphic stereo. Quad-buffered stereo requires the VGL Image Transport, and it also requires that the 2D X server support OpenGL and be connected to a 3D accelerator that supports stereo rendering.
rc = Use Red/Cyan (anaglyphic) stereo, even if quad-buffered is available
See Chapter 16 for more details.
DescriptionWhen an image is encoded using JPEG, Sun Ray DPCM, or Sun Ray YUV, each pixel in the image is first converted from RGB (Red/Green/Blue) to YUV. An RGB pixel has three values that specify the amounts of red, green, and blue that make
up the pixel’s color. A YUV pixel has three values that specify the overall brightness of the pixel (Y, or “luminance”) and the overall color of the pixel (U and V, or “chrominance”.)
Since the human eye is less sensitive to changes in color than it is to changes in brightness, the chrominance components for some of the pixels can be discarded without much noticeable loss in image quality. This technique, called “chrominance subsampling”,
significantly reduces the size of the compressed image.
1x = no chrominance subsampling
2x = discard the chrominance components for every other pixel along the image’s X direction (this is also known as “4:2:2” or “2:1” subsampling.) All else being equal, 2x subsampling generally reduces the image size by about 20-25% when compared to
no subsampling.
4x = discard the chrominance components for every other pixel along both the X and Y directions of the image (this is also known as “4:2:0” or “2:2” subsampling.) All else being equal, 4x subsampling generally reduces the image size by about 35-40%
when compared to no subsampling.
8x = discard the chrominance components for 3 out of every 4 pixels along the image’s X direction and half the pixels along the image’s Y direction (this is also known as “4:1:0” or “4:2” subsampling.) This option is available only with Sun Ray
DPCM or YUV encoding.
16x = discard the chrominance components for 3 out of every 4 pixels along both the X and Y directions of the image (this is also known as “4:4” subsampling.) This option is available only with Sun Ray DPCM or YUV encoding.
gray = discard all chrominance components. This is useful when running applications (such as medical visualization applications) that are already generating grayscale images. This option is available only with JPEG compression.
Subsampling artifacts are less noticeable with volume data, since it usually only contains 256 colors to begin with. But narrow, aliased lines and other sharp features on a black background will tend to produce very noticeable artifacts when subsampling is
enabled.
The axis indicator from a popular visualization app displayed with 1x, 2x, and 4x subsampling (respectively):


DescriptionNormally, VirtualGL’s operation is asynchronous from the point of view of the application. The application swaps the buffers or calls
back the framebuffer and sends the pixels to the client’s display … eventually. This will work fine for the vast majority of applications, but it does not strictly conform to the GLX spec. Technically speaking, when an application calls
it is well within its rights to expect the 3D image to be immediately available in the X window. Fortunately, very few applications actually do expect this, but on rare occasions, an application may try to use
to obtain a bitmap of the pixels that were rendered by OpenGL. Enabling
specifically), but at least one commercial application is known to require it as well (see Application Recipes.)
When
the X11 Image Transport and no frame spoiling. The call to
As such, this mode can have potentially dire effects on performance when used with a remote 2D X server. It is strongly recommended that
DescriptionNormally, the VGL Image Transport will divide an OpenGL window into equal-sized square tiles, compare each tile vs. the same tile in the previous frame, then compress and send only the tiles which have changed (assuming interframe
comparison is enabled.) The VGL Image Transport will also divide up the task of compressing these tiles among the available CPUs in a round robin fashion, if multi-threaded compression is enabled (see VGL_NPROCS.)
There are several tradeoffs that must be considered when choosing a tile size:
Smaller tile sizes:
Better parallel scalability
Worse compression efficiency
Better inter-frame optimization
Worse network efficiency
Larger tile sizes:
Worse parallel scalability
Better compression efficiency
Worse inter-frame optimization
Better network efficiency
Smaller tiles can more easily be divided up among multiple CPUs, but they compress less efficiently (and less quickly) on an individual basis. Using larger tiles can reduce traffic to the client by allowing the server to send only one frame update instead of
many. But on the flip side, using larger tiles decreases the chance that a tile will be unchanged from the previous frame.
256x256 was chosen as the default because, in experiments, it provided the best balance between scalability and efficiency on the platforms that VirtualGL supports.
DescriptionWhen tracing is enabled, VirtualGL will log all calls to the GLX and X11 functions it is intercepting, as well as the arguments, return values, and execution times for those functions. This is useful when diagnosing interaction problems
between VirtualGL and a particular OpenGL application.
DescriptionWhen verbose mode is enabled, VirtualGL will reveal some of the decisions it makes behind the scenes, such as which code path it is using to compress images, which type of X11 drawing it is using, etc. This can be helpful when diagnosing
performance problems.
DescriptionNormally, VirtualGL loads the first X11 dynamic library that it finds in the dynamic linker path (usually
You can use this setting to explicitly specify another X11 dynamic library to load.
You shouldn’t need to muck with this unless something doesn’t work.
DescriptionSome applications expect the X11 vendor string to contain a particular value, which the application (sometimes erroneously) uses to figure out whether it is being displayed to a local or a remote X server. This setting allows you to
fool such applications into thinking that they are being displayed to a “local” X server rather than a remote one.
Refer to Chapter 15 for specific applications that require this.
DescriptionSetting
from
These settings control the VirtualGL Client, which is used only with the VGL Image Transport.
in exotic circumstances. These settings are meant only for advanced users or those wishing to build additional infrastructure around VirtualGL.
DescriptionIf the client machine has a 3D accelerator, then it may be faster to draw pixels using OpenGL rather than using 2D (X11) commands. This is particularly true of many 3D accelerators available for the Solaris/SPARC platform, since they
are able to draw images using 24-bit pixels instead of the 32-bit pixels required by the X server.
DescriptionThe default behavior for
in the range of 4200-4299. If none of those ports is available, then
Setting this option circumvents the automatic behavior described above and causes
DescriptionIf profiling output is enabled, then VirtualGL will continuously benchmark itself and periodically print out the throughput of various stages in its image pipelines.
See Chapter 17 for more details.
DescriptionThe default behavior for
in the range of 4200-4299. If none of those ports is available, then
Setting this option circumvents the automatic behavior described above and causes
DescriptionWhen verbose mode is enabled, VirtualGL will reveal some of the decisions it makes behind the scenes, such as which code path it is using to decompress images, which type of X11 drawing it is using, etc. This can be helpful when diagnosing
performance problems.
Intended audience: System Administrators, Graphics Programmers, Researchers, and others with knowledge of the Linux or Solaris operating systems, OpenGL and GLX, and X windows.
Table of Contents
1 Legal Information2 Overview
3 System Requirements
3.1 Linux/x86
3.2 Linux/Itanium
3.3 Solaris/x86
3.4 Solaris/SPARC
3.5 Mac/x86
3.6 Windows
3.7 Additional Requirements for Stereographic Rendering
3.8 Additional Requirements for Transparent Overlays
4 Obtaining and Installing VirtualGL
4.1 Installing VirtualGL on Linux
4.2 Installing VirtualGL on Solaris
4.3 Installing VirtualGL on Mac (Client Only)
4.4 Installing VirtualGL on Windows (Client Only)
4.5 Installing VirtualGL from Source
4.6 Obtaining and Installing the Sun Ray Plugin
4.7 Uninstalling VirtualGL
5 Obtaining and Installing TurboVNC
5.1 Installing TurboVNC on Linux
5.2 Installing TurboVNC on Solaris
5.3 Installing TurboVNC on Mac (Client Only)
5.4 Installing TurboVNC on Windows (Client Only)
5.5 Installing TurboVNC from Source
5.6 Uninstalling TurboVNC
6 Configuring a Linux or Solaris Machine as a VirtualGL Server
6.1 GLP: Using VirtualGL Without a 3D X Server
6.2 Granting Access to the 3D X Server
6.3 SSh Server Configuration
6.4 Un-Configuring the Server
7 Configuring a Windows Machine as a Client for the VGL Image Transport
7.1 Optimizing Exceed
8 Using VirtualGL with the VGL Image Transport
8.1 VGL Image Transport with X11 Forwarding
8.2 VGL Image Transport with a Direct X11 Connection
8.3 VGL Image Transport with SSL Encryption
8.4 VGL Image Transport with X11 Forwarding and SSh Tunneling
8.5 VGL Image Transport over Gigabit Networks
8.6 VGL Image Transport with XDMCP
8.7 The VirtualGL Client Application: Nuts and Bolts
8.7.1 The VirtualGL Client and Firewalls
9 Using VirtualGL with TurboVNC
9.1 Using TurboVNC and VirtualGL on the Same Server
9.2 Using TurboVNC When VirtualGL Is Running on a Different Machine
9.3 Disconnecting and Killing the TurboVNC Session
9.4 Using TurboVNC in a Web Browser
9.5 Optimizing TurboVNC’s Performance for Different Network Types
9.5.1 Lossless Refresh
9.6 Securing a TurboVNC Connection
9.7 Further Reading
10 Using VirtualGL with Other X Proxies
11 Using VirtualGL in a Sun Ray Environment
12 vglrun and Shell Scripts
13 Using VirtualGL with Applications That Manually Load OpenGL
14 Using VirtualGL with Chromium and ModViz VGP
14.1 Configuration 1: Sort-First Rendering (Image-Space Decomposition)
14.2 Configuration 2: Sort-First Rendering (Image-Space Decomposition) with Readback
14.3 Configuration 3: Sort-Last Rendering (Object-Space Decomposition)
14.4 A Note About Performance
14.5 ModViz VGP v1.x and VirtualGL
15 Other Application Recipes
16 Advanced OpenGL Features
16.1 Stereographic Rendering
16.1.1 Quad-Buffered Stereo
16.1.2 Anaglyphic Stereo
16.1.3 Selecting a Stereo Mode
16.2 Transparent Overlays
16.3 Indexed (PseudoColor) Rendering
16.4 Troubleshooting
17 Performance Measurement
17.1 VirtualGL’s Built-In Profiling System
17.2 Frame Spoiling
17.3 VirtualGL Diagnostic Tools
18 The VirtualGL Configuration Dialog
19 Advanced Configuration
19.1 Server Settings
19.2 Client Settings
1 Legal Information
This document and all associated illustrations are licensed under the Creative Commons Attribution
2.5 License. Any works which contain material derived from this document must cite The VirtualGL Project as the source of the material and list the current URL for the VirtualGL web site.
This product includes software developed by the OpenSSL Project for
use in the OpenSSL Toolkit. Further information is contained in
LICENSE-OpenSSL.txt, which
can be found in the same directory as this documentation.
The VirtualGL server components include software developed by the FLTK Project and
distributed under the terms of the FLTK License.
The VirtualGL Windows packages include PuTTY,
which is released under this license.
VirtualGL includes portions of X.org, which is released under this
license.
VirtualGL is licensed under the wxWindows Library License, v3.1, a derivative of the GNU
Lesser General Public License (LGPL).
2 Overview
VirtualGL is an open source package which gives any Unix or Linux remote display software the ability to run OpenGL applications with full 3D hardware acceleration. Some remote display software, such as VNC, lacks the ability to runOpenGL applications at all. Other remote display software forces OpenGL applications to use a slow software-only OpenGL renderer, to the detriment of performance as well as compatibility. The traditional method of displaying OpenGL applications to a remote
X server (indirect rendering) supports 3D hardware acceleration, but this approach causes all of the OpenGL commands and 3D data to be sent over the network to be rendered on the client machine. This is not a tenable proposition unless the data is relatively
small and static, unless the network is very fast, and unless the OpenGL application is specifically tuned for a remote X-Windows environment.
With VirtualGL, the OpenGL commands and 3D data are instead redirected to a 3D graphics accelerator on the application server, and only the rendered 3D images are sent to the client machine. VirtualGL thus “virtualizes” 3D graphics
hardware, allowing it to be co-located in the “cold room” with compute and storage resources. VirtualGL also allows 3D graphics hardware to be shared among multiple users, and it provides “workstation-like” levels of performance on even the most modest of
networks. This makes it possible for large, noisy, hot 3D workstations to be replaced with laptops or even thinner clients. More importantly, however, VirtualGL eliminates the workstation and the network as barriers to data size. Users can now visualize gigabytes
and gigabytes of data in real time without needing to copy any of the data over the network or sit in front of the machine that is rendering the data.
Normally, a Unix OpenGL application would send all of its drawing commands and data, both 2D and 3D, to an X-Windows server, which may be located across the network from the application server. VirtualGL, however, employs a technique
called “split rendering” to force the 3D commands from the application to go to a 3D graphics card in the application server. VGL accomplishes this by pre-loading a dynamic shared object (DSO) into the application at run time. This DSO intercepts a handful
of GLX, OpenGL, and X11 commands necessary to perform split rendering. Whenever a window is created by the application, VirtualGL creates a corresponding 3D pixel buffer (“Pbuffer”) on a 3D graphics card in the application server. Whenever the application
requests that an OpenGL rendering context be created for the window, VirtualGL intercepts the request and creates the context on the corresponding Pbuffer instead. Whenever the application swaps or flushes the drawing buffer to indicate that it has finished
rendering a frame, VirtualGL reads back the Pbuffer and sends the rendered 3D image to the client.
The beauty of this approach is its non-intrusiveness. VirtualGL monitors a few X11 commands and events to determine when windows have been resized, etc., but it does not interfere in any way with the delivery of 2D X11 commands to
the X server. For the most part, VGL does not interfere with the delivery of OpenGL commands to the graphics card, either (there are some exceptions, such as its handling of color index rendering.) VGL merely forces the OpenGL commands to be delivered to a
server-side graphics card rather than a client-side graphics card. Once the OpenGL rendering context has been established in a server-side Pbuffer, everything (including esoteric OpenGL extensions, fragment/vertex programs, etc.) should “just work.” In most
cases, if an application runs locally on a 3D server/workstation, that same application will run remotely from that same machine using VirtualGL. However, if it were really as simple as that, we could all turn out the lights and go home. Most of the time spent
developing VirtualGL has been spent working around “stupid application tricks.”
VirtualGL can currently use one of three “image transports” to send rendered 3D images to the client machine:
1. VGL Image Transport (Formerly “Direct Mode”)The VGL Image Transport is most often used whenever the 2D X server (the X server used to draw the application’s GUI and transmit keyboard and mouse events back to the application server) is located across the network from the application
server, for instance if the 2D X server is running on the user’s desktop machine. VirtualGL uses its own protocol on a dedicated TCP socket to send the rendered 3D images to the client machine, and the VirtualGL Client application decodes the images and composites
them into the appropriate X window. The VGL Transport can either deliver uncompressed images (RGB encoded), or it can compress images in real time using a high-speed JPEG codec. It also supports the delivery of stereo image pairs, which can be reconstructed
into a stereo image by the VirtualGL Client.
Figure 2.1: The VGL Image Transport with a Remote 2D X Server
2. X11 Image Transport (Formerly “Raw Mode”)The X11 Image Transport simply draws the rendered 3D images into the appropriate X window using XPutImage() and similar X-Windows commands. This is most useful in conjunction with an “X Proxy”, which can be one of any number of Unix
remote display applications, such as VNC. These X proxies are essentially “virtual” X servers. They appear to the application as a normal X server, but they perform X11 rendering to a virtual framebuffer in main memory rather than to a real framebuffer on
a graphics card. This allows the X proxy to send only images to the client machine rather than chatty X-Windows rendering commands. When using the X11 Transport, VirtualGL does not perform any image compression or encoding itself. It instead relies upon an
X proxy to encode and deliver the images to the client(s). Since the use of an X proxy eliminates the need to send X-Windows commands over the network, this is the best means of using VirtualGL over high-latency or low-bandwidth networks. The VirtualGL Project
provides an accelerated version of VNC, called “TurboVNC”, which is meant to be used with VirtualGL’s X11 Transport. The combination of the two provides a highly-performant remote 3D solution, even on slow networks. TurboVNC also provides rudimentary collaboration
capabilities, allowing multiple users to simultaneously interact with the same 3D application.
Figure 2.2: The X11 Image Transport with an X Proxy
3. Sun Ray Image TransportThe Sun Ray thin client environment from Sun Microsystems consists of an X proxy (the Sun Ray Server Software) and a series of ultra-thin hardware clients that connect to this proxy over a network. It is similar in concept to VNC, in
that a virtual X server is created for every user and that only images, not rendering commands, are sent to the client. Unlike VNC, however, the client is not a piece of software running on a workstation or laptop. The client is a fanless, diskless little
box with only a monitor port, USB ports, a network jack, and a smart card slot (used for authentication.)
This environment presents unique challenges to VirtualGL The first challenge is that the Sun Ray 1 and Sun Ray 2 series clients contain relatively slow CPUs, so they are not fast enough to decompress JPEG in real time. The second challenge is that Sun Ray servers
are generally provisioned to handle a lot of simultaneous users, so using VirtualGL’s X11 Transport would put undue stress on both the Sun Ray servers and the network on which they reside. Thus, Sun Microsystems designed a plugin for VirtualGL which allows
VGL to compress images using a protocol that can be sent directly to the Sun Ray hardware client without having to pass through the Sun Ray server first. Since the plugin uses the proprietary Sun Ray image compression technology, it is currently closed source,
but the binary packages can be downloaded for free as part of the Sun Shared Visualization product.
This product also includes VirtualGL, TurboVNC, and other goodies.
Figure 2.3: The Sun Ray Image Transport
3 System Requirements
3.1 Linux/x86
| Server (x86) | Server (x86-64) | Client | |
|---|---|---|---|
| Recommended CPU | Pentium 4, 1.7 GHz or faster (or equivalent) For optimal performance, the processor should support SSE2 extensions. Dual processors recommended | Pentium 4/Xeon with EM64T, or… AMD Opteron or Athlon64, 1.8 GHz or faster For optimal performance with 64-bit VirtualGL, the processor should support SSE3 extensions. AMD 64-bit processors manufactured prior to 2005 do not support SSE3. Dual processors recommended | Pentium III or Pentium 4, 1.0 GHz or faster (or equivalent) |
| Graphics | Any decent 3D graphics card that supports Pbuffers Install the vendor drivers for the server’s 3D graphics card. Do not use the drivers that ship with Linux, as these do not provide 3D acceleration or Pbuffer support. | Any graphics card with decent 2D performance If using a 3D graphics card, install the vendor drivers for that 3D graphics card. | |
| Recommended O/S | Any distribution in the RedHat or SuSE families (including Fedora, CentOS, and White Box) Ubuntu Linux v6.0 or later | ||
| Other Software | X server configured to export True Color (24-bit or 32-bit) visuals |
3.2 Linux/Itanium
VirtualGL should build and run on Itanium Linux, but it has not been thoroughly tested. Contact us ifyou encounter any difficulties. A pre-built TurboJPEG binary package is not available for Linux/Itanium, so it will be necessary to build TurboJPEG from source using the Intel Integrated Performance Primitives for Itanium processors.
3.3 Solaris/x86
| Server | Client | |
|---|---|---|
| Recommended CPU | Pentium 4/Xeon with EM64T, or… AMD Opteron or Athlon64, 1.8 GHz or faster Dual processors recommended | Pentium III or Pentium 4, 1.0 GHz or faster (or equivalent) |
| Graphics | nVidia 3D graphics card | Any graphics card with decent 2D performance |
| O/S | Solaris 10 (or newer) OpenSolaris 2008.11 (or newer) | |
| Other Software | Sun mediaLib (v2.5 or higher recommended *) Solaris Patch 118345-04 (or later) X server configured to export True Color (24-bit or 32-bit) visuals | Sun mediaLib (v2.5 or higher recommended *) X server configured to export True Color (24-bit or 32-bit) visuals |
link above. mediaLib 2.5 improves the performance of VirtualGL significantly on Solaris/x86 systems, when compared to mediaLib 2.4.
3.4 Solaris/SPARC
| Server | Client | |
|---|---|---|
| Recommended CPU | UltraSPARC III 900 MHz or faster Dual processors recommended | UltraSPARC III 900 MHz or faster |
| Graphics | Any decent 3D graphics card that supports Pbuffers Tested with XVR-600, XVR-1200 (“jfb”), and XVR-2500 (“kfb”) | Any graphics card with decent 2D performance |
| O/S | Solaris 8 (or newer) OpenSolaris 2008.11 (or newer) | |
| Other Software | Sun mediaLib (pre-installed on Solaris 10 and higher) Sun OpenGL 1.3 or later (1.5 or later required for GLP) If your system does not ship with SSh pre-installed (older Solaris 8 and 9 systems don’t), then download and install an OpenSSH package from Blastwave or http://www.sunfreeware.com/. X server configured to export True Color (24-bit or 32-bit) visuals (if not using GLP) Recommended Patches OpenGL 1.5: 120812-15 (or later) XVR-2500 driver: 120928-25 (or later) OpenGL 1.3, 32-bit: 113886-41 (or later) OpenGL 1.3, 64-bit: 113887-41 (or later) | Sun mediaLib (pre-installed on Solaris 10 and higher) Sun OpenGL 1.3 or later recommended if the client has a 3D graphics card installed. If available, the VirtualGL Client will use OpenGL to draw images, which improves the client’s performance on Sun 3D graphics cards. If your system does not ship with SSh pre-installed (older Solaris 8 and 9 systems don’t), then download and install an OpenSSH package from Blastwave or http://www.sunfreeware.com/. X server configured to export True Color (24-bit or 32-bit) visuals |
3.5 Mac/x86
| Client | |
|---|---|
| Recommended CPU | Any Intel-based Mac |
| O/S | OS X 10.4 (“Tiger”) or later |
| Other Software | VGL Image Transport Only: Mac X11 application (in the “Optional Installs” package on the OS X install discs) |
3.6 Windows
| Client | |
|---|---|
| Recommended CPU | Pentium III or Pentium 4, 1.0 GHz or faster (or equivalent) |
| Graphics | Any graphics card with decent 2D performance |
| O/S | Windows 2000 or later |
| Other Software | VGL Image Transport Only: Hummingbird Exceed 8 or newer required Client display must have a 24-bit or 32-bit color depth (True Color.) |
3.7 Additional Requirements for Stereographic Rendering
The client requirements do not apply to anaglyphic stereo. See Chapter 16 formore details.
| Server | Client | |
|---|---|---|
| Linux | 3D graphics card that supports stereo (example: nVidia Quadro) and is configured to export stereo visuals | |
| Solaris/x86 | ||
| Mac/x86 | N/A | 3D graphics card that supports stereo (example: nVidia Quadro) and is configured to export stereo visuals |
| Solaris/SPARC | XVR-2500 graphics card Sun OpenGL 1.5 or later OpenGL Patch 120812-14 (or later) XVR-2500 driver Patch 120928-10 (or later) | 3D graphics card that supports stereo (examples: XVR-1200, XVR-2500) and is configured to export stereo visuals Sun OpenGL 1.3 or later |
| Windows | N/A | 3D graphics card that supports stereo (examples: nVidia Quadro, 3D Labs Wildcat Realizm) and is configured to export stereo pixel formats Hummingbird Exceed 3D v8 or newer |
3.8 Additional Requirements for Transparent Overlays
| Client | |
|---|---|
| Linux | 3D graphics card that supports transparent overlays (example: nVidia Quadro) and is configured to export overlay visuals |
| Solaris/x86 | |
| Mac/x86 | |
| Solaris/SPARC | 3D graphics card that supports transparent overlays (examples: XVR-1200, XVR-2500) and is configured to export overlay visuals Sun OpenGL 1.3 or later |
| Windows | 3D graphics card that supports transparent overlays (examples: nVidia Quadro, 3D Labs Wildcat Realizm) and is configured to export overlay pixel formats Hummingbird Exceed 3D v8 or newer |
4 Obtaining and Installing VirtualGL
VirtualGL must be installed on any machine that will act as a VirtualGL server or as a client for the VGLImage Transport. It is not necessary to install VirtualGL on the client machine if using VNC or another type of X proxy.
4.1 Installing VirtualGL on Linux
Installing TurboJPEG
Download the appropriate TurboJPEG binary package (v1.10 or later) for your system from the Downloadarea of the VirtualGL SourceForge web-site.
The “i386” RPM and DEB packages are for 32-bit-only systems. The “x86_64” RPM and “amd64” DEB packages are for 64-bit systems. The 64-bit packages contain both 32-bit and 64-bit libraries.
Log in as root, cd to the directory where you downloaded the binary package, and issue one of the following commands:
RPM-based systems
rpm -U turbojpeg*.rpm
Debian-based systems
dpkg -i turbojpeg*.deb
Installing VirtualGL
Download the appropriate VirtualGL binary package for your system from the Downloadarea of the VirtualGL SourceForge web-site.
The “i386” RPM and DEB packages are for 32-bit-only systems. The “x86_64” RPM and “amd64” DEB packages are for 64-bit systems. The 64-bit packages contain both 32-bit and 64-bit VirtualGL
components.
Log in as root, cd to the directory where you downloaded the binary package, and issue the following commands:
RPM-based systems
rpm -e VirtualGL
rpm -i VirtualGL*.rpm
Debian-based systems
dpkg -r VirtualGL
dpkg -i VirtualGL*.deb
4.2 Installing VirtualGL on Solaris
Download the VirtualGL Solaris package (SUNWvgl-
{version}.pkg.bz2for SPARC or
SUNWvgl-
{version}-x86.pkg.bz2for
x86) from the Download area of the VirtualGL
SourceForge web-site.
Both packages provide both 32-bit and 64-bit VirtualGL components.
Log in as root, cd to the directory where you downloaded the package, and issue the following commands:
pkgrm SUNWvgl
(answer “Y” when prompted.)
bzip2 -dSUNWvgl-{version}.pkg.bz2
pkgadd -dSUNWvgl-{version}.pkg
Select the
SUNWvglpackage (usually option 1) from the menu.
VirtualGL for Solaris installs into
/opt/SUNWvgl.
4.3 Installing VirtualGL on Mac (Client Only)
Download the VirtualGL Mac disk image (VirtualGL-
{version}.dmg) from the Download
area of the VirtualGL SourceForge web-site.
Open the disk image, then open
VirtualGL-
{version}.pkginside the disk image. Follow the instructions to install the Mac client. The Mac package installs files in
the same locations as the Linux packages.
4.4 Installing VirtualGL on Windows (Client Only)
Download the VirtualGL Windows installer package (VirtualGL-
{version}.exe) from the Download
area of the VirtualGL SourceForge web-site.
Run the VirtualGL installer. The installation of VirtualGL should be self-explanatory. The only configuration option is the directory into which you want the files to be installed.
NOTE: The VirtualGL Windows installer does not remove any previous versions of VirtualGL that may be installed on your machine. If you wish, you can remove these older versions manually by
using the “Add or Remove Programs” applet in the Control Panel (or the “Programs and Features” applet if you are running Vista.)
4.5 Installing VirtualGL from Source
If you are using a platform for which there is not a pre-built VirtualGL binary package available, then log in as root, download the VirtualGL source tarball (VirtualGL-
{version}.tar.gz)
from the Download area of the VirtualGL
SourceForge web-site, uncompress it,
cd vgl, and read the contents of
BUILDING.txtfor further instructions on how to build and install VirtualGL from source.
4.6 Obtaining and Installing the Sun Ray Plugin
The VirtualGL Sun Ray plugin is a proprietary add-on developed by Sun Microsystems to integrate VirtualGL with the Sun Ray thin client environment. If you plan to use this functionality, then it is recommended that you download andinstall the Sun Shared Visualization software. This software
product is available as a free download (Sun charges for support), and it includes VirtualGL, TurboVNC, the proprietary Sun Ray plugin, and enhancements to N1 GridEngine to allow it to manage VirtualGL jobs across a cluster of 3D servers.
4.7 Uninstalling VirtualGL
Linux
As root, issue one of the following commands:RPM-based systems
rpm -e VirtualGL
Debian-based systems
dpkg -r VirtualGL
Solaris
As root, issue the following command:pkgrm SUNWvgl
Answer “yes” when prompted.
Mac
Download and install the latest version of OSXPMLaunch OSXPM
Click the “Delete Package” button
Find
VirtualGL-
{version}.pkgin the list of packages and highlight it
Click “Delete Selected”
Enter your password if prompted
Complain to Apple about the lack of a built-in package uninstaller for OS X
Windows
Use the “Add or Remove Programs” applet in the Control Panel (or the “Programs and Features” applet if you’re running Vista.)
5 Obtaining and Installing TurboVNC
TurboVNC must be installed on any machine that will act as a TurboVNC server or client. It is not necessary to install TurboVNC to use the VGLImage Transport. Also, TurboVNC need not necessarily be installed on the same server as VirtualGL.
5.1 Installing TurboVNC on Linux
Installing TurboJPEG
Download the appropriate TurboJPEG binary package (v1.10 or later) for your system from the Downloadarea of the VirtualGL SourceForge web-site.
The “i386” RPM and DEB packages are for 32-bit-only systems. The “x86_64” RPM and “amd64” DEB packages are for 64-bit systems. The 64-bit packages contain both 32-bit and 64-bit libraries.
Log in as root, cd to the directory where you downloaded the binary package, and issue one of the following commands:
RPM-based systems
rpm -U turbojpeg*.rpm
Debian-based systems
dpkg -i turbojpeg*.deb
Installing TurboVNC
Download the appropriate TurboVNC binary package for your system from the Downloadarea of the VirtualGL SourceForge web-site.
Log in as root, cd to the directory where you downloaded the binary package, and issue one of the following commands:
RPM-based systems
rpm -U turbovnc*.rpm
Debian-based systems
dpkg -i turbovnc*.deb
5.2 Installing TurboVNC on Solaris
Download the TurboVNC Solaris package (SUNWtvnc-
{version}.pkg.bz2for SPARC or
SUNWtvnc-
{version}-x86.pkg.bz2for
x86) from the Download area of the VirtualGL
SourceForge web-site.
Log in as root, cd to the directory where you downloaded the package, and issue the following commands:
pkgrm SUNWvgl
(answer “Y” when prompted.)
bzip2 -dSUNWtvnc-{version}.pkg.bz2
pkgadd -dSUNWtvnc-{version}.pkg
Select the
SUNWtvncpackage (usually option 1) from the menu.
TurboVNC for Solaris installs into
/opt/SUNWtvnc.
5.3 Installing TurboVNC on Mac (Client Only)
Download the TurboVNC Mac disk image (TurboVNC-
{version}.dmg) from the Download
area of the VirtualGL SourceForge web-site.
Open the disk image, then open
TurboVNC-
{version}.pkginside the disk image. Follow the instructions to install the Mac client. The Mac package installs files in the
same locations as the Linux packages.
5.4 Installing TurboVNC on Windows (Client Only)
Download the TurboVNC Windows installer package (TurboVNC-
{version}.exe) from the Download
area of the VirtualGL SourceForge web-site.
Run the TurboVNC installer. The installation of TurboVNC should be self-explanatory. The only configuration option is the directory into which you want the files to be installed.
5.5 Installing TurboVNC from Source
If you are using a platform for which there is not a pre-built TurboVNC binary package available, then log in as root, download the TurboVNC source tarball (turbovnc-
{version}.tar.gz)
from the Download area of the VirtualGL
SourceForge web-site, uncompress it,
cd vnc/vnc_unixsrc, and read the
READMEfile for further instructions on how to build TurboVNC from source.
5.6 Uninstalling TurboVNC
Linux
As root, issue one of the following commands:RPM-based systems
rpm -e turbovnc
Debian-based systems
dpkg -r turbovnc
Solaris
As root, issue the following command:pkgrm SUNWtvnc
Answer “yes” when prompted.
Mac
Download and install the latest version of OSXPMLaunch OSXPM
Click the “Delete Package” button
Find
TurboVNC-
{version}.pkgin the list of packages and highlight it
Click “Delete Selected”
Enter your password if prompted
Complain to Apple about the lack of a built-in package uninstaller for OS X
Windows
Use the “Add or Remove Programs” applet in the Control Panel (or the “Programs and Features” applet if you’re running Vista.)
6 Configuring a Linux or Solaris Machine as a VirtualGL Server
6.1 GLP: Using VirtualGL Without a 3D X Server
Sun’s OpenGL library for Solaris/SPARC systems has a special extension called “GLP” which allows VirtualGL to directly access a 3D graphics card even if there is no X server running on the card. GLP greatly improves the overall securityof the VirtualGL server, since it eliminates the need to grant VirtualGL users access to the 3D X server running on that machine. In addition, GLP makes it easy to assign VirtualGL jobs to any graphics card in a multi-card system.
When using GLP, the architecture of VirtualGL changes as follows:
Figure 6.1: The VGL Image Transport with a Remote 2D X Server and GLP
Figure 6.2: The X11 Image Transport with an X Proxy and GLP
Figure 6.3: The Sun Ray Image Transport with GLP
If the application server is running Sun OpenGL 1.5
for Solaris/SPARC, then it is recommended that you configure it to use GLP:
Log in as root.
Run
/opt/VirtualGL/bin/vglserver_config
Select option 3 (
Configure server for use with VirtualGL in GLP mode.)
Restrict framebuffer device access to vglusers group (recommended)?
[Y/n]
YesOnly users in the
vglusersgroup can run OpenGL applications on the VirtualGL server (the configuration script will create the
vglusersgroup if it doesn’t already exist.) This limits the possibility that an
unauthorized user could snoop the 3D framebuffer device(s) and thus see (or alter) the output of a 3D application that is being used with VirtualGL.
NoAny authenticated user can run OpenGL applications on the VirtualGL server. If it is necessary for users outside of the
vglusersgroup to log in locally to this server and run OpenGL applications, then this option must be
selected.
If you chose to restrict framebuffer device access to the
vglusersgroup, then edit
/etc/groupand add
rootto the
vglusersgroup. If you choose, you can also
add additional users to the group at this time. Note that any user you add to
vglusersmust log out and back in again before their new group permissions will take effect.
Edit the
/etc/dt/config/GraphicsDevicesfile as necessary. This file contains a list of paths to 3D framebuffer devices (such as
/dev/fbs/kfb0,
/dev/fbs/jfb0, etc.) that you
wish to use with VirtualGL.
Sanity Check
To verify that the application server is ready to run VirtualGL, log out of the server, log back into the server using SSh, and execute the following command in the SSh session:/opt/VirtualGL/bin/glxinfo -dglp
This command should output a list of visuals and should complete with no errors.
Using GLP by Default in VirtualGL
If you wish VirtualGL to use GLP by default, then you can addVGL_DISPLAY=glp export VGL_DISPLAY
to
/etc/profileon the application server. This will cause VirtualGL to use the first device specified in
/etc/dt/config/GraphicsDevicesas the default rendering device. Users can override this default by
setting
VGL_DISPLAYin one of their startup scripts (such as
~/.profileor
~/.login) or by passing an argument of
-d<device>to
vglrunwhen invoking VirtualGL. See Chapter 19 for
more details.
6.2 Granting Access to the 3D X Server
If you plan to use VirtualGL only with GLP,then you can skip this section.
VirtualGL requires access to the application server’s 3D graphics card so that it can create off-screen pixel buffers (Pbuffers) and redirect the 3D rendering from applications into these Pbuffers. Unfortunately, accessing a 3D graphics
card on Linux and Solaris/x86 systems or on Solaris/SPARC systems without GLP requires going through an X server.
On such systems, the only way to share the application server’s 3D graphics card among multiple users is to grant those users access to the 3D X server (the X server attached to the application server’s 3D graphics card. Refer to the figures in Chapter 2.)
It is important to understand the security risks associated with this. Once a user has access to the 3D X server, there is nothing that would prevent the user from logging keystrokes or reading back images from that X server. Using
xauth,
one can obtain “untrusted” X authentication keys which prevent such exploits, but unfortunately, those untrusted keys also disallow access to the 3D hardware. Thus, it is necessary to grant full trusted access to the 3D X server for any users that will need
to run VirtualGL. Unless you fully trust the users to whom you are granting this access, then you should avoid logging in locally to the 3D X server (particularly as root) unless absolutely necessary.
This section will explain how to configure a VirtualGL server such that selected users can run VirtualGL, even if the server is sitting at the login prompt.
Shut down the display manager:
Ubuntu Linux servers
/etc/init.d/gdm stop
Other Linux servers
init 3
Solaris 10 servers running GDM
svcadm disable gdm2-login
Solaris 11/OpenSolaris servers running GDM
svcadm disable gdm
Solaris servers running dtlogin
/etc/init.d/dtlogin stop
Log in as root from the text console (or remotely using SSh.)
Run
/opt/VirtualGL/bin/vglserver_config
Select option 1 (
Configure server for use with VirtualGL in GLX mode.)
Restrict local X server access to vglusers group (recommended)?
[Y/n]
YesOnly users in the
vglusersgroup can use VirtualGL (the configuration script will create the
vglusersgroup if it doesn’t already exist.) This is the most secure option, since it prevents any users outside of
the
vglusersgroup from accessing (and thus exploiting) the 3D X server.
NoVirtualGL can be used by any user that successfully logs into the VirtualGL server. The 3D X server can also be accessed (and potentially exploited) by any user who is logged into the VirtualGL server. If you choose this option, it is
recommended that you also disable the XTEST extension (see below.)
Restrict framebuffer device access to vglusers group (recommended)?
[Y/n]
YesOnly users in the
vglusersgroup can run OpenGL applications on the VirtualGL server (the configuration script will create the
vglusersgroup if it doesn’t already exist.) This limits the possibility that an
unauthorized user could snoop the 3D framebuffer device(s) and thus see (or alter) the output of a 3D application that is being used with VirtualGL.
NoAny authenticated user can run OpenGL applications on the VirtualGL server. If it is necessary for users outside of the
vglusersgroup to log in locally to this server and run OpenGL applications, then this option must be
selected.
Disable XTEST extension (recommended)?
[Y/n]
YesDisabling XTEST will not prevent a user from logging keystrokes or reading images from the 3D X server, but if a user has access to the 3D X server, disabling XTEST will prevent them from inserting keystrokes or mouse events and thus
hijacking local X sessions on that X server.
On certain Linux distributions, it may be necessary to run
gdmsetupfirst in order to create the X server command line entries in the GDM configuration file. Until these command
line entries have been created, disabling XTEST using
vglserver_configwill not work. This is known to be necessary for openSUSE 10 and Enterprise Linux 5.
No
x11vncand
x0vncserverboth require XTEST, so if you need to attach a VNC server to the 3D X server, then it is necessary to answer “No” (and thus leave XTEST enabled.)
If you chose to restrict X server or framebuffer device access to the
vglusersgroup, then edit
/etc/groupand add
rootto the
vglusersgroup. If you choose, you
can also add additional users to the group at this time. Note that any user you add to
vglusersmust log out and back in again before their new group permissions will take effect.
Restart the display manager:
Ubuntu Linux servers
/etc/init.d/gdm start
Other Linux servers
init 5
Solaris 10 servers running GDM
svcadm enable gdm2-login
Solaris 11/OpenSolaris servers running GDM
svcadm enable gdm
Solaris servers running dtlogin
/etc/init.d/dtlogin start
Sanity Check
To verify that the application server is ready to run VirtualGL, log out of the server, log back into the server using SSh, and execute the following commands in the SSh session:If you restricted 3D X server access to
vglusers
xauth merge /etc/opt/VirtualGL/vgl_xauth_key
xdpyinfo -display :0
/opt/VirtualGL/bin/glxinfo -display :0
NOTE:
xauthand
xdpyinfoare in
/usr/openwin/binon Solaris systems.
If you did not restrict 3D X server access
xdpyinfo -display :0
/opt/VirtualGL/bin/glxinfo -display :0
Both commands should output a list of visuals and should complete with no errors. If you chose to disable the XTEST extension, then check the output of
xdpyinfoto verify that
XTESTdoes not show up in the
list of extensions.
6.3 SSh Server Configuration
The application server’s SSh daemon should have the X11Forwardingoption enabled and the
UseLoginoption disabled. This is configured in
sshd_config, the location of which varies depending on
your distribution of SSh. Linux, Solaris 10+, and OpenSolaris systems generally keep this in
/etc/ssh, whereas Blastwave OpenSSh keeps it in
/opt/csw/etcand SunFreeware OpenSSh keeps it in
/usr/local/etc.
6.4 Un-Configuring the Server
You can use the vglserver_configscript to restore the security settings that were in place before VirtualGL was installed. Option 2 (
Unconfigure server for use with VirtualGL in GLX mode) will remove any
shared access to the 3D X server and thus prevent VirtualGL from accessing the 3D hardware in that manner. Option 2 will also re-enable the XTEST extension on the 3D X server. Both Option 2 and Option 4 (
Unconfigure server for use with VirtualGL in GLP mode)
will restore the framebuffer device permissions to their default (by default, only root or the user that is currently logged into the application server locally can access the framebuffer devices.)
NOTE: Unconfiguring the server does not remove the
vglusersgroup or the
/etc/dt/config/GraphicsDevicesfile.
After selecting Option 2, you must restart the display manager before the changes will take effect.
7 Configuring a Windows Machine as a Client for the VGL Image Transport
Install Hummingbird Exceed if it isn’t already installed.Add the Exceed path (example:
C:\Program Files\Hummingbird\Connectivity\9.00\Exceed) to the system
PATHenvironment if it isn’t already there.
7.1 Optimizing Exceed
Disabling Pixel Format Conversion (Exceed 2006 and earlier)
Load Exceed XConfig (right-click on the Exceed taskbar icon, then select Tools–>Configuration.)Open the “X Server Protocol” applet in XConfig.
If you are using the “Classic View” mode of XConfig, open the “Protocol” applet instead.
In the “X Server Protocol” applet, select the “Protocol” tab and make sure that “Use 32 bits per pixel for true color” is not checked.
Click “Validate and Apply Changes.” If XConfig asks whether you want to perform a server reset, click “Yes.”
Disabling Backing Store
Load Exceed XConfig (right-click on the Exceed taskbar icon, then select Tools–>Configuration.)Open the “Other Server Settings” applet in XConfig.
If you are using the “Classic View” mode of XConfig, open the “Performance” applet instead.
Select the “Performance” tab and make sure that “Default Backing Store” is set to “None.”
Click “Validate and Apply Changes.” If XConfig asks whether you want to perform a server reset, click “Yes.”
Enabling MIT-SHM
VirtualGL has the ability to take advantage of the MIT-SHM extension in Hummingbird Exceed to accelerate image drawing on Windows. This can improve the overall performance of the VirtualGL pipeline by as much as 20% in some cases.The bad news is that this extension is not consistently implemented across all versions of Exceed. In particular, Exceed 8, Exceed 9, and Exceed 2008 require patches to make it work properly. If you are using one of these versions
of Exceed, you will need to obtain the following patches from the Hummingbird support site:
| Product | Patches Required | How to Obtain |
|---|---|---|
| Hummingbird Exceed 8.0 | hclshm.dllv9.0.0.1 (or higher) xlib.dllv9.0.0.3 (or higher) exceed.exev8.0.0.28 (or higher) | Download all patches from the Hummingbird support site. (Hummingbird WebSupport account required) |
| Hummingbird Exceed 9.0 | hclshm.dllv9.0.0.1 (or higher) xlib.dllv9.0.0.3 (or higher) exceed.exev9.0.0.9 (or higher) | exceed.execan be patched by running Hummingbird Update. All other patches must be downloaded from the Hummingbird support site. (Hummingbird WebSupport account required) |
| Hummingbird Exceed 2008 | xlib.dllv13.0.1.235 (or higher) (or install the latest Connectivity 2008 Service Pack.) | Download all patches from the Hummingbird support site. (Hummingbird WebSupport account required) |
Next, you need to enable the MIT-SHM extension in Exceed:
Load Exceed XConfig (right-click on the Exceed taskbar icon, then select Tools–>Configuration.)
Open the “X Server Protocol” applet in XConfig.
If you are using the “Classic View” mode of XConfig, open the “Protocol” applet instead.
Select the “Extensions” tab and make sure that “MIT-SHM” is checked.
Click “Validate and Apply Changes.” If XConfig asks whether you want to perform a server reset, click “Yes.”
8 Using VirtualGL with the VGL Image Transport
Advantages of the VGL Image Transport
Seamless windows; every application window appears as a separate window on the user’s desktopSupports stereographic and overlay rendering
Built-in encryption
Consumes fewer server resources, since the 2D (X11) rendering occurs on the client machine
Disadvantages of the VGL Image Transport
The VGL Image Transport is designed to be used with remote X servers, thus it relies on the chatty remote X11 protocol to send the 2D elements of the application’s GUI to the user’s desktop. As a result, the VGL Image Transportis not recommended for use on high-latency networks
No collaboration features
Requires purchasing Exceed for use with Windows clients
The client is not stateless. As with any remote X11 app, if the network connection drops, then the application will exit
8.1 VGL Image Transport with X11 Forwarding
This mode is recommended for use on secure local-area networks. The X11 traffic is encrypted, but the VirtualGL image stream is left unencrypted to maximize performance.Procedure for Linux/Solaris/Mac Clients
Start the X server if it isn’t started already (Mac clients: start the Mac X11 application.)Open a new terminal window (Mac clients: in the X11 application, start a new xterm [Command-N] if one isn’t already started.)
In the same terminal/xterm window, open a Secure Shell (SSh) session into the VirtualGL server:
/opt/VirtualGL/bin/vglconnect {user}@{server}Replace
{user} with your user account name on the VirtualGL server and {server} with the hostname or IP address of that server.In the SSh session, start a 3D application using VirtualGL:
/opt/VirtualGL/bin/vglrun [vglrun options] {application_executable_or_script} {arguments}Consult Chapter 19 for more information on
vglruncommand line options.
Procedure for Windows Clients
Start Exceed if it isn’t already started. Hover the mouse pointer over the Exceed taskbar icon and make a note of the display number on which Exceed is listening (Example: “Exceed 0.0 Multiwindow Mode”.)Open a new Command Prompt.
In the same Command Prompt window, set the
DISPLAYenvironment variable to match the display on which Exceed is listening. Example:
set DISPLAY=:0.0
If you only ever plan to use one Exceed session at a time, then you can set the
DISPLAYenvironment variable in your global user environment (Control Panel–>System–>Advanced–>Environment
Variables.)
Open a Secure Shell (SSh) session into the VirtualGL server:
cd /d "c:\program files\virtualgl-{version}-{build}"
vglconnect {user}@{server}
Replace
{user} with your user account name on the VirtualGL server and {server} with the hostname or IP address of that server.In the SSh session, start a 3D application using VirtualGL:
/opt/VirtualGL/bin/vglrun [vglrun options] {application_executable_or_script} {arguments}Consult Chapter 19 for more information on
vglruncommand line options.
8.2 VGL Image Transport with a Direct X11 Connection
As with the previous mode, this mode performs optimally on local-area networks.However, it is less secure, since both the X11 traffic and the VGL image stream are unencrypted. This mode is primarily useful in grid environments where you may not know ahead of time which server will execute a VirtualGL job. It is assumed that the “submit
host” (the machine into which you connect with SSh) and the “execute hosts” (the machines that will run VirtualGL jobs) share the same home directories and reside in the same domain.
Some newer Linux and Solaris distributions ship with default settings that do not allow TCP connections into the X server. Such systems cannot be used as clients with this procedure unless
they are reconfigured to allow X11 TCP connections.
Procedure
The procedure for this mode is identical to the procedure for X11 forwarding, exceptthat you should pass a
-xargument to
vglconnectwhen connecting to the server:
/opt/VirtualGL/bin/vglconnect -x {user}@{server}
8.3 VGL Image Transport with SSL Encryption
This mode encrypts the VGL image stream and, when used in conjunction with X11 forwarding,provides a completely secure solution. However, enabling SSL encryption can reduce VirtualGL’s performance by as much as 20% on high-speed networks such as Ethernet.
Procedure
The procedure for this mode is identical to the procedure for X11 forwarding, exceptthat you should pass an argument of
+sto
vglrunwhen starting a 3D application using VirtualGL. You can also set the environment variable
VGL_SSLto
1on the VirtualGL server prior to invoking
vglrun.
(see Chapter 19 for more details.)
8.4 VGL Image Transport with X11 Forwarding and SSh Tunneling
This mode is useful when either the VirtualGL server or the client machine are behind restrictive firewalls and only SSh connections are allowed through. Both the VGL image stream and the X11 traffic are tunneled through the SSh connection,and thus this mode provides a completely secure solution. However, using SSh tunneling can reduce VirtualGL’s performance by anywhere from 20-40% on high-speed networks such as Ethernet.
Procedure
The procedure for this mode is identical to the procedure for X11 forwarding, exceptthat you should pass a
-sargument to
vglconnectwhen connecting to the server:
/opt/VirtualGL/bin/vglconnect -s {user}@{server}vglconnectwill make two SSh connections into the server, the first to find an open port on the server and the second to create the secure image tunnels and open the secure shell. If you are not using an SSh agent to create
password-less logins, then this mode will require you to enter your password twice.
vglconnect -scan be used to create multi-layered SSh tunnels. For instance, if the VirtualGL server is not directly accessible from the Internet, you can use
vglconnect -sto connect to a gateway server,
then use
vglconnect -sagain on the gateway server to connect to the VirtualGL server. Both the X11 and the VGL image traffic will be forwarded from the VirtualGL server through the gateway and to the client.
8.5 VGL Image Transport over Gigabit Networks
When using the VGL image transport over Gigabit Ethernet or faster networks, it may be desirable to disable image compression. This can be accomplished by passing an argument of -crgbto
vglrunor setting
the
VGL_COMPRESSenvironment variable to
rgbon the VirtualGL server. Disabling image compression will reduce VirtualGL’s server and client CPU usage by 50% or more, but the tradeoff is that it will also increase VirtualGL’s network
usage by a factor of 10 or more. Thus, disabling image compression is not recommended unless you are using switched Gigabit Ethernet (or faster) infrastructure and have plenty of bandwidth to spare.
8.6 VGL Image Transport with XDMCP
Using the VGL Image Transport with XDMCP should mostly “just work”. Once you have established the connection to the remote X server using XDMCP, you can then follow any of the above procedures to create an SSh connection to the applicationserver and start a 3D application using VirtualGL. The application server and the machine running the remote X server need not necessarily be the same machine.
8.7 The VirtualGL Client Application: Nuts and Bolts
The VirtualGL Client application receives encoded and/or compressed images on a dedicated TCP socket, decodes and/or decompresses the images, and draws the images into the appropriate X window. In previous versions of VirtualGL, itwas necessary to manually start the VirtualGL Client prior to connecting to the application server, but the new
vglconnectscript wraps both
vglclientand SSh to greatly simplify the process of creating VGL Image Transport connections.
One consequence of this ease of use is that the actual workings of
vglclientare hidden from view, which makes it a bit more difficult to see the cause of connection failures and other issues as they happen.
vglconnectinvokes
vglclientwith an argument of
-detach, which causes
vglclientto completely detach from the console and run as a background daemon. It will remain running silently
in the background, accepting VGL Image Transport connections for the X server on which it was started, until that X server is reset or until the
vglclientprocess is explicitly killed. Logging out of the X server will reset the X server and thus
kill all
vglclientinstances that are attached to it. You can also explicitly kill all instances of
vglclientrunning under your user account by invoking
vglclient -kill
(
vglclientis in
/opt/VirtualGL/binon Linux/Mac/Solaris systems and in
c:\program files\virtualgl-{version}-{build} on Windows systems.)vglconnectinstructs
vglclientto redirect all of its console output to a log file named
{home}/.vgl/vglconnect-
{hostname}-
{display}.log,
where
{home} is the path of the current user’s home directory (%USERPROFILE%on Windows systems),
{hostname} is the name of the computer running vglconnect, and
{display} isthe name of the current X display (read from the
DISPLAYenvironment or passed to
vglconnectusing the
-displayargument.) In the event that something goes wrong, this log file is the first place to check.
When
vglclientsuccessfully starts on a given X display, it stores its listener port numbers in a pair of root window properties on the X display. If other
vglclientinstances attempt to start on the same
X display, they read the X window properties, determine that another
vglclientinstance is already running, and exit to allow the first instance to retain control.
vglclientwill clean up these X properties under most circumstances,
even if it is explicitly killed. However, under rare circumstances (if sent a SIGKILL signal on Unix, for instance), a
vglclientinstance may exit uncleanly and leave the X properties set. In these cases, it may be necessary to add an argument
of
-forceto
vglconnectthe next time you use it. This tells
vglconnectto start a new
vglclientinstance, regardless of whether
vglclientthinks that there is already an instance running on
this X display. Alternately, you can simply reset your X server to clear the orphaned X window properties.
8.7.1 The VirtualGL Client and Firewalls
To retain compatibility with previous versions of VirtualGL, the firstvglclientinstance on a given machine will attempt to listen on port 4242 for unencrypted connections and 4243 for SSL connections. If it fails to
obtain one of those ports, because another application or another
vglclientinstance is already using them, then
vglclientwill try to obtain a free port in the range of 4200-4299. Failing that, it will request a free port from the
operating system.
In a nutshell: if you only ever plan to run one X server at a time on your client machine, which means that you’ll only ever need one instance of
vglclientat a time, then it is sufficient to open inbound ports 4242 and
4243 in your client machine’s firewall. If you plan to run multiple X servers on your client machine, which means that you will need to run multiple
vglclientinstances, then you may wish to open ports 4200-4299. Similarly, if you are running
vglclienton
a multi-user TurboVNC or Sun Ray server that has a firewall, then you may wish to open ports 4200-4299 in the server’s firewall. Opening ports 4200-4299 will accommodate up to 50 separate
vglclientinstances. More instances than that cannot be
accommodated on a firewalled machine, unless the firewall is able to create rules based on application executables instead of listening ports.
Note that it is not necessary to open any inbound ports in the firewall to use the VGL Image Transport with SSh Tunneling.
9 Using VirtualGL with TurboVNC
Referring to Chapter 2, the X11 Image Transport bypasses VirtualGL’s internal image compressor and instead drawsthe rendered 3D images to an X server using standard X11 drawing commands. Since this results in the images being sent uncompressed to the X server, the X11 Image Transport is designed to be used with an “X Proxy.” An X proxy acts as a virtual X server, receiving
X11 commands from the application (and from VirtualGL), rendering the X11 commands into images, compressing the resulting images, and sending the compressed images over the network to a client or clients.
Since VirtualGL is sending rendered 3D images to the X proxy at a very fast rate, the proxy must be able to compress the images very quickly in order to keep up. Unfortunately, however, most X proxies can’t. They simply aren’t designed
for the types of full-screen video workloads that VirtualGL generates. Therefore, the VirtualGL Project provides an optimized X proxy called “TurboVNC”, which is based on the Virtual
Network Computing (VNC) standard (more specifically, on the TightVNC variant
thereof.)
On the surface, TurboVNC behaves very similarly to its parent project, but TurboVNC has been tuned to provide interactive performance for the types of full-screen video workloads that VirtualGL produces. On these types of image workloads,
TurboVNC performs as much as an order of magnitude faster than TightVNC, uses more than an order of magnitude less CPU time to compress each frame, and it produces generally better compression ratios. As with TightVNC, TurboVNC uses JPEG compression for image
tiles with a high number of unique colors and paletted encoding for image tiles with a low number of unique colors. Part of TurboVNC’s speedup comes from the use of TurboJPEG, the same high-speed vector-optimized JPEG codec used by the VGL Image Transport.
However, TurboVNC also bypasses the CPU-hungry smoothness detection routines that TightVNC uses to determine whether a tile is a good candidate for JPEG compression. Furthermore, TurboVNC eliminates buffer copies, it maximizes network efficiency by using the
largest tile sizes supported by the TightVNC protocol, and it never uses a Zlib compression level higher than 1. In the aggregate, TurboVNC compresses 2D application workloads less efficiently than TightVNC, but it generally does a better job than TightVNC
of compressing 3D application workloads. Also, TurboVNC is much faster across the board than TightVNC.
TurboVNC also has the ability to hide network latency by decompressing and drawing a frame on the client while the next frame is being fetched from the server. This can improve performance dramatically on high-latency connections.
TurboVNC additionally provides client-side double buffering, full support for Solaris, and other refinements.
Advantages of TurboVNC (when compared to the VGL Image Transport)
TurboVNC eliminates the need to send X11 traffic over the network, and thus it performs very well on low-bandwidth, high-latency connections (such as broadband or long-haul T1 lines.) The 3D application’s GUI will load and rendermuch faster (perhaps even orders of magnitude faster) with TurboVNC than with the VGL Image Transport on such connections.
For 3D applications whose rendered images do not contain very many unique colors (for instance, CAD applications in wireframe mode), the hybrid protocol used by TurboVNC will generally use less network bandwidth than the pure motion
JPEG protocol used by the VGL Image Transport.
TurboVNC provides two lossless compression modes, one of which is designed to reduce server CPU usage on gigabit networks and the other of which is designed to provide reasonable performance on wide-area networks (at the expense
of higher server CPU usage.) The VGL Image Transport’s only lossless option is uncompressed RGB.
TurboVNC includes a lossless refresh feature which will, on demand, send a mathematically lossless image of the current VNC desktop to the client. A user connecting over a low-bandwidth connection can use low-quality JPEG to achieve
the best performance when manipulating the 3D model, then they can request a lossless refresh when they are ready to study the model in detail.
TurboVNC provides rudimentary collaboration capabilities. Multiple clients can simultaneously view the same TurboVNC session and pass around control of the keyboard and mouse.
The TurboVNC viewer is stateless. If the network hiccups or the viewer is otherwise disconnected, the session continues to run on the server and can be rejoined from any machine on the network.
No X server is required on the client machine. This reduces the deployment cost and complexity for Windows clients.
Any web browser or PDA can be used as a TurboVNC client (with reduced performance.)
Disadvantages of TurboVNC
No seamless windows. All application windows are constrained to a “virtual desktop”, which displays in a single window on the client machine.TurboVNC will generally require about 20% more server CPU cycles to maintain the same frame rate as the VGL Image Transport, both because it has to compress more pixels in each frame (an entire desktop rather than a single window)
and because it has to perform 2D (X11) rendering as well as 3D rendering.
TurboVNC does not support quad-buffered stereo or transparent overlays.
9.1 Using TurboVNC and VirtualGL on the Same Server
The most common (and optimal) way to use TurboVNC is to set it up on the same server that is running VirtualGL. This allows VirtualGL to send its rendered 3D images to TurboVNC through shared memory rather than sending them over anetwork.
Procedure
Mac clients: Start the Mac X11 application.Open a new Command Prompt/terminal window on your client machine. (Mac clients: in the X11 application, start a new xterm [Command-N] if one isn’t already started.)
In the new Command Prompt/terminal/xterm window, open a Secure Shell (SSh) session into the VirtualGL/TurboVNC server:
Linux/Mac/Solaris clients
ssh {user}@{server}Windows clients
"c:\program files\turbovnc\putty" {user}@{server}Replace
{user} with your user account name on the VirtualGL server and {server} with the hostname or IP address of that server.In the SSh session, start a TurboVNC session:
/opt/TurboVNC/bin/vncserver
Make a note of the X display number that the TurboVNC session is occupying, for instance:
New 'X' desktop is my_server:1
If this is the first time that a TurboVNC session has ever been run under this user account, TurboVNC will prompt for a VNC session password.
The SSh session can now be exited, if desired.
On the client machine, start the TurboVNC Viewer.
Linux/Mac/Solaris clientsOpen a new terminal/xterm and type
/opt/TurboVNC/bin/vncviewer
Windows clientsSelect TurboVNC Viewer in the TurboVNC Start Menu group.
A small dialog box will appear.
| Windows TurboVNC viewer | Linux/Mac/Solaris TurboVNC viewer |
|---|---|
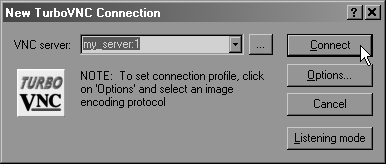 | 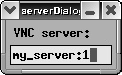 |
Another dialog box appears, prompting for the VNC session password.
| Windows TurboVNC viewer | Linux/Mac/Solaris TurboVNC viewer |
|---|---|
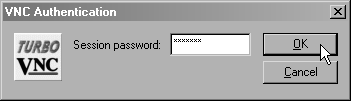 | 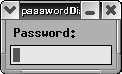 |
A TurboVNC desktop window should appear on your client machine. This window contains a virtual X server with which you can interact to launch X-Windows applications on the TurboVNC server.
Open a new terminal inside the TurboVNC desktop.
In the terminal, start a 3D application using VirtualGL:
/opt/VirtualGL/bin/vglrun [vglrun options] {application_executable_or_script} {arguments}VirtualGL will detect that the X display connection is local and will automatically enable the X11 Image Transport.
Consult Chapter 19 for more information on
vglruncommand line options.
9.2 Using TurboVNC When VirtualGL Is Running on a Different Machine
If TurboVNC and VirtualGL are running on different servers, then it is desirable to use the VGL Image Transport to send images from the VirtualGL server to the TurboVNC server. It is also desirable to disable image compression in the
VGL Image Transport. Otherwise, the images would have to be compressed by the VirtualGL server, decompressed by the VirtualGL Client, then recompressed by the TurboVNC server, which is a waste of CPU resources. However, sending images uncompressed over a network
requires a fast network (generally, Gigabit Ethernet or faster), so there needs to be a fast link between the VirtualGL server and the TurboVNC server for this procedure to perform well.
Procedure
The procedure for using the VGL Image Transport to remotely display 3D applications from a VirtualGL server to a TurboVNC server is the same as the procedure forusing the VGL Image Transport to remotely display 3D applications from a VirtualGL server to a remote 2D X server, with the following notable differences:
The “client” in this case is really the TurboVNC server.
The “X server” is really the TurboVNC session.
Once connected to the VirtualGL server with SSh, it is recommended that you disable image compression in the VGL Image Transport by either setting the
VGL_COMPRESSenvironment variable to
rgbor
passing an argument of
-crgbto
vglrunwhen launching VirtualGL. Otherwise, VirtualGL will detect that the connection to the X server is remote, and it will automatically try to enable JPEG compression.
9.3 Disconnecting and Killing the TurboVNC Session
Closing the TurboVNC viewer disconnects from the TurboVNC session, but the TurboVNC session will remain running on the TurboVNC server (as will any applications that you may have started in the session), and you can reconnect to thesession at any time.
To kill a TurboVNC session:
Using SSh (
c:\Program Files\TurboVNC\putty.exeon Windows clients), log into the server that is running the TurboVNC session that you wish to kill.
… or …
Using the TurboVNC Viewer, connect to the TurboVNC session that you wish to kill, and open a new terminal in that TurboVNC session.
Type the following command:
/opt/TurboVNC/bin/vncserver -kill :{n}Replace
{n} with the X display number of the TurboVNC session you wish to kill.To list the X display numbers and process ID’s of all TurboVNC sessions that are currently running under your user account on a particular machine, type the following command:
/opt/TurboVNC/bin/vncserver -list
9.4 Using TurboVNC in a Web Browser
When a TurboVNC session is created, it automatically launches a miniature web server that serves up a Java TurboVNC viewer applet. This Java TurboVNC viewer can be used to connect to the TurboVNC session from a machine that does nothave a native TurboVNC viewer installed (or a machine for which no native TurboVNC viewer is available.) The Java viewer is significantly slower than the native viewer on high-speed networks, but on low-speed networks the Java viewer and native viewers have
comparable performance. The Java viewer does not currently support double buffering.
To use the Java TurboVNC viewer, point your web browser to:
http://
{turbovnc_server}:{5800+n
}
where
{turbovnc_server} is the hostname or IP address of the TurboVNC server, and nis the X display number of the TurboVNC session to which you want to connect.
Example: If the TurboVNC session is occupying X display
my_server:1, then point your web browser to:
http://my_server:5801
9.5 Optimizing TurboVNC’s Performance for Different Network Types
The level of image compression in TurboVNC can be adjusted to balance the (sometimes conflicting) goals of high image quality and high performance. There are four options which control the manner in which TurboVNC compresses images:Allow JPEG compressionIf this option is enabled, then TurboVNC will use JPEG compression for all image tiles with more than 24 unique colors and paletted encoding for all other image tiles. If this option is disabled, then TurboVNC will select between paletted
or raw encoding depending on the size of the image tile and its color count.
JPEG image qualityLower quality levels produce grainier JPEG images with more noticeable compression artifacts, but lower quality levels also use less network bandwidth and CPU time. Refer to Section 19.1 for
more details.
JPEG chrominance subsamplingAfter converting the image from RGB to YUV, chrominance subsampling discards some of the U and V (chrominance) components to save space. 1x subsampling retains the chrominance components for all pixels, 2x subsampling retains the chrominance
components for every other pixel, 4x subsampling retains the chrominance components for every fourth pixel, and grayscale throws out all of the chrominance components. Refer to Section 19.1 for
more details.
Zlib compression levelIf Zlib compression is enabled, then paletted and raw-encoded image tiles will be compressed with Zlib prior to transmission. This decreases network bandwidth usage at the expense of increased server CPU usage. If JPEG compression is
enabled, then Zlib compression is always used with non-JPEG image tiles.
In the Windows TurboVNC Viewer, these parameters can be adjusted by accessing the Options dialog box (click on the “Options” button in the “TurboVNC Connection” dialog box or, after connecting to the server, click on the Connection
Options button in the toolbar.) In the Unix TurboVNC viewer, press F8 after connecting to bring up the options menu. In the Java viewer, click on the Options button at the top of the browser window.
The TurboVNC Viewer provides five image encoding protocols, corresponding to the most useful combinations of the image compression options described above:
| Image encoding protocol | Allow JPEG | JPEG image quality | JPEG chrominance subsampling | Zlib compression level | Notes |
|---|---|---|---|---|---|
| “Tight + Perceptually Lossless JPEG” | Yes | 95 | 1x | N/A | This protocol should be perceptually lossless (that is, any image compression artifacts it produces should be imperceptible to the human eye under most viewing conditions.) This protocol requires a great deal of network bandwidth, however, and is generally not recommended except on 50 Megabit/second and faster networks. |
| “Tight + Medium Quality JPEG” | Yes | 80 | 2x | N/A | For image tiles with a high number of unique colors, this protocol produces some minor, but generally not very noticeable, image compression artifacts. All else being equal, this protocol typically uses about twice the network bandwidth of the “Low Quality” protocol and about half the bandwidth of the “Perceptually Lossless” protocol, making it appropriate for medium-speed networks such as 10 Megabit ethernet. |
| “Tight + Low Quality JPEG” | Yes | 30 | 4x | N/A | For image tiles with a high number of unique colors, this protocol produces very noticeable image compression artifacts. However, it performs optimally on low-bandwidth connections. If image quality is more critical than performance, then use one of the other connection protocols or take advantage of the “Lossless Refresh” feature. |
| “Lossless Tight” | No | N/A | N/A | 0 | This protocol uses paletted encoding for image tiles with a low number of unique colors but otherwise does not perform any image compression at all. It is thus suitable only for gigabit and faster networks. This protocol uses significantly less CPU time than any of the JPEG-based protocols. |
| “Lossless Tight + Zlib” | No | N/A | N/A | 1 | This protocol uses paletted encoding for image tiles with a low number of unique colors and raw encoding for image tiles with a high number of unique colors. It compresses all image tiles using Zlib with compression level 1. For certain types of applications (CAD applications, in particular), this protocol uses less network bandwidth than the “Perceptually Lossless” protocol, but it also uses significantly more CPU time on the server than any of the JPEG-based protocols. |
Options button in the toolbar.) In the Java viewer, the same thing is accomplished by clicking on the “Options” button at the top of the browser window. With the Linux/Mac/Solaris TurboVNC Viewer, the “Perceptually Lossless” protocol is the default, and you
can use the following command line switches to select another protocol:
-medqual= select the “Tight + Medium Quality JPEG” protocol
-lowqual= select the “Tight + Low Quality JPEG” protocol
-lossless= select the “Lossless Tight” protocol
-losslesswan= select the “Lossless Tight + Zlib” protocol
You can also press the F8 key after connecting to pop up a menu from which you can select a different protocol.
9.5.1 Lossless Refresh
Since both of TurboVNC’s mathematically lossless protocols have performance drawbacks, another option for image-quality-critical applications is the “Lossless Refresh” feature. When a lossless refresh is requested by a TurboVNC viewer,the server will send a mathematically lossless copy of the current TurboVNC desktop to the requesting viewer. So, for instance, a user can rotate/pan/zoom an object in their 3D application using a very low-quality JPEG setting, then when that user is ready
to interpret or analyze the object, they can request a lossless refresh of TurboVNC’s virtual screen.
To perform a lossless refresh in the Windows or Unix TurboVNC viewers, press CTRL-ALT-SHIFT-L (in the Windows TurboVNC Viewer, you can also click on the Lossless Refresh toolbar icon.) In the Java TurboVNC Viewer, click on the “Lossless
Refresh” button at the top of the browser window.
9.6 Securing a TurboVNC Connection
Normally, the connection between the TurboVNC server and the TurboVNC viewer is completely unencrypted, but securing that connection can be easily accomplished by using the port forwarding feature of Secure Shell (SSh.) After you havestarted a TurboVNC session on the TurboVNC server, open a new SSh connection into the TurboVNC server using the following command line:
Linux/Mac/Solaris clients
ssh -L {5900+n}:localhost:{5900+n} {user}@{server}Windows clients
"c:\program files\turbovnc\putty" -L {5900+n}:localhost:{5900+n} {user}@{server}Replace
{user} with your user account name on the TurboVNC server and {server} with the hostname or IP address of that server. Replace nwith the X display number of
the TurboVNC session to which you want to connect.
For instance, if you wish to connect to display
:1on server
my_serverusing user account
my_user, you would type:
Linux/Mac/Solaris clients
ssh -L 5901:localhost:5901 my_user@my_server
Windows clients
"c:\program files\turbovnc\putty" -L 5901:localhost:5901 my_user@my_server
After the SSh connection has been established, you can then launch the TurboVNC viewer and point it to
localhost:
{n} (localhost:1in the above example.)
Performance Notes
For LAN connections and other high-speed networks, tunneling the TurboVNC connection over SSh will reduce performance by as much as 20-40%. For wide-area networks, however, there is no performance penalty for using SSh tunneling withTurboVNC.
9.7 Further Reading
For more detailed instructions on the usage of TurboVNC:Linux/Mac/SolarisRefer to the TurboVNC man pages:
man -M /opt/TurboVNC/man {vncserver | Xvnc | vncviewer | vncconnect | vncpasswd}WindowsUse the embedded help feature (the question mark button in the upper right of the TurboVNC Viewer window.)
The TightVNC documentation:
http://www.tightvnc.com/docs.html
might also be helpful, since TurboVNC is based on TightVNC and shares many of its features.
10 Using VirtualGL with Other X Proxies
The previous chapter described how to use VirtualGL with TurboVNC, but much of thisinformation is also applicable to other X proxies, such as RealVNC, NX, etc. Generally, none of these other solutions will provide anywhere near the performance of TurboVNC, but some of them have capabilities that TurboVNC lacks (NX, for instance, can do seamless
windows.)
VirtualGL reads the value of the
DISPLAYenvironment variable to determine whether to enable the X11 Image Transport by default. If
DISPLAYbegins with a colon (“
:”) or with “
unix:”,
then VirtualGL will assume that the X server connection is local and will enable the X11 Image Transport as the default. This should effectively make the X11 Image Transport the default for most X proxies, but if for some reason that doesn’t occur, then you
can force the use of the X11 Image Transport by setting the
VGL_COMPRESSenvironment variable to
proxyon the application server or passing an argument of
-cproxyto
vglrun.
11 Using VirtualGL in a Sun Ray Environment
As described in Chapter 2, the Sun Ray environment consists of both an X proxy and an ultra-thin hardware client.If the proprietary VirtualGL Sun Ray plugin is not used, then the Sun Ray server can be treated just like any other X proxy and used with either the X11 Image Transport or the VGL Image Transport, as described in Chapter 9 and
Chapter 10.
If, however, the Sun Ray plugin is installed on the VirtualGL server, then a slightly different procedure is required to connect to that server and use the Sun Ray Image Transport. This procedure assumes that VirtualGL is running on
a different machine than the Sun Ray server.
Procedure
In the Sun Ray session, open a new terminal window.In the same terminal window, open a Secure Shell (SSh) session into the VirtualGL server:
ssh -X {user}@{server}Replace
{user} with your user account name on the VirtualGL server and {server} with the hostname or IP address of that server.In the SSh session, start a 3D application using VirtualGL:
/opt/VirtualGL/bin/vglrun [vglrun options] {application_executable_or_script} {arguments}Consult Chapter 19 for more information on
vglruncommand line options.
Note that this procedure is substantially similar to the X11 Forwarding procedure
used with the VGL Image Transport, except that it invokes
sshdirectly rather than using the
vglconnectwrapper script.
vglconnectlaunches
vglclient, and
vglclientis not needed when using the
Sun Ray Image Transport.
If the VirtualGL Sun Ray plugin is installed on a VirtualGL server, then VirtualGL will try to use the Sun Ray Image Transport when displaying 3D applications from that server to a Sun Ray client. However, the Sun Ray Image Transport
requires that the Sun Ray client be on a network that is accessible from the VirtualGL server. Some Sun Ray deployments place the clients on a private network that is visible only to the Sun Ray server, and the Sun Ray Image Transport cannot be used in such
cases (unless VirtualGL is running on the Sun Ray server itself, but that defeats the purpose of the Sun Ray Image Transport.) If VirtualGL detects that it is running in a Sun Ray environment but is unable to use the Sun Ray Image Transport, then it will fall
back to using the X11 Image Transport.
12 vglrun
and Shell Scripts
vglruncan be used to launch either binary executables or shell scripts, but there are a few things to keep in mind when using
vglrunto launch a shell script. When you
vglruna shell script,
the VirtualGL faker library will be preloaded into every executable that the script launches. Normally this is innocuous, but if the script calls any executables that have the setuid and/or setgid permission bits set, then the dynamic linker will refuse to
preload the VirtualGL faker library into those executables. The following warning will be printed out for each setuid/setgid executable that the script tries to launch:
Linux
ERROR: ld.so: object 'librrfaker.so' from LD_PRELOAD cannot be preloaded: ignored.
Solaris
ld.so.1: warning: librrfaker.so: open failed: No such file in secure directories
On Solaris and on newer versions of Linux (GLIBC 2.3 and later), the executable will continue to run, but without VirtualGL preloaded into it. That may be a problem, if the setuid/setgid executable was a 3D application that was intended
to be used with VirtualGL. To further complicate matters, some older versions of Linux will refuse to launch setuid/setgid executables at all if one attempts to preload VirtualGL into them.
There are a couple of ways to work around this issue. Probably the safest way is to simply edit the application script and make it store the value of the
LD_PRELOADenvironment variables until right before the application
executable is launched. For instance, consider the following application script:
Initial contents of
application.sh:
#!/bin/sh
some_setuid_executable
some_application_executable
You could modify the script as follows:
SolarisModified
application.sh:
#!/bin/sh
LD_PRELOAD_32_SAVE=$LD_PRELOAD_32
LD_PRELOAD_64_SAVE=$LD_PRELOAD_64
LD_PRELOAD_32=
LD_PRELOAD_64=
export LD_PRELOAD_32 LD_PRELOAD_64

some_setuid_executable

LD_PRELOAD_32=$LD_PRELOAD_32_SAVE
LD_PRELOAD_64=$LD_PRELOAD_64_SAVE
export LD_PRELOAD_32 LD_PRELOAD_64

some_application_executable
LinuxModified
application.sh:
#!/bin/sh
LD_PRELOAD_SAVE=$LD_PRELOAD
LD_PRELOAD=
export LD_PRELOAD

some_setuid_executable

LD_PRELOAD=$LD_PRELOAD_SAVE
export LD_PRELOAD

some_application_executable
You can also force VirtualGL to be preloaded into setuid/setgid executables, but please be aware of the security ramifications of this before you do it. By applying one of the following workarounds, you are essentially telling the
operating system that you trust the security and stability of the VirtualGL code as much as you trust the security and stability of the operating system. And while we’re flattered, we’re not sure that we’re necessarily deserving of that accolade, so if you
are in a security critical environment, apply the appropriate level of paranoia here.
To force VirtualGL to be preloaded into setuid/setgid executables on Linux, make
librrfaker.soa setuid executable. To do this, run the following command as root:
chmod u+s /usr/lib/librrfaker.so
On 64-bit Linux systems, also run:
chmod u+s /usr/lib64/librrfaker.so
On Solaris, you can force VirtualGL to be preloaded into setuid/setgid executables by adding the VirtualGL library directories to the Solaris “secure path.” Solaris keeps a tight lid on what goes into
/usr/liband
/lib,
and by default, it will only allow libraries in those paths to be preloaded into an executable that is setuid and/or setgid. Generally, 3rd party packages are forbidden from installing anything into
/usr/libor
/lib. But you can use
the
crleutility to add other directories to the operating system’s list of secure paths. In the case of VirtualGL, you would execute the following commands (as root):
crle -u -s /opt/SUNWvgl/lib
crle -64 -u -s /opt/SUNWvgl/lib/64
vglrunon Solaris has two additional options that are relevant to launching scripts:
vglrun -32 {script}will preload VirtualGL only into 32-bit executables called by a script, whereas
vglrun -64 {script}will preload VirtualGL only into 64-bit executables. So if, for instance, the setuid executable that the script is invoking is 32-bit and the application executable is 64-bit, then you could use
vglrun -64to launch the
application script.
13 Using VirtualGL with Applications That Manually Load OpenGL
The lion’s share of OpenGL applications are dynamically linked against libGL.so, and thus
libGL.sois automatically loaded whenever the application loads. Whenever
vglrunis used to launch such
applications, VirtualGL is loaded ahead of
libGL.so, meaning that OpenGL and GLX symbols are resolved from VirtualGL first and the “real” OpenGL library second.
However, some applications (particularly games) are not dynamically linked against
libGL.so. These applications typically call
dlopen()and
dlsym()later on in the program’s execution to manually
load OpenGL and GLX symbols from
libGL.so. Such applications also generally provide a mechanism (usually either an environment variable or a command line argument) which allows the user to specify a library that can be loaded instead of
libGL.so.
So let’s assume that you just downloaded the latest version of the Linux game Foo Wars from the Internet, and (for whatever reason) you want to run the game in a VNC session. The game provides a command line switch
-gwhich
can be used to specify an OpenGL library to load other than
libGL.so. You would launch the game using a command line such as this:
vglrun foowars -g /usr/lib/librrfaker.so
You still need to use
vglrunto launch the game, because VirtualGL must also intercept a handful of X11 calls. Using
vglrunallows VGL to intercept these calls, whereas using the game’s built-in mechanism
for loading a substitute OpenGL library allows VirtualGL to intercept the GLX and OpenGL calls.
In some cases, the application does not provide an override mechanism such as the above. In these cases, you should pass an argument of
-dlto
vglrunwhen starting the application. For example:
vglrun -dlfoowars
Passing
-dlto
vglrunforces another library to be loaded ahead of VirtualGL and
libGL.so. This new library intercepts any calls to
dlopen()and forces the application to open VirtualGL
instead of
libGL.so.
Chapter 15 contains specific recipes for getting a variety of games and other applications to work with
VirtualGL.
14 Using VirtualGL with Chromium and ModViz VGP
Chromium is a powerful framework for performing various types of parallel OpenGL rendering. It is usually used on clusters of commodity Linux PC’s to divide up the task of rendering scenes with large geometries or large pixel counts(such as when driving a display wall.) Chromium is most often used in one of three configurations:
Sort-First Rendering (Image-Space Decomposition)
Sort-First Rendering (Image-Space Decomposition) with Readback
Sort-Last Rendering (Object-Space Decomposition)
14.1 Configuration 1: Sort-First Rendering (Image-Space Decomposition)
Sort-First Rendering (Image-Space Decomposition) is used to overcome the fill rate limitations of individual graphics cards. When configured to use sort-first rendering, Chromium divides up the scene based on which polygons will be
visible in a particular section of the final image. It then instructs each node of the cluster to render only the polygons that are necessary to generate the image section (“tile”) for that node. This is primarily used to drive high-resolution displays that
would be impractical to drive from a single graphics card due to limitations in the card’s framebuffer memory, processing power, or both. Configuration 1 could be used, for instance, to drive a CAVE, video wall, or even an extremely high-resolution monitor.
In this configuration, each Chromium node generally uses all of its screen real estate to render a section of the multi-screen image.
VirtualGL is generally not very useful with Configuration 1. You could theoretically install a separate copy of VirtualGL on each display node and use it to redirect the output of each
crserverinstance to a separate VirtualGL
Client instance running on a multi-screen 2D X server elsewhere on the network. However, synchronizing the frames on the remote end would require modifications to VirtualGL. Such is left as an exercise for the reader.
14.2 Configuration 2: Sort-First Rendering (Image-Space Decomposition) with Readback
Configuration 2 uses the same sort-first principle as Configuration 1, except that each tile is only a fraction of a single screen, and the tiles are recombined into a single window on Node 0. This configuration is perhaps the least
often used of the three, but it is useful in cases where the scene contains a large amount of textures (such as in volume rendering) and thus rendering the whole scene on a single node would be prohibitively slow due to fill rate limitations.
In this configuration, the application is allowed to choose a visual, create an X window, and manage the window as it would normally do. However, all other OpenGL and GLX activity is intercepted by the Chromium App Faker (CrAppFaker)
so that the 3D rendering can be split up among the rendering nodes. Once each node has rendered its section of the final image, the image tiles get passed back to a Chromium Server (CrServer) process running on Node 0. This CrServer process attaches to the
previously-created application window and draws the pixels into the window using
glDrawPixels().
The general strategy for making this work with VirtualGL is to first make it work without VirtualGL and then insert VirtualGL only into the processes that run on Node 0. VirtualGL must be inserted into the CrAppFaker process to prevent
CrAppFaker from sending
glXChooseVisual()calls to the 2D X server (which would fail if this X server was a VNC session or otherwise did not support GLX.) VirtualGL must be inserted into the CrServer process on Node 0 to prevent it from sending
glDrawPixels()calls
to the 2D X server (which would similarly fail if the 2D X server didn’t support GLX and which would create a performance issue if the 2D X server was remote.) Instead, VirtualGL forces CrServer to draw into a Pbuffer, and VGL then takes charge of transmitting
the pixels from the Pbuffer to the 2D X server in the most efficient way possible.
Since Chromium uses
dlopen()to load the system’s OpenGL library, preloading VirtualGL into the CrAppFaker and CrServer processes using
vglrunis not sufficient. Chromium provides an environment variable,
CR_SYSTEM_GL_PATH,
which allows one to specify an alternate path to be searched for
libGL.so. The VirtualGL packages for Linux and Solaris include a symbolic link named
libGL.sowhich points to the VirtualGL faker library (
librrfaker.so).
This symbolic link is located in its own isolated directory, so that directory can be passed to Chromium in the
CR_SYSTEM_GL_PATHenvironment variable, and this will cause Chromium to load VirtualGL rather than the “real” OpenGL library. Refer
to the following table:
| 32-bit Applications | 64-bit Applications |
|---|---|
/opt/VirtualGL/fakelib | /opt/VirtualGL/fakelib/64 |
CR_SYSTEM_GL_PATHsetting required to use VirtualGL with Chromium
Running the CrServer in VirtualGL is simply a matter of setting this environment variable and then invoking
crserverwith
vglrun. For example:
export CR_SYSTEM_GL_PATH=/opt/VirtualGL/fakelib
vglrun crserver
In the case of CrAppFaker, it is also necessary to set
VGL_GLLIBto the location of the “real” OpenGL library (example:
/usr/lib/libGL.so.1.) CrAppFaker creates its own fake version of
libGL.sowhich
is really just a copy of Chromium’s
libcrfaker.so. So VirtualGL, if left to its own devices, will unwittingly try to load
libcrfaker.soinstead of the “real” OpenGL library. Chromium’s
libcrfaker.sowill, in turn, try
to load VirtualGL again, and an endless loop will occur.
Therefore, we must use the
CR_SYSTEM_GL_PATHenvironment variable to tell Chromium to pass OpenGL commands into VirtualGL, then we must use the
VGL_GLLIBenvironment variable to tell VirtualGL not to
pass OpenGL commands into Chromium:
export CR_SYSTEM_GL_PATH=/opt/VirtualGL/fakelib
export VGL_GLLIB=/usr/lib/libGL.so.1
crappfaker
CrAppFaker will copy the application into a temporary directory and then copy
libcrfaker.soto that same directory, renaming it as
libGL.so. So when the application is started, it loads
libcrfaker.soinstead
of
libGL.so.
libcrfaker.sowill then load VirtualGL instead of the “real” libGL, because we’ve overridden
CR_SYSTEM_GL_PATHto point to VirtualGL’s fake
libGL.so. VirtualGL will then use the library specified
in
VGL_GLLIBto make any “real” OpenGL calls that it needs to make.
NOTE:
crappfakershould not be invoked with
vglrun.
So, putting this all together, here is an example of how you might start a sort-first rendering job using Chromium and VirtualGL:
Start the mothership on Node 0 with an appropriate configuration for performing sort-first rendering with readback
Start
crserveron each of the rendering nodes
On Node 0, set the
CR_SYSTEM_GL_PATHenvironment variable to the appropriate value based on whether
crserverand
crappfakerwere compiled as 32-bit or 64-bit apps (see table
above)
On Node 0,
vglrun crserver &
On Node 0, set
VGL_GLLIBto the location of the “real” libGL (example:
/usr/lib/libGL.so.1or
/usr/lib64/libGL.so.1).
On Node 0, launch
crappfaker(do not use
vglrunhere)
Again, it’s always a good idea to make sure this works without VirtualGL before adding VirtualGL into the mix.
Using VirtualGL to Force Pbuffer Rendering
In the procedure above, VirtualGL can also be used on the rendering nodes to redirect the rendering commands fromcrserverinto a Pbuffer instead of a window. If you wish to do this, then perform the following procedure
in place of step 2 above:
On each of the rendering nodes,
set the
VGL_READBACKenvironment variable to
0
set the
CR_SYSTEM_GL_PATHenvironment variable to the appropriate value based on whether
crserverwas compiled as a 32-bit or 64-bit app on that node (see table above)
vglrun crserver
14.3 Configuration 3: Sort-Last Rendering (Object-Space Decomposition)
Sort-Last Rendering is used when the scene contains a huge number of polygons and the rendering bottleneck is processing all of that geometry on a single graphics card. In this case, each node runs a separate copy of the application,
and for best results, the application needs to be aware that it is running in a parallel environment so that it can give Chromium hints as to how to distribute the various objects to be rendered. Each node generates an image of a particular portion of the
object space, and these images must be composited in such a way that the front-to-back ordering of pixels is maintained. This is generally done by collecting Z buffer data from each node to determine whether a particular pixel on a particular node is visible
in the final image. The rendered images from each node are often composited using a “binary swap”, whereby the nodes combine their images in a cascading tree so that the overall compositing time is proportional to log2(N) rather than N.
To make this configuration work with VirtualGL:
Start the mothership on Node 0 with an appropriate configuration for performing sort-last rendering
Start
crappfakeron each of the rendering nodes
On Node 0, set the
CR_SYSTEM_GL_PATHenvironment variable to the appropriate value based on whether
crserverwas compiled as a 32-bit or a 64-bit app (see table in Section 14.2.)
On Node 0,
vglrun crserver
CRUT
The Chromium Utility Toolkit provides a convenient way for graphics applications to specifically take advantage of Chromium’s sort-last rendering capabilities. Such applications can use CRUT to explicitly specify how their object spaceshould be decomposed. CRUT applications require an additional piece of software,
crutserver, to be running on Node 0. Therefore, the following procedure should be used to make these applications work with VirtualGL:
Start the mothership on Node 0 with an appropriate configuration for performing sort-last rendering
Start
crappfakeron each of the rendering nodes
On Node 0, set the
CR_SYSTEM_GL_PATHenvironment variable to the appropriate value based on whether
crserverwas compiled as a 32-bit or a 64-bit app (see table in Section 14.2.)
On Node 0,
vglrun crutserver &
On Node 0,
vglrun crserver
14.4 A Note About Performance
Chromium’s use of X11 is generally not very optimal. It assumes a very fast connection between the 2D X server and the Chromium Server. In certain modes, Chromium polls the 2D X server on every frame to determine whether windows havebeen resized, etc. Thus, we have observed that, even on a fast network, Chromium tends to perform much better with VirtualGL running in a TurboVNC session as opposed to using the VGL Image Transport.
14.5 ModViz VGP v1.x and VirtualGL
ModViz Virtual Graphics PlatformTM is a polished commercial clustered rendering framework for Linux which supports all three of the rendering modes described above and provides a much more straightforward interface to configureand run these types of parallel rendering jobs.
All VGP jobs, regardless of configuration, are spawned through
vglauncher, a front-end program which automatically takes care of starting the appropriate processes on the rendering nodes, intercepting OpenGL calls from
the application instance(s), sending rendered images back to Node 0, and compositing the images as appropriate. In a similar manner to VirtualGL’s
vglrun, VGP’s
vglauncherpreloads a library (
libVGP.so) in place of
libGL.so,
and this library intercepts the OpenGL calls from the application.
So our strategy here is similar to our strategy for loading the Chromium App Faker. We want to insert VirtualGL between VGP and the real system OpenGL library, so that VGP will call VirtualGL and VirtualGL will call
libGL.so.
Achieving this with VGP is relatively simple:
export VGP_BACKING_GL_LIB=librrfaker.so
vglrun vglauncher --preload=librrfaker.so:/usr/lib/libGL.so {application}
Replace
/usr/lib/libGL.sowith the full path of your system’s OpenGL library (
/usr/lib64/libGL.soif you are launching a 64-bit application.)
NOTE: This is known not to work with VGP 2.0.
15 Other Application Recipes
| Application | Platform | Recipe | Notes |
|---|---|---|---|
| ANSA v12.1.0 | Linux/x86 | AddLD_PRELOAD_SAVE=$LD_PRELOAD export LD_PRELOAD= to the top of the ansa.shscript, then add export LD_PRELOAD=$LD_PRELOAD_SAVE just prior to the ${ANSA_EXEC_DIR}bin/ansa_linux${ext2} line. | The ANSA startup script directly invokes /lib/libc.so.6to query the glibc version. Since the VirtualGL faker depends on libc, preloading VirtualGL when directly invoking libc.so.6creates an infinite loop. So it is necessary to disable the preloading of VirtualGL in the application script and then re-enable it prior to launching the actual application. |
| Army Ops | Linux/x86 | vglrun -dlarmyops | See Chapter 13 for more details |
| AutoForm v4.0x | All | vglrun +sync xaf_ {version} | AutoForm relies on mixed X11/OpenGL rendering, and thus certain features (particularly the “Dynamic Section” dialog and “Export Image” feature) do not work properly unless VGL_SYNCis enabled. Since VGL_SYNCautomatically enables the X11 image transport and disables frame spoiling, it is highly recommended that you use TurboVNC when VGL_SYNCis enabled. See Section 19.1 for more details. |
| Cedega v6.0.x | Linux | Addexport LD_PRELOAD=librrfaker.so to the top of ~/.cedega/.winex_ver/winex-{version}/bin/winex3, then run Cedega as you would normally (without vglrun.) Since vglrunis not being used, it is necessary to use environment variables or the VirtualGL Configuration dialog to modify VirtualGL’s configuration. | The actual binary (WineX) which uses OpenGL is buried beneath several layers of Python and shell scripts. The LD_PRELOADvariable does not get propagated down from the initial shell that invoked vglrun. |
| Descent 3 | Linux/x86 | vglrun descent3 -g /usr/lib/librrfaker.so or vglrun -dldescent3 | See Chapter 13 for more details |
| Doom 3 | Linux/x86 | vglrun doom3 +set r_glDriver /usr/lib/librrfaker.so or vglrun -dldoom3 | See Chapter 13 for more details |
| Enemy Territory (Return to Castle Wolfenstein) | Linux/x86 | vglrun et +set r_glDriver /usr/lib/librrfaker.so or vglrun -dlet | See Chapter 13 for more details |
| Heretic II | Linux/x86 | vglrun heretic2 +set gl_driver /usr/lib/librrfaker.so +set vid_ref glx or vglrun -dlheretic2 +set vid_ref glx | See Chapter 13 for more details |
| Heavy Gear II | Linux/x86 | vglrun hg2 -o /usr/lib/librrfaker.so or vglrun -dlhg2 | See Chapter 13 for more details |
| HyperWorks v8 (Altair) | Linux/x86-64 | vglrun -dl {application script} | See Chapter 13 for more details. |
| Java2D applications that use OpenGL | Linux, Solaris | Java2D will use OpenGL to perform its rendering if sun.java2d.openglis set to True. For example: java -Dsun.java2d.opengl=True MyAppClass In order for this to work in VirtualGL, it is necessary to invoke vglrunwith the -dlswitch. For example: vglrun -dljava -Dsun.java2d.opengl=True MyAppClass If you are using Java v6 b92 or later, you can also set the environment variable J2D_ALT_LIBGL_PATHto the path of librrfaker.so. For example: setenv J2D_ALT_LIBGL_PATH /opt/VirtualGL/lib/librrfaker.so vglrun java -Dsun.java2d.opengl=True MyAppClass | See Chapter 13 for more details |
| Java2D applications that use OpenGL | Solaris/SPARC | When VirtualGL is used in conjunction with Java v5.0 (also known as Java 1.5.0) to remotely display Java2D applications using the OpenGL pipeline (see above), certain Java2D applications will cause the OpenGL subsystem to crash with the following error:thread tries to access GL context current to another thread If you encounter this error, try setting the SUN_OGL_IS_MTenvironment variable to 1and re-running the application. | Java 5.0 should call glXInitThreadsSUN()since it is using multiple OpenGL threads, but it doesn’t. Purely by chance, this doesn’t cause any problems when the application is displayed locally. However, VirtualGL changes things up enough that the luck runs out. This issue does not exist in Java 6. |
| Pro/ENGINEER Wildfire v2.0 | Solaris/SPARC | Addgraphics opengl to ~/config.pro. You may also need to set the VGL_XVENDORenvironment variable to "Sun Microsystems, Inc."if you are running Pro/ENGINEER 2.0 over a remote X connection to a Linux or Windows VirtualGL client. | Pro/E 2.0 for Solaris will disable OpenGL if it detects a remote connection to a non-Sun X server. |
| QGL (OpenGL Qt Widget) | Linux | vglrun -dl{application} | Qt can be built such that it either resolves symbols from libGL automatically or uses dlopen()to manually resolve those symbols from libGL. As of Qt v3.3, the latter behavior is the default, so OpenGL programs built with later versions of libQt will not work with VirtualGL unless the -dlswitch is used with vglrun. See Chapter 13 for more details |
| Quake 3 | Linux/x86 | vglrun quake3 +set r_glDriver /usr/lib/librrfaker.so or vglrun -dlquake3 | See Chapter 13 for more details |
| Soldier of Fortune | Linux/x86 | vglrun sof +set gl_driver /usr/lib/librrfaker.so or vglrun -dlsof | See Chapter 13 for more details |
| Unreal Tournament 2004 | Linux/x86 | vglrun -dlut2004 | See Chapter 13 for more details |
| Wine | Linux | vglrun -dlwine {windows_opengl_app.exe} | See Chapter 13 for more details |
16 Advanced OpenGL Features
16.1 Stereographic Rendering
Stereographic rendering is a feature of OpenGL that creates separate rendering buffers for the left and right eyes and allows the application to render a different image into each buffer. How the stereo images are subsequently displayeddepends on the particulars of the 3D hardware and the user’s environment. VirtualGL can support stereographic applications in one of two ways: (1) by sending the stereo image pairs to the client to be displayed in stereo by the client’s 3D graphics card, or
(2) by combining each stereo image pair into a single anaglyph that can be viewed with traditional red/cyan 3D glasses.
16.1.1 Quad-Buffered Stereo
The name “quad-buffered” stereo derives from the fact that OpenGL uses four buffers (left front, right front, left back, and right back) to support stereographic rendering with double buffering. 3D graphics cards with quad-bufferedstereo capabilities generally provide some sort of synchronization signal that can be used to control various types of active stereo 3D glasses. Some also support “passive stereo”, which requires displaying the left and right eye buffers to different monitor
outputs. VirtualGL supports true quad-buffered stereo by rendering the stereo images on the server and sending the image pairs across the network to be displayed by a 3D graphics card on the client.
In most cases, the VirtualGL Client and TurboVNC Viewer use only 2D drawing commands, thus eliminating the need for a 3D graphics card on the client machine. But drawing stereo images requires a 3D graphics card, so such a card must
be present in any client machine that will use VirtualGL’s quad-buffered stereo feature. Since the 3D graphics card is only being used to draw images, it need not necessarily be a high-end card. Generally, the least expensive 3D graphics card that has stereo
capabilities will work fine in a VirtualGL client machine.
The VirtualGL server must also have a 3D graphics card that supports stereo, since this is the only way that VirtualGL can obtain a stereo Pbuffer. When an application tries to render something in stereo, VirtualGL will (by default)
use quad-buffered stereo rendering if:
The client supports OpenGL (Exceed 3D is required for Windows clients)
The client has stereo rendering capabilities
The server has stereo rendering capabilities
If one or more of these is not true, then VirtualGL will fall back to using anaglyphic stereo (see below.) It is usually necessary to explicitly enable stereo in the graphics driver configuration for both the client and server machines.
The Troubleshooting section below lists a way to verify that both client and server have stereo visuals
available.
In quad-buffered mode, VirtualGL reads back both eye buffers on the server and sends the contents as a pair of compressed images (one for each eye) to the VirtualGL Client. The VirtualGL Client then decompresses both images and draws
them as a single stereo frame to the client machine’s X display using
glDrawPixels(). It should thus be no surprise that enabling quad-buffered stereo in VirtualGL decreases performance by 50% or more and uses twice the network bandwidth to maintain
the same frame rate as mono.
Quad-buffered stereo requires the VGL Image Transport. If any other image transport is used, then VGL will fall back to anaglyphic stereo mode.
16.1.2 Anaglyphic Stereo
Anaglyphic stereo is the type of stereographic display used by old 3D movies. It generally relies on a set of 3D glasses consisting of red transparency film over the left eye and cyan transparency film over the right eye. To generatea 3D anaglyph, the red color data from the left eye buffer is combined with the green and blue color data from the right eye buffer, thus allowing a single monographic image to contain stereo data. From the point of view of VirtualGL, an anaglyphic image is
the same as a monographic image, so anaglyphic stereo images can be sent using any image transport to any type of client, regardless of the client’s capabilities.
VirtualGL uses anaglyphic stereo if it detects that an application has rendered something in stereo but quad-buffered stereo is not available, either because the client doesn’t support it or because a transport other than the VGL Image
Transport is being used. Anaglyphic stereo provides a cheap and easy way to view stereographic applications in X proxies and on clients that do not support quad-buffered stereo. Additionally, anaglyphic stereo performs much faster than quad-buffered stereo,
since it does not require sending twice the data to the client.
As with quad-buffered stereo, anaglyphic stereo requires that the VirtualGL server have stereo rendering capabilities. However, anaglyphic stereo does not require any 3D rendering capabilities (stereo or otherwise) on the client machine.
16.1.3 Selecting a Stereo Mode
A particular stereo mode can be selected by setting theVGL_STEREOenvironment variable or by using the
-stargument to
vglrun. See Section 19.1 for
more details.
16.2 Transparent Overlays
Transparent overlays have similar requirements and restrictions as quad-buffered stereo. In this case, VirtualGL completely bypasses its own GLX faker and uses indirect OpenGL rendering to render the transparent overlay on the clientmachine’s 3D graphics card. The underlay is still rendered on the server, as always. Using indirect rendering to render the overlay is unfortunately necessary, because there is no reliable way to draw to an overlay using 2D (X11) functions, there are severe
performance issues (on some cards) with using
glDrawPixels()to draw to the overlay, and there is no reasonable way to composite the overlay and underlay on the VirtualGL server.
The use of overlays is becoming more and more infrequent, and when they are used, it is generally only for drawing small, simple, static shapes and text. We have found that it is often faster to ship the overlay geometry over to the
client rather than to render it as an image and send the image. So even if it were possible to implement overlays without using indirect rendering, it is likely that indirect rendering of overlays would still be the fastest approach for most applications.
As with quad-buffered stereo, overlays must be explicitly enabled in the graphics driver configuration. In the case of overlays, however, they need only be supported and enabled on the client machine. Some graphics drivers are known
to disallow using both quad-buffered stereo and overlays at the same time.
Indexed color (8-bit) overlays have been tested and are known to work with VirtualGL. True color (24-bit) overlays work, in theory, but have not been tested. Use
glxinfo(see Troubleshooting below)
to verify whether your client’s X display supports overlays and whether they are enabled. In Exceed 3D, make sure that the “Overlay Support” option is checked in the “Exceed 3D and GLX” applet:
Overlays do not work with X proxies (including TurboVNC.) VirtualGL must be displaying to a “real” X server.
16.3 Indexed (PseudoColor) Rendering
In a PseudoColor visual, each pixel is represented by an index which refers to a location in a color table. The color table stores the actual color values (256 of them in the case of 8-bit PseudoColor) which correspond to each index.An application merely tells the X server which color index to use when drawing, and the X server takes care of mapping that index to an actual color from the color table. OpenGL allows for rendering to Pseudocolor visuals, and it does so by being intentionally
ignorant of the relationship between indices and actual colors. As far as OpenGL is concerned, each color index value is just a meaningless number, and it is only when the final image is drawn by the X server that these numbers take on meaning. As a result,
many pieces of OpenGL’s core functionality either have undefined behavior or do not work at all with PseudoColor rendering. PseudoColor rendering used to be a common technique for visualizing scientific data, because such data often only contained 8 bits per
sample to begin with. Applications could manipulate the color table to allow the user to dynamically control the relationship between sample values and colors. As more and more graphics cards drop support for PseudoColor rendering, however, the applications
which use it are becoming a vanishing breed.
VirtualGL supports PseudoColor rendering if a PseudoColor visual is available on the 2D X server or X proxy. A PseudoColor visual need not be present on the application server. On the application server, VirtualGL uses the red channel
of a standard RGB Pbuffer to store the color index. Upon receiving an end of frame trigger, VirtualGL reads back the red channel of the Pbuffer and uses
XPutImage()to draw the color indices into the appropriate X window. To put this another way,
PseudoColor rendering in VirtualGL always uses the X11 Image Transport. However, since there is only 1 byte per pixel in a PseudoColor “image”, the images can still be sent to the client reasonably quickly even though they are uncompressed.
VirtualGL’s PseudoColor rendering mode works with TurboVNC, provided that the TurboVNC server is configured to use an 8-bit color depth. Note, however, that VNC cannot provide both PseudoColor and TrueColor visuals at the same time.
16.4 Troubleshooting
VirtualGL includes a modified version of glxinfothat can be used to determine whether or not the client and server have stereo, overlay, or Pseudocolor visuals enabled.
Run one of the following command sequences on the VirtualGL server to determine whether the server has a suitable visual for stereographic rendering:
Solaris VirtualGL servers (using GLP)
/opt/VirtualGL/bin/glxinfo -d{glp_device} -vLinux and Solaris VirtualGL servers (not using GLP)
xauth merge /etc/opt/VirtualGL/vgl_xauth_key
/opt/VirtualGL/bin/glxinfo -display :0 -c-v
One or more of the visuals should say “stereo=1” and should list “Pbuffer” as one of the “Drawable Types.”
Run the following command sequence on the VirtualGL server to determine whether the X display on the client has a suitable visual for stereographic rendering, transparent overlays, or Pseudocolor.
/opt/VirtualGL/bin/glxinfo -v
In order to use stereo, one or more of the visuals should say “stereo=1”. In order to use transparent overlays, one or more of the visuals should say “level=1”, should list a “Transparent Index” (non-transparent visuals will say “Opaque”
instead), and should have a class of “PseudoColor.” In order to use PseudoColor (indexed) rendering, one of the visuals should have a class of “PseudoColor.”
17 Performance Measurement
17.1 VirtualGL’s Built-In Profiling System
The easiest way to uncover bottlenecks in VirtualGL’s image pipelines is to set the VGL_PROFILEenvironment variable to
1on both server and client (passing an argument of
+prto
vglrunon
the server has the same effect.) This will cause VirtualGL to measure and report the throughput of the various stages in the pipeline. For example, here are some measurements from a dual Pentium 4 server communicating with a Pentium III client on a 100 Megabit
LAN:
Server
Readback   - 43.27 Mpixels/sec - 34.60 fps
Compress 0 - 33.56 Mpixels/sec - 26.84 fps
Total      -  8.02 Mpixels/sec -  6.41 fps - 10.19 Mbits/sec (18.9:1)
Client
Decompress - 10.35 Mpixels/sec -  8.28 fps
Blit       - 35.75 Mpixels/sec - 28.59 fps
Total      -  8.00 Mpixels/sec -  6.40 fps - 10.18 Mbits/sec (18.9:1)
The total throughput of the pipeline is 8.0 Megapixels/sec, or 6.4 frames/sec, indicating that our frame is 8.0 / 6.4 = 1.25 Megapixels in size (a little less than 1280 x 1024 pixels.) The readback and compress stages, which occur
in parallel on the server, are obviously not slowing things down, and we’re only using 1/10 of our available network bandwidth. Looking at the client, however, we discover that its slow decompression speed (10.35 Megapixels/second) is the primary bottleneck.
Decompression and blitting on the client cannot be done in parallel, so the aggregate performance is the harmonic mean of the decompression and blitting rates: [1/ (1/10.35 + 1/35.75)] = 8.0 Mpixels/sec. In this case, we could improve the performance
of the whole system by simply using a client with a faster CPU.
17.2 Frame Spoiling
By default, VirtualGL will only send a frame to the client if the client is ready to receive it. If a rendered frame arrives at the server’s queue and there are frames waiting in the queue to be processed, then those unprocessed framesare dropped (“spoiled”) and the new frame is promoted to the head of the queue. This prevents a backlog of frames on the server, which would cause a perceptible delay in the responsiveness of interactive applications. However, when running non-interactive
applications, particularly benchmarks, frame spoiling should always be disabled. With frame spoiling disabled, the server will render frames only as quickly as VirtualGL can send those frames to the client, which will conserve server resources as well as allow
OpenGL benchmarks to accurately measure the frame rate of the VirtualGL system. With frame spoiling enabled, OpenGL benchmarks will report meaningless data, since the rate at which the server can render frames is decoupled from the rate at which VirtualGL
can send those frames to the client.
In a VNC environment, there is another layer of frame spoiling, since the server only sends updates to the client when the client requests them. Thus, even if frame spoiling is disabled in VirtualGL, OpenGL benchmarks will still report
inaccurate data if they are run in a VNC session. TCBench, described below, provides a limited solution to this problem.
To disable frame spoiling, set the
VGL_SPOILenvironment variable to
0on the VirtualGL server or pass an argument of
-spto
vglrun. See Section 19.1 for
more details.
17.3 VirtualGL Diagnostic Tools
VirtualGL includes several tools which can be useful in diagnosing performance problems with the system.NetTest
NetTest is a network benchmark that uses the same network I/O classes as VirtualGL. It can be used to test the latency and throughput of any TCP/IP connection, with or without SSL encryption.nettestcan be found in
/opt/VirtualGL/binon
Linux/Mac/Solaris VirtualGL installations or in
c:\program files\VirtualGL-{version}-{build} on Windows installations.To use NetTest, first start up the NetTest server on one end of the connection:
nettest -server [-ssl]
(Use
-sslif you want to test the performance of SSL encryption over this particular connection.)
Next, start the client on the other end of the connection:
nettest -client {server} [-ssl](Replace
{server} with the hostname or IP address of the machine where the NetTest server is running. Use -sslif the NetTest server is running in SSL mode.)
The NetTest client will produce output similar to the following:
TCP transfer performance between localhost and {server}:

Transfer size  1/2 Round-Trip      Throughput      Throughput
(bytes)                (msec)        (MB/sec)     (Mbits/sec)
1                    0.093402        0.010210        0.085651
2                    0.087308        0.021846        0.183259
4                    0.087504        0.043594        0.365697
8                    0.088105        0.086595        0.726409
16                   0.090090        0.169373        1.420804
32                   0.093893        0.325026        2.726514
64                   0.102289        0.596693        5.005424
128                  0.118493        1.030190        8.641863
256                  0.146603        1.665318       13.969704
512                  0.205092        2.380790       19.971514
1024                 0.325896        2.996542       25.136815
2048                 0.476611        4.097946       34.376065
4096                 0.639502        6.108265       51.239840
8192                 1.033596        7.558565       63.405839
16384                1.706110        9.158259       76.825049
32768                3.089896       10.113608       84.839091
65536                5.909509       10.576174       88.719379
131072              11.453894       10.913319       91.547558
262144              22.616389       11.053931       92.727094
524288              44.882406       11.140223       93.450962
1048576             89.440702       11.180592       93.789603
2097152            178.536997       11.202160       93.970529
4194304            356.754396       11.212195       94.054712
We can see that the throughput peaks at about 94 megabits/sec, which is pretty good for a 100 Megabit connection. We can also see that, for small transfer sizes, the round-trip time is dominated by latency. The “latency” is the same
thing as the one-way (1/2 round-trip) transit time for a zero-byte packet, which is about 93 microseconds in this case.
CPUstat
CPUstat is available only in the VirtualGL Linux packages and is located in the same place as NetTest (/opt/VirtualGL/bin.) It measures the average, minimum, and peak CPU usage for all processors combined and for each
processor individually. On Windows, this same functionality is provided in the Windows Performance Monitor, which is part of the operating system. On Solaris, the same data can be obtained through
vmstat.
CPUstat measures the CPU usage over a given sample period (a few seconds) and continuously reports how much the CPU was utilized since the last sample period. Output for a particular sample looks something like this:
ALL :  51.0 (Usr= 47.5 Nice=  0.0 Sys=  3.5) / Min= 47.4 Max= 52.8 Avg= 50.8
cpu0:  20.5 (Usr= 19.5 Nice=  0.0 Sys=  1.0) / Min= 19.4 Max= 88.6 Avg= 45.7
cpu1:  81.5 (Usr= 75.5 Nice=  0.0 Sys=  6.0) / Min= 16.6 Max= 83.5 Avg= 56.3
The first column indicates what percentage of time the CPU was active since the last sample period (this is then broken down into what percentage of time the CPU spent running user, nice, and system/kernel code.) “ALL” indicates the
average utilization across all CPUs since the last sample period. “Min”, “Max”, and “Avg” indicate a running minimum, maximum, and average of all samples since CPUstat was started.
Generally, if an application’s CPU usage is fairly steady, you can run CPUstat for a bit and wait for the Max. and Avg. for the “ALL” category to stabilize, then that will tell you what the application’s peak and average % CPU utilization
is.
TCBench
TCBench was born out of the need to compare VirtualGL’s performance to that of other thin client packages, some of which had frame spoiling features that couldn’t be disabled. TCBench measures the frame rate of a thin client systemas seen from the client’s point of view. It does this by attaching to one of the client windows and continuously reading back a small area at the center of the window. While this may seem to be a somewhat non-rigorous test, experiments have shown that if care
is taken to ensure that the application is updating the center of the window on every frame (such as in a spin animation), TCBench can produce quite accurate results. It has been sanity checked with VirtualGL’s internal profiling mechanism and with a variety
of system-specific techniques, such as monitoring redraw events on the client’s windowing system.
TCBench can be found in
/opt/VirtualGL/binon Linux/Mac/Solaris or in
c:\program files\VirtualGL-{version}-{build} on Windows. Run tcbenchfrom the command line, and it will prompt you to click
in the window you want to benchmark. That window should already have an automated animation of some sort running before you launch TCBench. Note that GLXSpheres (see below) is an ideal benchmark to use with TCBench, since GLXSpheres draws a new sphere to the
center of its window on every frame.
TCBench can also be used to measure the frame rate of applications that are running on the local display, although for extremely fast applications (those that exceed 40 fps on the local display), you may need to increase the sampling
rate of TCBench to get accurate results. The default sampling rate of 50 samples/sec should be fine for measuring the throughput of VirtualGL and other thin client systems.
tcbench -?
lists the relevant command line switches, which can be used to adjust the benchmark time, the sampling rate, and the x and y offset of the sampling area within the window.
GLXSpheres
GLXSpheres is a benchmark which produces very similar images to NVidia’s (long discontinued) SphereMark benchmark. Back in the early days of VirtualGL’s existence, it was discovered (quite by accident) that SphereMark was a prettygood test of VirtualGL’s end-to-end performance, because that benchmark generated images with about the same proportion of solid color and similar frequency components to the images generated by volume visualization applications.
Thus, the goal of GLXSpheres was to create an open source Unix version of SphereMark (the original SphereMark was for Windows only) completely from scratch. GLXSpheres does not use any code from the original benchmark, but it does
attempt to mimic the image output of the original as closely as possible. GLXSpheres lacks some of the advanced rendering features of the original, such as the ability to use vertex arrays, but since it was primarily designed as a benchmark for VirtualGL,
display lists are more than fast enough for that purpose.
GLXSpheres has some additional modes which its predecessor lacked, modes which are designed specifically to test the performance of various VirtualGL features:
Stereographic rendering (
glxspheres -s)
Color index rendering (
glxspheres -c)In color index mode, GLXSpheres will draw the spheres using an 8-bit color map and will change the color map periodically.
Overlay rendering (
glxspheres -o)This renders text, a moving crosshair cursor, and a block of pixels to an 8-bit transparent overlay while animating the spheres on the underlay. The color map of the overlay is changed periodically.
Immediate mode rendering (
glxspheres -m)Want to really see the benefit of VirtualGL? Run
glxspheres -mover a remote X connection, then run
vglrun -sp glxspheres -mover the same connection and compare. Immediate mode does not use display lists, so
when immediate mode OpenGL is rendered indirectly (over a remote X connection), this causes every OpenGL command to be sent as a separate network request to the X server … on every frame. Many applications cannot use display lists, because the geometry they
are rendering is dynamic, so this models how such applications might perform when displayed remotely without VirtualGL.
Interactive mode (
glxspheres -i)In interactive mode, GLXSpheres will wait to draw a frame until it receives a mouse event. Continuously dragging the mouse in the window should produce a steady frame rate, and this frame rate is a reasonable model of the frame rate
that you can achieve when running interactive applications in VirtualGL. Comparing this interactive frame rate (
vglrun glxspheres -i) with the non-interactive frame rate (
vglrun -sp glxspheres) allows you to quantify the effect of
X latency on the performance of interactive applications in a VirtualGL environment.
GLXSpheres is installed in
/opt/VirtualGL/binon Linux and Solaris VirtualGL servers. 64-bit VirtualGL packages contain both a 32-bit version (
glxpheres) and a 64-bit version (
glxspheres64.)
18 The VirtualGL Configuration Dialog
Several of VirtualGL’s configuration parameters can be changed on the fly once a 3D application has been started. This is accomplished by using the VirtualGL Configuration dialog, which can be popped up by holding down the CTRLand
SHIFTkeys
and pressing the
F9key while any one of the 3D application’s windows is active. This displays the following dialog box:
You can use this dialog to adjust various image compression and display parameters in VirtualGL. Changes are reflected immediately in the application.
Image Compression (Transport)This is a drop-down gadget with the following options:
None (X11 Transport) : equivalent to setting
VGL_COMPRESS=proxy. This option can be activated at any time, regardless of which transport was active when VirtualGL started.
JPEG (VGL Transport) : equivalent to setting
VGL_COMPRESS=jpeg. This option is only available if the VGL Image Transport was active when VirtualGL started.
RGB (VGL Transport) : equivalent to setting
VGL_COMPRESS=rgb. This option is only available if the VGL Image Transport was active when VirtualGL started.
DPCM (Sun Ray Transport) : equivalent to setting
VGL_COMPRESS=sr. This option is only available if the Sun Ray Image Transport was active when VirtualGL started.
RGB (Sun Ray Transport) : equivalent to setting
VGL_COMPRESS=srrgb. This option is only available if the Sun Ray Image Transport was active when VirtualGL started.
YUV (Sun Ray Transport) : equivalent to setting
VGL_COMPRESS=sryuv. This option is only available if the Sun Ray Image Transport was active when VirtualGL started.
See Section 19.1 for more information about the
VGL_COMPRESSconfiguration option and its various parameters.
Chrominance SubsamplingThis drop-down gadget is active only when using JPEG, Sun Ray DPCM, or Sun Ray YUV compression. It has the following options:
Grayscale : equivalent to setting
VGL_SUBSAMP=gray. Available only with JPEG compression.
1X : equivalent to setting
VGL_SUBSAMP=1x
2X : equivalent to setting
VGL_SUBSAMP=2x
4X : equivalent to setting
VGL_SUBSAMP=4x
8X : equivalent to setting
VGL_SUBSAMP=8x. Available only with Sun Ray DPCM or YUV compression.
16X : equivalent to setting
VGL_SUBSAMP=16x. Available only with Sun Ray DPCM or YUV compression.
See Section 19.1 for more information about the
VGL_SUBSAMPconfiguration option and its various parameters.
JPEG Image QualityThis slider gadget is active only when using JPEG compression. It is the equivalent of setting
VGL_QUAL. See Section 19.1 for
more information about the
VGL_QUALconfiguration option.
Connection ProfileThis drop-down gadget is active only if the VGL Image Transport was active when VirtualGL started. It has the following options:
Low Qual (Low-Bandwidth Network) : Sets the image compression type to JPEG (VGL Transport), sets the Chrominance Subsampling to 4X, and sets the JPEG Image Quality to 30.
Medium Qual : Sets the image compression type to JPEG (VGL Transport), sets the Chrominance Subsampling to 2X, and sets the JPEG Image Quality to 80.
High Qual (High-Bandwidth Network) : Sets the image compression type to JPEG (VGL Transport), sets the Chrominance Subsampling to 1X, and sets the JPEG Image Quality to 95.
Gamma Correction FactorThis floating point input gadget is the equivalent of setting
VGL_GAMMA. If using a gamma-corrected visual (SPARC clients only), then this gadget has no effect. Otherwise, it enables VirtualGL’s internal gamma correction
system with the specified gamma correction factor. See Section 19.1 for more information about the
VGL_GAMMAconfiguration
option.
Frame SpoilingThis toggle button is the equivalent of setting
VGL_SPOIL. See Section 17.2 and Section 19.1 for
more information about the
VGL_SPOILconfiguration option.
Interframe ComparisonThis toggle button is the equivalent of setting
VGL_INTERFRAME. See Section 19.1 for more information
about the
VGL_INTERFRAMEconfiguration option.
Stereographic Rendering MethodThis drop-down gadget has the following options:
Send Left Eye Only : equivalent to setting
VGL_STEREO=left.
Send Right Eye Only : equivalent to setting
VGL_STEREO=right
Quad-Buffered (if available) : equivalent to setting
VGL_STEREO=quad
Anaglyphic (Red/Cyan) : equivalent to setting
VGL_STEREO=rc
See Section 19.1 for more information about the
VGL_STEREOconfiguration option and its various parameters.
Limit Frames/secondThis floating point input gadget is the equivalent of setting
VGL_FPS. See Section 19.1 for more information
about the
VGL_FPSconfiguration option.
You can set the
VGL_GUIenvironment variable to change the key sequence used to pop up the VirtualGL Configuration dialog. If the default of
CTRL-SHIFT-F9is not suitable, then set
VGL_GUIto
any combination of
ctrl,
shift,
alt, and one of
f1, f2,..., f12(these are not case sensitive.) For example:
export VGL_GUI=CTRL-F9
will cause the dialog box to pop up whenever
CTRL-F9is pressed.
To disable the VirtualGL dialog altogether, set
VGL_GUIto
none.
VirtualGL monitors the application’s X event loop to determine whenever a particular key sequence has been pressed. If an application is not monitoring key press events in its X event loop,
then the VirtualGL Configuration dialog might not pop up at all. There is unfortunately no workaround for this, but it should be a rare occurrence.
19 Advanced Configuration
19.1 Server Settings
You can control the operation of the VirtualGL faker in four different ways. Each method of configuration takes precedence over the previous method:Setting a configuration environment variable globally (for instance, in
/etc/profile)
Setting a configuration environment variable on a per-user basis (for instance, in
~/.bashrc)
Setting a configuration environment variable only for the current shell session (for instance,
export VGL_XXX={whatever})Passing a configuration option as an argument to
vglrun. This effectively overrides any previous environment variable setting corresponding to that configuration option.
| Environment Variable | VGL_CLIENT = {c} |
vglrunargument | -cl {c} |
| Summary | {c} = the hostname or IP address of the VirtualGL client machine or Sun Ray server |
| Image Transports | Sun Ray, VGL |
| Default Value | Automatically set by vglconnector vglrun |
VGL_CLIENTshould be set to the hostname or IP address of the machine on which
vglclientis running. When using the Sun Ray Image Transport,
VGL_CLIENTshould
be set to the hostname or IP address of the Sun Ray server. Normally,
VGL_CLIENTis set automatically by the
vglconnector
vglrunscript, so don’t override it unless you know what you’re doing.
| Environment Variable | VGL_COMPRESS = proxy | jpeg | rgb | sr | srrgb | sryuv |
vglrunargument | -c proxy | jpeg | rgb | sr | srrgb | sryuv |
| Summary | Set image transport and image compression type |
| Image Transports | All |
| Default Value | (See description) |
jpeg = Compress images using JPEG and send using the VGL Image Transport. This is useful when displaying to a remote 2D X server (see Chapter 8.)
rgb = Encode images as uncompressed RGB and send using the VGL Image Transport. This is useful when displaying to a remote 2D X server or X proxy across a very fast network (see Section 9.2.)
sr = Compress images using the Sun Ray default compression method (DPCM) and send using the Sun Ray Image Transport. This requires that the proprietary Sun Ray plugin be installed on the VirtualGL server. (see Chapter 11.)
srrgb = Encode images as uncompressed RGB and send using the Sun Ray Image Transport. This requires that the proprietary Sun Ray plugin be installed on the VirtualGL server (see Chapter 11.)
sryuv = Encode images as uncompressed YUV and send using the Sun Ray Image Transport. This requires that the proprietary Sun Ray plugin be installed on the VirtualGL server (see Chapter 11.)
If this option is not specified, then the default is set as follows:
If the 2D X server is a Sun Ray server and the Sun Ray plugin is installed on the VirtualGL server, then VGL will default to using sr compression. VGL will fall back to using proxy compression if, for any given frame, it is unable to send
the frame using the Sun Ray Image Transport. This could occur if, for example, the Sun Ray client is on a network that is not visible to the VirtualGL server.
If the 2D X server is not a Sun Ray server but the
DISPLAYenvironment variable begins with
:or
unix:, then VirtualGL assumes that the X display connection is local and it defaults to using proxy compression.
Otherwise, it defaults to jpeg compression.
| Environment Variable | VGL_DISPLAY = {d} |
vglrunargument | -d {d} |
| Summary | {d} = the X display or GLP device to use for 3D rendering |
| Image Transports | All |
| Default Value | :0 |
VGL_DISPLAY=:1.0or whatever. This could be used, for instance, to support
many application instances on a beefy multi-pipe application server.
GLP mode (Solaris/SPARC only):
Setting this option to
glpwill enable GLP mode and use the first framebuffer device listed in
/etc/dt/config/GraphicsDevicesto perform 3D rendering. You can also set this option to the pathname of a specific GLP device (example:
/dev/fbs/jfb0.)
See Section 6.1 for more details.
| Environment Variable | VGL_FPS = {f} |
vglrunargument | -fps {f} |
| Summary | Limit the client/server frame rate to {f} frames/second, where {f} is a floating point number > 0.0 |
| Image Transports | VGL, X11 |
| Default Value | 0.0 (No limit) |
constrained.
If frame spoiling is disabled, then this effectively limits the server’s 3D rendering frame rate as well.
| Environment Variable | VGL_GAMMA = 0 | 1 | {g} |
vglrunargument | -g/ +g/ -gamma {g} |
| Summary | Disable/enable gamma correction and specify gamma correction factor |
| Image Transports | All |
| Default Value | VGL_GAMMA=1on Solaris/SPARC VGL servers, VGL_GAMMA=0otherwise |
where X is between 0 and 1. G is called the “gamma” of the monitor. PC monitors and TV’s usually have a gamma of around 2.2.
Some of the math involved in 3D rendering assumes a linear gamma (G = 1.0), so technically speaking, 3D applications will not display with mathematical correctness unless the pixels are “gamma corrected” to counterbalance the non-linear response curve of the
monitor. However, some systems do not have any form of built-in gamma correction, so the applications developed for such systems have usually been designed to display properly without gamma correction. Gamma correction involves passing pixels through a function
of the form X = W1/G, where G is the “gamma correction factor” and should be equal to the gamma of the monitor. So the final output is Y = XG = (W1/G)G = W, which describes a linear relationship
between the intensity of the pixels drawn by the application and the intensity of the pixels displayed by the monitor.
VGL_GAMMA=1or
vglrun +g: Enable gamma correction with default settings
This option tells VirtualGL to enable gamma correction using the best available method. If VirtualGL is remotely displaying to a Solaris/SPARC X server which has gamma-corrected X visuals, then VGL will attempt to assign one of these visuals to the application.
This causes the 3D output of the application to be gamma corrected by the factor specified in
fbconfigon the client machine (default: 2.22.) Otherwise, if the 2D X server does not have gamma-corrected X visuals or if the gamma-corrected visuals
it has do not match the application’s needs, then VirtualGL performs gamma correction internally and uses a default gamma correction factor of 2.22. This option emulates the default behavior of OpenGL applications running locally on SPARC machines.
VGL_GAMMA=0or
vglrun -g: Disable gamma correction
This option tells VGL not to use gamma-corrected visuals, even if they are available on the 2D X server, and disables VGL’s internal gamma correction system as well. This emulates the default behavior of OpenGL applications running locally on Linux or Solaris/x86
machines.
VGL_GAMMA=
{g} or vglrun -gamma
{g} : Enable VGL’s internal gamma correction system with a gamma correction factor of {g}If
VGL_GAMMAis set to an arbitrary floating point value, then VirtualGL performs gamma correction internally using the specified value as the gamma correction factor. You can also specify a negative value to apply a “de-gamma” function. Specifying
a gamma correction factor of G (where G < 0) is equivalent to specifying a gamma correction factor of -1/G.
| Environment Variable | VGL_GLLIB = {l} |
| Summary | {l} = the location of an alternate OpenGL library |
| Image Transports | All |
/usr/lib/libGL.so.1,
/usr/lib64/libGL.so.1, or
/usr/lib/64/libGL.so.1.) You can use this
setting to explicitly specify another OpenGL dynamic library to load.
You shouldn’t need to muck with this unless something doesn’t work. However, setting this environment variable is necessary when using VirtualGL with Chromium.
| Environment Variable | VGL_GUI = {k} |
| Summary | {k} = the key sequence used to pop up the VirtualGL Configuration dialog, or noneto disable the dialog |
| Image Transports | All |
| Default Value | shift-ctrl-f9 |
CTRL-SHIFT-F9is pressed. In the event that this interferes with a key sequence that the application is
already using, then you can redefine the key sequence used to pop up the VirtualGL Configuration dialog by setting
VGL_GUIto some combination of
shift,
ctrl,
alt, and one of
f1, f2, ..., f12.
You can also set
VGL_GUIto
noneto disable the configuration dialog altogether. See Chapter 18 for more details.
| Environment Variable | VGL_INTERFRAME = 0 | 1 |
| Summary | Enable or disable interframe image comparison |
| Image Transports | Sun Ray, VGL |
| Default Value | Enabled |
VGL_INTERFRAMEto
0disables this behavior.
This setting was introduced in order to work around a specific application interaction issue, but since a proper fix for that issue was introduced in VirtualGL 2.1.1, this option isn’t really useful anymore.
When using the VGL Image Transport, interframe comparison is affected by the
VGL_TILESIZEoption
| Environment Variable | VGL_LOG = {l} |
| Summary | Redirect all messages from VirtualGL to a log file specified by {l} |
| Image Transports | All |
| Default Value | Print all messages to stderr |
| Environment Variable | VGL_NPROCS = {n} |
vglrunargument | -np {n} |
| Summary | {n} = the number of CPUs to use for multi-threaded compression |
| Image Transports | VGL |
| Default Value | 1 |
VirtualGL will not allow more than 4 processors total to be used for compression, nor will it allow you to set this parameter to a value greater than the number of processors in the system.
Multi-threaded compression is affected by the
VGL_TILESIZEoption
| Environment Variable | VGL_PORT = {p} |
vglrunargument | -p {p} |
| Summary | {p} = the TCP port to use when connecting to the VirtualGL Client |
| Image Transports | VGL |
| Default Value | Read from X property stored by VirtualGL Client |
vglclientstores on the 2D X server, so don’t override this unless you know what you’re doing.
| Environment Variable | VGL_PROFILE = 0 | 1 |
vglrunargument | -pr/ +pr |
| Summary | Disable/enable profiling output |
| Image Transports | All |
| Default Value | Disabled |
See Chapter 17 for more details.
| Environment Variable | VGL_QUAL = {q} |
vglrunargument | -q {q} |
| Summary | {q} = the JPEG compression quality, 1 <= {q} <= 100 |
| Image Transports | VGL (JPEG) |
| Default Value | 95 |
of both low-frequency and high-frequency components, whereas images with smooth transitions between neighboring pixels contain only low-frequency components. JPEG compression works by breaking down the image into its constituent frequencies and then throwing
out the highest of these frequencies. The JPEG image “quality” determines which frequencies are thrown out. A JPEG quality of 1 throws out all but the lowest frequencies and thus produces a very impressionistic, but generally not very useful, compressed image.
A JPEG quality of 100 retains all frequencies in the original image (but, due to roundoff errors, the compressed image is still not completely lossless.)
Because the human eye usually can’t detect the highest frequencies in the image, and often because the image lacks those high-frequency elements to begin with, a sufficiently high JPEG quality setting can produce a “perceptually lossless” image. A “perceptually
lossless” image contains a small amount of mathematical error when compared to the original image, but this error is so small that, under normal circumstances, the human visual system cannot distinguish it. The threshold quality level at which JPEG compression
becomes perceptually lossless is different for each image, but experiments with various visual difference benchmarks (such as HDR-VDP)
suggest that a JPEG quality of 95 is sufficient to guarantee perceptual losslessness for the types of applications (volume visualization apps, in particular) in which image quality is critical. As with any benchmarks, Your Mileage May Vary. If image quality
is of paramount concern, consider setting the JPEG quality to 100 or using RGB encoding.
| Environment Variable | VGL_READBACK = 0 | 1 |
| Summary | Disable/enable VirtualGL’s pixel pipelines |
| Image Transports | All |
| Default Value | Enabled |
back the rendered pixels, so setting
VGL_READBACK=0disables VirtualGL’s readback mechanism and prevents duplication of effort.
This feature was developed initially to support running ParaView in parallel using MPI. ParaView/MPI
normally uses MPI processes 1 through N as rendering servers, each drawing a portion of the geometry into a separate window on a separate X display. ParaView reads back these server windows and composites the pixels into the main application window, which
is controlled by MPI process 0. By creating a script which passes a different value of
VGL_DISPLAYand
VGL_READBACKto each MPI process, it is possible to make all of the ParaView server processes render to off-screen buffers on different
graphics cards while preventing VirtualGL from displaying any pixels except those generated by process 0.
This setting can also be used to force Chromium to render into Pbuffers instead of windows. See Section 14.2.
| Environment Variable | VGL_SPOIL = 0 | 1 |
vglrunargument | -sp/ +sp |
| Summary | Disable/enable frame spoiling |
| Image Transports | All |
| Default Value | Enabled |
of a 3D scene will appear to drag behind the mouse motion. VirtualGL’s default behavior is to compensate for this by dropping frames. This ensures that every mouse motion event will result in a new frame being rendered on the server, even though not all of
these frames will actually be delivered to the client.
Frame spoiling should produce the best results with interactive applications, but it should be turned off when running benchmarks or other non-interactive applications. Turning off frame spoiling will force every frame rendered on the server to be sent through
VirtualGL, and thus the frame rate reported by OpenGL benchmarks will accurately reflect the frame rate of VirtualGL’s image pipeline (though, in X proxy environments, this may still not accurately reflect the frame rate seen by the user. See Section 17.2.)
Disabling frame spoiling also prevents non-interactive applications from wasting graphics resources by rendering frames that will never be seen.
| Environment Variable | VGL_SSL = 0 | 1 |
vglrunargument | -s/ +s |
| Summary | Disable/enable SSL encryption of the VGL Image Transport |
| Image Transports | VGL |
| Default Value | Disabled |
| Environment Variable | VGL_STEREO = left | right | quad | rc |
vglrunargument | -st left | right | quad | rc |
| Summary | Specify the delivery method for stereo images |
| Image Transports | All |
| Default Value | quad |
right = When an application renders a stereo frame, send only the right eye buffer
quad = Attempt to use quad-buffered stereo, which will result in a pair of images being sent to the VirtualGL Client for every frame. If quad-buffered stereo is not available, either because the client machine or the image transport does not support
it, then fall back to using anaglyphic stereo. Quad-buffered stereo requires the VGL Image Transport, and it also requires that the 2D X server support OpenGL and be connected to a 3D accelerator that supports stereo rendering.
rc = Use Red/Cyan (anaglyphic) stereo, even if quad-buffered is available
See Chapter 16 for more details.
| Environment Variable | VGL_SUBSAMP = gray | 1x | 2x | 4x | 8x | 16x |
vglrunargument | -samp gray | 1x | 2x | 4x | 8x | 16x |
| Summary | Specify the level of chrominance subsampling in the JPEG and Sun Ray image compressors |
| Image Transports | Sun Ray (DPCM, YUV), VGL (JPEG) |
| Default Value | 1x for VGL Image Transport, 16x for Sun Ray Image Transport |
up the pixel’s color. A YUV pixel has three values that specify the overall brightness of the pixel (Y, or “luminance”) and the overall color of the pixel (U and V, or “chrominance”.)
Since the human eye is less sensitive to changes in color than it is to changes in brightness, the chrominance components for some of the pixels can be discarded without much noticeable loss in image quality. This technique, called “chrominance subsampling”,
significantly reduces the size of the compressed image.
1x = no chrominance subsampling
2x = discard the chrominance components for every other pixel along the image’s X direction (this is also known as “4:2:2” or “2:1” subsampling.) All else being equal, 2x subsampling generally reduces the image size by about 20-25% when compared to
no subsampling.
4x = discard the chrominance components for every other pixel along both the X and Y directions of the image (this is also known as “4:2:0” or “2:2” subsampling.) All else being equal, 4x subsampling generally reduces the image size by about 35-40%
when compared to no subsampling.
8x = discard the chrominance components for 3 out of every 4 pixels along the image’s X direction and half the pixels along the image’s Y direction (this is also known as “4:1:0” or “4:2” subsampling.) This option is available only with Sun Ray
DPCM or YUV encoding.
16x = discard the chrominance components for 3 out of every 4 pixels along both the X and Y directions of the image (this is also known as “4:4” subsampling.) This option is available only with Sun Ray DPCM or YUV encoding.
gray = discard all chrominance components. This is useful when running applications (such as medical visualization applications) that are already generating grayscale images. This option is available only with JPEG compression.
Subsampling artifacts are less noticeable with volume data, since it usually only contains 256 colors to begin with. But narrow, aliased lines and other sharp features on a black background will tend to produce very noticeable artifacts when subsampling is
enabled.
The axis indicator from a popular visualization app displayed with 1x, 2x, and 4x subsampling (respectively):
| Environment Variable | VGL_SYNC = 0 | 1 |
vglrunargument | -sync/ +sync |
| Summary | Disable/enable strict 2D/3D synchronization |
| Image Transports | All |
| Default Value | Disabled |
glFinish()or
glFlush()or
glXWaitGL(), and VirtualGL reads
back the framebuffer and sends the pixels to the client’s display … eventually. This will work fine for the vast majority of applications, but it does not strictly conform to the GLX spec. Technically speaking, when an application calls
glXWaitGL()or
glFinish(),
it is well within its rights to expect the 3D image to be immediately available in the X window. Fortunately, very few applications actually do expect this, but on rare occasions, an application may try to use
XGetImage()or other X11 functions
to obtain a bitmap of the pixels that were rendered by OpenGL. Enabling
VGL_SYNCis a somewhat extreme measure that may be needed to make such applications work properly. It was developed initially as a way to pass the GLX conformance suite (
conformx,
specifically), but at least one commercial application is known to require it as well (see Application Recipes.)
When
VGL_SYNCis enabled, every call to
glFinish(),
glXWaitGL(), and
glXSwapBuffers()will cause the contents of the Pbuffer to be read back and synchronously drawn into the application’s window using
the X11 Image Transport and no frame spoiling. The call to
glFinish(),
glXWaitGL(), or
glXSwapBuffers()will not return until VirtualGL has verified that the pixels have been delivered into the application’s window.
As such, this mode can have potentially dire effects on performance when used with a remote 2D X server. It is strongly recommended that
VGL_SYNCbe used only in conjunction with an X proxy (such as TurboVNC) running on the same server as VirtualGL.
| Environment Variable | VGL_TILESIZE = {t} |
| Summary | {t} = the image tile size ({t} x {t} pixels) to use for multi-threaded compression and interframe comparison (8 <= {t} <= 1024) |
| Image Transports | VGL |
| Default Value | 256 |
comparison is enabled.) The VGL Image Transport will also divide up the task of compressing these tiles among the available CPUs in a round robin fashion, if multi-threaded compression is enabled (see VGL_NPROCS.)
There are several tradeoffs that must be considered when choosing a tile size:
Smaller tile sizes:
Better parallel scalability
Worse compression efficiency
Better inter-frame optimization
Worse network efficiency
Larger tile sizes:
Worse parallel scalability
Better compression efficiency
Worse inter-frame optimization
Better network efficiency
Smaller tiles can more easily be divided up among multiple CPUs, but they compress less efficiently (and less quickly) on an individual basis. Using larger tiles can reduce traffic to the client by allowing the server to send only one frame update instead of
many. But on the flip side, using larger tiles decreases the chance that a tile will be unchanged from the previous frame.
256x256 was chosen as the default because, in experiments, it provided the best balance between scalability and efficiency on the platforms that VirtualGL supports.
| Environment Variable | VGL_TRACE = 0 | 1 |
vglrunargument | -tr/ +tr |
| Summary | Disable/enable tracing |
| Image Transports | All |
| Default Value | Disabled |
between VirtualGL and a particular OpenGL application.
| Environment Variable | VGL_VERBOSE = 0 | 1 |
vglrunargument | -v/ +v |
| Summary | Disable/enable verbose VirtualGL messages |
| Image Transports | All |
| Default Value | Disabled |
performance problems.
| Environment Variable | VGL_X11LIB = {l} |
| Summary | {l} = the location of an alternate X11 library |
| Image Transports | All |
/usr/lib/libX11.so.?,
/usr/lib/64/libX11.so.?,
/usr/X11R6/lib/libX11.so.?, or
/usr/X11R6/lib64/libX11.so.?).
You can use this setting to explicitly specify another X11 dynamic library to load.
You shouldn’t need to muck with this unless something doesn’t work.
| Environment Variable | VGL_XVENDOR = {v} |
| Summary | {v} = a fake X11 vendor string to return when the application calls XServerVendor()or ServerVendor() |
| Image Transports | All |
fool such applications into thinking that they are being displayed to a “local” X server rather than a remote one.
Refer to Chapter 15 for specific applications that require this.
| Environment Variable | VGL_ZOOM_X = 1 | 2 VGL_ZOOM_Y = 1 | 2 |
| Summary | Subsample all pixels by the specified factor |
| Image Transports | Sun Ray |
| Default Value | 1 |
VGL_ZOOM_X=2causes the Sun Ray Image Transport to discard every other pixel along the X direction of the image. Setting
VGL_ZOOM_Y=2does the same thing for the Y direction of the image. This differs
from
VGL_SUBSAMPin that
VGL_SUBSAMPdiscards only the chrominance components from the pixels it subsamples.
VGL_ZOOM_*, on the other hand, discards the luminance components as well. The result is extremely grainy.
19.2 Client Settings
These settings control the VirtualGL Client, which is used only with the VGL Image Transport. vglclientis normally launched automatically from
vglconnectand should not require any further configuration except
in exotic circumstances. These settings are meant only for advanced users or those wishing to build additional infrastructure around VirtualGL.
| Environment Variable | VGLCLIENT_DRAWMODE = ogl | x11 |
vglclientargument | -gl/ -x |
| Summary | Specify the method used to draw pixels into the application window |
| Default Value | oglfor Solaris/SPARC systems with 3D accelerators, x11otherwise |
are able to draw images using 24-bit pixels instead of the 32-bit pixels required by the X server.
| Environment Variable | VGLCLIENT_LISTEN = sslonly | nossl |
vglclientargument | -sslonly/ -nossl |
| Summary | Accept only unencrypted or only SSL connections from the VirtualGL server |
| Default Value | Accept both SSL and unencrypted connections |
| Environment Variable | VGLCLIENT_PORT = {p} |
vglclientargument | -port {p} |
| Summary | {p} = TCP port on which to listen for unencrypted connections from the VirtualGL server |
| Default Value | Automatically select a free port |
vglclientis to first try listening on port 4242, to maintain backward compatibility with VirtualGL v2.0.x. If port 4242 is not available, then
vglclientwill try to find a free port
in the range of 4200-4299. If none of those ports is available, then
vglclientwill request a free port from the operating system.
Setting this option circumvents the automatic behavior described above and causes
vglclientto listen only on the specified TCP port.
| Environment Variable | VGL_PROFILE = 0 | 1 |
| Summary | Disable/enable profiling output |
| Default Value | Disabled |
See Chapter 17 for more details.
| Environment Variable | VGLCLIENT_SSLPORT = {p} |
vglclientargument | -sslport {p} |
| Summary | {p} = TCP port on which to listen for SSL connections from the VirtualGL server |
| Default Value | Automatically select a free port |
vglclientis to first try listening on port 4243, to maintain backward compatibility with VirtualGL v2.0.x. If port 4243 is not available, then
vglclientwill try to find a free port
in the range of 4200-4299. If none of those ports is available, then
vglclientwill request a free port from the operating system.
Setting this option circumvents the automatic behavior described above and causes
vglclientto listen only on the specified TCP port.
| Environment Variable | VGL_VERBOSE = 0 | 1 |
| Summary | Disable/enable verbose VirtualGL messages |
| Default Value | Disabled |
performance problems.

相关文章推荐
- iOS在UILabel中间画删除线
- druid log4j配置
- 187 Repeated DNA Sequences
- java.lang.IllegalArgumentException: Page directive: invalid value for import 问题处理
- java.lang.IllegalArgumentException: Page directive: invalid value for import 问题处理
- 设计模式(2)---Builder模式
- UIStackView简单使用
- AndroidUI设计之高仿系列
- UIGestureRecognizer-手势识别器
- SSRS域账号下 User 'XXX' does not have required permissions的处理方法
- win10系统下使用EDGE浏览器找不到Report Builder 启动图标
- druid配置详解
- iOS UIActionSheet的使用
- iOS UITextField的属性、代理及通知
- UESTC(LCA应用:求两点之间的距离)
- 搜索框UISearchController的使用(iOS8.0以后替代UISearchBar + UISearchDisplayController)
- Discuz--QQ互联登陆出现(1054) Unknown column “conuintoken” in “field list”
- UILabel 设置字体间的距离 和 行与行间的距离
- Cts框架解析(8)-IBuildProvider
- 2016你一定要试试这8款原型设计工具