在Cordova中自定义AndroidTest(Instrumented Unit Test)
2016-01-28 16:45
666 查看
最近因为因为工作的需要,简单了解了下Cordova这个hybird app应用平台。
因为用Cordova create出来的Android工程目录和Android Studio工作目录结构不一样,所以在加Test的时候也遇到一些坑,在此简单进行分享。
首先我们来看下
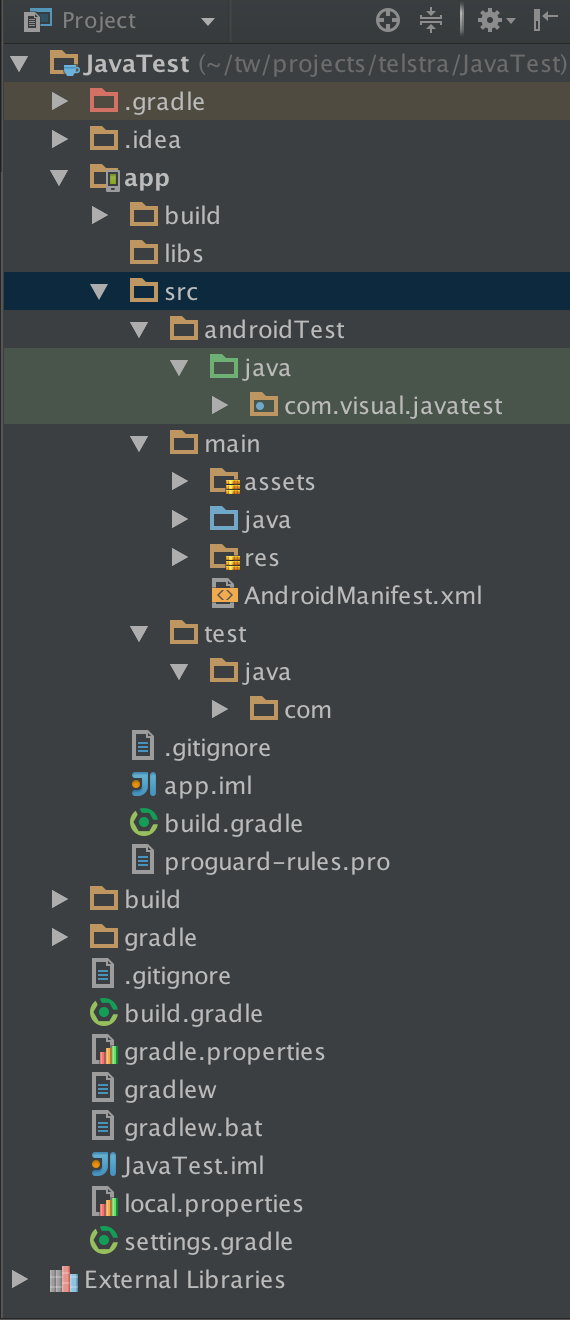
从图中不难看出AndroidTest的目录结构是在src下的:src/androidTest/java/xxx
而local unitTest默认的结构是src/test/java/xxx,local unit test和AndroidTest的切换在侧栏的Build Variants里面。在默认的工程里面我们不需要在sourceSets里面进行配置了。
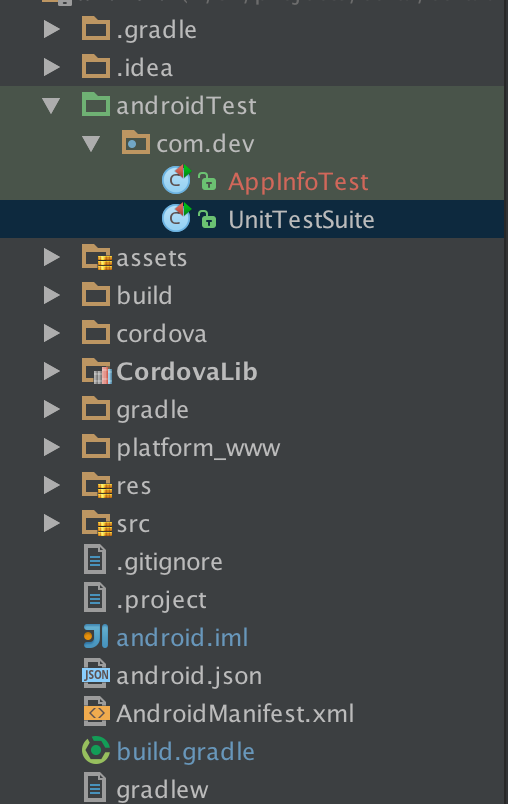
在Cordova的工程中,可以看到讲assets,res,AndroidManifest.xml文件都放在了与src目录同一级的目录下面,这个是与默认工程目录结构不一样的地方。当然如果这样放的话,我们就要添加sourceSets来配置了:
其中指定了各种各样的文件所在的路径,在这里我们就不能将于Test相关的文件放到main下面了,除非你单独指定java.srcDirs=[‘src/xxx/xxx’]。在这里我单独将androidTest文件放在了外面。
引用依赖包:
androidTestCompile ‘com.android.support:support-annotations:23.0.1’
androidTestCompile ‘com.android.support.test:runner:0.4.1’
androidTestCompile ‘com.android.support.test:rules:0.4.1’
然后进行android Test run,直接在test中右键run test进行了。这时候我报错了:
trouble processing “java/com/dev/AppInfoTest.class”:
Ill-advised or mistaken usage of a core class (java.* or javax.*)
when not building a core library.
This is often due to inadvertently including a core library file
in your application’s project, when using an IDE (such as
Eclipse). If you are sure you’re not intentionally defining a
core class, then this is the most likely explanation of what’s
going on.
However, you might actually be trying to define a class in a core
namespace, the source of which you may have taken, for example,
from a non-Android virtual machine project. This will most
assuredly not work. At a minimum, it jeopardizes the
compatibility of your app with future versions of the platform.
It is also often of questionable legality.
If you really intend to build a core library – which is only
appropriate as part of creating a full virtual machine
distribution, as opposed to compiling an application – then use
the “–core-library” option to suppress this error message.
If you go ahead and use “–core-library” but are in fact
building an application, then be forewarned that your application
will still fail to build or run, at some point. Please be
prepared for angry customers who find, for example, that your
application ceases to function once they upgrade their operating
system. You will be to blame for this problem.
If you are legitimately using some code that happens to be in a
core package, then the easiest safe alternative you have is to
repackage that code. That is, move the classes in question into
your own package namespace. This means that they will never be in
conflict with core system classes. JarJar is a tool that may help
you in this endeavor. If you find that you cannot do this, then
that is an indication that the path you are on will ultimately
lead to pain, suffering, grief, and lamentation.
1 error; aborting
Error:Execution failed for task ‘:dexDebugAndroidTest’.
com.android.ide.common.process.ProcessException: org.gradle.process.internal.ExecException: Process ‘command ‘/Library/Java/JavaVirtualMachines/jdk1.7.0_79.jdk/Contents/Home/bin/java” finished with non-zero exit value 1
然后就开始google…
终于找到了答案,我将androidTest拷贝到与src目录同级下面,虽然在sourceSets中进行了指定,但是在这里与AS默认创建的工程不一样,androidTest下面不能再加上java的目录,如果加上了,在test里面package的名字就变成了,package java.xxx.xx这个是默认的工程里面是xxx.xxx所以默认的test目录结构没有问题,在这里我们需要把java的目录给删了同时去掉test中package java.xxx.xxx为xxx.xxx,估计和jdk的package冲突。详见:StackOverFlow
下一步,还是开始运行test,提示我们“no test found”,对比了下Android的官方文档
发现少了上面那个,见Android Test
最后run一次,就ok了
因为用Cordova create出来的Android工程目录和Android Studio工作目录结构不一样,所以在加Test的时候也遇到一些坑,在此简单进行分享。
首先我们来看下
默认的Android工程目录结构:
从图中不难看出AndroidTest的目录结构是在src下的:src/androidTest/java/xxx
而local unitTest默认的结构是src/test/java/xxx,local unit test和AndroidTest的切换在侧栏的Build Variants里面。在默认的工程里面我们不需要在sourceSets里面进行配置了。
Cordova创建的目录结构
在Cordova的工程中,可以看到讲assets,res,AndroidManifest.xml文件都放在了与src目录同一级的目录下面,这个是与默认工程目录结构不一样的地方。当然如果这样放的话,我们就要添加sourceSets来配置了:
sourceSets {
main {
manifest.srcFile 'AndroidManifest.xml'
java.srcDirs = ['src']
resources.srcDirs = ['src']
aidl.srcDirs = ['src']
renderscript.srcDirs = ['src']
res.srcDirs = ['res']
assets.srcDirs = ['assets']
jniLibs.srcDirs = ['libs']
}
androidTest {
java.srcDirs = ['androidTest']
}
其中指定了各种各样的文件所在的路径,在这里我们就不能将于Test相关的文件放到main下面了,除非你单独指定java.srcDirs=[‘src/xxx/xxx’]。在这里我单独将androidTest文件放在了外面。
引用依赖包:
androidTestCompile ‘com.android.support:support-annotations:23.0.1’
androidTestCompile ‘com.android.support.test:runner:0.4.1’
androidTestCompile ‘com.android.support.test:rules:0.4.1’
然后进行android Test run,直接在test中右键run test进行了。这时候我报错了:
trouble processing “java/com/dev/AppInfoTest.class”:
Ill-advised or mistaken usage of a core class (java.* or javax.*)
when not building a core library.
This is often due to inadvertently including a core library file
in your application’s project, when using an IDE (such as
Eclipse). If you are sure you’re not intentionally defining a
core class, then this is the most likely explanation of what’s
going on.
However, you might actually be trying to define a class in a core
namespace, the source of which you may have taken, for example,
from a non-Android virtual machine project. This will most
assuredly not work. At a minimum, it jeopardizes the
compatibility of your app with future versions of the platform.
It is also often of questionable legality.
If you really intend to build a core library – which is only
appropriate as part of creating a full virtual machine
distribution, as opposed to compiling an application – then use
the “–core-library” option to suppress this error message.
If you go ahead and use “–core-library” but are in fact
building an application, then be forewarned that your application
will still fail to build or run, at some point. Please be
prepared for angry customers who find, for example, that your
application ceases to function once they upgrade their operating
system. You will be to blame for this problem.
If you are legitimately using some code that happens to be in a
core package, then the easiest safe alternative you have is to
repackage that code. That is, move the classes in question into
your own package namespace. This means that they will never be in
conflict with core system classes. JarJar is a tool that may help
you in this endeavor. If you find that you cannot do this, then
that is an indication that the path you are on will ultimately
lead to pain, suffering, grief, and lamentation.
1 error; aborting
Error:Execution failed for task ‘:dexDebugAndroidTest’.
com.android.ide.common.process.ProcessException: org.gradle.process.internal.ExecException: Process ‘command ‘/Library/Java/JavaVirtualMachines/jdk1.7.0_79.jdk/Contents/Home/bin/java” finished with non-zero exit value 1
然后就开始google…
终于找到了答案,我将androidTest拷贝到与src目录同级下面,虽然在sourceSets中进行了指定,但是在这里与AS默认创建的工程不一样,androidTest下面不能再加上java的目录,如果加上了,在test里面package的名字就变成了,package java.xxx.xx这个是默认的工程里面是xxx.xxx所以默认的test目录结构没有问题,在这里我们需要把java的目录给删了同时去掉test中package java.xxx.xxx为xxx.xxx,估计和jdk的package冲突。详见:StackOverFlow
下一步,还是开始运行test,提示我们“no test found”,对比了下Android的官方文档
android {
defaultConfig {
testInstrumentationRunner "android.support.test.runner.AndroidJUnitRunner"
}
}发现少了上面那个,见Android Test
最后run一次,就ok了

相关文章推荐
- Ruby单元测试框架TestUnit的替代者MiniTest介绍
- Android学习笔记之应用单元测试实例分析
- 我的Node.js学习之路(四)--单元测试
- Android编程单元测试实例详解(附源码)
- Android Studio注释模板介绍
- Android编程之单元测试实例分析
- Android应用开发中单元测试分析
- mstest实现类似单元测试nunit中assert.throws功能
- java编程之单元测试(Junit)实例分析(附实例源码)
- python单元测试unittest实例详解
- angularjs中的单元测试实例
- Python中unittest模块做UT(单元测试)使用实例
- Windows下使用Apache Cordova开发ANDROID之HelloWorld
- Android单元测试 笔记
- 关于Android Studio 和 Gradle的那些事儿
- 收藏各种技术源码
- 泡WeX5论坛,就能把钱给挣了! WeX5论坛 金币制启动 -- 让大家帮助大家,让知识变成收益
- 关于cordova/nodejs/npm的坑