带着问题学习Android中View的measure测量
2016-01-13 14:48
615 查看
在进行研究measure原理之前,我们先带着这三个问题来想想。因为我是遇到这三个问题才开始研究measure的源码,所以我也把下面的三个问题当做引子。
调用measure(int widthMeasureSpec, int heightMeasureSpec)方法传递的参数是什么?
为什么调用measure方法View控件没有进行测量?
如何强制view进行测量?
在进行研究之前,我们先来看一个简单的布局,
看效果图:
根据布局文件,我们并没有设置边距属性,为什么显示的效果的Button跟下面的没有对齐。这就是。在实际开发中,我们细心点会发现,对于Button控件,我们选中它的时候显示的区域比它展现的区域大。
如果我们给Button控件添加背景色:
我们再次看下效果图:
可以看到Button的背景色和LinearLayout的背景色无缝连接在一起,同时我们观察下面的那个点击的Button,发现它的周围区域实际是存在的,是白色与我们的背景色重叠起来了。这就引入了我们的一个重要概念:控件边界布局和视觉编辑布局。我们在真机上打开【显示布局边界】,在设置——>开发者选项——>显示布局边界。
我们看下效果图。
注:蓝色 为控件的布局边界;粉红色为视觉边界
这就涉及到我们的一个ViewGroup属性:android:layoutMode

说的通俗一点,clipBounds就是默认值,不处理一些控件之间的“留白”,opticalBounds消除控件之间的留白。
我们抽出LinearLayout的布局来说:
我们看效果图:

我们修改属性android:layoutMode=”opticalBounds”,效果图:

通过对比发现就是一个清除的效果。
一个MeasureSpec封装了父布局传递给子布局的布局要求,每个MeasureSpec代表了一组宽度和高度的要求。一个MeasureSpec由大小和模式组成。由32位组成,头8位为模式,后24位封装大小。它有三种模式:UNSPECIFIED(未指定),父元素部队自元素施加任何束缚,子元素可以得到任意想要的大小;EXACTLY(完全),父元素决定自元素的确切大小,子元素将被限定在给定的边界里而忽略它本身大小;AT_MOST(至多),子元素至多达到指定大小的值。它常用的三个函数:
static int getMode(int measureSpec):根据提供的测量值(格式)提取模式(上述三个模式之一)
static int getSize(int measureSpec):根据提供的测量值(格式)提取大小值(这个大小也就是我们通常所说的大小)
static int makeMeasureSpec(int size,int mode):根据提供的大小值和模式创建一个测量值(格式)
Mode的取值:
MeasureSpec.AT_MOST,即十进制2,该值表示View最大可以取其父ViewGroup给其指定的尺寸,例如现在有个Int值widthMeasureSpec,ViewGroup将其传递给了View的measure方法,如果widthMeasureSpec中的mode值是AT_MOST,size是300,那么表示View能取的最大的宽度是300。
MeasureSpec.EXACTLY,即十进制1,该值表示View必须使用其父ViewGroup指定的尺寸,还是以widthMeasureSpec为例,如果其mode值是EXACTLY,控件大小就是它老子的大小
MeasureSpec.UNSPECIFIED,即十进制0,该值表示View的父ViewGroup没有给View在尺寸上设置限制条件,这种情况下View可以忽略measureSpec中的size,View可以取自己想要的值作为量算的尺寸。
我们常看到measure(0,0)或者measure(1,1)之类的,这就是传入的测量模式。
在上面的代码中,注释还算详细,仔细看应该能知道测量的流程。
(1)、测量首先判断控件的模式,通过调用isLayoutModeOptical方法进行判断。
这个方法就是判断view是否为ViewGroup类型,然后判断layoutMode设定是否为opticalBounds。如果是,则对传入的widthMeasureSpec、heightMeasureSpec进行重新计算封装,通过上面的试验,我们看到了设定的区别,所以需要重新计算封装。
(2)、判断当前view是否强制重新计算,或者传入进来的MeasureSpec是否和上次不同。这两种情况满足一种则进行测量运算。
(3)、系统还不满足,又判断是否为强制测量,如果为强制测量或者忽略缓存,则调用我们重写的onMeasure()方法进行测量,反之,从mMeasureCache缓存中读取上次的测量数据。
为什么调用measure()方法控件没有进行重新测量?
通过前面的源码分析,是不是对结果知道一二,View也不是因为我们调用了measure方法就进行真真切切的重新测量,首先,它会判断我们是否是强制测量或者测量模式发生了改变没有,这个是必要条件,如果这里都不满足就不会进入执行到我们的onMeasure方法,之后还要判断我们是否强制重新测量,不然取缓存的值,只样实际上还没有达到我们的测量。
注:Android不同版本对应的measure方法源码可能有所不同。
说到这里,measure的源码是分析了,我们在往深入的想,我们如果在我们的自定义View时没有对onMeasure()方法进行重写,那么系统调用的onMeasure()方法是怎么实现的呢?不错,我们就瞧一瞧View中默认的onMeasure()方法是怎么实现的。
这里面涉及到三个方法:
getDefaultSize
getSuggestedMinimumWidth
getSuggestedMinimumHeight
稍微思考下,我们也知道肯定是设置一个默认值的,我们看下后两个函数的源码:
都是进行判断backgroud是否为空,如果为空,返回view最小的高度或宽度,如果不为空,返回与backgroud的最小宽高中的最大值。可能你会疑惑,view的最小宽度或高度是怎么来的?这个就要回归到我们的View构造函数。
可以从这里获取,当然我们也可以进行设定:
我们接着看看看getDefaultSize()的源码:
在getDefaultSize中,传入进来我们获取的最小值,然后根据我们设定的MeasureSpec获取对应size和mode,然后判断mode,如果为MeasureSpec.UNSPECIFIED就将size赋值我们获取的最小大小。模式为MeasureSpec.AT_MOST、MeasureSpec.EXACTLY时,赋值为我们从MeasureSpec获取的大小。这也证实了自定义控件时,我们没有重写onMeasure方法,同时给控件设置wrap_content属性,控件显示的效果是match_parent的效果。
说到这里measure流程的大概也基本搞明白了。
我们来看第三个问题,如何强制一个view进行重绘?
根据上面的分析,我们强制重绘就得清除缓存mMeasureCache缓存中的数据。这里就得提及forceLayout()方法,看下这个方法的源码:
这个方法中就是清除缓存mMeasureCache中的缓存数据,然后改变View的mPrivateFlags属性值。这里又得说起requestLayout()函数,用于请求重新布局。
这样就可以完成View的强制测量。在实际的开发中,我们在对自定义View进行测量的时候,只需要重写onMeasure()方法即可,在onMeasure()方法中指定我们要求的控件大小,除非我们在刷新控件的时候需要我们去考虑一些方法的实现,探究源码让我们知道了为什么是这样,不至于迷惘。
作者:mr_dsw 欢迎转载,与人分享是进步的源泉!
转载请保留地址:http://blog.csdn.net/mr_dsw
调用measure(int widthMeasureSpec, int heightMeasureSpec)方法传递的参数是什么?
为什么调用measure方法View控件没有进行测量?
如何强制view进行测量?
在进行研究之前,我们先来看一个简单的布局,
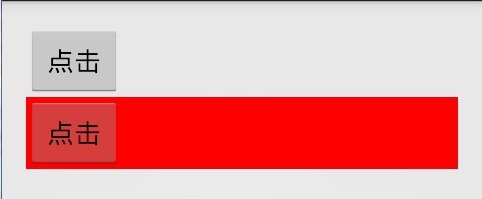
<Button
android:id="@+id/btn_click"
android:layout_width="wrap_content"
android:layout_height="wrap_content"
android:text="点击"
android:onClick="start"
/>
<LinearLayout
android:id="@+id/linear"
android:layout_width="match_parent"
android:layout_height="wrap_content"
android:background="#FF0000">
<Button
android:layout_width="wrap_content"
android:layout_height="wrap_content"
android:text="点击"/>
</LinearLayout>
看效果图:
根据布局文件,我们并没有设置边距属性,为什么显示的效果的Button跟下面的没有对齐。这就是。在实际开发中,我们细心点会发现,对于Button控件,我们选中它的时候显示的区域比它展现的区域大。
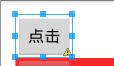
如果我们给Button控件添加背景色:
<Button
android:id="@+id/btn_click"
android:layout_width="wrap_content"
android:layout_height="wrap_content"
android:text="点击"
android:background="#FF0000"
android:onClick="start"
/>
我们再次看下效果图:
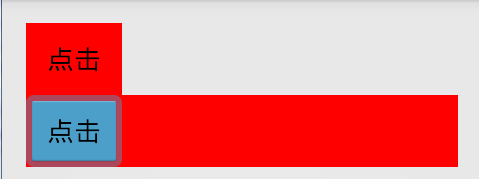
可以看到Button的背景色和LinearLayout的背景色无缝连接在一起,同时我们观察下面的那个点击的Button,发现它的周围区域实际是存在的,是白色与我们的背景色重叠起来了。这就引入了我们的一个重要概念:控件边界布局和视觉编辑布局。我们在真机上打开【显示布局边界】,在设置——>开发者选项——>显示布局边界。
我们看下效果图。
注:蓝色 为控件的布局边界;粉红色为视觉边界
这就涉及到我们的一个ViewGroup属性:android:layoutMode
说的通俗一点,clipBounds就是默认值,不处理一些控件之间的“留白”,opticalBounds消除控件之间的留白。
我们抽出LinearLayout的布局来说:
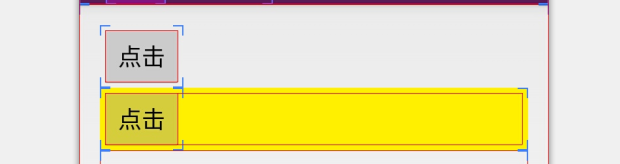
<LinearLayout
android:id="@+id/linear"
android:layout_width="match_parent"
android:layout_height="wrap_content"
android:background="#fff000"
android:layoutMode="clipBounds">
<Button
android:layout_width="wrap_content"
android:layout_height="wrap_content"
android:text="点击"/>
<TextView
android:layout_width="wrap_content"
android:layout_height="wrap_content"
android:text="测试的"
/>
</LinearLayout>
我们看效果图:
我们修改属性android:layoutMode=”opticalBounds”,效果图:
通过对比发现就是一个清除的效果。
MeasureSpec
我们分析第一个问题,onMeasure()方法里传的是什么?传的就是MeasureSpec变量。它是View的一个内部类。源码设计非常简单精悍。一个MeasureSpec封装了父布局传递给子布局的布局要求,每个MeasureSpec代表了一组宽度和高度的要求。一个MeasureSpec由大小和模式组成。由32位组成,头8位为模式,后24位封装大小。它有三种模式:UNSPECIFIED(未指定),父元素部队自元素施加任何束缚,子元素可以得到任意想要的大小;EXACTLY(完全),父元素决定自元素的确切大小,子元素将被限定在给定的边界里而忽略它本身大小;AT_MOST(至多),子元素至多达到指定大小的值。它常用的三个函数:
static int getMode(int measureSpec):根据提供的测量值(格式)提取模式(上述三个模式之一)
static int getSize(int measureSpec):根据提供的测量值(格式)提取大小值(这个大小也就是我们通常所说的大小)
static int makeMeasureSpec(int size,int mode):根据提供的大小值和模式创建一个测量值(格式)
Mode的取值:
MeasureSpec.AT_MOST,即十进制2,该值表示View最大可以取其父ViewGroup给其指定的尺寸,例如现在有个Int值widthMeasureSpec,ViewGroup将其传递给了View的measure方法,如果widthMeasureSpec中的mode值是AT_MOST,size是300,那么表示View能取的最大的宽度是300。
MeasureSpec.EXACTLY,即十进制1,该值表示View必须使用其父ViewGroup指定的尺寸,还是以widthMeasureSpec为例,如果其mode值是EXACTLY,控件大小就是它老子的大小
MeasureSpec.UNSPECIFIED,即十进制0,该值表示View的父ViewGroup没有给View在尺寸上设置限制条件,这种情况下View可以忽略measureSpec中的size,View可以取自己想要的值作为量算的尺寸。
我们常看到measure(0,0)或者measure(1,1)之类的,这就是传入的测量模式。
measure()方法
下面就开始分析measure方法。public final void measure(int widthMeasureSpec, int heightMeasureSpec) {
//判断当前view的LayoutMode是否为opticalbounds
boolean optical = isLayoutModeOptical(this);
if (optical != isLayoutModeOptical(mParent)) {//判断当前view的ParentView的LayoutMode是否为opticalbounds
Insets insets = getOpticalInsets();
int oWidth = insets.left + insets.right;
int oHeight = insets.top + insets.bottom;
widthMeasureSpec = MeasureSpec.adjust(widthMeasureSpec, optical ? -oWidth : oWidth);
heightMeasureSpec = MeasureSpec.adjust(heightMeasureSpec, optical ? -oHeight : oHeight);
}
// 根据我们传入的widthMeasureSpec和heightMeasureSpec计算key值,我们在mMeasureCache中存储我们view的信息
long key = (long) widthMeasureSpec << 32 | (long) heightMeasureSpec & 0xffffffffL;
//如果mMeasureCache为null,则进行new一个对象
if (mMeasureCache == null) mMeasureCache = new LongSparseLongArray(2);
//mOldWidthMeasureSpec和mOldHeightMeasureSpec分别表示上次对View进行量算时的widthMeasureSpec和heightMeasureSpec
//执行View的measure方法时,View总是先检查一下是不是真的有必要费很大力气去做真正的量算工作
//mPrivateFlags是一个Int类型的值,其记录了View的各种状态位
//如果(mPrivateFlags & PFLAG_FORCE_LAYOUT) == PFLAG_FORCE_LAYOUT,
//那么表示当前View需要强制进行layout(比如执行了View的forceLayout方法),所以这种情况下要尝试进行量算
//如果新传入的widthMeasureSpec/heightMeasureSpec与上次量算时的mOldWidthMeasureSpec/mOldHeightMeasureSpec不等,
//那么也就是说该View的父ViewGroup对该View的尺寸的限制情况有变化,这种情况下要尝试进行量算
if ((mPrivateFlags & PFLAG_FORCE_LAYOUT) == PFLAG_FORCE_LAYOUT ||
widthMeasureSpec != mOldWidthMeasureSpec ||
heightMeasureSpec != mOldHeightMeasureSpec) {
//通过运算,重置mPrivateFlags值,即View的测量状态
mPrivateFlags &= ~PFLAG_MEASURED_DIMENSION_SET;
//解决布局中的Rtl问题
resolveRtlPropertiesIfNeeded();
//判断当前View是否是强制进行测量,如果是则将cacheIndex=-1,反之从mMeasureCache中获取
//对应的index,即从缓存中读取存储的大小。
int cacheIndex = (mPrivateFlags & PFLAG_FORCE_LAYOUT) == PFLAG_FORCE_LAYOUT ? -1 :
mMeasureCache.indexOfKey(key);
//根据cacheIndex的大小判断是否需要重新测量,或者根据布尔变量sIgnoreMeasureCache进行判断。
if (cacheIndex < 0 || sIgnoreMeasureCache) {
// 重新测量,则调用我们重写的onMeasure()方法进行测量,然后重置View的状态
onMeasure(widthMeasureSpec, heightMeasureSpec);
mPrivateFlags3 &= ~PFLAG3_MEASURE_NEEDED_BEFORE_LAYOUT;
} else {
// 通过我们计算的cacheIndex值,从缓存中读取我们的测量值。
long value = mMeasureCache.valueAt(cacheIndex);
// 通过setMeasuredDimension()方法设置我们的测量值,然后重置View的状态
setMeasuredDimension((int) (value >> 32), (int) value);
mPrivateFlags3 |= PFLAG3_MEASURE_NEEDED_BEFORE_LAYOUT;
}
// 如果View的状态没有改变,则会抛出异常“我们没有调用”setMeasuredDimension()“方法,一般出现在我们重写onMeasure方法,
//但是没有调用setMeasuredDimension方法导致的。
if ((mPrivateFlags & PFLAG_MEASURED_DIMENSION_SET) != PFLAG_MEASURED_DIMENSION_SET) {
throw new IllegalStateException("onMeasure() did not set the"
+ " measured dimension by calling"
+ " setMeasuredDimension()");
}
mPrivateFlags |= PFLAG_LAYOUT_REQUIRED;
}
mOldWidthMeasureSpec = widthMeasureSpec;
mOldHeightMeasureSpec = heightMeasureSpec;
//将最新的widthMeasureSpec和heightMeasureSpec进行存储到mMeasureCache
mMeasureCache.put(key, ((long) mMeasuredWidth) << 32 |
(long) mMeasuredHeight & 0xffffffffL); // suppress sign extension
}在上面的代码中,注释还算详细,仔细看应该能知道测量的流程。
(1)、测量首先判断控件的模式,通过调用isLayoutModeOptical方法进行判断。
public static boolean isLayoutModeOptical(Object o) {
return o instanceof ViewGroup && ((ViewGroup) o).isLayoutModeOptical();
}

//ViewGroup的isLayoutModeOptical方法
boolean isLayoutModeOptical() {
return mLayoutMode == LAYOUT_MODE_OPTICAL_BOUNDS;
}
这个方法就是判断view是否为ViewGroup类型,然后判断layoutMode设定是否为opticalBounds。如果是,则对传入的widthMeasureSpec、heightMeasureSpec进行重新计算封装,通过上面的试验,我们看到了设定的区别,所以需要重新计算封装。
(2)、判断当前view是否强制重新计算,或者传入进来的MeasureSpec是否和上次不同。这两种情况满足一种则进行测量运算。
(3)、系统还不满足,又判断是否为强制测量,如果为强制测量或者忽略缓存,则调用我们重写的onMeasure()方法进行测量,反之,从mMeasureCache缓存中读取上次的测量数据。
为什么调用measure()方法控件没有进行重新测量?
通过前面的源码分析,是不是对结果知道一二,View也不是因为我们调用了measure方法就进行真真切切的重新测量,首先,它会判断我们是否是强制测量或者测量模式发生了改变没有,这个是必要条件,如果这里都不满足就不会进入执行到我们的onMeasure方法,之后还要判断我们是否强制重新测量,不然取缓存的值,只样实际上还没有达到我们的测量。
注:Android不同版本对应的measure方法源码可能有所不同。
说到这里,measure的源码是分析了,我们在往深入的想,我们如果在我们的自定义View时没有对onMeasure()方法进行重写,那么系统调用的onMeasure()方法是怎么实现的呢?不错,我们就瞧一瞧View中默认的onMeasure()方法是怎么实现的。
protected void onMeasure(int widthMeasureSpec, int heightMeasureSpec) {
setMeasuredDimension(getDefaultSize(getSuggestedMinimumWidth(), widthMeasureSpec),
getDefaultSize(getSuggestedMinimumHeight(), heightMeasureSpec));
}
这里面涉及到三个方法:
getDefaultSize
getSuggestedMinimumWidth
getSuggestedMinimumHeight
稍微思考下,我们也知道肯定是设置一个默认值的,我们看下后两个函数的源码:
protected int getSuggestedMinimumWidth() {
return (mBackground == null) ? mMinWidth : max(mMinWidth, mBackground.getMinimumWidth());
}

protected int getSuggestedMinimumHeight() {
return (mBackground == null) ? mMinHeight : max(mMinHeight, mBackground.getMinimumHeight());
}
都是进行判断backgroud是否为空,如果为空,返回view最小的高度或宽度,如果不为空,返回与backgroud的最小宽高中的最大值。可能你会疑惑,view的最小宽度或高度是怎么来的?这个就要回归到我们的View构造函数。
case R.styleable.View_minWidth:
mMinWidth = a.getDimensionPixelSize(attr, 0);
break;
case R.styleable.View_minHeight:
mMinHeight = a.getDimensionPixelSize(attr, 0);
break;
可以从这里获取,当然我们也可以进行设定:
public void setMinimumWidth(int minWidth) {
mMinWidth = minWidth;
requestLayout();
}

public void setMinimumHeight(int minHeight) {
mMinHeight = minHeight;
requestLayout();
}
我们接着看看看getDefaultSize()的源码:
public static int getDefaultSize(int size, int measureSpec) {
int result = size;
int specMode = MeasureSpec.getMode(measureSpec);
int specSize = MeasureSpec.getSize(measureSpec);

switch (specMode) {
case MeasureSpec.UNSPECIFIED:
result = size;
break;
case MeasureSpec.AT_MOST:
case MeasureSpec.EXACTLY:
result = specSize;
break;
}
return result;
}
在getDefaultSize中,传入进来我们获取的最小值,然后根据我们设定的MeasureSpec获取对应size和mode,然后判断mode,如果为MeasureSpec.UNSPECIFIED就将size赋值我们获取的最小大小。模式为MeasureSpec.AT_MOST、MeasureSpec.EXACTLY时,赋值为我们从MeasureSpec获取的大小。这也证实了自定义控件时,我们没有重写onMeasure方法,同时给控件设置wrap_content属性,控件显示的效果是match_parent的效果。
说到这里measure流程的大概也基本搞明白了。
我们来看第三个问题,如何强制一个view进行重绘?
根据上面的分析,我们强制重绘就得清除缓存mMeasureCache缓存中的数据。这里就得提及forceLayout()方法,看下这个方法的源码:
public void forceLayout() {
if (mMeasureCache != null) mMeasureCache.clear();
mPrivateFlags |= PFLAG_FORCE_LAYOUT;
mPrivateFlags |= PFLAG_INVALIDATED;
}
这个方法中就是清除缓存mMeasureCache中的缓存数据,然后改变View的mPrivateFlags属性值。这里又得说起requestLayout()函数,用于请求重新布局。
public void requestLayout() {
if (mMeasureCache != null) mMeasureCache.clear();

if (mAttachInfo != null && mAttachInfo.mViewRequestingLayout == null) {
// Only trigger request-during-layout logic if this is the view requesting it,
// not the views in its parent hierarchy
ViewRootImpl viewRoot = getViewRootImpl();
if (viewRoot != null && viewRoot.isInLayout()) {
if (!viewRoot.requestLayoutDuringLayout(this)) {
return;
}
}
mAttachInfo.mViewRequestingLayout = this;
}

mPrivateFlags |= PFLAG_FORCE_LAYOUT;
mPrivateFlags |= PFLAG_INVALIDATED;

if (mParent != null && !mParent.isLayoutRequested()) {
mParent.requestLayout();
}
if (mAttachInfo != null && mAttachInfo.mViewRequestingLayout == this) {
mAttachInfo.mViewRequestingLayout = null;
}
}
这样就可以完成View的强制测量。在实际的开发中,我们在对自定义View进行测量的时候,只需要重写onMeasure()方法即可,在onMeasure()方法中指定我们要求的控件大小,除非我们在刷新控件的时候需要我们去考虑一些方法的实现,探究源码让我们知道了为什么是这样,不至于迷惘。
作者:mr_dsw 欢迎转载,与人分享是进步的源泉!
转载请保留地址:http://blog.csdn.net/mr_dsw

相关文章推荐
- Android TabLayout(选项卡布局)简单用法实例分析
- android中绘制各种图表
- Android执行文件apk的组成结构
- Android ListView的通用适配器Adapter
- OpenCV Android开发环境搭建 教程
- android:contentInsetStart android:contentInsetEnd contentInsetStart paddingstart paddingEnd
- Android是如何编译的
- Android--MVP模式--简介
- Android 图表
- Android Studio中常用设置与快捷键
- [Android] RapidFloatingActionButton
- Android Studio教程从入门到精通
- Android Studio注解框架的偷懒插件Android Butterknife Zelezny
- Android开发之自定义组合控件
- Android应用程序签名详解
- Android使用selector修改TextView中字体颜色和背景色的方法
- Android源码编译
- Volley 实现原理解析(转)
- mac下android-ndk-r10e-darwin-x86_64.bin解压
- Android Studio 优秀插件